Perhaps you need:
Electrical cable clamp 6 round (50 pcs)
More details
Bracket for electrical cable 6 flat (50 pcs)
More details
Bandage for cable 3.0x150 mm (100 pcs)
Read more
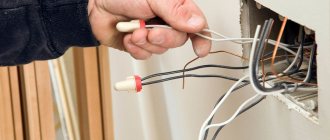
They are cut with a power tool called a wall chaser. A cable or group of wires is inserted into the channel and secured in different ways:
- metal brackets with single or double fastening;
- alabaster (quick-setting plaster);
- dowel clamps.
After this, the channel is finally plastered, the walls are painted or wallpapered, and the wires are routed to junction boxes, switches and sockets. If the wall is not yet plastered, then gating is not required. In this case, the height of the protrusion of the wiring elements is made such that it is covered with a margin by the plaster layer.
Installation of hidden wiring with grooves is a rather labor-intensive process. It requires special tools, as well as manual operations, which generate a lot of dust and debris.
With the open installation method, all wires remain visible. However, using different methods, you can make them aesthetic, unnoticeable, and fit well into the design of the room. This is quite achievable if the work is carried out carefully and high-quality fasteners are used.
Thus, the use of various systems of suspended, plasterboard and stretch ceilings completely hides the “open” wiring made on the ceiling. The same effect can be achieved on walls when covering them.
Cable wiring made in plastic or metal cable ducts becomes invisible and organic, especially if the entire set of fittings is used - horizontal and vertical rotating elements, bends, built-in sockets, switches, boxes and other parts.
How to attach a cable duct to a wall without drilling
- Registration
- Entrance
- To the beginning of the forum
- Forum Rules
- Old design
- FAQ
- Search
- Users
- List of forums AUTOLADA.RU
- Coffee shop and smoking room
why did you let him in under the ceiling? I spent it under my baseboard.
It’s just that the hole from the landing to the apartment is under the ceiling, and it’s best to go through the room where the computer is located under the ceiling. In general, all this space is temporary (although there is nothing more permanent than temporary
why glue at all? or “peck”?
buy a pack of plastic “ears” (or whatever they are correctly called) and attach small nails to the wall. Before renovation, this option is IMHO the best.
buy a pack of plastic “ears” (or whatever they are correctly called) and attach small nails to the wall.
I tried these “ears” but I couldn’t get the nails into the wall. They don't hold on. And drill a hole for each nail and hammer in a hole. something is wrong.
Is there a kind of double-sided tape that can be wound on a reel like regular tape? I've only seen small double-sided plates.
Is there a kind of double-sided tape that can be wound on a reel like regular tape?
Of course I have. In any business there should be, in principle. in construction markets - 100%.
but it’s unlikely to hold the wire. Maybe he himself is not stuck to the wall. And if it sticks (depending on the wall covering), then you’ll have a hard time peeling it off.
I would suggest running the wire down the door frame on the "ears", then along the baseboard, then, if necessary, along the jamb and up.
Well, you give it. What about the cable channel? I think the whole wiring is like this - it’s fun to look at.
+1, if the recess is screwed to the wall, then you can use the same double-sided tape along the entire length, it will hold
Of course have! Cluegan! - heating gun and polypropylene rods. Our office floor is supported by it. From the plastic, if desired, it can then be peeled off without leaving a trace. It's not true from the wallpaper.
My double-sided tape doesn't hold anything on. Babies, you may not know that the most amazing glue is sold in perfume stores and is called nail glue. Almost the entire car (95gv) was holding up on it, I advised my stepfather once - and now it’s holding up for him.
But yeah, baby dolls can’t do this. we are brutal mushes.
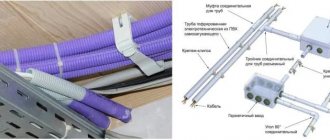
Organizing cable groups
Typically, wiring involves laying a large number of groups of cables to ensure that all equipment can be connected. It is advisable to organize such groups to avoid confusion and increase security.
For this purpose, there is a special fastener for connecting wires. A variety of ready-made plastic platforms are produced that fix a group of several cables.
The fastening pads can be fixed with self-tapping screws or nails. There are models attached with adhesive tape. The latter can be mounted, for example, on furniture. But this solution is more likely for low-voltage wiring. Such fasteners are not suitable for thick, rigid wires.
Types of wiring
The need to attach the wire to the wall is first considered from the point of view of the expected service life. Power cables coming from wire distribution boxes are intended for long-term use. Communication lines and television connections are of a temporary type, capable of changing their position if necessary.
Based on this, there are 2 types of laying electrical communications:
- open wiring, when the line is fastened to the outer surface of the structure and the entire network is accessible for inspection and partial repair;
- hidden wiring is embedded in the wall materials (walled up) and is accessible for operations at the points of connection to it (sockets, connectors) or intermediate switchings (boxes, panels).
If the hidden laying of the wire is made in corrugated or smooth pipes, then in these areas a subsequent quick replacement of the electrical wiring is possible.
The procedure for installing a network in pipes
An example of installation in smooth PVC pipes is shown in a series of photos:
In technical rooms, such wiring may remain uncovered by a layer of plaster; in residential apartments, it is located under a layer of finishing.
What are we going to mount it on?
The bases for fastening cables are mainly divided into hard and soft. By solid we mean metal, concrete, brick. Under the soft ones, respectively, is wood or plaster. There are also so-called brittle bases - plasterboard or lightweight concrete. The last type of base is thin fiberboards.
Solid foundations. A dowel-nail is considered a universal fastener. The disadvantage of this method of fastening is the lengthy process. It is necessary to drill each hole and insert a dowel.
Soft bases. When working with soft bases, self-tapping screws or nails are used. Installation is as fast and simple as possible.
Brittle bases. There are several options for fasteners: fasteners with an adhesive base; dowels of special design.
Thin bases. Small nails are suitable. Fastening the cable to a wall with a thin base can also be done with staples.
Hidden type
Naturally, during construction or major repairs, electrical wiring is fastened in a hidden way in specially prepared channels - grooves. The absence of the need to maintain aesthetics during electrical installation expands the mounting options. Next, a number of effective and practical methods will be considered.
Dowel clamps and dowel ties
The advantage of this type of fastening is its low cost and obvious practicality. To fasten the wire with a clamp or tie, you need to use a hammer drill to drill holes in the wall or ceiling at a distance of 30–35 centimeters from each other. Make sure that the cable fits tightly to the wall and that there are no kinks or creases. If you choose a dowel clamp, then simply insert it into the hole. The latter does not require additional effort, but the reliability of the fastening will be low.
In the case of dowel ties, you will need to additionally drive in an expanding peg, which will significantly improve the quality of fastening
In the case of drywall, we strongly recommend using the so-called butterfly dowel.
Quick drying solution
This method is the fastest and most reliable. But its use requires some skill, since prepared alabaster or plaster dries quickly. Consequently, there is a risk of not having time to attach the entire wire to the wall. As in the case discussed above, the cable is laid in a pre-prepared ditch (groove) and glued with a solution every 40–50 centimeters. The obvious advantage of this method is that there is no need to drill into the walls or buy additional materials. But it will be quite difficult to secure more than three wires.
Homemade staples
If the budget for repairs is limited and every penny counts, you can make the mounting brackets yourself. This will require thin steel strips or a standard two-core cable, cut into pieces of 6–7 centimeters. Next, everything is simple: a hole is made in the center of each strip into which a dowel is inserted. The latter is driven into a pre-prepared hole in the wall. If the mounting surface is wooden, you can get by with simple nails.
The obvious disadvantage of this method is the long preparation time for the staples themselves. Also, if the staples are left uncovered, rust stains may subsequently appear on the wallpaper.
The second type of fastening we will consider will be:
"Designer" fixation
There is a way to secure the wire to the wall without drilling at numerous points - this is fixation using an insulator. In addition, this method is considered very relevant in rooms with retro and Provence styles.
Designer fastening of wires is carried out in the following sequence:
- Special barrels are attached at a distance of 0.5-0.6 m. They can be fixed by screwing in 1 bolt.
- The cable itself is twisted. You can do this yourself or purchase a ready-made twist. The wire can first be placed in a stocking insulator.
- Then, using the twisting method, the cable is fixed along the route where there are already barrels. In this case, you need to tighten the cable well so that it does not become disconnected from the barrel.
The option is suitable for electrical installation in residential premises and rooms with high humidity. The unique type of wire arrangement helps create an ambience that matches the interior design.
Main varieties
Depending on the modification, the dimensions of the cable channels, their shape, material of manufacture and technical parameters vary. In everyday life or for registration of wiring in offices, the following are most often found:
| Name | Peculiarities | Areas of application |
| Mini | Box with a small cross-section. They hold up to 3 small cables. Installation of mini cable channels is carried out using self-tapping screws. When turning the wires, the joints are poured at an angle of 45° or plugs are installed. Typical sizes range from 10x10 mm to 60x80 mm | Most often used for Internet, television and telephony. |
| Flattened floor | An oval profile, which is used if it is not possible to route cables around the perimeter of an office or apartment. When installing, one edge of the box is attached to the floor with self-tapping screws, then it is closed with a lid and plugs are placed at the joints. Made from aluminum, galvanized or hard plastic. Size variations: from 16×6.5 cm to 7.5×1.5 cm. Colors include white, black grey, brown and a natural wood option. | They are laid in offices where it is necessary to run the wire to office equipment or a workplace in the center of the wall. Suitable for one or more medium sized cables. |
| Parapet guides | Main (parapet) boxes are made of plastic. There are several variations depending on the type of profile: similar to the “P” burka without a partition, “W” - with three sections, “G” for corners, curly and universal. The main advantage is the ability to adjust the rotation angle from 7 to 45° using adapters. Dimensions from 10×6 cm to 1×2 cm. | Can be used in any domestic premises. |
| Perforated with open access | Made of plastic or metal, it is 30-40% lighter than conventional options with easier installation. They provide good air circulation, have constant access to the wire in different parts of the network and can be installed on curved surfaces. | They are used to connect wires to each other when entering electrical panels or in production workshops, where the appearance of the wiring is not important. |
| Skirting floors | This type of cable duct is fastened using self-tapping screws to the walls or floor. Their design resembles hollow sections with a lid on top. The main selection parameter is the width of the diagonal wall (5 and 7 cm). The advantages include versatility for residential and office premises, variability of colors and immunity to ultraviolet rays. After dismantling the plinth cable channel, it can be reused. | Offices, administrative buildings, apartments and private houses. |
| Flexible | Prefabricated structures made of metal or plastic. Available in different colors, there are corrugated models. Such cable channels protect against mechanical damage, vibration or chemical reactions with the external environment. Such a box is flexible, can reduce noise levels and provide free access to wiring. At the same time, it is easy to replace a separate element, and installation does not require much time. By diameter you can find the following subtypes:
| When connecting wires to machines and other equipment in production. |
| Corner under the ceiling | Installation of the corner cable channel is carried out at the joint between the wall and the ceiling. The triangular shape of the structure fits perfectly into a flat corner. The maximum dimensions of the internal cavity are 4 by 4 cm. Simple installation and light weight of the structure are among the positive aspects of the box. Such cable channels are fixed only under the ceiling due to their fragility. | Any office and residential premises. |
| Transparent with backlight | Externally similar to corner ceiling models. They have a completely transparent lid, tilted at an angle of 45°. They have built-in lighting. | They are used to decorate lighting systems under the ceiling, frame kitchen cabinets and other decorative elements. |
| Industrial wire | Made from metal wire. They provide free air circulation, quick access to wires and do not accumulate dust inside the structure. | Installed in warehouses and workshops, as well as behind suspended ceilings. |
The types of cable channels listed can be divided according to the degree of rigidity, the presence of a cover or the type of locks at the joints. However, installation of wiring boxes in an apartment is carried out according to the same principle and with general rules.
Possible installation errors
When installing an input into a house using a SIP cable, difficulties may arise, and in order to avoid mistakes, the most common of them are listed below:
Weak tension: a dynamometer was not used when tensioning, and installation was carried out “by eye”
This error can lead to increased load on the cable, especially in winter, and its breakage. Strong tension: also has a negative effect on the cable, especially its insulation. An attempt to reuse piercing clamps: they are disposable, since the head breaks off and re-installation is not possible. Damage to insulation during work: It is important to use a solid cable; damage to the insulation may result in a short circuit or electric shock. The clamps are not fully secured: the conductors must be correctly and securely fixed in the clamps and not dangle in them. A bad clamp will lead to poor contact, sparking and cable damage.
How to secure cables to the ceiling
If there are not very many cables on the ceiling, you can use ordinary fasteners - clamps, ties, clips, homemade clamps, etc. But they are inconvenient to install - you have to work for a long time with your hands raised, and even hold the tool and cable in them. Hard work.
If the ceiling is suspended, the cables can be secured to hangers. In this case, use ordinary plastic clamps (tightenings), which secure the wires above the level of the future ceiling. In order not to damage the sheath or even the cores, it is better to lay the wires in a protective corrugated hose. This will also make the wiring safer from a fire safety point of view.
Wiring arrangement when installing a suspended ceiling
Large bundles of cables on the ceiling are easier to lay in trays. They are available in wire and metal (solid metal and perforated). In apartments and houses, wire ones are usually used. They cost and weigh less. They are attached to the ceiling with adjustable hangers.
Trays for laying large bundles of cables
This type of cable fastening also requires the installation of hangers, but the number of fasteners is much less. Another advantage of this method of laying cables is that it is easy to replace or lay new ones if necessary. The downside is that the trays are not very cheap.
Fixation without compromising the integrity of the walls
This is the most in demand type of work. If you need to change the wiring, but not cause much damage to the repair, then you should ask the craftsmen how to fix the cable to the wall without drilling. Naturally, this will only be an open type of wiring. Self-adhesive clips can serve as fasteners. You can attach the cable channel using liquid nails.
Open installation fasteners
When using an open installation method, they try to use the least visible types of fasteners
Such cable fastening cannot be completely invisible, but it may not attract attention.
We must try to make the cable invisible...
Staples from a construction stapler
If you have a stapler on your farm, you can fasten a small-diameter low-voltage cable easily and quickly. There are special U-shaped brackets on sale. They are designed precisely for these purposes. There are two types:
- 28 or S. Made of 1.25 mm thick wire, suitable for fastening cables with a diameter of 4.5 mm, leg height from 9 mm to 11 mm.
- 36 or L. They have a diameter of 6 mm, leg height from 10 mm to 14 mm.
There are also special cable cleats with a plastic housing (pictured on the right). They are more expensive, but due to the plastic housing there is less chance of crushing the wires or damaging the insulation.
The brackets can be made of galvanized steel or stainless steel. The legs can be regular or pointed. The second option fits easier even into dense substrates such as chipboard. As you understand, this fastener is not used for serious conductors, but for wired Internet, telephone, etc. very convenient.
Staples and clips
Fastening cables of different diameters is most often done using staples and clips. They are made from metal and especially durable plastic. Plastic clips are used to secure wires indoors; metal clips can also be used outdoors. The metal can be galvanized or painted, but it is better to find ones made of stainless steel for outdoor use.
Clips and brackets for attaching cables to walls
The most inconspicuous of the clips are small plastic clips with nails (upper left corner in the photo). They are used if it is necessary to stretch one thread of cable. The work is progressing quickly - I put a nail in place and drove it in. The remaining staples are more noticeable, but stronger and stiffer wires can hold them.
There are also plastic clips for attaching the corrugated protective shell to the wall. There are them in the form of several rulers, and there are one at a time. So you can secure both a single conductor and a group of cables.
For fastening corrugated hoses
The same clips can be used to fasten cables of suitable diameter. For very hard ones, it is better to use metal staples, and for conductors of medium hardness, these are also suitable. Clips with a lock are good for these purposes (pictured below on the left). They can also be used to secure cables to the ceiling.
Based on dowels
There are cable fasteners based on plastic dowels. The plastic used is heavy-duty, so the area of use is not limited - it can be installed in both brick and concrete walls. There are several types:
- Dowel tie. The plug of this fastener is cast with a tie. Convenient if you need to fix a bunch of cables.
- Dowel clip. Suitable for fastening single conductors. Made from plastic tape with notches. Available for round and flat cables of different diameters/sizes. This is one of the most invisible fastening methods.
- Dowels with a platform for the screed. There are two types - with a removable platform and a plastic tie and with a slot in the cap.
All these types of fasteners are inexpensive, but do their job well. They are even better to use than with metal nails - there is less chance of damaging the insulation. Since they are inexpensive, they can be used to secure cables in a groove.
Staples and clips
Clamps are usually used to secure low voltage cables.
Such fasteners can have a U or L-shaped design. Depending on the thickness of the cable, staples of the appropriate size are selected. It is better to use staples with a plastic casing, this minimizes the risk of damage to the insulation. But, for wiring even a household electrical network, this type of installation is not recommended. This is the optimal solution for laying computer networks, telephone lines, etc.
A clip for fastening wires is a special steel or plastic structure through which cables are installed. Plastic clips are used when performing interior work.
Steel clips are suitable for use in open areas. It is best to use stainless steel fasteners, they are the most durable. Coated with paint or a layer of zinc are also strong, but less durable.
The most aesthetic and inconspicuous type of clip is a compact plastic clip with a nail. Such fasteners provide quick installation and are well suited for laying a single cable. Staples for thick wires or bundles of wires are more visible, but provide greater security.
Attaching cables to the ceiling
It is necessary to attach cables to the ceiling mainly when installing suspended ceilings or ceilings made of plastic panels and plasterboard. In the case of plasterboard, everything is somewhat simpler: there is a system of suspensions to which you can fasten wiring harnesses with plastic ties. In other cases, everything is somewhat more complicated: you have to drill a large number of holes for fasteners, because they use the same clips and brackets, and under each you need to install a dowel (if the ceiling is made of a concrete slab).
Attaching the cable to the ceiling is time-consuming
There are several ways to speed up installation:
- Using cable trays (described above).
- After attaching a number of lines to the ceiling, hang small wire harnesses from them using plastic ties.
- Use a long perforated strip of metal for fastening.
Fastening with clips
These fasteners are quite popular when laying open cables. The clips look pretty neat after installation. They can be of different sizes, shapes and be metal or plastic,
A simple version looks like a bow, on both sides of which there are holes for dowels or screws. A good and simple design, but there is a small drawback - for installation you need to drill two holes. This slightly increases installation time.
Metal clips
Made from metal strip. To install, first “wrap” the cable with it, align the holes and secure it to the surface. Can be used on the wall and ceiling. For the latter, they are inconvenient only because you need to drill a lot of holes.
Plastic clips
They are mainly used for installing corrugated cables for hidden and outdoor installation. Corresponding clip sizes are available for different pipe diameters. They are mounted on concrete walls using dowels, and on wooden surfaces using ordinary self-tapping screws.
The installation can be performed for one cable, or combine several pieces to secure a bundle of wiring. The design of the clips allows them to be assembled into a single block. Each side has locks (special grooves), which help securely connect the clips to each other. The layout using these elements is neat and even.
Self-adhesive clip
They are used for fastening cables or wires of various shapes; they can be made in plastic or metal form. The surface where it will be attached must be cleaned of all dust and dirt. The clip has a one-sided adhesive tape on the back. This type of fastener is used for attaching cables to plastic panels or furniture. There is no need to drill holes in expensive or brittle materials.
Clips with nail
They are made in the form of a plastic bracket, on the side of which there is a hole for a nail. They can be very different in shape. Used for open installation on wooden and similar density walls. In the photo above.
This fastening is very fast and convenient. It is often used when it is necessary to route telephone, television and other small cross-section cables along the baseboard.
Fastening the cable in the groove
When laying hidden in non-combustible foundations, the cables are laid in a special groove cut into the wall. These grooves are called grooves, and the process is called gating or gating. In order for the cable to stay in this groove and not fall out, it must be secured in some way. There are several ways to fix:
- Dilute the construction plaster and use its “cakes” to fix the wires to the walls of the made recess. The method is suitable for a small number of conductors with not very rigid insulation. While working, you need to mix a small amount of gypsum as it “sets” very quickly.
- Use a dowel tie. Installation of fasteners occurs before laying the cable. Not a bad way, but it takes a lot of time. Especially when installed in concrete walls or floor slabs. The second drawback is that when the routes are long, a significant amount of money accumulates on the fasteners themselves.
- If you need to save money, just take a dowel or a nail - depending on the type of base, pierce a piece of telephone “noodle” in the middle with it, and wind the wire. Install the fasteners as in the previous case - before starting to lay the conductors.
- To quickly secure the cable in the groove, you can use pieces of corrugated hose. Cut a piece slightly longer than the width of the groove, squeeze the hose, and install it in the groove. It holds the cable well due to its elastic force and saves a lot of time. As the plaster is applied, these “holders” for the cable can be removed.
Features of combustible substrates
If hidden wiring is done in flammable walls - wooden, frame, etc. - according to fire safety requirements, they must be laid in a non-flammable protective shell. The non-combustible casing is either corrugated hoses made of non-flammable plastics, or all-metal boxes. When using corrugated hoses, the fastening method is the same as when fixing the cable. The difference is in the diameters of the required fasteners.
To secure corrugated hoses, you can use any suitable size clamps
When using metal boxes, they are fixed in the wall, and then cables are laid in trays. This method is more often used in frame housing construction, because sanding channels in wooden walls significantly reduces their heat-insulating properties. In addition, a wooden house constantly changes its size and rigidly fixed boxes can become a problem. When laying wiring in wooden houses, they often use open wiring in cable channels or make retro wiring.
Large bundles of wires
Often, when installing electrical wiring, it is necessary to lay a large number of cables. To minimize the time required to attach large bundles of wires, you can:
- Break them into bundles of 3-4 pieces and secure them with ties, dowel ties, etc. The method is not bad, but the grooves must be deep, which is impossible with small wall thicknesses (a problem with panel houses).
- Make a shallow and wide groove in which to place the conductors “in one layer”, securing them with aluminum perforated tape. These tapes are used in the construction of suspended plasterboard structures and are inexpensive.
A combination of these methods can also be used. When using tape, it is attached along the edges. Due to its rigidity, it holds even hard conductors or corrugated shells well. If necessary, you can install fasteners between the cables, but you must be careful not to damage the insulation.
General rules
When installing cables hidden or open, indoors or outdoors, there are several general rules:
- The optimal distance between fasteners is 40-50 cm.
- If self-tapping screws, screws, or dowels are used, they are tightened all the way so that the protruding cap does not damage the insulation.
- The cable is laid evenly, without humps. If a reserve is needed, it is placed in the least visible place.
It is advisable to lay the cable in a straight line - vertically or horizontally
Basically, that's all the recommendations. They are versatile and uncomplicated. The distance can be reduced if necessary. For example, at turns of the route, the fasteners are installed at a short distance from the bend point - 5-10 cm. The task is to ensure reliable fixation and prevent sagging.
How to glue fallen tiles to the wall and floor
A tile on the wall has fallen off
Over time, any repair gradually loses its original luster and gradually becomes unusable. Depending on the type of cement mortar, this problem is typical for the tiles; they simply peel off over time due to the destruction of the surface adhesive layer of the back surface. Moreover, the problem of fallen tiles, although significant, can be restored.
For this, a number of adhesive compositions are used; you can also solve the problem radically by replacing the cement mortar in the right places. To glue loose tiles in the bathroom, you can use one of the following methods, including the one shown in the video.
Advice from experienced craftsmen
As a rule, when it comes to such a problem as fallen tiles on the wall and floor in the bathroom or kitchen, it is recommended to glue it with one of the available materials:
Floor tiles fell off
- glue;
- homemade adhesive solution from linoleum and acetone;
- silicone sealant;
- put on oil paint;
- bitumen or resin;
- casein mastic;
- cement paste;
- liquid nails.
Each of these methods for falling off tiles has its own advantages, but still refers to a kind of “ambulance”, that is, unprofessional methods.
Considering that this problem occurs in places of vibration - the floor, a plumbing hatch with a panel or a bathroom door, you need to ensure reliable fastening for long-term use. In this sense, it is worth commenting on the above list of funds.
Homemade glue from linoleum and acetone
A home remedy for quickly repairing tiles in the bathroom and kitchen, on the wall and floor is glue made from leftover linoleum. It is prepared by cutting pieces of the coating and pouring acetone over them. The oil fraction acts as a solvent, resulting in a high-strength polymer adhesive. As is known, polymers have excellent adhesive ability.
Linoleum and acetone glue
According to reviews, this product glues ceramic tiles and wood better than many compounds. However, the recipe given refers to old manufacturing methods. At that time, linoleum was made from nitrocellulose and resins, the result was an NC-type adhesive that could actually be used to glue different surfaces, including concrete and ceramics.
Nitrocellulose adhesive is commercially available and is used mainly for parquet, wood, yachting and furniture. You can also use it to glue tiles that have fallen off, but they are not designed for this purpose.
PVC glue, which is obtained from modern linoleum, is an analogue of industrial compounds recommended for rubber and plastics. At the same time, the well-known Moment also applies to polyurethane compositions and can be used for gluing tile ceramics back to concrete.
Liquid nails for fallen tiles
Liquid nails Axton
There are quite a lot of adhesive compositions under the general name liquid nails; there is a mounting adhesive called Moment that belongs to this type. This composition is not bad, but it temporarily holds the ceramics on the concrete base.
Over time, it will disappear anyway. Some craftsmen, instead of liquid nails, recommend giving preference to regular PVA, which ensures normal adhesion to the surface.
Cement paste and tile adhesive
Cement or mortar mixture is the most suitable way to repair tiles. Use leftover cement or cement mixture. You will need to beat off the base with a chisel, put new dough and use a homemade level to glue the ceramic tiles.
As part of a budget renovation, this is one of the most affordable and reliable options. Moreover, in order to glue a fallen tile to the wall, if it has fallen off, it is better to use good tile adhesive rather than cement mortar. After curing, you will need to caulk the seams.
Modern adhesives for bathroom and kitchen tiles
Applying adhesive to tiles
These compositions for gluing tiles if they have fallen off are often used when installing a hidden plumbing hatch, but in this case the ceramics are placed on a wooden base, gluing with almost any available composition. For gluing to concrete, silicate glue is used, having previously treated it with silicate to improve adhesion. The result is a strong connection, but if you have loose ceramic tiles in an area of use, for example, near a door, then such repairs are only temporary.
Another affordable and reliable option is styrofoam glue. This is a mastic that has good binding ability to concrete. Perfect for the floor if you don’t want to use a radical method of repairing the wall with tile adhesive.
Homemade fasteners
In some cases, you can do without purchasing retainers. You can use homemade devices. Usually this is a small plate of soft metal that can be attached with a nail or self-tapping screw to the surface of the wall. You can think of other “designs” of fasteners from scrap materials. The main thing is that they are not a fire hazard during operation.
In any case, the electrical installation of the cable must be carried out in accordance with what exactly the wall is made of, in which room the wiring will be used, and what kind of wiring you want to do in the room. To fix the cable itself, you can use a variety of techniques and devices. You can even choose those that do not involve drilling the wall surface. And some even become the “highlight” of the interior of the room.
What fasteners can be used for electrical wiring?
Their list is quite extensive, but we will highlight the most popular types of wire fasteners, related to versions for open and closed installation. Let's start with hidden installation:
Dowel clamps
Dowel clamps are considered the most popular because they are easy to use and have a low price.
But it is not difficult to get confused in them due to the abundance of different types, differing in functional features and external shape.
The simplest version is considered to be “bracket”. It is made on a plastic basis and has jagged ends with a width of about 8 mm. The size along with the shape can be chosen based on the need to create a quality fastening.
But dowel clamps for fastening have a spacer part and are considered a more reliable product for forming high-quality wiring. The design is based on a plastic rod base for using a hammer to drive the fastener deep into a pre-created socket.
What is the difference:
- Can withstand loads of up to 8 kg, which is enough for home electrical wiring;
- Thanks to the clamp, you can secure power cables, smooth-walled versions of pipes and corrugations with a diameter of no more than 32 mm.
Important: This type of fastener can only be used once, so we recommend that you mark the points for its installation correctly
Installation site
The version with the name “installation platform” is considered a hybrid option, since it includes the capabilities of the two fasteners considered. Externally, it is offered in the form of a dowel based on a mounting head, which has an input for creating a plastic or metal tie. Created using nylon or polypropylene
If a strong base was used, then it is distinguished by reliable fixation in the wall, which is due to the special shape of the rod. Due to this, you can securely secure one cable or several wiring lines.
Fasteners depending on the type of base material
Types of clips for fastening wires
The method of cable installation depends on the material of the base on which the fastening is performed.
The following types of fastenings are distinguished:
- steel fasteners driven or screwed into the wall (ceiling);
- dowels, expansion anchors that are inserted into pre-drilled holes;
- adhesives and mounting mixtures.
The easiest way is if the base is wood or other soft material. To install the fasteners, a hammer, a construction stapler or a screwdriver may be sufficient. In such cases, expansion anchors for drywall, self-tapping screws, nails, and staples are used.
Homemade cable fastening devices
Many factory-made fixtures have a relatively low price, but when hundreds of them are required, the cost adds up to a considerable amount. And if the wiring is hidden, you need, for example, to secure the cable in a groove, why wall up extra money if you can get by with improvised means. Here's what a homemade cable mount is made from:
- Strips of tin + nails or dowels - depending on the wall material. The tin is preferably galvanized, and it can be “mined” from beer cans. It is cut into strips 7-10 mm thick, and a hole is made in the center into which a nail is inserted. First, fasteners are stuffed along the route in increments of 60-100 cm, then the cable or wire is clamped with tin strips. To ensure reliable fastening of the cable, it is advisable to clamp the ends into a lock.
- From galvanized metal, cut into strips about 1 cm thick, you can make a simple U-shaped bracket. Nail the ends and use them like regular staples - grabbing the conductor every 50-80 cm. Can be used to attach wires to walls and ceilings.
- Also, a strip of tin can be used to secure the cable into a loop. The strip covers the cable and then the strip is attached to the wall (see photo on the right). This option can also be used to fix conductors in the groove. It will differ from conventional external fastening only in the installation step of the clamps - they can be installed less frequently, since their task is to hold the cables until the solution with which the groove is sealed hardens. In the same way, you can secure wires in a protective sheath - corrugation, pipe, etc. Only the strips will need to be longer and, possibly, wider - for a more reliable fixation. For wood, a nail or self-tapping screw is suitable; for brick and concrete, a dowel is required.
- Bundles of wires can also be secured using improvised means. A longer strip of tin can be used to fasten several conductors located one next to the other. It is more convenient to use perforated metal for this (for example, mounting hangers for suspended ceilings), but you can also get by with ordinary strips of tin.
These are the main types of cable fasteners that you can make yourself. Surely there are other options - the imagination of craftsmen is inexhaustible, but these are the most common.
Insulators
In most cases, fastening wires to insulators is used for retro or decorative purposes. This open installation method is used for installing electrical wiring both in the house and in the bathhouse.
Retro wiring, mounting on insulators
The barrel is attached to the wall with a screw or nail and a pre-twisted wire is attached to it. You can twist it yourself or buy it already twisted.
Installation of wiring in the groove
For any type of installation of electrical wiring and cables, the same types of fasteners can be used. It is selected based on the existing conditions, capabilities and tastes of the owners.
The main task is to ensure high-quality fixation and not to disturb the insulation either during installation or during further work and operation. And you select the type of fastening from the possible options.
There are quite a lot of them - there are special ones that are produced specifically for cables, there are those borrowed from other areas, and there are homemade ones.
Dowel clamp
Plastic dowel cable clamps are designed to secure a single cable. It is very simple to secure the cable dowel with a clamp. To do this, we just need a hammer drill and a concrete drill with a diameter of 6 mm.
There are notches on the sides of the clamp at an angle, which prevents it from falling out of the wall. If the size of the drill and clamp are chosen correctly, the dowel will never fall out of the hole.
The dowel clamp for fastening the cable can be in two versions: for flat and round cable.
The positive aspects are low cost, quick installation method, reliable fixation (you can be sure that the cable will not break under its own weight).
Using a dowel clamp, the cable can be fastened to concrete, brick, foam block, and decorative stone. Suitable for both open and hidden fixation of wires.
This type of fastening is sometimes called a dowel-clip or dowel-bracket.
Dowel clip
A dowel-clip is more invisible during installation. This is a curved strip of plastic with characteristic branches at the ends, which, due to elastic force, will hold the fasteners in the wall or ceiling material.
The shape of these products is available for round and flat cables of different sizes. But you can’t secure serious cables with them—they’re too small. But they look very neat on conductors of small cross-sections, including television, telephone and Internet.
Construction mixture
Used for hidden cable laying in wall and ceiling grooves. For this, gypsum mortar is often used. This type of installation has a special name - “freezing”. There is nothing complicated about this method. An alabaster mixture is made and the cable is tacked in the groove in places evenly spaced from each other. This should be done promptly, since the plaster sets quickly enough.
Plaster solution for fastening wiring
This “freezing” is well suited for installation of a single cable in a groove. But this method is also used as an additional fastening of several cables, to secure already installed brackets, dowels, clamps, etc. After all this, the groove channels are filled with plaster mortar.
If the laying volumes are large, frequent preparation of the solution and fixation of the cable significantly reduces the installation speed. But in many cases this is completely justified.
Laying on the wall
Next, facade fasteners are used. If you purchase factory fittings, the distance is already regulated: at least 6 cm from the cable to the wall.
Then the cable route is marked and holes for fasteners are prepared. The distance between the fastening points is usually at least 70 cm. In bending areas, the frequency of fastening increases to prevent free sagging.
Then, using standard bolts, all facade fastenings are secured. To prevent corrosion and destruction of fasteners, the metal caps are closed with special plugs.
If house communications are located along the laying route, it is necessary to ensure a safe distance. At least 10 cm to water pipes, at least 40 cm to gas pipes.
Under wind load, the cable can fray the insulation and the wires will short out.
The use of fasteners that are intended for other purposes is not permitted. For example, pipe clamps or cable clips for indoor installation.
Features of ordering bundles of wires
Very often, several wires are laid, which requires their marking to prevent errors during maintenance and connection. There are two main solutions for this:
- color marking, when, for example, for single-phase networks, the ground wire has yellow-green insulation, the neutral wire has blue insulation, the phase wire has brown or black insulation;
- the use of special number tags that are installed at the ends of the wires.
Another option is to use special combs made from clamps or clips. Such solutions are quite sufficient to identify a specific wire, provided that uniform rules are maintained during installation work.
Attaching to poles and walls using aerial installation method
When laying cables aerially, they must be secured to poles, walls of buildings and other objects. There are fasteners for self-supporting and conventional cables. Ordinary cables cannot be suspended between poles without support - they will not withstand the load and will break. For such conductors, a cable is stretched between the supports and the cable is attached to it on hangers. In this case, the load falls on the cable, and not on the cable. There are any ways to attach a cable, but the most common is to make a loop around a pole and secure the end. For intermediate posts, you can use any available method - two separate cables, a driven hook, a suitable bracket.
Attaching the cable to the poles
The cable is fastened to the supporting cable using supporting clamps. They come in cables of different shapes and cross-sections. It is also possible to use ties made of UV-resistant plastic. Sometimes, to save money, the cable is screwed in with pieces of wire, twisting it. This method is the least reliable - under heavy loads, the twist may not hold the wire, it will sag and break.
How to hang a cable from a rope
For self-supporting cables, the fastening usually consists of two parts - brackets or clamps that are attached to the wall or pole, and clamps that cling to the installed bracket and hold the cables. Clamps are used only on poles. They are especially convenient on reinforced concrete pillars - there is no need to drill holes, which is very difficult.
Several options for attaching the cable to the pole
There are several types of brackets. They are selected depending on the type of base (wooden, steel, concrete, aluminum) and the planned load. By purpose there are:
- branch - for installation on poles and supports in places where the route turns;
- intermediate fastenings - for installation on poles and supports along the route without turns or branches;
- facade - for installation on external walls.
Suspensions or clamps are attached to the brackets. They are selected depending on the type of cable, its cross-section, etc.