Ceramic tiles on the balcony are one of the best options for its cladding. But we need to make it clear right away: finishing a balcony with tiles is only possible in relation to a concrete slab, i.e. floor. This is due to the fact that the ceramics on the walls, together with the wall material (brick, foam blocks, welded metal frame with gypsum plasterboard cladding, etc.) and double-glazed windows create an excessive load on the load-bearing structures of the balcony - do not forget that the weight of the ceramics is 18 -25 kg/m2, and the load-bearing capacity of the balcony slab is 200-250 kg/m2, and at the same time its area is 3.5-4.5 times less than the area of the walls. Therefore, in this work we will consider only options for tiled flooring.
Important: the conclusion drawn does not apply to the loggia. There are no overloads, which is why tiling the walls is allowed.
Is it possible to lay tiles on the balcony floor?
Before we consider in detail all the nuances of laying tiles on a balcony, we will first figure out whether it is possible to lay tiles on the floor of a balcony/loggia. To do this, we will formulate the requirements for the floor covering of the balcony.
Flooring requirements
The general list of requirements includes the following items:
- low specific gravity is the main indicator due to limited loads on the balcony;
- resistance to sudden temperature changes, including freezing (the material must be frost-resistant);
- low hygroscopicity and complete absence of water absorption;
- high level of resistance to abrasion (wear) and deformation under the influence of natural factors;
- easy care;
- non-slip surface.
Is it possible to lay tiles on the balcony?
The tiles meet almost all of the above requirements for the flooring of a loggia/balcony. The only thing you need to pay special attention to is the weight of the floor pie in a glazed balcony and the surface of the tiles in an open one.
The walls and double-glazed windows place a serious load on the balcony slab of a closed balcony. Therefore, laying tiles on a leveled surface with cement-sand mortar is questionable: you need to consider the weight load of the walls, double-glazed windows and floor on the balcony. Practice shows that a screed on a balcony under tiles 4-5 cm thick is incompatible with any porcelain tiles and tiles more than 11 mm thick - the mechanical load becomes critical and when several people go out onto the balcony at the same time, something irreparable can happen: a collapse.
On an open balcony, any type and type of tile can be laid on a screed up to 7-8 cm thick. But there is another problem: the slipperiness of the material, which is aggravated by the need to arrange a slope of 3-4o for rainwater to drain. To minimize the risk of injury from a fall, you should purchase satin porcelain tiles or grooved ceramic tiles. Clinker tiles work well.
Its varieties
Standard tiles for a loggia (balcony) are divided into main types, and each type has its own advantages:
- Tile.
- Clinker tiles.
- Cotto slabs.
- Porcelain tiles.
- Quartz vinyl tiles.
To make a ceramic product, sand, clay and related materials are used under high temperatures.
After preliminary shaping, the tile is fired in a kiln and then covered with a glazed mass (the last component determines the future color and texture).
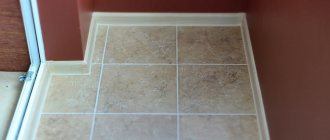
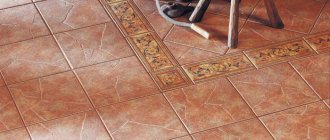
Tiled floor on the balcony
Standard clinker tiles are highly resistant to low temperatures and high humidity, and are also distinguished by their enormous wear resistance, which is significantly superior to other types of facing material. The price is cheaper than porcelain tiles.
Clinker board
The specific tile on the balcony, the photo of which can be seen just below, is called Cotto tile. Initially, it was produced exclusively without glazed mass and had a yellow or brown tint. Now glaze is used in its production, which affects the range of materials.
Cotto tile
Facing porcelain tiles are manufactured as follows:
- It is given its original shape in special containers.
- Next comes the mold processing under pressure.
- After pressure – firing at high temperature.
After all the procedures, the finished porcelain tile not only looks like natural stone, but also has similar properties, namely: increased strength, resistance to frost, sudden temperature changes and good resistance to a humid environment.
Porcelain tile options
The product is produced both without admixtures of the glazed mass and together with it. The latest type of porcelain tile has a good selection of textures and colors, which is preferable from an artistic design point of view.
The only disadvantage of porcelain tiles is their cost.
Quartz vinyl tile floors have fairly high performance, competing with other materials.
Quartz vinyl for flooring
The floor covering is practically not subject to wear and has good durability. This is due to the specific manufacturing process, including components consisting of 80% quartz sand. But wear resistance is ensured not by decorative material, as is commonly believed, but by a special protective film on top of the product.
Pros and cons of laying tiles on the balcony
Supporters of laying tiles on the balcony floor have compelling arguments:
- The flooring is durable - service life is 30-100 years. This variation is due to the many types of ceramic tiles. Thus, technical porcelain stoneware has practically no restrictions on its service life; matte has a service life of 75-100 years, polished - 30 years and above, lappoted and satin - about 40 years. A tiled floor lasts 30-50 years, clinker - 100 years or more;
- durable - withstands a load of about 200 kg/cm2 (tension - 450-500 kg/cm2). True, this does not mean that furniture of any weight can be placed on the balcony. It can and will collapse;
- solid. But here the hardness indicators on the Mohs scale are different: 3-7 points;
- resistant to ultraviolet radiation and household chemicals;
- moisture resistant - snow and rain do not affect performance characteristics: durability, strength, color saturation;
- environmentally friendly materials - do not emit harmful substances when heated;
- simple care required - just a wet cloth;
- the installation technology does not contain complex operations - the owner of the balcony can glue the tiles;
- There is always a huge assortment of sizes, textures and designs on sale;
- compatibility with “warm floors”, but only in the case where the heating systems consist of infrared film (rods) or amorphous metal tape - cable “warm floors” are laid in a screed about 5 cm thick, which is critical for a balcony.
Among the disadvantages:
- low coefficient of friction, with the exception of satin porcelain tiles and grooved tiles. And this is the risk of falling with serious injuries;
- high level of heat transfer - on an unheated balcony the floor is always cold, as a result of which it is unpleasant to walk barefoot or in socks not only in winter, but also in summer;
- low level of sound insulation;
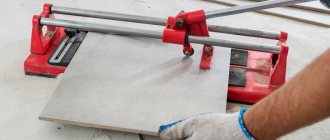
- complex processing - cutting requires a special tool;
- fragility - can crack at the most unexpected moment, from transportation to installation.
General information
Advantages of the material. Floor tiles have several undoubted advantages over other cladding materials. It has the following properties:
- Great attraction.
- The beauty of a glossy finish.
- High resistance to frost.
- High thermal conductivity.
- Long service life.
- It doesn't take much time or effort to keep it clean.
- It is highly resistant to organic and chemical substances such as mold, aggressive cleaning agents, etc.
Laying tiles on the balcony (as a type of flooring) is rightfully considered one of the best, although there are still several disadvantages.
- It is quite cold to the touch, which is not so pleasant even in the hot summer.
- In most cases, the surface of the product is slippery, which is not an advantage for installation on open balconies, and especially on upper floors.
- The material successfully reflects all sounds, which will turn a cozy room into a echoing one.
Although there are fewer disadvantages than advantages, it is of little use for finishing living rooms.
Which tiles are suitable for a balcony?
For a balcony, the choice of tiles can be made according to many parameters:
- the type of materials from which it is made;
- size and shape;
- design.
Tile type
To lay on the balcony floor you can use:
- tiles _ This is a classic representative of ceramic tiles. Consists of red clay (sometimes kaolin), sand and plasticizers. The formed tile is dried and then fired at a temperature of about 1200oC. There are many varieties of tiles, which are determined by the production technology: the number of firings, the application of enamel before or after heat treatment, etc. The variety of types implies a huge selection of cladding not only in size, but also in design: pattern, color. The disadvantage of the floor covering is a slippery surface and a small number, 25-100, of freezing cycles, which is a significant disadvantage for an open balcony;
- porcelain stoneware . This is the same ceramic tile with a slightly different composition, but made using a different technology: the molded tile is pressed under a pressure of about 500 kg/cm2, after which it is fired at a temperature of about 1300oC. The result is a material with properties identical to granite. That’s why the name porcelain stoneware;
- clinker is the same ceramics, only made from refractory clays and takes about 3 days in the kiln, unlike tiles, which are fired in only 2-3 hours. It has the maximum strength among ceramic tiles and frost resistance. The surface is not slippery. These qualities make clinker an ideal flooring option for an open balcony;
Clinker.
Attention: detailed information about the types of tiles and porcelain tiles with photos can be obtained here.
- gypsum decorative stone tiles can only be used in closed heated balconies;
- PVC tiles are the cheapest flooring option. The problem is that such a floor can withstand negative temperatures from zero to -15oC. Therefore, it is risky to use on open and unheated glazed balconies and loggias. Compatible with all types of heated floors. Maintains technical and operational characteristics throughout its service life;
- quartz vinyl tiles (vinyl laminate) look great, have a long service life, are not afraid of moisture, can be laid on a “warm floor” system, but, like PVC tiles, they are afraid of frost.
Sizes and shape of tiles
The dimensions of the tiles affect the visual perception of the area of the room. Square tiles with a side length of 25-40 cm do not change the proportions of the balcony. It is used in cases where no additional effect is required. Large rectangular tiles look ridiculous.
Medium-sized rectangular tiles visually increase the length or width of the room, depending on how they are laid: lengthwise or crosswise.
Cross laying makes the balcony visually wider.
Design
The color of the floor not only dramatically affects the geometry of the room, but also participates in creating a beautiful interior.
Dark tones of the floor on the south and east side with light walls make the floor warmer. On the north and west side, it is better to choose light colors - it adds warmth to the interior of the room, bringing in more light.
White color makes the atmosphere light, visually increasing the area of the room. Gray shades look modest and at the same time elegant. The range of brown shades fits into any interior. The use of patterned tiles minimizes the volume of the balcony.
When designing the interior of a balcony, first of all, the design of the walls is created, and tiles are selected for them. At the same time, the perception of the room as a whole is influenced not only by the color of the tiles, but also by the way they are laid. He can be:
- basic, when the tiles are laid in rows without shifting. The method is simple; you don’t need a tutorial to master it;
- diagonal, but with a peculiarity. After all, the diagonal method involves laying tiles from one corner to another, the opposite one, which does not look the best in a narrow, elongated balcony. Here it is more correct to talk about a diamond-shaped layout, which is not found in classic layouts;
Diagonal laying.
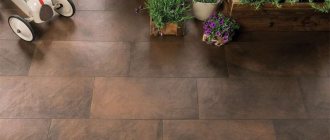
- brickwork or offset layout. It is also called “runaway”. It is better to lay out rectangular tiles using this method. Can be used in the basic and diagonal method;
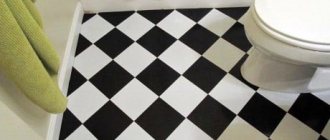
- chessboard - tiles of dark and light colors alternate as in a chessboard. Can be used in basic and diagonal layout.
Checkerboard method of laying tiles.
Key points when choosing
When choosing a suitable option, it is necessary to take into account the architectural features of the room, interior design, and the wishes of future owners:
- It is recommended to cover narrow and long spaces with products of medium or small size. A large one will look rough.
- If the balcony is located on the shady side of the house, it is better to choose a light color for the coating. This will add warmth to the interior and brighten the room.
- On small balconies, light weight products are used for safety reasons. On loggias, the issue of weight is not so acute, since the floor on them is one slab with the floor of the adjacent room. The balcony is an attached element that is designed for a weight of 200 kg per square meter. It is necessary to take into account the total weight of all finishing (including glazing) and furniture.
- The design of the material for the loggia, which is one space with an adjacent room, should be combined with it and match the interior items.
- On small balconies, small tiles look better; soft colors will visually increase the space.
- Wear resistance should be greater than 3. Please note that the floor needs a surface with an anti-slip coating.
- Medium-sized material can be placed on the wall; it must be moisture resistant and well tolerate changes in temperature.
The choice is based on the type of tile, which determines the characteristics of the coating as a whole.
Preparatory work
Preparing the balcony for laying tiles is carried out step by step:
- everything unnecessary is removed from the surface of the balcony slab: building materials, tools, fixtures, garbage;
- the type and type of tiles are determined, as well as the installation method;
- the need for basic and auxiliary materials is being calculated: tiles, tile adhesive, grout;
- purchases are made. Floor tiles for the balcony must be from the same batch and have the same geometry. To do this, you will have to open the package and place the tiles there on their edges. If the discrepancy between the length and width is more than 1 mm, it is better to refuse such a purchase - it will be difficult to get even seams. By the way, well-known manufacturers calibrate gres tiles and the data is indicated on the box.
You can buy glue from any manufacturer, but experts recommend Ceresit CM 16 Flex for tiles and Ceresit Ceramic & Gres for porcelain tiles, as well as Knauf Fliesen universal glue, which can be used on open and glazed balconies.
It is best to buy epoxy grout, and along with it a remover. If you do not immediately remove the remains of the fugue from the tiles, you will have to tinker for a long time to clean the floor from stains:
- a set of tools is included;
- from the balcony slab, if necessary, remove the old screed and flooring;
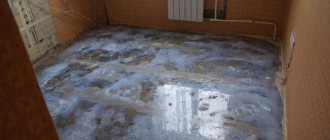
- The surface of the slab is being repaired. The repair technology is described in detail in the work “Floor screed on the balcony.”
Preparing the base
Before laying tiles, you must ensure:
- floor level;
- surface cleaning;
- installation of reinforcing mesh;
- priming the base.
Floor level. If the balcony is not glazed and this is not expected in the near future, the floor level should have a slight slope from the threshold. This is done so that water after precipitation does not accumulate under the wall and doors. If the balcony is sealed, the floor should be level. In case of deviations from the level of more than 2 cm, it is advisable to make a quick screed.
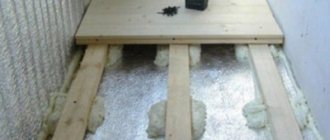
Preparing a wooden floor for laying ceramic tiles
Cleaning. The floor on which the installation will be carried out must be cleaned of dust, dirt, grease accumulations, concrete (or mortar) peelings, and remnants of old coatings must be removed.
Reinforcing mesh. A so-called polyethylene mat is laid on the cleaned surface. A reinforcing layer is necessary to prevent cracking of the tile covering.
Primer. The cleaned floor must be covered with a special compound (primer) for an absorbent surface (screed, concrete, brick). A salesperson at a hardware store will tell you the type of primer you need if you explain to him what it is needed for.
Required materials and tools
Before you start laying tiles, you need to purchase materials and prepare (ask friends, neighbors or rent) tools and equipment. Materials you will need:
- tiles (tiles, porcelain stoneware, quartz vinyl);
- tile adhesive class C2 (different for each type of tile);
- deep penetration primer;
- grout, preferably epoxy;
- washing off epoxy grout (not required when grouting on a different base) - without it, traces of epoxy resin are practically not washed off;
- silicone sealant.
The set of tools and accessories should include:
- tile leveling system (Russian-made SVP, Western Rubi Tile Level) or plastic crosses;
Russian floor leveling system.
- a hammer drill (electric drill, screwdriver) with a mixing attachment for stirring the glue;
- manual tile cutter (you can use a glass cutter);
- primer cuvette;
- container for preparing glue;
- paint brush for applying primer near walls;
- roller with telescopic handle;
- level;
- trowel for applying glue to tiles or floors;
- notched metal spatula;
Notched trowel.
- plastic narrow spatula - used for grouting joints;
- rubber or wooden hammer;
- roulette;
- construction pencil;
- soft sponge.
In the estimate for laying tiles, the cost of materials is always more than 60-70%. Therefore, you need to save as much as possible on this expense item. This can be achieved in two ways: accurately calculate the need for materials and work carefully to prevent overuse.
Tile calculation
There are two methods for calculating the number of tiles on any surface.
1. Calculate the area of the balcony, which is divided by the area of one tile. The result obtained (the number of tiles per piece) is multiplied by a factor of 1.4 (you can keep it at 10%, but the floor will look “ugly”, since the law of symmetry will be violated, as discussed below) for direct installation and 1.2 for diagonal - thus, irrecoverable losses are taken into account.
2. The number of tiles in length is determined (rounded up), then the number of rows (also rounded up). Multiplying the resulting numbers gives a more accurate number of tiles. A couple of tiles are usually added to this value as a reserve for unexpected losses.
Glue calculation
All bags of glue indicate the weight of the mixture and the total area for which the adhesive composition is sufficient (for 25-kilogram bags this is approximately 5 m2). Therefore, the number of bags of tile adhesive is found simply: the floor area is divided by the area indicated on the bag. For a balcony, as a rule, one bag weighing 25 kg is enough. The loggia is always more than 5 m2. Here you need to count and buy smaller packaging: 5 or 10 kg.
Important: if the surface on the balcony is leveled using tile adhesive (the screed is not poured), the consumption increases by about 20%. In this case, one bag is not enough - you need to make more accurate calculations.
Grout calculation
The amount of fugue (grout) depends on:
- on tile parameters: length, width, thickness;
- seam width;
- solution density.
The calculation is carried out according to the formula: P = (D + L) / D * L * T * d * K * S * 1.1 , where:
- P is the required amount of mixture, in kg;
- D is the width of the tile, in cm;
- L is the length of the tile, in cm;
- T—tile thickness, in mm;
- d is the width of the tile joint, in mm;
- K - grout density in g/cm3 (usually the average is taken, equal to 1.6 g/m3);
- S—area of laid tiles, m2;
- 1.1 - loss factor.
To speed up calculations, we provide a table of fugue consumption per 1 m2 in kg.
Grouting joints
A day later, after the surface has completely dried, we proceed to grouting the joints. Grouts containing epoxy resins are considered universal because they have water-repellent properties and do not wear off quickly.
We select a grouting compound of a suitable color and mix according to the instructions on the package.
- Apply a small amount of the mixture to a rubber spatula and rub it into all the seams between the tiles.
- Excess grout is periodically removed with a sponge. In addition, this allows you to level the grout layer inside the joints.
- After the grout has dried, the surfaces are washed with a sponge.
At this point, the work on finishing the balcony with tiles can be considered complete.
Leveling the surface
Tiles can only be laid on a flat surface. Large differences in height (more than 5 mm) are not allowed. The glue tends to shrink during the setting process. The adhesion force is enough to either disrupt the geometry of the surface, part of the tile will go down, or break the tile.
There are several ways to level the surface of the slab:
- wet screed. In this case, you need to carefully calculate the load on the balcony. It can be critical. The nuances of leveling a slab with a wet screed can be found here;
- self-leveling mixtures - the most effective option if the task is not to raise the floor level (features of the technology are described in the work “Self-leveling floor on the balcony”);
- using lag - instructions are given here;
- tile adhesive - the fastest and cheapest option. Used on open balconies with a flat base.
Solving possible problems
If you strictly follow the recommendations for laying tiles, difficulties are rare. The problem often becomes the presence of round sockets or other holes on the balcony. The hole is made with special nippers or a drill. Another problem that you may encounter when finishing a balcony is that the tiles do not lie evenly. The error is usually hidden in improper surface preparation. It is worth making sure that the walls and floor are perfectly level, using a level. It is important to completely remove dust using a damp cloth. Even a few grains of sand can disrupt the ideal plane.
Difficulties often arise when decorating corners or window sills. The use of plastic corners is unacceptable. The recommended option for decorating the corners is to use only tiles, carefully measuring every millimeter before arming yourself with a tile cutter and removing the excess.
Instructions for laying tiles
There is nothing complicated about how to lay tiles on a balcony with your own hands. The step-by-step algorithm of actions includes the following operations:
- the surface on which the glue will be applied (screed, balcony slab, plywood, gypsum fiber sheets or OSB) is primed twice;
Attention: waterproofing of the base under the tiles and insulation is carried out only under “warm floors”. Recommendations to lay a polyethylene mat on the screed and glue tiles on it, which were posted on several construction sites, refer to the unhealthy fantasies of the authors of the articles who have never held a trowel in their hands.
- Marking of tile laying is carried out. The recommendation to start from the far corner does not allow you to get beautifully laid tiles (an asymmetrical layout does not look good on a small balcony area). Depending on which installation method is chosen, the markings are carried out:
- the middle of the balcony is located lengthwise and crosswise;
- A center line is drawn along the entire length of the slab with chalk or a marker;
- when laying out in a rhombus (many consider it diagonal, which is not entirely accurate), the first tile is laid at an angle to the far wall on a drawn line, so that the opposite corner is on the center line;
- For a basic layout, a central tile is laid at the intersection of lines, without glue. A continuation of the row is laid out from it to the far wall. In this case, the distance between the tiles should be maintained to the width of the seam. The position of the last tile (closest to the far wall, but intact, without undercuts) is marked. From this place you need to lay the first tile.
Laying tiles diagonally on the balcony.
- the glue is diluted. To prepare it, pour 5 liters of clean warm water into a container. An electric drill with a mixer is switched on. If the work is done in pairs, pour powder from the bag into the liquid in a small stream, or in parts. As a rule, 5 liters of water require 20 kg of dry mixture (the recipe can be found on the packaging). Stirring is carried out until a homogeneous consistency of the solution is obtained;
- glue 3-5 mm thick is applied to a small area, no more than 1 m2;
- Use a notched trowel to level the adhesive layer. By changing the angle of inclination of the tool, you can obtain different thicknesses. Ideally it should be 3 mm;
- Glue is also applied to the back side of the tile;
- ridges are created using a notched spatula so that when the tiles are pressed into the adhesive, it does not protrude through the seams;
- the tile is laid in the marked place and pressed into the glue with little force;
- using a level and a mallet, the horizontal position of the tile is determined;
Important: it is difficult to immediately build a horizontal plane using one tile. It can be obtained after laying several tiles. Therefore, horizon checking is carried out constantly.
- Elements of the hovercraft are installed; if it is not available, plastic crosses are installed in the corners;
This is how the SVP element is installed.
Leveling tiles with the Rubi Tile Level system.
- Using the same technology, a second tile is glued and the horizon of the plane is checked again.
- The tiles that need to be laid near the walls are cut to size and also glued.
Cutting tiles using a manual tile cutter.
Work near the doors is being completed, because You cannot walk on the laid tiles for 2-3 days until the glue dries.