As a rule, all old houses have one problem - low ceilings. Such a room is beneficial in terms of heating, but installing modern furniture with tall cabinets creates certain problems. And this situation itself evokes a feeling of pressure from above. To solve this problem, do not disassemble the roof. It can be raised along with the ceiling. To do this you will need several jacks and a metal channel. Now we will try to understand in more detail how to raise the roof of a house installed on brick and wooden walls.
Main works
The stages of building a house roof involve its construction using a certain technology. By dividing the construction into the main components of the structure, we get the following:
- fastening the foundation part - the Mauerlat. It bears the pressure of the main loads. The material used is wooden beams with a cross section of 15x15 cm.
- frame device. This means attaching the rafters to the Mauerlat. The optimal size of beams is taken to be 7x15 cm.
- carrying out work to strengthen the roof. To reduce the impact of the spacer load on the Mauerlat and gain high strength of the roof, the rafter legs are fastened with additional beams.
- installation of wooden sheathing. It is necessary to create a continuous roof covering.
When the wooden frame is completely ready, further work begins. Their list includes installation of insulation, vapor barrier, installation of waterproofing layers and laying of the top covering. In this capacity, tiles or profile sheets are often used.
In addition to the above work, you must remember to carry out ventilation, install the cornice, internal valleys, pipes, and drainage trays. In addition, drip edges and a lining layer along the edges of the roof must be installed to protect against moisture penetration.
Raising the roof
After completing the preparatory procedures, you can proceed directly to raising the roof. In this case, it is most convenient to use a hydraulic jack, designed for a maximum load of 12 tons, as a lifting mechanism. Note that sometimes two jacks are used to raise the roof, but this method is not at all safe, as it can lead to loss of stability of the structure.
In addition to the jack, you will need the following consumables and tools for work:
- hammer and nail puller;
- mounting screws;
- metal fittings;
- channel blanks used for arranging fixing crossbars;
- metal mounting strips.
To further strengthen the support zones (at the location of the support legs and the jack), it is advisable to prepare special substrates made from several channel scraps welded together.
Lifting is carried out by sequentially moving each of the roof corners in the vertical plane to a height of no more than 5 cm.
Moving in turn from one corner to another, it is necessary to ensure a uniform rise of the entire structure by about 25 cm. And only after reaching this mark can the next safety cross member be welded to the supports, fixing the position of the base of the roof.
By sequentially moving along each of the 4 supports, after a certain time (usually it takes 2-3 days) you will be able to achieve the required height of lifting the base. Note that as the roof is raised, the jack's support point will also need to rise.
To obtain a full-fledged attic “superstructure,” the roof will need to be raised to a height of about 3 m.
To carry out a full range of preparatory, lifting and superstructure work, you may need 10-12 days.
Stages of work execution
Mauerlat installation
The roof of a country house begins with a mauerlat. It is best to attach a wooden frame made of timber to special studs, which are embedded into the wall in its upper part in two ways:
- Through pouring a concrete armored belt. In this case, the studs are simply filled with solution.
- Through fixing the studs in the last rows of masonry.
Installation of rafters
The rafter legs are mounted on the country house in the shape of a triangle. One edge (upper) rests on a parallel rafter or on a transverse ridge beam, and the second lower edge of the rafter rests on the mauerlat through an internal cut. At the same time, it is highly not recommended to form cutouts on the Mauerlat, since this will greatly weaken the overall structure of the house later.
In our case, we will join two rafters at the corners to each other without using a ridge. In order for all the rafter legs to be the same length and fit exactly together in the upper and lower parts, it is necessary to make a pattern (rafter sample) and then use it to form the inner lower cutout and the straight upper one. In order to make an internal cutout, step 50 cm away from the edge of the rafter (towards the roof overhangs) and apply a square block with a cross-section of approximately 8x8cm. Using it, the corner of the rafter is removed to rest it on the Mauerlat.
Now we lift the beam onto the roof of the dacha, rest it against the Mauerlat with one edge and install it at the desired angle. A vertical mark must be placed on the beam strictly in the vertical center relative to the frame of the house. This will be the angle of the triangular cut for joining the two rafters later. Using this pattern we cut out all the legs of the structure. We install the finished rafters in increments of 60 cm. In general, the width of the rafters depends on the final roofing covering. The heavier it is, the smaller the step should be. We fix all the elements to the Mauerlat and to each other with special angles, brackets and bolts.
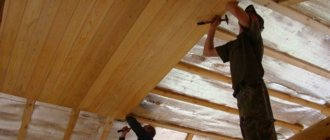
Installation of sheathing
As soon as the skeleton of the roof of the country house is ready, the lathing is done. You can use an unedged board of any section for it. Before attaching the sheathing boards, you can lay a vapor barrier material, and sew the boards on top of it. The spacing of the sheathing boards depends on whether you will insulate your roof. If yes, then the step can be made 30-50 cm. If not, then the sheathing is placed in steps of 60-70 cm.
Important: if roofing felt is laid on the roof as a finishing coating, then the sheathing should be continuous with a maximum pitch of 5-7 cm. This will not allow the material to sag over time
The last thing to do is to close the roof gables. They can be made from the same material as the frame of the house, or covered with wood and then painted. Now you know how to build a roof with two slopes and you are sure of one thing: “I’ll build the roof myself.”
Two ways to install a log roof
So, the roof on a log frame must have a movable rafter system. But how to do it? There are two ways.
The first is to make a roof on the males. This is a traditional but complex technology that is hundreds of years old.
The second is the installation of a standard layered rafter system, but using special fasteners that allow the frame elements to move relative to each other.
Both options deserve attention, so we will tell you more about them.
How to make a roof on a log house on males
In wood house construction, males are the logs that form the gables of houses. They are a continuation of the wall and differ from the floor logs in only one way - length. Consequently, the roof of a log house on males is a roof that rests on the gables, and not on the mauerlat or the upper crown of the side wall of the house.
Here's how to make such a roof on a log house:
- In the center of the crown of the end wall, a board is nailed strictly vertically, the length of which is equal to the planned height of the roof.
- Ropes are pulled from the edge of the board to the crowns of the side walls to form an even triangle.
- The male logs are cut and laid along the rope. The same is repeated with the second pediment.
- A log is placed in the center of the upper male, which is called a ridge or prince's sledge. In windy areas, for greater reliability, the prince's leg can be covered by another male.
- A rope is pulled between the prince's bed and the side crowns of the log house.
- The rest of the logs are installed along the rope, cutting into the edges of the male logs after 1-2 rows. In this case, the beds should be at a distance of 1-1.5 m from each other.
- The correct installation is slightly checked with a flat calibrated board, which is placed perpendicular to the logs. It should lie tightly on all the beds. In places where the board does not fit tightly, the unevenness becomes crowded.
- Rafters are installed across the beam, and the cuttings in them should be 30-50 mm larger than the diameter of the log.
- The lower edge of the rafter leg is cut so that it fits tightly onto the upper crown of the side wall of the house. In this case, each board is tied to the crown with wire.
- If the rafters in the ridge are mounted with an overlap, they are cut along the contour of each other so that there are no protruding parts. If end-to-end, the boards are cut along a line perpendicular to the ridge, leaving a distance between the rafters, which depends on the type of wood and the diameter of the log. When shrinking, the rafters will converge and only a small gap will remain between them.
- Opposite rafters are fastened to each other with wire.
- Waterproofing, counter battens, sheathing and roofing are attached to the rafters. The roof of a log house can be insulated only after intensive shrinkage has been completed.
A male gable roof on a log house will shrink with it without the risk of deformation. But the wire that connects the rafters to the beams and crowns will need to be tightened periodically.
Rafter system with movable joints
The roof on males is traditional, but difficult to install. If you want to make a gable roof on a log house with your own hands, choose modern rafter systems with movable fasteners.
Such roofs are made in almost the same way as conventional roofs. But there are differences:
- the upper crown of the side wall acts as a mauerlat;
- the ridge log most often rests on the male gables anyway;
- the rafters are cut into a wide bowl and attached to the crowns using sliding fasteners - “sleds”;
- ● in the ridge, the rafters are always overlapped using a hinge joint - bolted or plate-bolted.
Such roofs are only layered. Hanging rafters are not suitable for log roofs, since they require tightening, and this is a rigid connection.
Which jack to choose to lift a house
When choosing a jack, first of all you need to pay attention to such a parameter as its power or lifting force. To calculate the required value of this value, calculate the mass of the house and then divide it by 4
However, when lifting a small building, it is advisable to choose jacks with a lifting force equal to half the mass. The fact is that when lifting large houses, up to ten installation points for the lift are created, and when lifting small ones - only 4.
To lift a house, it is better to place as many supports as possible. Source oldhousecrazy.com
Before you lift a house with a jack, you need to decide on the type of mechanism. For houses located low above the ground, rolling and inflatable devices are well suited. Before installation, a board 50-100 mm thick is placed under them. If the distance from the lower crown to the ground is 30-40 cm, then it is better to use bottle or scissor hydraulic jacks.
The process of raising the ceiling of a brick house
So, having decided to increase the ceiling height of your home, you need to be prepared for any unforeseen situations. Firstly, the work is organized in the summer, when the weather outside is dry and windless. Secondly, it is advisable to remove all furniture and other attributes from the living space. It is better if the house is completely empty.
When everything is ready, you can begin lifting work:
- In order not to compromise the integrity of the roof, its base must be reinforced with a frame. The ideal option is a frame welded from a metal channel, fixed along the perimeter of the ceiling to the beams.
- Plaster from the ceiling or any other coating is removed, because you need to get to the beams. The jacks are placed in one row, starting from any angle under each beam. A substrate is placed under the bottom of the jack, a support from a channel or timber is installed, and a metal frame will play the role of a substrate on top.
- When all the jacks with supports are installed, they begin to lift the beams one by one. The jack furthest from the corner is squeezed out first, then they move on. When each beam is raised by a maximum of 5 cm, underlays are placed under them.
- Next, take out the first jack from the corner, transfer it along with the support to the next unraised beam and squeeze it to the same height. Now the procedure is repeated with the second jack from the corner and so on. The process of rearranging the jacks continues along the length of the building until all the beams on one wall are raised by 5 cm.
- A similar procedure is repeated with beams on the opposite wall of the building. Each side of the ceiling must be raised in turn by 5 cm, placing substrates under the beams. You cannot immediately raise the ceiling high, otherwise the roof may move sideways due to severe distortion.
- When all the ceiling beams are raised by 5 cm, one difficult problem will have to be solved. The fact is that the outer beams are hidden in the wall, and you won’t be able to get to them with a jack. Here you will need the help of several people. At the corners of the house, the walled-up beams are pressed manually with a long lever made of a metal pipe.
- When the ceiling is raised to the required height, begin building up the walls. At this time, it is important to pay attention to window openings. In a house with a low ceiling, the windows are similarly installed close to the ground. For aesthetics, it is advisable to raise them too. To do this, you will have to dismantle part of the brickwork above the window, raise the lintel, and fill the bottom of the opening a little with brick.
- An armored belt is made from rods and concrete on top of the raised walls. It will distribute the load from the roof over all walls of the building. The Mauerlat is attached to the armored belt, and the roof rafter frame is fixed directly to it.
When the mortar in the brickwork has hardened, you can begin waterproofing, insulation and other finishing work.
In the video you can see the process of raising the roof:
The easiest way to raise an old garage roof
Surprisingly, it turns out that raising an old roof is a much more profitable undertaking than dismantling the entire ceiling, laying new beams and sheathing and redoing the roofing.
There are several ways to raise the roof structure:
- Using a powerful truck crane, tying the floor structure with transverse beams and crossbars. The method is very reliable, but too expensive. A crane can lift the roof, but it won't wait for additional rows of brick to be laid on the walls. You can temporarily lay the removed structure in a prepared place away from the garage box, and after laying out the walls to the required level, return it to a new location;
- In the second case, the roof is lifted only by laying it on quick-dismountable steel supports prepared and installed from inside the garage. The structure is lowered onto the racks by crane, and then the space between the walls and slabs is filled with brickwork as efficiently and quickly as possible;
- The third method is the slowest and relatively inexpensive. The ceiling is connected by a frame of steel beams laid around the perimeter of the slab. Using at least six 5-ton jacks, the floor is sequentially raised millimeter by millimeter to the planned height.
For your information! Using these methods, you can raise any roof if they are assembled from reinforced concrete hollow slabs, and their condition allows the floors to be loaded with jacks or slings.
For example, it is quite easy to lift the roof of a steel garage along with the walls. The weight of the structure is small, therefore, in the absence of traces of rust and corrosion of the metal, it is quite possible to raise the structure by a meter or more using ordinary hydraulic jacks.
For roofs made on steel I-beams, it is enough to make a steel frame with diagonal crossbars, and you can freely lift them with jacks. The weight of the roof is much less than a slab structure, while the transverse rigidity of the floor is very high; it is only necessary to correctly determine the installation points of the jacks.
Raising the ceiling in a wooden house
To raise the ceiling of a wooden house, it is not necessary to move the entire roof. There are two tricks that can be used to solve this problem.
Actual ceiling lift
The actual raising of the ceiling involves dismantling part of the structure, but the roof itself remains intact. Wooden houses have a certain distance between the arch of logs and the ceiling. Alternatively, you can use the large attic space. Due to these voids, an enlarged ceiling is obtained.
You can do similar work with your own hands in any weather:
- Work begins with dismantling the old ceiling. Remove all finishing coating and the sheathing to which it was attached. It is important not to touch the supporting beams during dismantling, otherwise the integrity of the house will suffer. All thermal insulation will also have to be removed, after which you can estimate the size of the free space from the old ceiling to the roof vaults. Typically, in small private houses, this method can raise the ceiling by 80 cm.
- When only the load-bearing beams remain from the old ceiling, they begin to manufacture a new structure. For a new ceiling, new elements made of wooden beams are attached above the old beams or a metal frame is welded. Next comes the sheathing with insulation and finishing material. The old beams that remain visible can be decorated.
Upon completion of the finishing work, the ceiling becomes actually higher.
Installation of roofing material
Flexible bitumen shingles
To make it easier to overlap and distribute the tiles evenly, the process should start from the middle of the eaves. Remove the protective film from the shingles and glue it to the base.
Then they are nailed along the edges. The best option is galvanized nails with fairly wide heads. The joints of the shingles should be covered with tabs.
If the design assumes the presence of pipes, then special passage elements are attached along the perimeter of the shingle cutout. The tiles should be glued overlapping where the ridge is.
If you have a brick chimney that gets hot, it would be better to place a triangular shaped block at the corner of the chimney and the roof. At a distance of approximately 20 cm from the pipe, a lining carpet is laid, and a special connector is put on the pipe. The cracks should be sealed with sealant.
Metal tiles
A loose sheathing should be laid under the metal tiles. The amount of material can be calculated by adding the length of the slope from the ridge to the eaves, the vertical overlap of the sheets and the eaves overhang.
The first of the sheets is laid and aligned along the end and cornice, the second should be laid on top, and the third on the side. Above the second sheet is the fourth.
The entire resulting structure must be leveled and attached to the sheathing using self-tapping screws. In accordance with this diagram, the entire roof is assembled.
It is also recommended to install snow guards. They are mounted directly on the roofing using self-tapping screws (parallel to the eaves). There are several options: tubular, plank, mesh.
Start covering the metal tiles from the bottom, in the top direction, from left to right. The tiles are pre-laid out into small (5 pieces) stacks. They are placed on the slopes.
In this case, the load exerted on the rafters is distributed evenly. The tiles are attached to the rafters using galvanized screws. Each of the sheets has special holes, with the help of which you need to attach the sheets to each other.
Tips for building a second floor
It is necessary to follow the recommendations from professionals in order to know how to build a 2nd floor without errors. Builders advise the following:
- before starting construction, take care of the stairs in order to leave room for them in advance;
- You cannot use too heavy material for the construction of walls and partitions, otherwise there will be a large load on the first floor;
- you can prepare thick ropes that will help lift equipment and material without a crane;
- Before work, the foundation should be strengthened so that the structure does not collapse.
In the video about strengthening the foundation
If all these requirements are met, it is possible to build a large and spacious second floor without adverse consequences for the first. All work is easy to do yourself.
Fix the roof at the required height
When the beam is raised to the required height, a support must be erected under it. Even if you use clay when laying openings, it is better to use mortar to build supports, since it dries faster and acquires the necessary strength. The support will have to be erected at the moment when the beam rests on the raised jack; after the jack is loosened, the load will immediately fall on the support - the freshly laid clay at this moment will most likely cause subsidence.
Particularly difficult will be the sections of the wall where the beams lie above the window openings. You will probably want to increase the height of the windows, which will require raising the lintels and filling in the voids while the beams are resting on the jacks.
Options for arranging the second floor in a private house or country house
Let's consider several options for planning an additionally constructed room. The room can be equipped as a bedroom, living room, or combine these two areas.
Cozy bedroom under the roof of the houseSource kaksdelat.guru
Bedroom, living room and office in one roomSource kaksdelat.guru
Layout of two rooms on the second floorSource kaksdelat.guru
Recreation areaSource kaksdelat.guru
Spacious living room for the whole familySource kaksdelat.guru
About the frame second floor in the video
Briefly about the main thing
To know how to make a second floor in a private house under a roof, you need to familiarize yourself with all the rules and installation technologies. It is worth calculating the materials in advance and assessing the risks with the help of specialists. If the building is not able to withstand heavy loads, then its frame and foundation should be well strengthened before carrying out major work.
The process itself is not difficult to carry out independently without the help of a team; it is enough to follow the plan and step-by-step instructions. The last stage is the arrangement of the room depending on its purpose. By following the rules, you can build a durable and beautiful second floor, which will become not only additional living space, but also a decoration of the house.
Types of roofs for log houses
Flat, pitched, hip, hipped - over thousands of years, humanity has come up with dozens of types of roofs. But you will have to forget about all this diversity when building a solid log house - not every roof is suitable for a log house.
Moving connections of the rafter system on roofs of complex shapes is a non-trivial engineering task. It can be solved, but here two questions arise in full force: the cost of designing and installing such a roof, as well as finding performers for these tasks. Both factors make a complex roof with movable fastenings of the rafter system unreasonably expensive for ordinary private houses.
Therefore, in the vast majority of cases, the log house is covered with a simple gable roof, and much less often with a single-pitch roof. Moreover, a pitched roof is used mainly for small buildings: bathhouses, barns, outbuildings.
It’s another matter if only the first floor is made of logs, and the second floor is framed. In this case, any roof can be made - it will be rigidly connected to the frame of the second floor, which will lie on the crowns of the log house, like a float on the water. Then there is no risk of roof shrinkage. But such a hybrid house is more likely not a log house, but a variation on a theme.
Instead of an afterword. How to make a roof reliable? Choose quality and professionalism!
The roof is an important element of the structure of the house. Errors in its construction will very quickly lead to a deterioration in the quality of the entire structure and its early destruction. Therefore, constructing a roof with your own hands should be treated with special care.
Have you decided to build a roof yourself without resorting to the help of professionals? In this case, we recommend building only the simplest options, such as a pitched roof. For the construction of roofs of complex geometric shapes, especially if mansard roofs are needed, it is better to resort to the services of specialists.
We are sure that our article about the step-by-step construction of a house roof will help you in life.
As for the choice of roofing materials, you should always focus on their quality. Remember, high prices are usually recouped by avoiding frequent roof repairs.
Some tips
Try to organize the entire process efficiently so that it takes as little time as possible. While the roof is on temporary supports, it is a rather shaky structure - a gust of strong wind can ruin the result of your work.
Once the interior masonry has been laid and the roof is firmly in place, the outer masonry can be raised.
Since lifting and repairing a roof is a rather labor-intensive task, you should immediately think about updating the roof so that this issue no longer bothers you.
Why do you need to raise the roof?
Raising the roof can occur for the following reasons:
The need to increase the ceiling height. To increase the ceiling, in most cases it is enough to raise the roof by only 1 meter. Before increasing the height of the ceiling, it is necessary to prepare all the necessary materials in order to complete the walls after raising the roof. The desire to complete the 2nd floor. In this case, the elevation occurs to the height of one floor, and the walls are built of brick
When choosing this option, it is important to properly strengthen the foundation of the house, calculating the increase in load on the structure. If this is not done, the structure may begin to deform after construction.
At best, the house will shrink.
Before raising the structure, you need to carefully prepare a drawing so that the structure is reliable and does not deform after removing the temporary supports. Its lifting must be carried out very carefully, since careless actions can lead to the destruction of the structure.
The increased ceiling of a one-story house helps create more comfortable conditions in the premises.
So, let's begin
As part of the first stage of work, it is necessary to adjust the jacks to the ceiling beams. The beams may be initially visible or sewn up from below; in this case, you need to calculate their position (it corresponds to the location of the roof’s load-bearing frame) and mark it on the walls from the inside in order to know in which places to install the jacks. There will be a lot of dust during the process, so the furniture should be covered or removed from the room.
We start from the corner. We install the jack on the distribution gasket strictly under the beam and slightly wedge the channel between the beam and the jack, extending the jack rod. The jack should still have 5-10 centimeters of travel left for the upcoming lift. Next, you need to make sure that the channel is located vertically in all planes. If necessary, you can loosen the jack, adjust the channel and lightly wedge it again.
If you do not plan to sew up the beams in the future, place cushioning material between the channel and the beam to prevent damage to the beam. Now you can try to carefully lift the beam. Monitor the relative position of the jack and the channel. If you see that a break is occurring at the point of their contact, loosen the jack and slightly move it to the inside of the break. Do not ignore this break - under increasing load during lifting, the channel can jump out of the connection, which can lead to injury. If there is no break, extend the jack rod no more than 5 centimeters and secure this position by placing a spacer between the beam and the wall. Do not loosen the jack.
Repeat the same operation with all jacks on one side of the house.
The more jacks you have, the better - you'll save time on reinstalling them.
When all the jacks are raised by 5 centimeters, you can start again from the first to the penultimate one, raising them another 5 centimeters and increasing the thickness of the spacers between the beam and the wall. It’s not worth raising it any higher yet: if there is a large distortion, the roof may “move out” during the process of raising the opposite side.
Next, we weaken and rearrange all the jacks under the next beams, except for the last one, raised by 5 centimeters. We repeat the whole process from the beginning. When all the beams on one side are raised by 10 centimeters and spacers are placed under them, we move to the other side of the house and raise them in the same way. From this side you can raise it by 15–20 centimeters, and we also do all further lifts to the required height. In this way, the slight displacement that occurs when the roof is skewing will be compensated.
Some important tips for carrying out work
Raising a ceiling with a roof is a very serious matter. In order not to ruin your house with inept actions, you need to carefully calculate everything, call helpers and not rush into it. But there is no point in delaying this matter. The roof raised on jacks is very shaky. An accidental gust of wind can cause irreparable damage to the structure.
Raising the walls begins with the internal masonry, provided that they are double, for example, made of adobe and brick. When all the rows of adobe have been laid out, begin the facing brickwork.
Raising the roof in any case will have a bad effect on the roofing. Fragile materials, such as asbestos-cement slate or tiles, will be especially hard hit. It is advisable to replace the roof covering after such a procedure.
Tools and materials used to raise the roof of a brick house
If you wish, you can raise the roof of a small country house with your own hands to the desired height, without having to disassemble it. For work you will need to prepare the following materials and tools:
- The main mechanism that will raise the roof is jacks. You will need at least three of them, and it is better if there are four of them. Advice! For lifting work, it is better to give preference to oil jacks designed for a load capacity of five tons or more.
- Wooden poles are prepared according to the number of jacks. The wood must be strong in compression, such as oak or beech. Instead of wooden poles, you can take a metal channel or pipes.
- Under the jacks you will need wide, strong pads made of sheet steel or oak boards with a thickness of at least 50 mm. The pads will prevent the jacks from pressing into the floor when the ceiling is raised.
- As each beam rises, temporary supports must be placed under them. For these purposes, pieces of wooden beams or bricks will be used. The number of supports should be enough for all the beams, so it is better to prepare with a reserve.
- After raising the entire roof along with the ceiling, the walls will have to be built to the same height. At this point, the appropriate materials (brick, adobe, etc.), as well as the mortar, must be ready. Their number is calculated in advance based on the height of the added rows.
If a new roof is planned for the house, it is advisable to dismantle the old covering before raising the roof. This will reduce the pressure on the jacks, and, consequently, on the floor itself.
Important! Raising the ceiling of a house along with the roof using jacks does not cause damage to the supporting structures. The rafter system and walls remain intact.
Preparatory work
Before you begin raising the roof, you need to strengthen the base of the roof. For this, it is best to use a metal frame made from channel grade 14U. In this case, cable stays are made from reinforcing bars, the diameter of which is 14 mm.
The support legs are used as guide rails, they provide easier lifting without moving to the sides.
The channel is fastened to the lower beam using screws 10 cm long and 10 mm in diameter. Longitudinal channels located in the center are attached to the beam directly, while metal ears are welded to the perimeter channels. It is through them that the channel will be attached to the beam using screws in the future. In total, you will need about 70 screws, if they have a diameter of at least 8 mm. When lifting, you can use half as many transverse channels, since their strength is enough to hold the roof. In addition, in the future they can be used to produce floors between the first floor and the attic. The estimated weight of the channels, which are used to strengthen the base of the roof of the house, is 2.3 tons.
Installation of support legs
The support legs are used as guide rails, designed to allow easier lifting without moving laterally.
Placement of support legs on the floor plan.
The estimated weight of the support legs is 1.4 tons. It is necessary to use four legs, each of which weighs 350 kg. In this case, each leg consists of four vertical channels of grade 12u. Their height is 2.9 m. They are connected using horizontal channels of grade 8u. Their length is 0.385 and 0.35 meters. In this case, the distance of the supporting leg between the horizontal channels should be 0.25 meters. Spacers of grade 10u are used as inclined channels. Their length is 1.5 meters, and their inclination is no more than 45 degrees. When using materials with the listed dimensions, the supporting legs will obtain the necessary strength. They are designed for wind loads of 73 m/sec. Such legs can withstand a weight of more than 100 tons from top to bottom. But, as a rule, when constructing them, the calculation is made according to the horizontal and wind load. In order not to break the ceiling of the first floor, the supporting legs should be placed in those places where the main internal wall of the house and the partition, the thickness of which is equal to half a standard brick, pass.
Installation of support devices
Supports are necessary to ensure that the roof is raised without moving it to the sides. They can also be installed as temporary supports for the roof of a wooden house before a permanent foundation is installed underneath.
The complete set of supports includes 4 legs. Moreover, each element must withstand a weight of about 1.5 tons. They are created from channels whose height is 3 meters. The connection is made using jumpers about half a meter long. In this case, the jumpers are cut from 8U grade channels.
The metal structures created in this way can support a structure weighing up to 40 tons. To ensure that the floor covering does not begin to collapse during the raising of the roof, supports should be installed only in those places where the structure can withstand heavy loads. If this rule is not followed, the floor under the supports will begin to collapse, resulting in the need for repairs to the roof and the rest of the structure.
Preparatory activities
To arrange the base of the roof, it will be necessary to prepare a special metal frame, assembled from channels and rigidly fixed to the roof support beam.
The list of auxiliary devices and materials used to raise the roof base should include the following items:
- metal channels of grade 14U;
- special cable stays used to securely hold the structure during its lifting;
- the so-called support legs, which play the role of guides, ensuring strict vertical lifting (without noticeable displacements to the sides);
Let us immediately note that cable stays can be made from reinforcing bars with a diameter of about 14 mm. To prepare the metal frame, 14U brand channels are used with metal eyes welded to them, which are necessary for fastening to the roof base.
The channel base is attached to the lower section of the base using ten-millimeter screws with a screw-in length of at least 10 cm. Longitudinal channels passing through the middle of the structure are attached directly to the beam, while previously welded eyes are used to fix the workpieces along the perimeter of the base. When choosing channels used to strengthen the base, you need to ensure that the total weight of the structure does not exceed 2 tons.
Mounting the support leg
Installing support legs will reduce the likelihood of the roof moving to the side. The supporting legs will serve as guides. They are made from 12U channel, 4 pieces are enough. They are connected by horizontal channels 8U. Legs weighing 350 kg each are also used, which are connected horizontally by channels. For an inclined spacer at 45°, a 10U channel should be used. The length of the selected channel will directly depend on the height to which the roof will be raised.
Provided that you use a material with these parameters, the foundation for holding the roof will be truly powerful and stable. Moreover, it will be able to withstand wind loads of up to 73 m/sec and support a weight of up to 100 tons. With all this, there is a small margin of safety. Such supports are mainly located on load-bearing walls, and also on partitions, the thickness of which is half a brick.
Options for design solutions for houses with a pitched roof
Currently, design and construction companies offer different options for using single-pitched roofs or roofs with several slopes located at different levels and in different planes. It is safe to say that in this diversity you can always find a solution that will suit the most demanding customer.
When designing houses of this type, several technical and regulatory aspects should be analyzed. Unlike houses with a gable roof, the wind resistance of the lean-to version is higher. However, if designers propose the continuation of the roof in the form of a canopy over the veranda or over the parking lot, then such a solution requires careful calculations. Additional open roof area dramatically increases windage and can cause destruction
Therefore, it is important to provide additional fastenings in the form of reinforced racks or additional beams
Project of a house with a pitched roof
Houses with one pitched roof are usually of medium size and have a small area
When designing them, you should pay attention to the rational use of usable space. Due to the uneven height of the ceilings, the highest rooms should be reserved for common rooms, living rooms
Rooms with lower ceilings can be allocated for bedrooms and utility rooms.
As an example, let’s look at a project for a country house that fits into the surrounding landscape in an original way. Such a house is a harmonious and practical solution. A single wooden roof over the entire interior space of the home gives it a natural, natural look.
Large roof overhangs do not pose a danger of destruction, since the surrounding trees reliably protect the house from the wind
Practicality when using different heights of rooms is brought almost to the ideal. The staircase, terrace and large windows on the slope side provide additional views, and also leave space for a hallway and utility compartments under the upper part of the roof. Additional reaction supports provide reliability to the roof fastening. Warmth, comfort and a realized dream emanate from such a house.
Project of a log house with a pitched roof
The design of this log house in nature is unpretentious, but very harmonious. An ideal place for family recreation, fishing and hunting. And not only in the summer, since a house made of timber can be heated quickly enough in winter, turning it into a warm, cozy place for spending leisure time. The pitched roof makes it possible to arrange additional camp sleeping places. A terrace and summer area can become a comfortable place for family and friends without any special expenses. A canopy or tent will quickly turn it into a comfortable overnight camp.
A pitched roof successfully crowns an elegant house on the shore of a reservoir, which can be used for living when going fishing or hunting.
Houses made from ordinary logs are traditionally built with a gable roof. However, now there are often cases when the option of a pitched roof is used.
Photo gallery: options for log houses with a pitched roof
Projects of houses with a pitched roof and a garage
A pitched roof, with its inherent disadvantage of incompleteness, is radically transformed in a solution with several slopes at different levels. Separate blocks of the house, a garage or a terrace perfectly balance the appearance, giving it a complete and harmonious look. At the same time, all the practical advantages of a pitched roof are preserved.
- A garage space fits well into this composition. This is especially true when there is a separate passage from the house to it. For dynamic people who value every minute, this advantage is undeniable.
An auxiliary garage roof with an oppositely oriented slope successfully compensates for the height of the main house
If all the buildings on the site have the same roofs, it looks stylish and quite unique
A large pitched roof with a minimal angle of inclination allows for the most efficient use of the space of the second floor
The originality of such a project is achieved due to multidirectional planes of pitched roofs
Country house with a pitched roof
It is convenient to build a country house with a pitched roof on a sloping plot. At the same time, the natural slope can be practically used to reduce costs by fitting part of the living space into the existing topography. Such a “dugout” for utility rooms can be practically useful: cool in summer, warm in winter. A large terrace with glass walls provides an excellent view of the open part of the landscape.
In the part of the house located on a slope, utility rooms are successfully placed, in which a comfortable climate is always created
Replacing bathhouse walls without dismantling the roof
Question:
Hello! I bought a house, and next to it on the plot there is a building made of old dilapidated wooden walls, but with a new roof on a quite good brick strip foundation. I want to build a bathhouse from foam blocks on this foundation, but I don’t want to touch the roof. Is it possible to build walls without dismantling the roof and is it advisable?
Alexander, Saratov.
Answer:
Hello, Alexander from Saratov!
In the vast majority of cases similar to yours, they proceed with the simplest option - they completely dismantle the structure. Putting a new roof on one side and unusable walls on the other.
After which the rubbish is destroyed or removed from the site so that it does not interfere. They bring material for new walls, assemble them, and cover the structure with the previously dismantled roof.
This option, although considered somewhat cumbersome, is the simplest.
Another option is when the roof is left over the building and the walls are dismantled. In order for the roof to remain in place intact, it must be “hung out,” that is, left in a suspended state.
To do this, prepare a sufficiently large number of vertical posts with a height slightly greater than the height of the walls.
Their number depends on the size of the building. For example, for the same bathhouse 3*3 meters there can be 4 of them. And for parameters of 6*6 meters such racks may require 8 or more.
Racks are usually solid pillars or logs, with a cross section of 150*150 mm or Ф150 mm or so. Installed strictly vertically in level on pads on the ground made of boards made of thick edged boards or solid sheets of metal with a thickness of at least 10 mm and an area of approximately 0.5 * 0.5 meters. Place the racks at a very short distance from the walls (about 15-30 cm approximately).
The goal is to prevent the racks from falling into the ground under the weight of the roof and their own weight.
Therefore, safety comes first when carrying out such work. If such a structure falls, it won’t seem like much, it can seriously cripple you.
To prevent the racks from leaning to the sides, they are strengthened together with braces made of edged boards with a cross section of approximately 100 * 50 mm crosswise. On the top of the racks between the oppositely installed ones, jumpers are mounted to support the roof of the building on them. To do this, through holes are made in the upper crown of the bath. Jumpers made of the same timber or logs. With reliable fastening!
After all this is done, they begin to dismantle the old walls. As dismantling proceeds, the roof sits on the lintels.
And then they begin to install new walls.
As the work progresses, you will have to show ingenuity and a certain amount of imagination; all sorts of unforeseen situations may arise.
So, your choice is either the relatively simple option of completely dismantling the roof and walls, followed by constructing walls from new material and assembling the roof.
Or the second option of “hanging” with all the attendant difficulties.
With our work teams, we usually prefer the first.
Good luck!
Construction in Moscow and Moscow region
We work with a guarantee! Wide range of construction services. Foundation, walls, ceilings, roofing, turnkey! +7 (905) 797-20-34
luxurykomfort.ru
Other questions on the topic of walls in various rooms:
- Zavalinka
- Base
- Cover the house with bricks
- Everything is on the walls
Zavalinka
- The blockage of a house on the blind area
- Repairing the rubble of an old house
- Repair of the blockage
- Filling and insulation of the lower crowns of the log house
- Low base made of FBS
- Should the inside of a log house be lined with clapboards?
- Restore a brick wall with mortar
- Selecting columns to support the second floor wall
- How to place a heap correctly
- Make a pile to protect an old house
- Do-it-yourself filling
- Heap for an extension without a foundation
- Heaping on a pile foundation and ventilation
Base
- Lining crowns made of logs with natural stone
- FBS plinth on a monolithic slab
- Mortar is pouring out between the bricks of the basement
- Lay the base with foam blocks price
- How to make windows in a brick basement
- Wooden plinth finishing
- Economical repair of a crumbling base
- The basement under the utility room gets wet
- Leveling the foundation with a brick plinth
- Socle made of sand-lime brick and its finishing
- What is between the foundation and masonry
- How to cover a columnar foundation
- DSP base
- Finishing the base with stone panels
- Waterproofing the walls of a brick house
- Raise the plinth on the slab foundation
- Set up a garage basement on heaving soil
- High brick plinth
- Finishing the base and blind area of a columnar foundation
- Restoration of the foundation plinth
- Brick plinth on a concrete foundation
- Is it necessary to raise a concrete plinth with bricks?
- Make a brick plinth on a strip foundation
- How to preserve basement floor joists
- Noisy plastic canopies on pits
Cover the house with bricks
- Cladding a house with blocks - how to fill the gap
- How to cover an adobe house with bricks
- Finishing the façade from expanded clay concrete blocks
- Documents for house reconstruction
- Steps made of brick and decorative tiles
- Cover the house with expanded clay concrete blocks
- How to cover a brick house with facing bricks
- Foundation for brick cladding
- Foundation for brick lining and insulation
- How to brick an adobe building
- How to veneer block walls with bricks
- How to decorate a house with small windows
- How to decorate a house beautifully
- Repair of the wall of an embankment house lined with bricks
- Cover a house made of sleepers without a foundation with bricks
- How to close vents when laying bricks
- Construction and strengthening of a half-brick pediment
- Crack in the brick lining of a house
- Cover the panel room with bricks or blocks
- How to cover an old house?
- Buying an oak house lined with brick
- The wall burst while covering the house with bricks
- Insulation of a log house when facing with bricks
- How to cover a wooden house with bricks
- How to cover a log house on screw piles with bricks
- How to cover an adobe house with bricks
- How to cover an old wooden house to make it stand
- Cover a gas silicate house with bricks
- How to cover a house with blocks
- How to cover wooden walls with bricks on both sides
- How to brick a house
- The beam crushed the facade of a brick-lined house
- Velo house lined with bricks
Construction in Moscow and Moscow region
We work with a guarantee! Wide range of construction services. Foundation, walls, ceilings, roofing, turnkey! +7 (905) 797-20-34
luxurykomfort.ru
Questions about the walls
- How to protect a wooden house during construction
- Breathable Pie Frame Wall
- How to determine the material of the walls of a house
- Drywall adhesive for clay plaster
- Insulating the walls of a frame bath
- Wall decoration from sleepers
- Restoration of foam concrete walls after a fire
- Insulation of brick walls from the inside
- Restoration of varnished lining
- Treatment of external walls made of aerated concrete
- Part of the wall of a frame house sank
- Frame partition in a house made of timber
- Led walls made of timber
- Log partitions in a panel house
- Cladding a fentilated timber house façade
- Wall made of foam block in two rows with insulation
- Replacing bathhouse walls without dismantling the roof
- How to update the external walls of a brick house
- Cracks in the walls of a cinder concrete house
- Cladding of timber walls with clapboard from the inside
- The house is 50 years old - reconstruct or demolish
- Cracked corner of a house made of aerated concrete blocks
- Cracks in the corners of an old combined house
- Partition wall reinforcement
- Strengthening a doorway in a cinder wall
- The slate wall bulged
- Monolithic house on different levels
- Quality of wall panels
- Building a new house around an old one
- Replacing a section of a wall made of timber with aerated concrete
- Blind area and crack on the wall of a brick house
- Armobelt for a house made of wood concrete
- Lining a timber house from the inside with clapboard
- Strengthening a prefabricated panel house
- Finishing a bathroom (floors, walls, ceiling) in a wooden house
- Reworking the project of a house made of aerated concrete into timber
- Leveling a panel house on heaving soils
- Facade plaster is peeling off
- The brick vestibule extends away from the house
- The corner of a panel wooden house diverges
- Build a house around an old cinder block
- Repair of a pre-revolutionary brick house
- Summer kitchen and bathhouse made of 125 mm thick gas block
- Finishing the façade from expanded clay concrete blocks
- Interior partition made of timber
- Repairing a burnt wall
- Reconstruction of an old brick house
- The walls of a slag-cast house are cracking
- Finishing the log floor on both sides
- Protecting facing bricks from sparrows
- How to soundproof the fifth wall (log) in a house
- Major repairs of a slag house
- Internal lining with clapboard or imitation timber
- Wooden pallet house
- The geometry of the house is broken
- Expanded clay concrete blocks in the open air
- The plastic covering near the electric stove is burning
- The wall gets wet from the corner
- House made of foam block with ceilings made of sip panels
- Insulating a wall from PVC panels from a gas stove
- How to move the fifth wall in the house
- Repair of timber walls
- Renovation of an old tourist house
- Tiles with a pattern near the gas stove
- Aligning the walls of the house vertically
- How to tie a log wall to a cinder block wall
- How to clad a garden house
- How to determine the material of the walls of a house
- Finishing a foam block wall with plasterboard
- Joining a log house and a wall made of aerated blocks
- How to connect the walls of a house and an extension
- Attaching nets to wooden frames
- Painting MDF panels
- Reconstruction of the walls of an old house
- Strengthening the old panel house
- Tiles on a timber wall
- Renovation of an old stone house
- Expanded clay blocks or gas blocks
- What to build a house from
- Cut an arch in the wall of a frame house
- Waterproofing walls from the ground in an adobe house
- Clay hut on the facade of a timber house
- Damp walls in a twin block house
- Joining sand block and cinder block walls
- Finishing a log house, a year after installation
- Inserting a load-bearing wall into a log house
- Construction of a building - brick or wood
- Exterior decor of a timber house
- Should I build from an old log?
- The bathhouse leaned due to a poor foundation
- Connection of block walls to the log house
- Seismic resistance of a private house
- Restoring a cinder block house after a fire
- Walls made of metal profiles for a country house
- Lining a log house from the inside
- Temporary house 6 by 6 m
- Methods for installing wooden lining
- Facing bricks are crumbling
- Load on edged board
- Questions about frame construction
- Strengthening the frame after the grief of the builders
- Repair of the lower crowns of a half-beam house
- Internal walls made of foam blocks in a SIP house
- Finishing the wall behind the gas stove
- Repair of cinder block walls of a house
- The gables are leaning, what should I do?
- Sheathing a log house with planks on the outside
- Finishing timber walls with imitation timber
- Cover the metal pillars of the canopy with ceramic tiles
- Problem with cinder block walls
- Combined house made of blocks and logs
- Red brick crumbles in the wall
- Decorating the interior walls of an old log house
- How to plaster timber from the street
- Laying tiles on DSP in the bathroom
- How to cover the walls in an old summer house
- Painting wall panels
- Support pillars for the foundation
- Interior decoration of the walls of a country house
- Protection of lining indoors
- Facade cladding with metal profiles
- House made of foam block with ceilings made of sip panels
- Should you buy a house with a crack in the wall?
- Cover a hewn log wall with plasterboard
- Foil-coated isolon for lining sheathing
- How to sheathe the inside of a frame house
- Installation and installation of an interior wall made of clay
- Armobelt for brick walls under slabs
- How to find out what a house wall is made of
- Frame house pie
- How to attach imitation timber to external walls
- How to putty polystyrene with bark beetle
- How to attach lining to corrugated sheets
- Gaps between gable boards
- Bulk walls are diverging
- Wall of a timber house
- The timber wall vibrates
- Repair of brick walls
- What material to choose for the facade of a timber house
- Finishing the timber from the inside
- Base for ceramic tiles in a timber house
- Lathing for imitation timber inside the house
- Internal insulation and cladding of a country house made of timber
- How to cover a brick plastered wall with clapboard
- Repair of plasterboard walls
- A log was pushed into the room above the doorway
- How to lay tiles on plywood
- Preservation of the construction of a block house for the winter
- Gas block or wood for building a house
- Repairing void corners of an old house
- Protecting eurolining for the winter
- Interior walls in a log house
- Fiberglass rods to strengthen masonry blocks
- Metal profile over OSB
- Converting panel walls to timber walls in a house
- Level the wall of a log house
- False walls in an adobe house
- Level the walls of a house from sleepers
- Tire Shed or Earthships Home
- Crack in a brick wall of a house
- Do-it-yourself clay pot
- How to attach timber to a concrete floor (for a wall)
- Sheathe the inside walls of a house made of sleepers with plasterboard
- House facade renovation
- Waterproofing between foundation and wall
- Plastering adobe walls
- What is the best way to cover the walls and floor of a garden house?
- Finishing interior walls with imitation timber
- Restoring old brick in arches
- Application of liquid wallpaper on adobe walls
- Strengthening an old brick garden house
- Attaching drywall to the timber wall of a house
- Cladding a timber house outside and inside
- How and with what to plaster a timber house
- Screed adobe walls
- The walls in the house are damp
- Tongue-and-groove slabs as walls in a log house
- What is the best way to cover the walls of the steam room?
- Leveling walls using old oil paint
- Finishing the external walls of an adobe house
- Repair of old walls for wallpapering
- How to line a wall in the kitchen
- Walls made of kalyb stone
- Replacing log walls with stone
- Repairing stone walls of a house
- Strengthening the foundation and walls of an old house
- Repairing the walls of an adobe house
- Reworking backfill walls
- Cladding the walls of a wooden house with plasterboard
- Remove echo and insulate gypsum plasterboard walls
- Timber floors in block walls
- Lathing for lining on log walls
- Make a window in the wall from timber
- How to make and insulate bath walls
- Wall cladding with larch boards
- Terracing and retaining walls made of natural stone
- Insulation of a brick wall
- Cracks in walls and gables
- Crack in the wall of a brick house
- Installing siding in November - snow, rain. Installation and insulation of floors and walls.
- How to tighten the wall of a wooden house?
- Decorating kitchen walls with MDF panels
- The brick of the false foundation wall is crumbling
- Walls made of kalyb stone
- Tire walls
Construction in Moscow and Moscow region
We work with a guarantee! Wide range of construction services. Foundation, walls, ceilings, roofing, turnkey! +7 (905) 797-20-34
luxurykomfort.ru
Walls
All questions to Semenych about construction
Semenych (author of materials)
Our site is regularly updated with interesting and unique materials and articles on the topics of lumber, building materials and works, the author's opinion and knowledge of a real coven with more than 15 years of experience are provided. There is a section - funny stories of shabashniks. If you would like to receive information about this, subscribe to our website's newsletter. We guarantee that your address will not be shared with third parties.
Apartment renovation in Moscow and Moscow region
We work with a guarantee!
Wide range of repair work. Professional craftsmen.
+7 (905) 797-20-34
luxurycomfort.ru
| Country house | Bath |
| For the dacha | Tool |
| Materials | Tales |
| Foundation | Log houses |
| Roofs | Insulation |
| Walls | Siding |
| Floors | Cellars |
| Attics | Doors windows |
| Stairs | Extensions |
| Wells | Toilets |
| Balconies | Loggias |
| Condensate | Flooding |
| Fences | Kennels |
| Sidewalk | Birdhouse |
| Adobe | Carts |
| Garages | Barn |
| Greenhouses | Bath |
| Swing | Brazier |
| Shower | Horizontal bar |
Arrangement of under-roof space
After the roof is raised and the walls are built, you can also begin installing windows in the resulting room.
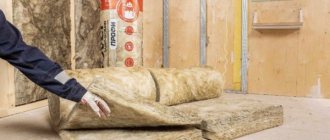
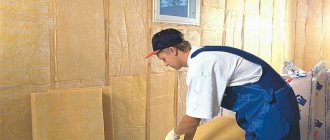
After the brick walls are completely laid out, it is necessary to begin insulating the under-roof space, ensuring protection against water penetration from the outside. The attic space needs better insulation. This is due to the fact that it has a larger area of contact with the environment.
Most often, mineral wool is used for these purposes, which is a fibrous material with excellent insulating qualities, which makes it possible to create a denser layer. In order for this insulation to remain dry throughout, it must be protected from direct ingress of water not only from the inside of the house, but also from the street. This is achieved through the use of special membrane films. The highest demands are placed on the quality of insulation of the under-roof space, which is used as a living room. This is especially true in cases where the new room is planned to be used all year round. The attic structure of the roof of the house consists of a multi-layer structure, which includes:
- Interior decoration.
- Vapor barrier layer.
- A layer of mineral wool or other insulation.
- Waterproofing layer.
- Roofing covering.
As a rule, proper insulation of the attic space depends not only on the correct insulation, but also on the insulation of the outer walls of the house and the floor. We also must not forget about the design of the ventilation system of the attic roof. It will save the room from the appearance of dampness, mildew and mold.
In this case, it is important to observe one condition, which is to ensure a large gap, which should be located between the insulating layer and the roof. In this case, the thickness of the air gap should be no more than 5 cm, but not less than 2.5 cm, depending on what type of roofing material is used to cover the roof
https://youtube.com/watch?v=Ne0TfTVtisA
Another stage - installation of windows
Once the roof is raised and the walls are built, you can think about installing a window in the resulting room. There are several types of window installation:
- sheer;
- inclined.
The first option is especially difficult, because it is accompanied by the installation of an individual rafter system for any window. And so another option is often used. Also, installing inclined windows does not interfere with light entering the room, which will make it possible to get rid of the lighting problem. To provide a particularly comfortable climate in the attic roof, it is required that windows occupy at least 12% of the entire wall surface. Raising the roof of a house requires significant financial expenses and a professional approach. And therefore, it is extremely important to study as thoroughly as possible the theoretical issues of roof raising know-how. It would be a good idea to consult with professionals before creating a project for a new building.
Fastening and strengthening the frame
The assembled frame must be attached to the building box so that the entire structure is not blown away by gusty winds. For fixation, 4 mm wire is quite suitable, pieces of which are wrapped near the rafter leg at its support point. The free ends of the wire are attached to anchors installed in advance in the wall. In the case of wooden houses, it is quite possible to use staples - they will be quite enough to securely hold the roof in place.
To increase the strength of the frame, you need to reduce the span of the rafters using struts and racks. The struts are usually installed at an angle of 45 or 60 degrees relative to the horizontal. The walls located underneath them or special elements located in the space between the walls are used as supports for the racks.
The structure can also be strengthened by tightening, which reduces the bursting load. This is especially true when using a hanging rafter system. To assemble the frame, two ties are usually used, mounted using self-tapping screws on both sides relative to the rafter legs.