- April 2, 2020
- Floor
- Daisy Angel
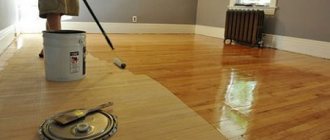
Wooden floors are reliable and durable. But due to their ability to absorb moisture, they are subject to detrimental effects. At elevated temperatures and humidity, the material begins to swell and shrink in winter. All this causes cracks to form between the floorboards. The boards rot over time.
The pressure of furniture causes scratches and dents on the floor, paint peels off, and chemicals that were accidentally spilled on the floor leave a mark. Therefore, every owner of a house where there is such a finish sooner or later faces the question of how to repair a wooden floor. In this matter, it is important to know how to select materials, where to start work, how to carry out the restoration process itself and how to finish it.
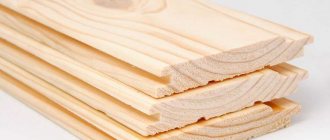
How to choose replacement boards
If you are planning to renovate your floor, you must choose the right boards. In the case of a subfloor, you must know what requirements apply to it. Since this layer of the cake is hidden from view, the boards may not be of very high quality as finished ones. The appearance of such material does not matter; the boards may have cosmetic defects, but the rough structure will take on part of the load, which means it must be strong enough.
Check the lumber for gaps, cracks, and damage from insects, mold, and rot. In the case of such boards, there are no requirements regarding abrasion resistance, so the elements of the subfloor can be made of soft wood.
Before you repair a wood floor, you should make sure that the subfloor boards are not twisted. There may be only a few of these defective products in a batch; you will use them on wedges and chips to level the rough flooring and seal cracks. Experts recommend purchasing edged floorboards that fit well and do not require mechanical processing. You can check them for fungal infection and damage.
Deciding on the scope of work
The initial stage of floor repair is to assess the condition of the existing floor. Reasons why coverage is changed:
- the strength and evenness of the surface is lost;
- floor leakage occurred;
- the coating swelled and began to play;
- cracks appeared, floorboards creaked;
- damage to wooden structures by fungus.
Defects in a wooden floor are manifested by creaking, lack of strength - the floorboards seem to play under the weight, cracks appear and the smell of rot. Boards can crack and even fall down under the weight.
Concrete screed also has its defects, especially if it was originally made poorly. They are expressed in the form of rustling sand and small stones, and the appearance of dents. The finishing coating loses its strength and is damaged in whole pieces.
What type of boards should I use?
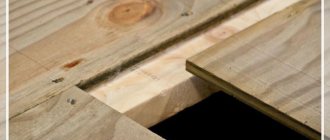
For the rough covering, you can use boards of grades B and C. The wood can be spruce or pine, which are the cheapest. If you have to repair the floor in a room with high humidity, larch would be the ideal option. Before repairing a wooden floor, you should select subfloor boards, which should have a thickness ranging from 25 to 35 mm. Here you should consider what the expected load is. If your budget allows, you can purchase a tongue-and-groove floorboard, then the gaps will be minimal.
Selecting finishing material
In the process of refinishing a finished wood floor, you will also need boards. Their dimensions are not very important, because the main load will fall on the outer covering. Today on the market there are boards whose width reaches 135 mm, while the most popular are 100 mm products. The thickness of the floorboards can be selected taking into account the size range - from 28 to 40 mm, but most often boards of 30 or 35 millimeters are used.
When choosing a length, you need to focus on the largest size of the room. One floorboard should cover the entire room lengthwise. It is not recommended to install lumber with a thickness of less than 22 mm, as this coating will sag and individual elements will quickly fail. The quality of the wood will play an important role, so you need to choose the best grade of floorboards with a minimum number of defects.
Removing debris and sand from under old floors
In old houses, when dismantling the floors, you can see a large amount of sand and soot under the joists. The smell of dust and rot penetrates through the cracks in the floor, poisoning the health of residents, and the structure itself can reduce the height of the ceilings in the room.
In addition to old boards, all the sand that is under the joists is sent to the container (it is necessary to prepare thick garbage bags in advance, since a lot of sand is usually collected). The floor slab must be cleaned as much as possible and cleared for further leveling.
Thus, having gotten rid of the old floors, we get a cleaned floor slab, prepared for further work. But such floors are found only in old houses. Rough renovation of an apartment in a new building is carried out without any dismantling: the surface is measured, primed and leveled.
Core Technologies
Before you repair a wooden floor, you must decide which algorithm you will use. There is no need to rush to start work - perhaps, in addition to those areas where the damage is most visible, there are hidden defects. They will need to be eliminated, otherwise the repair will have to be repeated over time. The first step is to inspect the flooring and its components. This will allow you to understand whether the floors can be repaired or whether they will need to be completely replaced.
If you are faced with the task of repairing a wooden floor in an apartment, you will have to follow the following algorithm: to detect rotten boards, you should walk with a hammer over the entire surface. This way you will find defects. If you hear a dull sound, this indicates the presence of rot. The rusty nails in the floorboards will tell you this. The amount of work will depend on the extent of damage. The easiest way is to replace the top floorboards.
Subfloor boards are more difficult to replace, but not as difficult as logs. To repair rotten joists, you will need to disassemble the floor and cut out the defective piece, after which it is replaced with a new one. Old wooden floors are more difficult to repair if the work is carried out inside the house. In addition to a thorough check of the floorboards, joists and subfloor, you will have to inspect the embedded crowns and beams. Inspection must be carried out from all sides. This stage should take place in good light: this way you will not miss the beginning of rot.
Laying reinforcement
Reinforcing the apartment screed is recommended, but with a layer thickness of 40-50 mm you can use the following methods:
- classic, laying a 10 mm steel mesh with a mesh size of 5 cm on the floor with a gap to the insulation or waterproofing insulation;
- using plastic reinforcing mesh;
- adding special fibers to the solution.
You can also place an aluminum mesh inside the screed. But the method using fibers is the leader in terms of convenience and rationality. This will allow:
- do not worry about the presence of an expansion gap to the waterproofing or insulation;
- lay a heated floor heating system inside the screed;
- work at high speed.
The screed is laid from the window or far wall to the door. The solution is laid out in large portions and leveled with a long rule along the beacons. There are no difficulties during the work, you just need to act quickly so that the solution does not set and is easily smoothed out. It is recommended that two people work together to lay the screed.
Replacing floorboards
Repairing wooden floors in an apartment with your own hands can be done using the technology of replacing floorboards. If only one or more floorboards need to be replaced, the rotted board should be removed after identifying the damaged area. According to its dimensions, a new element is prepared, treated with an antiseptic without affecting the ends, and placed in its place. If you treat the ends with an antiseptic, after a while the process of rotting will begin.
Using self-tapping screws, you will need to secure the board in place, screwing it to the joists. This way you can replace every rotten board. If a small area of rot is found on one of them, you do not need to replace the entire floorboard. You can only cut out the damaged area. It is used as a template to cut replacement wood from new wood. It is attached to the joists using self-tapping screws.
Types of defects
Before restoring wood, it is necessary to eliminate all existing defects
. The most common defects in flooring that can be eliminated through restoration are:
- Scratches;
- Cracks;
- Creak;
- Irregularities;
- loosening of boards;
Working with wood requires certain skills and experience, so you should not do the restoration yourself. To perform high-quality flooring repairs, it is better to contact specialists.
Sealing cracks
Before sealing cracks, the coating should be cleaned. Excess furniture is removed from the room. To thoroughly clean crevices, use a stiff-bristled brush. In order not to miss anything after the inspection, all areas are marked with a pencil. A composition for wood is prepared for work. There are special putties for this, but you can make the composition yourself by mixing PVA glue with sawdust. The thickness of the mixture should be the consistency of thick sour cream. All cracks are treated with this compound and left until completely dry. After this, the surface is cleaned with sandpaper.
Eliminating squeaks
Sometimes repairs involve eliminating minor defects such as creaking floorboards. Over time, any coating begins to creak. The main reason is loose fastenings. If the house has a basement, the cause of the unpleasant sounds can be easily eliminated. To identify floorboards that require strengthening, you need to use the help of a partner. He will walk on the floor while you try to determine where the defect is.
A wooden wedge is driven between the board and the beam. It is important not to overdo it so that the board does not rise above the surface. If it is impossible to get into the underground, repairs can be carried out from above. Holes are drilled into the creaking floorboards. Next, you need to secure the screws by driving them into the beams at a certain angle. The board can be secured with a nail.
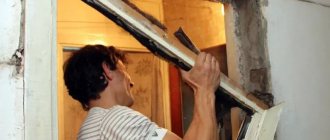
Removing coating on joists
If you need to dismantle a wooden floor on joists, which will allow you to lay a new covering, you should remove the baseboards that run along the perimeter of the room. To do this, use a nail puller. After this, the old flooring is demonstrated. If it is fiberboard or plywood, you can also use a nail puller, because such boards are installed on self-tapping screws. This work is very labor-intensive; it must be carried out with a partner, since it is extremely difficult to cope alone.
One worker will lift the slab, while the other will remove all fasteners. The flooring may not be able to be saved. This is especially true if adhesive was used to install the floor. In these situations, the coating breaks into individual elements.
If you want to start laying a wooden floor, then before installing the joists, they should be prepared. The material is sold planed, but if burrs are detected during inspection, they are removed using an electric planer. All boards and bars must be treated with an antiseptic. This will protect them from fungus and mold, as well as protect them from insects and even rodents.
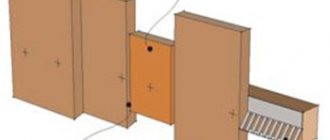
Next, you will need to determine what design features the wooden floor will have. It could be:
- coating on joists;
- floating structure;
- covering laid on the ground.
If you choose logs, you can fix them on the concrete surface. The whole difficulty here will be in leveling the joists, especially if the wooden covering is planned to be raised a few centimeters above the concrete slab. The floor joists are drilled through. In order to raise them above the base, plastic and metal elements should be used. Studs are suitable that will allow you to lower or raise the logs from different sides, aligning them according to the level. After removing the joists, excess sections of the studs must be cut off using a grinding machine.
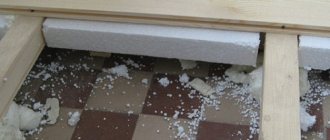
Thermal insulation can be laid on the concrete between the joists, which will also act as a layer that muffles noise. Insulation of a wooden floor can be done using polystyrene foam, mineral wool, or loose insulation. The log is stretched on top and a vapor barrier film is attached, only then can you begin laying the final coating.
Concrete floor repair
We will also consider the technology for eliminating defects that could form on a concrete floor. Here the master will demonstrate the work on a small sample. The technology for repairing a large floor surface will in no way differ from that presented in the example.
Step 1. First of all, it is important to remove from the concrete surface all those pieces of concrete that easily break off. The concrete surface must be sanded well. This will make the floors smoother, as well as open the pores of the concrete (this is necessary so that the primer mixture, which will be applied subsequently, is better absorbed into the concrete).
Grinding the concrete surface
Step 2. Next you need to remove all the resulting dust. A good helper for this is a construction vacuum cleaner. It is important to remove dust not only from the surface of the sanded slab, but also from the cracks.
Removing dust
Step 3. Then you need to apply the primer mixture to the entire surface of the concrete and let it dry well. You can apply it to a flat surface with a roller, but it is recommended to carefully coat the cracks with a brush. The primer must be applied in two layers, with the second layer applied only after the first has dried.
Applying primer
Step 4. Now you can begin rough filling with a special mixture. You need to fill all the large cracks on the surface of the concrete with putty and also let it dry well.
Large cracks are covered with putty
Step 5. Next you need to finish filling the smaller defects. But first, the surface needs to be sanded again and then cleaned of debris.
Re-grinding the surface
Step 6. Now you can apply the finishing epoxy putty, consisting of a base and hardener, which are mixed together. The mixture must be poured onto the floor surface, and then dispersed with a squeegee.
Final putty
Leveling the mixture
Step 7. Once the putty has dried, it needs to be sanded and the base should be even. After which the floor surface needs to be vacuumed.
Dried putty is sanded
Step 8. Now the concrete floors can be painted or you can use other floor design options by laying some kind of floor covering.
Final layer of enamel
By the way, after the first filling, you can use the technology of self-leveling floors and arrange just such an option in your room. Their main advantage is strength and durability. But at the same time, self-leveling floors can be very beautiful. Filling them is not easy, but in general, if the technology is fully followed, everything will turn out as it should.
Prices for self-leveling floors "Starateli"
self-leveling floors prospectors
Insulation of coating on joists
In order to insulate an existing floor, you should dismantle the old covering and inspect the floor for defects. At the next stage, floor joists are prepared and installed on the concrete surface. A distance of up to a meter should be maintained between elements. The next layer will be waterproofing, then insulation. The material should be laid tightly against the joists to avoid cold bridges.
The insulation of a wooden floor is completed by laying a vapor barrier. After this, you can lay the boards. If there are defective ones among them, they are replaced with new ones. When insulating the floor on the second floor, the technique will be almost the same. The only difference here is that the materials used can be combined, this can be hydro- and vapor barrier.
Board processing
Before laying a wooden floor, you can treat the elements with a special compound, depending on what effect you want to achieve. The market offers transparent materials, including impregnations and varnishes. Some mixtures have the ability to bring out the natural structure of a material.
If you want to hide the main color, you should choose an opaque composition. These are solvent-based paints, as well as acrylic water-dispersible substances. The most popular polyurethane acrylic and alkyd compounds today.
If you are still thinking about how to treat your floorboards, then consider opaque compounds, because with their help you can create a high-quality coating that will be easy to clean. For example, polyurethane varnishes also have elasticity and strength, which allows you to obtain a durable coating.