Joints between vertical siding boards can result in board warping, rot damage, and blistering of exterior paint. This is due to the fact that the ends of the boards absorb moisture the most. Therefore, there should be as few joints of vertical external cladding boards as possible, and it is advisable that they should not be located in the lower part of the wall, since there they are more susceptible to the negative effects of moisture. It is advisable to sheathe high walls with jointed external cladding boards, this will avoid joints. If joints cannot be avoided, it is better to join only the sheathing boards located under the flashings. The joints must be spaced apart and evenly distributed, this also applies to factory-joined boards if they are not painted with covering paint. At least 2 boards, and preferably 3, must be placed between the joined boards - joints cannot be placed more often. Both parts of the joined board must be secured to at least three sheathing bars. On both sides of the joint, the sheathing boards should be attached to the bars, as shown in Figure 9.51. To reduce warping and stabilize the joint, a small board is nailed under it so as not to block the ventilation gap. The ends of the joined boards should end at an angle of 15–20° and be attached to the sheathing bars with 2 nails at a distance of approximately 100 mm from the end. It is also important that the core wood of both boards being joined faces the same direction, preferably outward.
Rice. 9.51 Joining boards of vertical external cladding
Installation of vertical sheathing at the base of the wall
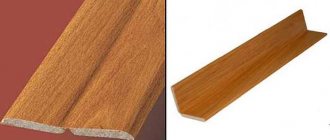
To avoid cracking, vertical external cladding boards should be attached to the sheathing bars at a distance of approximately 100 mm from the end. The lower ends of the boards of vertical outer cladding must be edged at an angle of 15–20°, forming a drip edge, then drops of water will break off the board without being absorbed into the wood of the end. To protect the ends of the boards from snow moisture and moisture from rain splashes, it is necessary to provide a gap of at least 300 mm between the skin and the ground (Fig. 9.52).
Rice. 9.52 Minimum gap between wooden sheathing and the ground, distance from the end of the boards to the nails
Along the base of the wall, between the boards of the vertical outer cladding, the Norwegians install small boards that do not block the ventilation gap. They prevent warping of the strips and serve as protection against mice. As an alternative, special metal tapes are also used to keep mice out (Fig. 9.53).
Rice. 9.53 Installation of vertical external cladding at the base of the wall
There can be a lot of options for installing vertical external cladding at the base of the wall; in Figure 9.54 you can see 2 more examples.
Rice. 9.54 Alternative examples of installing vertical sheathing at the base of a wall
The material was prepared by designer Vladislav Vorotyntsev based on the Norwegian technology of frame house construction developed by the SINTEF Institute
To decorate the facade of a building, as a rule, standard materials are used. But if a person wants to decorate his home in a unique way, then he can use unedged boards. The building gets a very unique appearance. A huge advantage is the low cost of materials.
What is an unedged board
Unedged board is a special type of lumber that has different widths and thicknesses. The main feature of the products is that their end is not cut off. Due to the different shapes and sizes, finishing the facade of a building with unedged boards can have an attractive and original appearance.
What types of wood are suitable for cladding?
For cladding, you can use different types of materials.
- If we consider the characteristics of various types of wood, then larch is considered the best option. Wood is not afraid of high humidity; it has a lower degree of warping than all other species. It is easy to work with and holds nails well.
- Finishing the facade with unedged spruce boards is considered not a very popular option. Wood has its own impregnation. Due to the presence of a large number of knots, the boards have an attractive decorative appearance. After some time, noticeable cracks appear on them, so unedged spruce boards are used extremely rarely.
- The pine will quickly warp and soon become unusable. It is never used for exterior cladding.
- Hardwood will look very nice. In addition, it has a long service life. It is worth remembering that hard rocks are difficult to process, and nails can cause them to split if the work is not done carefully. Also considered a disadvantage is the high price of the material.
Selection of lumber
Lapped boards are far from the most effective in terms of weather protection and not the cheapest finishing method. The advantages of this solution mainly come down to the fact that it creates a certain style: country style implies an exaggerated, old-fashioned, extremely simple finish using exclusively natural materials.
That is why for finishing we use lumber with distinctly uneven edges and a completely preserved structure of the wood layers - unedged boards.
Let's find out which types of wood are preferable for finishing. In general, if you use protective impregnations, you can safely use inexpensive spruce and pine. However, larch cladding is the most practical.
Why larch?
There are two reasons:
- It is not susceptible to mold fungi. The resin composition of this softwood makes it impervious to rot;
- Larch practically does not absorb water and, as a result, is least susceptible to deformation due to fluctuations in humidity.
The optimal board width is 300 millimeters. Thickness can vary in the range of 22 – 30 mm.
Unedged board made of Siberian larch.
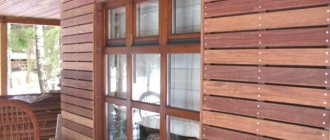
Exterior cladding of a house: materials and technologies
In order to make the house attractive from the outside, you will need a beam with a section of 20x20 or 30x30 mm. It will be used for the frame of the building. The average width of an unedged board is 30 cm. The thickness of the elements can be selected depending on preference.
You need to purchase sealant and mineral wool, antiseptic impregnation and protective impregnation in advance. Barriers for the insulation used and finishing products - varnish or paint - are purchased.
- All products must first be coated with a primer or a special substance for protection. This will increase the wear resistance of the elements several times and increase their service life.
- Next, waterproofing is installed on the walls where the boards will be finished. In this case, coating waterproofing would be the ideal option. It is necessary not only to take care of protecting the walls, but also to secure the blind areas of the building. The mastic is applied to the surface of the walls using a small brush. If there are gaps, the mixture is poured into them, and all excess is removed with a spatula.
- You need to wait until the waterproofing layer is completely dry. To prevent mold and mildew from appearing in the building, it is advisable to apply at least three layers of the mixture.
- Then you need to install insulation. Mineral wool would be an ideal option for external insulation. It does not ignite, it is not afraid of frost, high humidity, or precipitation.
Wood species from which it is made
To sheathe the outside of a house with unedged boards, you need to choose the highest quality material. An important parameter is the duration of service. For these purposes, there are only a few options to choose from:
- Pine has a denser structure, which allows it to withstand strong mechanical loads.
- Spruce is not so dense, so it retains heat well.
- Larch is reliable in all aspects.
With the edged finishing board everything is clear. If there are any defects on the surface, then you should not buy it. It’s even easier with an unedged board
But when choosing this material, you should pay attention to several points:
- quality of cut - a good product should not have chips, gouges or other defects;
- bitches – there can’t be too many of them. The presence of such a defect reduces the quality of the board and also provokes curvature of the material during drying;
- cracks - reduce strength, reduce service life and compromise the integrity of the material;
- curvature - if the board has such a defect, it is difficult to fix it on the base.
Final finishing
After the boards for finishing the facade are securely fastened, sealant can be applied to the joints. Experts recommend using polyurethane sealants, which are more elastic and can withstand fairly strong stretching. They are not so afraid of mechanical damage.
Lastly, the finishing coat is applied. Most often, varnish is used, which must be carefully applied to each board with a small brush.
An unedged board for finishing a facade is an excellent and economical option that will look very beautiful and original. Installation does not take much time and does not require any special knowledge.
Happy owners of private houses often face the question of how to improve the appearance of the building . The material for external walls must be environmentally friendly, aesthetically pleasing, durable, modern and not expensive. A profitable design solution is finishing the facade with boards . Wood never goes out of style. And with the development of modern technologies, many varieties of wooden panels , the characteristics of which will satisfy even the most demanding owner.
Block parquet
A classic solution for the floor is also a good idea for the walls. Piece parquet is small strips of valuable wood; it is rarely used as a complete finish, more often to decorate an accent wall behind the head of the bed or in the TV area.
A controversial but effective solution is to lay the kitchen apron with parquet. Near the hob, a tempered glass screen will come to the aid of capricious parquet flooring that is not ready for temperature changes.
The material is highly wear-resistant and maintainable, ages beautifully and looks classy. There are many decorative styling options, but the most popular, of course, is the “French herringbone”.
Facade board - what is it?
This term is commonly used to describe a number of facing materials that are similar in that their production is based on wood. What do you need to know about façade boards ? This is a building material made from hardwood, which has an attractive appearance thanks to the latest wood processing methods .
Figure 1. Finishing the facade with boards.
Materials for making facade boards
More often, natural materials are used for finishing - namely, “industrial wood”. The most popular types of wood among people, from which facing slabs are usually made, are coniferous species. Due to their high resin content, they are characterized by greater strength, durability, and moisture-repellent properties. Hardwood products are used less often. These types of wood require additional processing methods, otherwise they will not last long on the façade parts of the building. There are mixed materials, when polymers, combined with wood, ultimately produce a durable composition that not only decorates, but also protects the walls of buildings from adverse weather conditions. Before you go shopping for facade cladding, you need to familiarize yourself with the types of facade wood and their properties. So, the materials from which the facade board is made:
- Angara pine;
- cedar;
- larch;
- wood-polymer composite;
- thermal board;
- there are exotic materials - wood species such as teak, arrowroot, but the prices for such a facade will be exorbitant
Facade board profiles
Now there are several types of profiles . The choice must be made based on the initially thought-out finishing project. It is necessary to take into account what the final appearance of the house should be, what heat, moisture and insulation problems should be solved. The choice of profile depends on this:
- unedged board;
- lining;
- block house;
- imitation timber;
- planken;
- WPC siding.
Lining
This facing material has long been well known to almost everyone. It is a wide panel, the thickness of which is 12-20 mm (depending on the purpose). The tongue-and-groove fastening system allows you to easily, reliably and hermetically connect parts of the cladding together.
The main advantages of lining include environmental friendliness, thermal insulation properties, aesthetic appearance, ease of installation and reasonable cost.
Facade board. Types and features
Lining, block house and imitation timber
The familiar lining, block house, imitating the style of log houses made of hewn logs, and boards imitating timber , are similar in the installation method. They are fastened using the tongue and groove method. They are mounted tightly, without gaps, often using the open method, that is, with self-tapping screws through and through.
Planken
A new word in the field of construction. Planken - what kind of material is this ? At its core, it is an edged board, well sanded on all sides. There are two types of plank profiles - with straight and beveled ends of the boards. The straight ends of the plank have an edge angle of 90°; as a rule, installation occurs with an overlap. Joint to joint and horizontally fastened plank with edges beveled from 45° to 75°. In this case, installation is carried out according to the tile principle, from bottom to top.
Regardless of how the planks are attached to the facade, this must be done by leaving small gaps between the planks. This technological gap is necessary to prevent deformation of the facade, since natural wood cladding “breathes” - it either increases in volume when humidity rises, or shrinks when it dries.
Wood-polymer composite
An innovative material that has burst into the construction market. coverings were made from composite wood boards . Today, with the advent of new technologies, the production of panels is practically waste-free. In the process of manufacturing a wood- polymer composite , wood flour is mixed with synthetic substances, polymer resins. As a result, the resulting product is very durable, not subject to deformation, resistant to fading and does not require special care. The appearance completely matches the structure and color of the wooden covering. Siding is easy to use: it can be easily sawed off or trimmed; the plasticity of panels made of fiberboard is achieved precisely because of the presence of a polymer composite .
Thermal board
The name of this material contains the word board, but this is only a conventional name. The process of modifying wood with gradually increasing temperatures changes its structure so much that it radically changes its performance characteristics. Thermal board panels become moisture-proof, lightweight, and durable. The appearance of the finish is not inferior to elite types of wood, repeating the structure and color of, for example, oak. Basically, planken made from thermal boards is in high demand. But if you wish, you can clad the house with clapboard or panels that imitate timber. For facades, thermally treated fir, alder, beech and maple are used. The “thermo” prefix does not affect installation methods in any way.
The unique color of larch
Particularly loved by admirers of natural materials is larch. It is able to transform the appearance of the facade , giving it a noble, status look. And the price of larch panels is quite affordable. When choosing facade slabs from this coniferous wood, you only need to be guided by the chosen design style. A variety of color solutions will help realize any design idea.
Installation instructions
Preliminary work:
- Façade measurement.
- Cutting wood material.
- Treatment of planks with protective compounds.
- If you plan to mount the boards on a wooden base, you must first apply a layer of primer to it. If the wall is brick/concrete, this is not necessary.
Frame installation
What the frame step width will be depends on the thermal insulation material.
The width of mineral wool and expanded polystyrene is 600 mm. The thickness of the frame depends on the thickness of the insulation. Another 20-25 mm should be added to this indicator to create a ventilation gap. Vertical guides (metal bends or wooden beams are suitable) are attached to the corners of the walls and in the center. To do this, use nails and screws.
If the walls of the building are not insulated enough, you should take care of this at the current stage - cotton wool, as it “breathes” and helps create a cozy microclimate indoors.
Air membrane
This layer is necessary to prevent moisture from entering the insulating material. The membrane is laid on top of the thermal insulation, thereby allowing condensation from the insulation side to evaporate.
A second frame is necessary if there is no ventilation gap between the insulation and the façade board.
Working with façade boards
The method of installing the planks depends on their type.
So, for untreated boards with uneven edges, the “overlapping” method is suitable. But for planken, the best solution would be to fasten it joint to joint. To compensate for the geometric expansion of the wood, a treated board with a beveled profile should be used. To improve the appearance of the cladding, it is recommended to install the planks using hidden fasteners.
Work after covering
When the installation of the boards is completed, all joints should be treated with protective compounds.
If necessary, the finish is primed and painted. The cost of facade boards may vary depending on the manufacturer and region. Let’s look at the example of “extra” class larch.
The average price of untreated timber is 1300−1600 rubles. for 1 sq./m3, and WPC - 3500 rub. for 1 sq./m3. The cost of a thermal board ranges from 2700−3000 rubles. for 1 sq./m3, and the price for a plank with an oblique cut is 2000 rubles. for 1 sq./m3.
Technology of cladding boards for façade elements of a private house
There should not be any difficulties when installing façade boards. Following the manufacturer's recommendations and basic skills will help you build a facade without the involvement of specialists. The material is lightweight and can be changed in size.
Step-by-step lap sheathing technology
Depending on the choice of lumber , finishing is done with overlapping boards or joint to joint. When covering a house with DPK boards , they often resort to the overlap finishing method:
- The wall is marked, and the frame for the guide rails is attached using the markings.
- If additional thermal insulation is intended, at this stage insulating material is placed in the cells of the frame.
Figure 3. Overlapping planking. - The next step will be attaching the façade boards. This happens from the bottom up. All elements are leveled and secured horizontally with self-tapping screws or nails. It is better to fasten in a staggered manner so that the cladding does not move during natural deformation.
- With a plank width of 100 mm, the overlap should be at least 20-27 mm on each side. These proportions must be maintained over the entire cladding area.
- The lengthwise joining of façade elements is covered with even strips.
Vertical façade cladding
With the vertical method of finishing facade boards, a tongue-and-groove joint is used.
- First of all, guides are installed according to the markings. Under the vertical cladding, the guides are leveled strictly horizontally.
- Thermal insulation is being installed.
- The boards are attached vertically to the frame with self-tapping screws or nails, in hidden or open ways.
- For better adhesion of the tongue-and-groove lock, each cladding element is tapped with a wooden hammer.
- The joints of the boards are covered with cash strips.
Sheathing with flashings and staggered
In order for the facade to serve for a long time and be less subject to deformation, when the boards are arranged vertically, the option of installing the facade of the house with strippings or in a staggered manner is used. Both of these options, used for covering a house with facade boards , are similar. The only difference is in the width of the boards that are attached between the main elements of the facade. Flashings can be wooden that are installed behind the two main sheathing boards, forming a gap between them. This creates internal ventilation of the system. If the main sheathing board serves as flashings, this type of installation is called staggered finishing. The same principle applies when facing with unedged boards .
Sheathing with open seams
For special ventilation of the façade system, they resort to finishing-cladding with open seams. The board can be installed both vertically and horizontally. The basic rule for this type of installation is to install UV-resistant windproof membranes under the main planks. The size of the gaps between the boards can vary from 3 mm to 5-6 mm, but not more than 15-18% of the total sheathing area. A facade with open seams is convenient in practical terms. A separate element is easier to replace in case of damage.
Scandinavian motifs in exterior design.
Scandinavian style involves the use of wood and stones. Straight, laconic shapes, natural colors in the decoration. Facade panels, both natural and using composites, can easily cope with all these conditions. The exterior is decorated with clear geometric lines, contrasting colors, in brown, beige, red and gray tones.
Figure 4. Finishing the facade with unedged boards.
How to install imitation timber: preparing the base
Finishing a wooden house with imitation timber begins with preparing the wall surfaces.
Clean the walls from dust and dirt. You may need to apply a primer solution (we wrote about it above).
Then, you need to put a waterproofing layer for the wood - most often it is a film membrane, sometimes it is replaced with glassine - a coverless, rolled material, impregnated with petroleum bitumen.
Fastenings for imitation timber may differ - the film sheet is attached from below, connected with construction tape, glue or self-adhesive strips, while the overlap of the membrane should be no more than 15 cm.
Plastic dowels are not suitable for attaching profiles to a concrete wall - only self-tapping screws, clamps to imitate timber (a curved plate with a hook and two holes) or galvanized nails.
If the wall is without flaws - unevenness, potholes or chips, the sheathing is installed tightly. If there are defects, then synthetic linings are inserted into the gaps.
To prevent the sheathing from turning out crooked, apply a level to it. The distance of one beam from another should be no more than 80 cm.
Then pipes and wires are laid, a layer of insulation is laid, another sheathing frame is installed and a film membrane is stretched over it. The second sheathing is necessary for air circulation.
Preparing timber before installation
The next step is to unpack the panels. It is not recommended to lay the canvas right away; wait a few days for the wood to absorb all the moisture (the wood may increase in size). This way you will avoid possible distortion after installation.
Installation of imitation timber for the exterior of the house begins only after applying a protective composition to the surface of the wood.
Install panels from bottom to top only.
Where to begin? Facing and fastening of false beams
Imitation of timber for exterior finishing of a house should be carried out only in sunny, dry weather. It is better to mount light-colored timber on the sunny side - if it fades in the sun, the differences in color will not be as noticeable as on dark panels.
Attach the first board to the sheathing using a screw, clamp or nails. Drive the nails into the longitudinal groove of the panel (ridge).
The first (starting) board should be placed with the ridge up - level it with a building level and secure it. If the first panel is placed unevenly, then all subsequent boards will lie crookedly. The result will be a severe bevel.
The next step is to install the second board.
When attaching the second panel, insert the tenon into the groove of the first board. Do not drive it close to the first block, leave a small gap (no more than 4-5 mm). The gap is left so that the canvas does not deform due to possible temperature changes indoors or outdoors.
Using this technique, install the boards to the top of the ceiling. To ensure that the parts fit together beautifully, file the corners (a 45° angle is suitable for external wall mounting) or install a decorative strip.
Imitation of timber vertically will “raise” the ceilings, making a room with a low ceiling higher.
Installation of imitation timber inside rooms
The interior decoration of a wooden house with imitation timber differs little from external installation work on the street.
The only thing is that when installing vertically in the rooms of a house, to fasten the boards you do not use screws, but nails intended for furniture.
Otherwise, all actions are repeated.
New panels can be attached to an old wooden surface using a construction stapler.
The last step is to treat the surface with a protective solution.
How to attach imitation timber to the ceiling: installation sequence
Ceiling cladding is considered the most difficult job due to the intense pressure on the hands during installation.
To reduce the load, choose boards that are not too wide (a wide panel visually makes the ceiling smaller).
The length also needs to be selected - the fewer joints, the better.
Ceiling installation begins with the installation of a wooden frame and film (if the beams are crooked). Start attaching the boards from the side of the window (width no more than 3 cm).
The technique is the same as for wall cladding - if necessary, place a layer of insulation between the crossbars.
If there are already floor beams on the ceiling, then it is enough to stretch a layer of vapor barrier, without sheathing.
How to strengthen a facade made of boards with your own hands.
Do-it-yourself reinforcement of a board façade is necessary when using untreated lumber. To avoid deformation, the appearance of mold and mildew, and to protect against fire, it is necessary to carry out a number of measures to strengthen the facade.
- Treat the lumber with a fire retardant (fire retardant).
- Then apply impregnation, varnish or paint.
- Monitor the condition of the wood and repeat protective measures if necessary.
Decorating the facade with wood is a wonderful modern way to show individuality, while protecting the walls of the house from the negative influence of the environment.
Planken
This material has appeared on the market of facing materials recently, but has already proven itself on the positive side. Planken is a board planed on all sides, the ends and corners of which are chamfered. This ensures that the finished skin has rounded edges. There are two main types of plank: straight (with a rectangular cross-section) and oblique (with beveled sides).
If we talk about the advantages of planken, it is worth noting the easy replaceability of parts, environmental safety, resistance to fungus, mold and rot, and original appearance.
Application area
Most often, Scandinavian boards are used in the external cladding of the facades of houses and cottages. It is also suitable for other purposes:
- interior design of hotels, inns, cafes and restaurants;
- wall cladding in apartments, houses and offices;
- construction of verandas, terraces, patios, gazebos.
Interior design in Scandinavian style
Insulation
When choosing insulation, it is important to remember the main rule of forming the structure of the facade: the vapor permeability of the walls should not decrease from the inside to the outside. Otherwise, moisture will accumulate in the thickness of the walls.
The consequences are quite predictable:
- Decrease in the thermal insulation qualities of the wall;
- The appearance of fungus;
- Reduced service life of capital structures.
As a rule, slabs of glued mineral wool are used as insulation. The material is covered with a windproof membrane that protects the facade from blowing. A furniture stapler is used to attach the membrane to the sheathing.
An important point: a gap of 1-2 centimeters is left between the windproof membrane and the sheathing board. This instruction relates to the need for ventilation of the rear side of the casing. A ventilation gap can be created by bending the membrane on each block inward and securing it with a stapler on the side edges of the block; As an option, you can put a counter-latten made of a thin wooden batten on top of the main lathing.
Waterproofing will provide reliable protection from dampness.