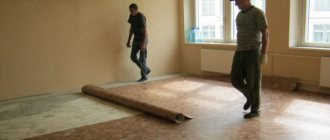
Linoleum is a high-quality, durable, relatively inexpensive material for finishing floors. That is why it continues to be considered one of the best options for finishing flooring in apartments and houses. However, linoleum has certain requirements - its installation must be done on a leveled and cleaned surface. Chipboard on a linoleum floor is one of the most common ways to create a level base for laying the material.
Chipboard on the floor under linoleum
Choosing a material to level the surface
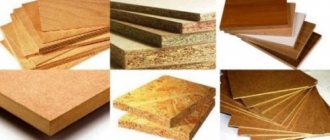
There are several common materials suitable for creating a smooth subfloor. They differ from each other in some characteristics and installation requirements. However, the materials under consideration are united by the fact that they are all made using wood shavings or sawdust.
Methods for installing chipboard floors
Table. Floor leveling materials made from wood waste.
| Type of material | general information |
| OSB board | The material is made from small wood chips, which are glued together using special synthetic wax. The resulting mixture is fed under a press, from where the finished material comes out. OSB boards, when laid under linoleum, are fixed on a rough base or laid without fixation at all. For installation of this material, dispersion adhesives are not used, since it practically does not absorb liquids. |
| Fiberboard | This is a rather thin and soft material made from fine-grained wood fibers. The elasticity of fiberboard is its main drawback: if the rough base is too soft or has voids, then fiberboard cannot be laid - the material easily breaks under the pressure exerted on it when walking. However, fiberboard is an environmentally friendly product that is not harmful to health, and is inexpensive. Therefore, such slabs are still used for laying linoleum, and quite often. |
| Plywood | Layers of this material are made by gluing several thin sheets of wood together using natural resins. The plywood is also pressed, resulting in a strong connection between the individual plates. The material is inexpensive, quite durable, which largely depends on the thickness of the sheets. Plywood is often used to level floors before laying linoleum. |
| DSP board | This material is made from cement compounds, wood shavings using additional components. A fairly durable material that is not prone to getting wet, which is used for cladding walls, creating subfloors, as well as for building partitions indoors. |
On a note! When choosing any material, it is important to take into account several factors - the microclimate of the room and the work for which it will be used. However, in order to choose a product for creating a rough base, it is important to pay special attention to the thickness of the material, because too thin can easily break under the weight of a person or furniture.
Chipboard and MDF
All of the above materials have certain characteristics, including installation requirements, which are important to consider when choosing. For example, fiberboard can only be used in dry rooms - where there is high humidity, it has no place. The material easily absorbs water, as a result of which it deforms and loses its performance characteristics. But on a level base and in a dry room, it will serve as an excellent substrate for linoleum and will even make the floors warmer.
Advice! Before laying, it is recommended to soak fiberboard sheets with antiseptic agents. A layer of drying oil will help protect the material from excess moisture.
Universal antiseptic
There is another type of building material made from wood waste. This is a chipboard familiar to many.
Chipboard sheets
Expert advice
In order for a new floor covering to last a long time, its installation must be carried out adhering to certain rules and technologies.
Therefore, if a novice master performs repairs, he should know:
- Work on linoleum flooring takes place in rooms where the air temperature does not exceed +18.
- The coating is pre-cut into strips and laid out on the floor. The linoleum must rest before installing the baseboard. This way he can level out well and get used to the temperature in the room. It is worth noting that pieces of material must be laid out on the wrong side, this will help avoid damage to its appearance.
When installing flooring for a short period of time, it is recommended to use the glue-free method. Strips of double-sided tape are glued along the perimeter of the room and in the center, after which the linoleum is placed and fixed. All installation measurements must be performed correctly, taking into account the grips of the doorway. Therefore, it is advisable to cut the canvas with a margin of 10 cm
When laying the coating, it is important to ensure that the pattern matches and try to make fewer seams.
You will learn how to lay linoleum yourself from the following video.
What is chipboard
Chipboard can be found in various fields. The material is used to make furniture, elements used in construction (for example, formwork), room partitions, containers, etc. The material is also used in the installation of floors.
Characteristics of particle boards
Chipboard (or chipboard) is made in the form of a fairly large sheet obtained from sawdust and shavings, pressed using hot pressing technology (pressure about 0.2-5 MPa at a temperature of more than +120 degrees) with the addition of resins and additional chemicals components. The volume of special additives by weight of the entire sheet can range from 6% to 18%.
Chipboard
On a note! The production of chipboard was carried out back in the 30s of the twentieth century - inventor Max Himmelheber came up with the material. However, chipboard was first produced for sale only in 1941. And in 1951 the scientist received a patent for this material, but of a modern type.
Now chipboard has spread widely throughout the world and is an affordable and popular construction material for creating furniture and building elements. Thanks to the appearance of this product, less wood waste has been recycled - now the volume of completely unusable material is only about 10%.
Tabletop made of chipboard sheets
Table. Characteristics of chipboard.
| Parameter | Meaning |
| Density | 0.5-1 g/cm3 |
| Ultimate tensile strength | About 0.5 MPa |
| Fracture strength | Not less than 10 MPa |
| Swelling in water | Up to 30% |
| Humidity | Up to 12% |
| Thickness | From 1 mm (gradation 1) |
| Length | From 1.8 m |
| Width | From 1.2 m with 10 mm gradation |
Prices for chipboards (chipboards)
chipboard sheet
Types of substrates
The market offers various types of substrates. It is quite difficult for a non-professional to choose which type is suitable for his repair. Let's consider what is placed under the floor base:
- Jute. A natural textile material made from fibers of the jute bast plant. The fibers are treated with a fire retardant to give the material protective properties against water and fire. Jute is able to absorb excess moisture without decomposing, and after drying there is no smell of dampness.
- Cork. The cork lining is made from oak bark. The bark is crushed and compressed under pressure. It is produced in the form of rolls 2-4 mm thick and sheets up to 1 cm. This is a completely natural material, bactericidal and environmentally friendly. A floor with a cork backing will be soft and warm.
Linen. Linen lining consists of flax fibers. Flax is similar in its characteristics to jute
An important property of linen is ventilation between the base and the top covering. This will help eliminate putrefactive processes, the proliferation of bacteria and fungi. Combination of natural materials. A mixture of natural fibers of flax, jute and wool will provide climatic comfort in the room
Available in rolls and has a high density.
A mixture of natural fibers of flax, jute and wool will provide climatic comfort in the room. Available in rolls and has a high density.
- Akuflex is a synthetic non-woven fabric in the form of rolls. Akuflex is used as a highly effective sound and impact noise absorber. The material allows air to circulate, which prevents humidity from rising.
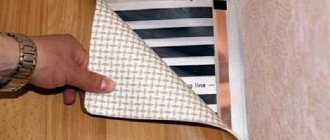
- Infrared floor. Infrared radiation comes from carbon heaters and is an excellent way to quickly warm up a room. Warm floors will create a comfortable and safe environment in the house. They produce rod and film types of infrared systems. Film floors are easy to install; there is no screed, but the linoleum is immediately laid out.
Let's look at some substrates in more detail.
Foam backing
It includes a whole group of synthetic linings: penofol, extruded polystyrene, isolon, polyethylene foam, penoizol, expanded polystyrene. Penofol is made from foil and polystyrene or isolon. The foil product gives increased heat-reflecting qualities.
produces extruded polystyrene foam. It has high water-repellent, hydrophobic and insulating properties. Laying penoplex under a soft covering has a significant disadvantage - the furniture will push through the material, the floor will be shaky.
Foamed artificial pads are moisture-resistant, durable, and absorb sound. A significant disadvantage is that it gets dented, which leads to deformation, and after a while it loses its functions. The disadvantages of a polymer lining can be eliminated by laying a product not exceeding 2 mm in thickness. The service life of the foam underlayment depends on the wear and tear of the floor.
Wood-based products
Oriented strand board consists of three to four layers of compressed long shavings with synthetic resins. The strength of the slabs is given by multidirectional laying of layers. The ease of processing and installation of OSB makes it easy to cover the floor.
Plywood is made from glued together slabs of wood veneer. The number of veneer layers (from 3 to 23) gives the product different thickness and strength.
Cement particle board and gypsum fiber sheet
A separate type of chip sheets are DSP and GVL.
Cement particle boards consist of wood shavings and a special cement solution. DSP is resistant to fire, humidity, temperature changes, and contains no harmful substances to human health. The difficulty of installation is caused by the large weight of the slabs and low strength during deformation.
Gypsum fiber sheet is a mixture of cellulose waste paper and gypsum. GVL is an improved analogue of drywall. Drywall is fragile, but the wood base gives the gypsum fiber sheet strength. This is a warm, harmless material, fireproof, and maintains comfortable humidity in the room.
Types of chipboard
There are two main types of particleboard. Laminated and extruded options are available for sale. The first is designated by the abbreviation LDSP; the sheets are covered with damage-resistant melamine film or varnish (for more expensive types of boards). Thanks to this, the material is not afraid of moisture. Laminated chipboard has increased strength characteristics and is often used to create furniture.
Chipboards (chipboards)
Extruded chipboard has less strength and can easily break when bent, but the effort required to do this is still quite large. The material is practically not produced in Russia.
Using chipboard in interior decoration
Basic provisions
If you decide to put chipboard on the floor under linoleum, then you should adhere to the following rules:
- The thickness of the chipboards used should not be too large; the maximum thickness of the sheets should be 6 mm.
- Chipboard can be laid on a wooden or concrete floor.
- Do not save on chipboard sheets, because the quality of the material depends on the price. Cheap slabs can become deformed during use; for example, seams can appear on the floor, which will be clearly visible even through the laid linoleum.
- Remember that when adjusting chipboard, you should not cut the board with a hacksaw; it would be much better to use a knife and trim it.
Chipboard - pros and cons
Chipboard, like any other material, has its pros and cons. Knowing them, it is easy to decide whether it is worth using such a slab to create a subfloor.
Advantages of chipboard:
- low price (much lower than solid wood flooring);
- smooth and even surface that does not require additional leveling;
- some species have sufficient density and strength. Suitable for installation on joists;
- The chipboard coating will be reliable and durable;
- good heat and sound insulation characteristics;
- high adhesion rates - you can use glue when carrying out work;
- ease of installation;
- Suitable for laying under linoleum.
Installation of the material is not difficult at all
However, chipboard, for all its advantages, also has many disadvantages, which manifest themselves quite strongly during operation. Disadvantages of chipboard:
- nails and screws are often used to fasten chipboard, but the material does not hold them well;
- does not like dampness and can deteriorate in a damp room;
- the edges of the slabs often crumble and collapse;
- This is a fire hazardous material.
The main disadvantage of chipboard is the lack of environmental safety. The material releases formaldehyde vapor into the environment, a substance hazardous to human health, especially in high concentrations.
Chipboards
Attention! It is not recommended to lay chipboard under linoleum in bedrooms and children's rooms. Some types of products are completely prohibited for use in an apartment.
One of the main parameters when choosing slabs is the maximum permissible concentration of formaldehyde per specific volume. This indicator is determined by sanitary standards. Unfortunately, in Russia there are many chipboard production companies whose managers do not care about the health of consumers and produce low-quality and sometimes even dangerous material.
This coating can be both rough and finishing.
It is impossible to answer unequivocally whether it is good to use chipboard for installing a subfloor under linoleum. Very often, the decision whether or not to purchase material for this purpose appears after assessing the operating conditions of the slabs. If the conditions are not suitable for using chipboard, then it is better to abandon the material in favor of another.
How to measure floor curvature
Useful tips
If some parquet strips are very worn, they can be replaced with suitable sized wooden planks. If linoleum is laid directly on parquet, you should first lay out the backing and check the surface by touch. This will help determine the location of large differences in height or gaps that were not noticed during the preparation process.
To avoid joints in the middle of the room, it is worth calculating the area of the room in advance and finding a roll of the appropriate size.
The basic rule on which the quality of laying linoleum depends is to thoroughly smooth the surface. The appearance of even a small bubble will spoil the appearance of the entire room.
Preparing the base and laying chipboard
In general, laying chipboard is quite simple and can be done quite quickly, even by one person. However, it is important to remember that the base for the material requires some preparation. The surface of the concrete screed must be thoroughly cleaned of construction debris, dirt, dust - even a small pebble can negate all the work done. All surface defects - cracks, bumps - must be removed. The bumps are polished, and the cracks are sealed using mortars.
Repair and preparation of concrete base
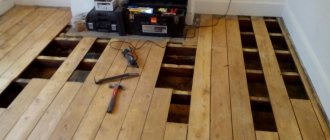
The rough wooden base is tested for strength - rotten boards are removed and replaced with strong and new ones. All irregularities and cracks are removed/sealed, and construction debris is also removed.
It is important to know! The chipboard must be securely attached to the floor, otherwise the linoleum laid on top, due to the movement of the material, will itself lie unevenly, and the entire floor will turn out to be very unreliable.
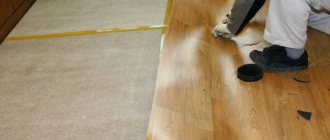
Rolling out linoleum for straightening
The base, after carrying out the above-described series of works and after drying, is subjected to priming. It is advisable to use formulations with antiseptics. The applied primer layer dries within approximately three days.
You should also pay special attention to the purchase of chipboard. You should choose a thicker one for the floor, especially if you plan to install the slabs on joists. Chipboard is a somewhat fragile material. It is recommended that each sheet be additionally treated with an antiseptic and dried well before installation. Otherwise, fungus and mold can reach the material, although chipboard is not prone to infection by them.
An example of laying bars under chipboard sheets on a balcony
Laying insulation and chipboard sheets
Attaching chipboard to the floor using self-tapping screws
How to choose
All types of chipboard sheets can be divided into two large classes:
- laminated;
- rough.
Laminated chipboard is used for the production of furniture products. A special layer with a texture is applied to it, which can repeat the patterns of certain types of wood. Such chipboard sheets are much more expensive and do not make much sense in laying them on the floor.
When purchasing chipboard sheets for laying on a concrete floor, it is important to pay attention to the strength class. A suitable option would be the P-A brand. In terms of density, 550 kg/m3 will be sufficient
If in the future the cladding will be laid in the form of parquet, laminate or linoleum, then the density of chipboard sheets can be increased up to 750 kg/m3. Regarding emissions, it is worth focusing on European standards. Sheets with the E1 index are suitable for a living room. In some countries, the use of chipboards with an E2 index is prohibited. This is due to the presence of formaldehydes, which are carcinogens. In domestic practice, regulation is carried out in accordance with GOST
In terms of density, 550 kg/m3 will be sufficient. If in the future the cladding will be laid in the form of parquet, laminate or linoleum, then the density of chipboard sheets can be increased up to 750 kg/m3. Regarding emissions, it is worth focusing on European standards. Sheets with the E1 index are suitable for a living room. In some countries, the use of chipboards with an E2 index is prohibited. This is due to the presence of formaldehydes, which are carcinogens. In domestic practice, regulation is carried out according to GOST.
Concrete is a hygroscopic material, so it is necessary to take into account the moisture resistance class of chipboard sheets. If it is known that the humidity in the room is slightly higher than usual, then it is better to take sheets marked P5. If there are no problems with excess moisture, then sheets P6 and P3 will be relevant. Sheets can be of different thicknesses. The standard is 16 mm, but there are also options with a thickness of 24 mm. This affects the strength and, accordingly, the distance between the beams. In some cases, chipboard sheets with a thickness of 16 mm can only be laid on a level screed without beams. Regarding the size of the chipboard sheet itself, everything will depend on the size of the room. It is necessary to measure the area in advance and think about which option is best. The following standards are available: 175×350, 183×275, 183×303 cm.
Installation technology: laying linoleum on chipboard
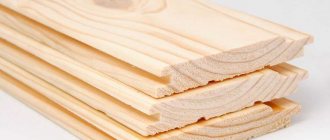
Step 1. The log system is mounted on the prepared rough surface. It is convenient to use bars with a thickness of at least 25 mm and a width of 80 mm. The logs are laid in such a way that there is a small gap of 2-3 mm between the sheathing and the wall of the room. The distance between individual lags in the sheathing is at least 40 cm. For chipboard sheets thicker than 18 mm, a larger distance can be left. The space between the joists can be filled with insulation for better thermal insulation of the floor.
Logs are being constructed
Attention! Chipboard sheets are also cut before starting work. By the way, it is not recommended to throw away the pieces remaining during sawing. They can be useful for forming a subfloor in hard-to-reach and non-standard places.
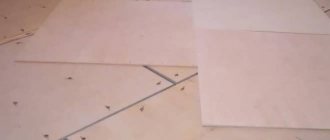
Step 2. The chipboard log system is covered. The material is attached to a wooden frame using self-tapping screws at 30 cm intervals. It is important that the fastener heads do not protrude above the surface of the chipboard - they go slightly deeper into the material. A small gap of 1 cm remains between the chipboard and the wall to compensate for the expansion of the material if its dimensions change due to the effects of temperature and humidity.
The gap between the chipboard sheets and the wall
On a note! If many sheets of chipboard are laid, then the joints must be positioned so that they do not run in one row. It is best to move them 10-15 cm away from each other.
Step 3. All cracks and gaps between the chipboard boards are puttied.
Coating after puttying
Step 4. Next, the prepared chipboard surface is cleared of debris. The linoleum is spread on the surface and left for some time so that it can “sit down”. A special adhesive for linoleum is applied to the chipboard surface with a notched trowel, and then the linoleum itself is glued.
Linoleum
Let's start laying linoleum. It is important that the material “rest” before this
Step 5. The compensation gap along the wall is closed with a plinth.
Floor plinth
You can also glue linoleum to the base using double-sided tape, but usually it is used only to fix the material in the area of the joints.
Chipboard flooring scheme
Prices for Tarkett linoleum
linoleum tarkett
Video - Installation of chipboard on the floor
Video - How to lay linoleum correctly
Self-leveling floor device
Laying plywood on a wooden floor surface along joists with your own hands, OSB board or plywood
A lot is said about concrete screed. The screed can be laid from a ready-made mixture for self-leveling floors, or you can prepare a solution yourself from cement and sand (ratio 1/3). A substrate is placed on the finished screed - foamed polystyrene foam, and then the laminate.
Self-leveling floor installation.
Before filling the floor with mortar, the floor surface must be cleaned, all expansion joints, cracks and chips must be repaired, and a layer of waterproofing and primer must be applied. Only then fill in the base layer. For a small room, you can prepare a solution for the entire area at once. For example, dilute a whole bag of dry mixture with water. For large rooms, the solution is prepared in parts. The prepared solution is poured onto the floor and leveled within 30 minutes. To work, you will need wooden slats, a wide spatula and a toothed roller with a long handle. Complete drying of the screed occurs after 5-7 days. After this time, work can continue.
If the solution is prepared independently, then you will probably be interested in the question related to the materials used. Recommendations for preparing concrete yourself:
- Typically, cement grades 400 and 500 are used for mortar.
- Cement grade 400 – proportions of cement and sand 1/1, 1/2, 1/3.
- Cement grade 500 – proportions of cement and sand 1/2, 1/3.
- The solution is poured in a layer of 20-40 mm.
- If a floor of 15 m² is poured at 40 mm, then 15x0.04 = 0.6 m3 of mixture will be required. With a sand ratio of 1/3, 0.5 cubic meters of sand and 0.1 cubic meters of cement will be required.
To glue or not
Before laying linoleum, you need to decide whether you will glue it or not. There is an opinion that it is not necessary to glue it in houses and apartments. It is pressed against baseboards, furniture, large appliances, etc. All this “holds” him in place. Sometimes it works, sometimes it doesn't. It usually works on hard semi-commercial and commercial types of coating, but does not work on softer - household ones.
It's a matter of thermal expansion. In the summer, when it’s hot, linoleum expands, “creeping out” from under furniture and appliances. In the fall, it shrinks to its previous size, but does not return under the furniture. Waves and bumps form. Therefore, the majority agrees that it should be fixed.
If you don't glue it, it might look like this
Just keep in mind that linoleum either does not need to be glued at all, or glued completely. Glue it in some places - you are almost guaranteed to get humps and swelling after a while.
Details
Preparatory stage of chipboard surface for laying linoleum
Before the assembly process of subfloors begins, it is necessary to bring the slabs into the room and leave them for at least a day so that the material gains the required degree of humidity. If you lay slabs of shavings just taken from a garage or shed under linoleum, as the floor dries, cracks will certainly form between the sheet joints.
How to treat chipboard before laying
Helpful advice! When laying the material, it is necessary to choose more of the chipboard side; after applying the varnish composition, the surface must dry in a horizontal position to avoid the formation of smudges and waves.
Features of leveling chipboard floors
Chipboard under linoleum is needed on a wooden floor for leveling. To make the covering under the rolled material horizontal and perfectly flat, you need to nail the chipboard onto the floor using nails, at least 15 pieces per sheet. The particle board needs to be laid on the floor in advance and the coverings are made smoother using wooden pads. Chipboard is fixed to wooden floors with an “oblique” hammer, since otherwise the nails may come out of the substrate. Under no circumstances should nails be driven into the chipboard itself, and it is also necessary to drill a hole in advance so that the point does not knock out a piece of shavings from the back. The pads are screwed onto the floorboards using self-tapping screws. All that remains is to apply polyurethane foam to the floor, lay chipboard and nail it to the floorboards. When laying chipboard on concrete floors, self-tapping screws are used for sheet leveling, which are screwed into the body of the slab. After leveling, the chipboard substrate is glued to the mounting foam or mastic.
Preparatory stage for gluing linoleum
After the particle boards have been laid, the seams need to be cleaned and sealed. The preparatory stage of the floor for laying the floor covering in this order:
Moreover, the joint around the perimeter must be caulked with sealant or wax mastic. This is required in order to compensate for the thermal expansion of the material.
Chipboard thickness for flooring
For a wood base, you can use sheets with a thickness of 1 to 1.5 cm; on a concrete floor, you can lay thicker panels with a thickness of up to 2 cm. If it is noticeable that the floor is complex, and there is a possibility that you will not be able to level the surface under the PVC linoleum , then it is better to buy materials with a margin of thickness. After fixing the sheets on a self-leveling floor or floorboards, protruding edges often remain at the joints, and the difference in height can reach up to several mm. In this case, you can sand the joints using an electric belt machine, and seal the resulting dust with glue into the cracks, and only after that can the surface be primed.
How to glue linoleum to chipboard
Chipboard adheres much worse than OSB or fiberboard.
The structure of the material is such that a lot of adhesive mastic will simply be absorbed, and therefore there is simply no point in applying linoleum adhesive to the chipboard surface without priming. By the way, the glue should be quite liquid.
You immediately need to indicate adhesive compositions that are definitely not suitable for laying linoleum based on shavings:
For gluing linoleum, only butyl-polyurethane, isoprene and polyurethane compositions can be used. German and Italian brands can be considered the best. This adhesive composition not only holds the coating on the chipboard base; the polyurethane seam also contributes to high-quality fixation and preservation of the chipboard mass.
How to lay linoleum on chipboard
So, first you need to cut out the panels. Linoleum needs to be cut into separate sections based on an allowance for wall surfaces of at least 2.5 cm. If imported material is laid on the slab, that is, it can be glued without any holding time. Domestic brands are traditionally laid out on the floor for 2-3 days to prevent air bubbles from appearing. The canvas needs to be rolled up and laid along the wall, opposite the entrance to the room.
After this, you need to apply and thoroughly rub it on the surface of the base of the slab, while at the same time rolling out the linoleum. After all the pieces of covering have been laid out, it is necessary to roll the canvas onto the floor using a heavy roller or a plastic wallpaper spatula. After the adhesive has set, trim the joint line and edge of the covering around the entire perimeter of the room.
What to glue
Before laying linoleum, you need to figure out what to glue it with. If the room is small, lay household linoleum in one piece on a smooth base (sheet material, old linoleum, etc.), you can fix it with double-sided tape. It is secured securely, but due to thermal expansion, humps may form between the tape strips. Therefore, if you glue linoleum, then use glue.
There are two types of adhesives:
- Glue, which, after drying, creates a rigid connection between the floor and the coating (the most famous and often used when laying linoleum is PVA);
- wet gluing, applied with a roller or brush (for absorbent substrates);
- dry gluing applied with a spatula (universal, including for non-absorbent substrates);
- Fixation is a composition that is first applied to the base and dries to form a sticky layer (like tape). Linoleum is rolled onto this layer, which sticks and does not move during use.
- Homakoll 186Prof (Homakoll) is a universal fixing composition for repeated re-gluing of flexible floor coverings.
- Fobo 541 Eurofix Anti Slip - fixation for materials with vinyl or bitumen backing on an absorbent or non-absorbent substrate.
Linoleum adhesive is applied with a roller or spatula
The first option is more familiar to us, but when changing the coating you have to suffer for a long time, tearing off the coating and glue residues from the base. The fixation holds the “shift” no less reliably, but allows you to easily re-lay it several times (from 5 to 8 depending on the composition).
Fixations
Fixations are used for laying household and semi-commercial linoleum. If we talk about the price per liter, then fixation is much more expensive. But its consumption is much less (100-180 g/square), so gluing one square meter will be cheaper. From all points of view, this is the best option. Here are some normal fasteners to work with:
Fixation for linoleum allows you to change the coating several times without replacing the “sticky” layer
There are other manufacturers, new products appear every day. But, before purchasing, read the instructions carefully. See that it can be used on your base, with your type of coating.
Adhesive for linoleum
You should definitely not use solvent-based glue (neoprene). Technologies have changed so that such glue produces a color change (red spots appear). This glue can only be used to glue marmoleum (a material based on natural ingredients).
If you decide to use glue, here are the brands that give good results:
- Forbo 522. Adhesive with high adhesive ability for rolled floor coverings, can be used in rooms where there is furniture on casters. Suitable for gluing linoleum onto linoleum or for heated floors. Apply with a notched trowel, consumption 220-270 g/m2.
- Polynomial 105. Designed for gluing household and semi-commercial linoleum without a base or on a foam base. Apply using a notched trowel. Consumption 300-400 g/m2.
How to lay linoleum - with glue or fixation - you decide for yourself
If you need to save money, household linoleum “with a pile”, on a jute or foam base, can be glued to PVA or Bustilat M. If it is placed on concrete, screed or other similar coating, first the glue is diluted with water (1 to 1), and the surface is primed with this composition (maybe twice). Then PVA or Bustilat is applied and the coating is rolled out “on wet”.
How to glue linoleum joints
There is a special glue for joining linoleum joints. It is called “cold welding for linoleum”. These are small tubes with a sharp spout, with which the composition is filled directly into the joint. It does not so much glue as it dissolves adjacent areas of the coating, creating a sealed seam.
There are two types of cold welding for linoleum:
- type A - for connecting freshly laid sheets (for example, SINTEX H44, Werner Muller, Tytan (Titanium);
- type C - for repairs (if you need to fill a split seam, a burst fabric, etc.).
How to join linoleum at joints - cold welding glue
When laying linoleum, naturally, type A is used. Pay attention to the instructions for use. They come in different types and require different drying times.
If you haven’t worked with cold welding for linoleum joints before, practice first on scraps. Once you have mastered the technology and understand what and how to do, you can start gluing joints indoors.
One more point: the glue for joining linoleum joints does not polymerize until it releases harmful substances. Therefore, windows and doors are opened in the room, providing ventilation. It’s better to work with gloves, and a respirator won’t hurt.