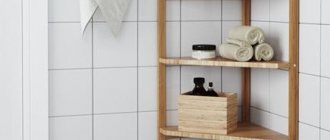
At the moment, many apartment owners are beginning to refuse to decorate the bathroom with tiles, as this option for wall cladding is becoming banal. Every owner wants to make this room as comfortable and functional as possible, and plasterboard shelves in the bathroom can help with this, since often this room in apartments is not large in size.
Shelf made of plasterboard in the bathroom And if you make not simple rectangular structures, but beautiful streamlined shapes, with an unusual shelf design, then the bathroom room can become beautiful and original.
Advantages of plasterboard shelves
Before we begin to disassemble these structures in detail, it is worth noting that simple drywall cannot be used for this room. For this, there is a special type of moisture-resistant drywall - green slabs, which are impregnated with a special composition that protects the material from fungal formations and moisture. Advantages of gypsum plasterboard shelves:
- You can make individually designed shelves; you don’t need to go shopping looking for the right style;
- you can choose any color and texture, and in any situation you can change the design of the room by simply repainting the shelves;
Plasterboard shelves in the bathroom - shelves, mounted correctly, can support a lot of weight;
- no matter how complex the design, its cost will be small;
- the material is environmentally friendly and harmless to humans;
- you can install the shelves yourself, and quite simply and quickly;
- Thanks to the flexibility of the material, you can create structures of any shape from it: broken, semicircular, angular, rectilinear, curly, built-in.
It is thanks to its low cost and ease of installation that plasterboard has gained its popularity among builders and ordinary people. At the same time, a design made according to all the rules will not be inferior to similar objects made from MDF or boards, and working with drywall is much easier. You can create a full-fledged plasterboard shelf in the bathroom using the following structure:
Example of a plasterboard shelf in a bathroom
- Creating a plan.
- Collection of materials and tools.
- Carrying out markings.
- Frame assembly.
- System cladding.
- Finishing.
The above sequence of processes is optimal and makes it possible to carry out construction work to the maximum. In addition, the use of such a structure allows you to obtain a high-quality product that can withstand heavy loads.
Helpful information
You should remember about the preliminary preparation of all technological holes, which, as needed, will become necessary for maintenance of communications. For example, these could be pipelines hidden in a plasterboard niche.
When arranging plasterboard niches with shelves, you should think about good ventilation.
- GLA is ordinary drywall, it is used to repair and decorate rooms with normal humidity and temperature conditions. It is a white rectangular sheet. Ordinary drywall is not used in the bathroom.
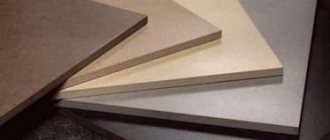
In construction terminology, plasterboard is dry gypsum plaster in the form of rectangular sheets. This material was invented by the owner of a small paper mill in America almost a century ago. To make drywall, thick, viscous gypsum dough is mixed and placed between two sheets of thick cardboard.
It will serve as the basis for installation and it is thanks to accurate drawings that the necessary calculations can be made when purchasing materials. Typically, partitions serve to divide a room into several sections. In the bathroom, they are intended to separate sanitary systems or to create niches. (see also the article How to make a niche out of plasterboard with your own hands) Subsequently, if you wish, you can finish the gypsum board with any finishing materials that tolerate moisture. This could be ceramic tiles, stone, bathroom wallpaper, cork or painting.
Important! Moisture-resistant drywall is secured using metal guides. The frame is constructed from a metal profile, it allows you to level the surface to be finished
The second layer of drywall can be glued using a special mastic.
The screen is mounted directly under the bathtub itself, covering its entire front part. The process technology is similar to the partition device. To give a finished look, tiles are laid out or coated with waterproof paints. The frame parts are metal profiles, the same as those used for larger elements.
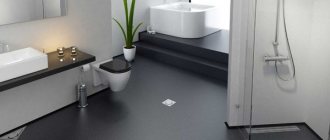
Drywall can be called a unique material. And it will be right. Due to its external shape and properties, it is used to create a wide variety of structures and carry out all kinds of construction processes. GKL sheets are used to sheathe walls, install partitions, and sheathe ceilings.
This material is perfect for creating boxes, lining niches and other finishing works. However, whatever the type of partition, it will in any case be unique and will serve as both a useful addition to the room and its decoration. Drywall, such a popular material for home construction, can also be successfully used to install partitions in the bathroom, and this will be a winning, practical and interior solution.
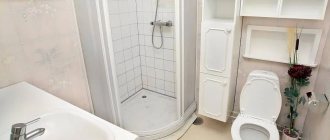
- Standard plasterboard shelves are the simplest option for decorating a bathroom. Such designs look laconic and strict, but with the correct use of finishing materials (for example, decoration with mosaics or stylish tiles) they can become a very attractive element of the room.
Shelves made of gypsum plasterboard look attractive, solid and reliable. They transform the average bathroom into a stylish corner, not devoid of grace and comfort.
Preparation for installation
Before you begin installation, you need to prepare everything you need, materials:
- GVL is moisture resistant;
- CD and UD profiles;
- metal screws (“fleas” and 25 mm);
- arched profile, when constructing curved shelves;
- serpyanka;
Tools for installing drywall - moisture-resistant putty if painting is planned;
- gypsum plaster;
- priming.
Each of these materials is responsible for a specific process, the combination of which allows you to get a durable and beautiful bathroom shelf. However, it is impossible to assemble a frame structure without a drywall tool. Therefore, it also needs to be prepared in advance:
- concrete drill (its diameter must match the width of the dowel);
- drill;
- hammer;
- screwdriver;
- screwdriver;
- metal scissors;
- pencil;
- knife;
- building level;
- 2 spatulas (narrow and wide).
Tools for assembling the frame Having prepared the necessary tools and materials, you can begin the actual process of installing the frame system. It is carried out according to the drawn up plan, taking into account the technical characteristics of the materials and their properties.
Necessary equipment
Of course, there is no universal “gentleman’s set” in this case, since the list of necessary accessories greatly depends on the tasks and the specific situation.
After all, for example, you can make simple shelves from plasterboard in a bedroom or another room, or you can implement them with lighting - and in this case you will also need an electrician’s “suitcase”. Therefore, as a clear example, let’s consider the most common situation - when what is needed is not a complex corner or semicircular shelf, but an ordinary external shelf near the wall, which in its structure will resemble a rack familiar to everyone. (see also the article DIY plasterboard niche with lighting: decorating the ceiling with LEDs)
Wall with shelves and lighting
To implement such a project, you will need standard equipment.
Tool set
In general, the following tool is needed (excluding tools for puttying and painting):
- screwdriver and screwdriver set;
- hammer and metal scissors;
- upholstery cord with good paint, tape measure and pencil;
- two-meter rule and a small level (50-70 cm);
- square;
- plumb line and knife with blades;
- water level.
In addition, it would not be a bad idea to have a grinder - cutting a profile with scissors is not always convenient.
Now about consumables.
Consumables
In order to assemble a complete frame, you will need the following:
guide and supporting profile for installing partitions;
Support profile CW
- plasterboard sheets of at least 12 mm. thick;
- various screws for metal;
- quick installation;
As you can see, everything is quite affordable, and if, for example, it is not possible to buy a power tool, then it is quite possible to rent it. It is very convenient because it is inexpensive. After all, the tools will only be needed for a few days at most.
So, you can get to work directly.
Step-by-step instructions for installing a plasterboard shelf in the bathroom
Creating a shelf from plasterboard with your own hands does not fall into the category of difficult tasks. However, to resolve such an issue, it is necessary to show care and responsibility, otherwise the result of the work will be depressing. Step-by-step instructions for installing a plasterboard structure are as follows:
- According to the markings, holes are drilled in the wall for dowels. Moreover, the length of each of them exceeds the size of the dowel by at least 1-1.5 cm. To increase the load-bearing capacity of the object, the distance between the holes must be at least 10-15 cm.
Fastening the profile using dowels - Dowels are inserted into the holes and driven until they are flush with the wall. The UD ceiling profile is adjusted to size, applied to the wall and drilled according to the location of the fastening points. A washer is put on the self-tapping screw, it is threaded through the hole in the profile and inserted into the dowel, after which it is screwed in to the very end. A similar action is performed with all fixation points, and the attached profile is checked against the level.
Fastening the profile for drywall - The UD profile plays a fixing role and sets the direction of the entire structure. It is installed on 2 walls that form a corner, and sets the width and length of the future shelf. On the outside, an angle is formed from it, which is twisted with self-tapping screws. The CD profile is cut to the required length so that there are 2 longitudinal elements and at least 4 transverse strips (our shelf will be about 120 mm long, and they should be placed every 40 mm).
Installation of a profile structure - Longitudinal slats are inserted into the guide profile, with one facing outward and the other inward. They are screwed on both ends with self-tapping screws. In this form, the load-bearing capacity of the shelf leaves much to be desired, so the shelf needs to be strengthened.
Fastening the longitudinal rails of the structure - Starting from the outer edge, retaining strips are screwed to the wall every 40 cm (they are fixed with dowels and self-tapping screws). Their size directly depends on the length of the shelf and must correspond to it. After this, the lower parts of the planks should be connected to the extreme points of the longitudinal planks. A similar action is performed using a rack-mount CD profile, the value of which is determined by calculation using the Pythagorean theorem (which refers to the square of the hypotenuse).
An example of a drawing of a corner structure for a shelf - The parts of the CD profile are connected to the retaining rails and inserted flush with the outer longitudinal strip. In this position it is fixed at 3-4 points on each side. Now the frame of the rack is able to withstand heavy loads.
A properly assembled frame can withstand heavy loads - Sheets of drywall (gypsum board) are cut according to the resulting model. To cover the shelf you will need 5 parts - top, bottom and 3 sides. First, the bottom piece is screwed on and a kind of box is formed. In this case, small grooves are cut out for the retaining slats and only after that, the gypsum board is completely fixed with self-tapping screws in at least 6 places (3 each near the wall and the edge of the shelf).
An example of attaching drywall to a shelf - The side linings are made in the same way. To fix them, 3-4 screws are enough. The top piece of sheet is laid last, giving the structure a finished appearance. If desired, the holding posts can also be covered with plasterboard and painted.
The frame is covered with plasterboard - The finished shelf in the bathroom made of gypsum plasterboard requires additional processing, which consists of sealing the plasterboard seams and fastening points and will be described in detail below.
Processing joints of plasterboard sheets
Assembling the rack
The production of shelving, partitions, decorative niches and built-in cabinets using plasterboard is carried out according to the same principle. First, guides are installed along the marking lines on the floor, ceiling, and, if necessary, walls. They are mounted with their backs to the base base, so that the profile shelves form a groove into which the racks are inserted.
If it is just a partition, the rack profile is doubled so that the frame can be covered with plasterboard on both sides. If the partition, such as the example below, contains shelves that have a certain depth, then you will have to install two frames in parallel, which are rigidly connected to each other by crossbars.
Partition-rack zoning the room
It is impossible, of course, to give a “recipe” that is suitable for any situation - each master is guided by the given conditions and decides where to install the guides. The main thing is to follow the technology for installing drywall, which does not depend on what configuration your structure has. This will be discussed further.
Substructure from a profile
In order for the result to be a durable product, the guide profiles must be attached to the base surfaces - and preferably even ones. That is, all coatings must be removed from them, including plaster if it is old and crumbling.
In general, a concrete ceiling and floor are an ideal basis for attaching the frame. If the guide must be attached to a wall - and it is, for example, brick and very uneven, it is better to first level it with cement mortar.
This is not the case when you can get out of the situation with the help of direct hangers, since it is not just cladding, but a supporting structure. When installing the guide profile, a sealing tape is glued to its back, which compensates for minor unevenness and serves as a sound-proofing and shock-absorbing layer.
Built-in shelves
The complexity of assembling this design is slightly higher than the previous one, so let’s take a closer look at the algorithm of actions:
- Starting from the corner on the ceiling surface, draw a line that will define the inside of the shelves.
- Use a plumb line to mark and draw a straight line on the floor.
- Connect the marks on the floor and ceiling with a line on the wall.
Marking the wall for the future structure - Secure the guides along the lines on the ceiling and floor.
Fastening the guides - Install the wall profile by connecting it to the guides with small self-tapping screws.
Example of built-in shelves design - The resulting frame must be sheathed with gypsum board, having previously cut it to the required dimensions with a construction knife. Installation is carried out using a screwdriver and black screws. Covering the frame with plasterboard
- We install grooves for future shelves; to do this, we cut the guide elements to the required size and attach them to the finished structure. You can check the horizon with a simple or laser level. It is worth noting that the groove elements must be strictly opposite each other.
Installation of grooves for future shelves - Prepare load-bearing elements equal to the size of the shelves, 2 pieces for each. The first part is attached to the wall, do not forget to insert it into the groove first, the second one is on the opposite side - this will be the edge of the structure.
- Install jumpers to strengthen the shelves.
Preparing load-bearing elements and installing jumpers Important! Reinforcement of the structure is carried out only if the depth of future shelves is more than half a meter. - The finished frame is covered with plasterboard.
Covering the frame with plasterboard
Video selection of finished plasterboard shelves in the bathroom.
Afterword
The shelves vary in design features. You can make them wavy, multi-story, high-tech, and so on.
But the main thing is that they turn out to be reliable and durable. If there is something you don’t understand, then here you will find photo and video materials with which you can understand in more detail this easy, but requiring certain skills, process.
By the way, the price for selling such shelves will be quite low. The cost of 1 m² of plasterboard structure (including frame, screws and plasterboard) is approximately 400 rubles - it is not difficult to calculate how much your future structure will cost.
Curly shelves
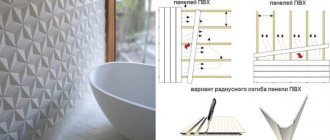
These are the most difficult structures to install. To make them, a template is cut out of plywood, according to which a plasterboard sheet is subsequently cut. A special flexible profile is purchased for the frame. The sheathing itself for the shelves is made according to the principle described above, only instead of a rack profile an arched element is used. You should also correctly bend the gypsum board fragments so that they do not break during installation. To do this, you need to walk over the surface of the drywall with a needle roller and wet them well.
Curly shelf made of plasterboard Make sure that the core does not get completely wet. As soon as the third part of the gypsum layer gets wet, you can carefully begin installation. Fastening is carried out from the highest point, gradually moving towards the edges. In this case, the screw pitch should not exceed 15 cm.
Important! If you can’t find an arched profile in the store, you can make a flexible structure yourself; for this, the edges of the guide profile are cut into small fragments, as a result of which it acquires the required flexibility.
Installing plasterboard shelves in a bathroom
Figured plasterboard shelf
What to consider
It is better to stick the tiles using special adhesives designed specifically for wet rooms. If you use standard glue, there is a very high risk that everything glued will soon fall off. In this regard, the savings are not justified - cheap adhesive mixtures may turn out to be counterfeit and everything will have to be redone, therefore, glue is needed that is proven and not the cheapest.
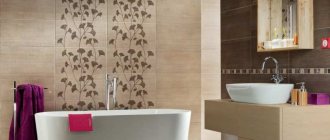
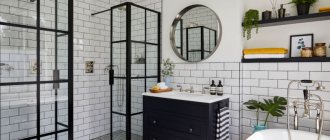
You can decorate the shelves not only with tiles that have already been used to decorate the bathroom. Combinations of tiles of different sizes look good - you can create a kind of mosaic or simply choose tiles of a different size for your design.
Despite the fact that the size of the tiles can be any, the color scheme should be selected based on the general design idea. All surfaces, including niches and shelves, should match each other well in color. The rest is left to your choice - the appearance of the structure can be very different - from complex multi-storey niches with openings of complex shapes, to simple rectangular tabletops.
Source
Finishing the finished structure
The finishing of plasterboard shelves depends on the overall design of the bathroom, and is done as follows:
- Apply two layers of primer to the finished structure and let it dry thoroughly;
- using putty and serpyanka, seal all joints and connections to the walls so that cracks do not appear later;
- Install perforated corner elements on the outer corners and fix them with a mixture of plaster. Important! For curved structures, buy an arched corner made of plastic; it bends perfectly thanks to the sections applied to one side;
Preparing the shelf for decoration - Apply a layer of putty to the entire surface of the plasterboard structure and let it dry;
- putty the shelves again after 24 hours;
- as soon as the second layer of putty has dried, the structure must be sanded well with an abrasive mesh;
- Apply primer to the finished shelves.
Preparation for the final coating is complete. You can decorate plasterboard shelves in various ways, for example:
- Apply decorative plaster with a water-repellent effect.
- Paint it any shade.
- Place decorative mosaics on the shelves using tile adhesive. This cladding method can be used without prior puttying.
Wooden walls
The most pleasant material for installing shelves, since you only need a screwdriver or drill and ordinary self-tapping screws. Wood is the most pliable and reliable material, and even a simply driven nail will hold firmly in it.
However, if your walls are made of fiberboard, chipboard and others, then you should use the method of mounting shelves, as with plasterboard sheets.
If you decide to turn to professionals for help, then you need to find out the cost of hanging a shelf. The price for such a service depends on several factors:
- The material from which the shelf is made;
- The material from which the walls in your room are made;
- Type of fastener;
- The design of the shelf itself;
- The region of the country in which you live.
Video on how to hang a shelf
We hope that after reading our article you will get an idea of all types of walls and the most reliable and suitable methods for securing any structures. Now all that remains is to do it yourself.
Photo selection of the design of plasterboard shelves in the bathroom
Where to start: preparatory stage ↑
We start with the drawings. In order for them to be done correctly, you need to clearly know what the resulting shelf should look like. We schematically draw it in all details, simultaneously noting which areas need to be measured. We take measurements. We carry them out extremely carefully and correctly, otherwise there may be problems with fitting the shelf in the future. Using the obtained values, we build a drawing of the future structure. With its help you can easily calculate the exact amount of materials needed.
To make shelves you will need:
- drywall;
- galvanized profile (most often 50x25 mm);
- guide rails;
- arched profiles, if a curved structure is planned;
- dowels with spacers, self-tapping screws;
- reinforcing mesh for processing joints;
- primer.
In addition, you should prepare the necessary tools.
Sheathing
Once the frame is ready, you can begin covering it. To do this, sheets of drywall are cut to measurements and the cut-out blanks are attached in place with self-tapping screws.
The shelves need to be sheathed on the top and bottom sides, and then the end of the structure is closed using a narrow strip. The most difficult thing to do is cover a curved structure, since drywall cannot be bent so easily. To make this work, you need to do the following:
- cut out a piece of cardboard or other sufficiently dense but flexible material that is appropriate in size and shape;
- the workpiece is bent to the desired radius;
- then cut out a blank from plasterboard, moisten it with water and roll it with a needle roller, after which the blank can be bent, fitting it to a pre-made cardboard template;
- then the workpiece is fixed and allowed to dry, after which it can be fixed in place.
The drywall is secured using self-tapping screws; it is necessary to tighten the screws so that the cap is slightly recessed into the material. But you can’t overtighten, otherwise cracks will appear around the screw.
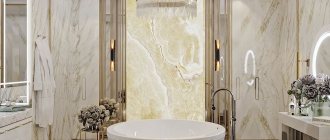
Original design
In classic interiors, it is preferable to decorate the plasterboard structure and the entire room using finishing materials of the same color and texture. You can make a decorative niche a bright element of the interior using a contrasting color palette and a material of various qualities.
Spotlights installed in a plasterboard structure will provide an excellent backdrop for personal hygiene items located in a niche. When thinking through the design of a niche, you need to take into account many important aspects, such as size, configuration and depth. A decorative niche can have strict geometry or, on the contrary, take on fancy shapes.
Read more: Is it necessary to prime drywall after puttying before wallpapering?