Home / Types of ceilings / Wooden / Features of creating a ceiling made of timber in an apartment
The decoration of ceilings in city apartments is almost always monotonous. There are several basic materials and solutions that, in one variation or another, are found everywhere. However, you can create a unique surface by using materials that are unconventional for the city. For example, to assemble a ceiling in your apartment from timber, or rather from wooden panels imitating it, since it is not practical to use real timber in this case.
Requirements for ceiling finishing
There are a number of requirements for the ceiling in wooden buildings that are not complex or difficult to meet:
- Safety
. This is one of the main conditions, since it must be reliable, strong, and fireproof. The material used to construct the ceiling cannot release dangerous and harmful components into the surrounding space, both under normal conditions and in the case of high temperatures. - Durability
. The owners build a country house for many years. The longer it lasts without repairing or replacing the ceiling in a wooden house, the better. - Attractive view
. The materials used to decorate the ceiling surface should be in harmony with the walls made of natural wood and, as a result, create a unified interior, making the atmosphere in the house even more cozy and comfortable. - Reliable thermal insulation
. For private households, solving the problem of heat conservation is very relevant. According to physical laws, a lot of thermal energy rises along with the heated air. For this reason, the ceiling in a wooden house made of timber requires high-quality and effective insulation.
Main nuances
A true decoration
The ceiling should create a feeling of lightness and not clutter up the space. This effect can be achieved by choosing the right color, texture, and shape. Wood is a very flexible material in processing; it can be given any shape that the master wishes. Such solutions have many advantages:
- The natural base is always highly environmentally friendly. You don't have to worry about allergic reactions or unpleasant odors. With the right approach, you can use water-based dyes.
- The durability of wood is difficult to overestimate. If you provide good care and choose hardwood, the ceilings will last so long that they may become boring.
- Compatible with any interior. This type of material is suitable for both antique and modern style finishes.
- Excellent insulating properties. This applies to both sound and heat loss. Wood was the main material for construction in ancient times, because... people were well aware of such positive qualities.
- Creating a unique solution. You can order a ceiling design from an experienced carpenter.
Wooden ceiling in loft style
There are some dangers that are worth considering:
- Favored by pests. If this is a solution made from pure wood, and not from slabs, then it is imperative to ensure good treatment with antiseptic compounds.
- The need for proper storage. If the wood was stored incorrectly, this can lead to the fact that the finished structure begins to crack and lose its appearance.
- Possibility of ignition. It is important to think carefully about this point in order to avoid accidents later.
- Relatively high cost.
Preparing the ceiling surface for finishing
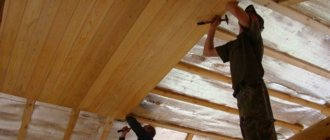
Before you begin decorating the ceiling, you need to properly prepare its surface. First, the ceiling is treated with an antiseptic that will protect it from mold, mildew and rot. The fact is that treated wood will last much longer. When an antiseptic has already been applied during the construction of a house, this procedure can be omitted.
Then the wooden ceiling structure should be impregnated with fire retardant. This treatment will protect the rough base from the influence of high temperatures and ignition. This step cannot be skipped, since safety rules should not be ignored.
During the final stage of preparation, a layer of heat insulation is laid, which minimizes the leakage of warm air from the house through the ceiling and roof. How effective the insulation of the ceiling surface will be depends mainly on the chosen material.
Each insulation has features, advantages and disadvantages:
- Mineral wool
. Depending on the scope of application, it has a density of 75-200 kg/m3 and thermal conductivity from 0.03 to 0.12 W/(mK). At high temperatures, the insulation only melts and is easy to install. Among the disadvantages, the ability to absorb moisture should be noted. - Styrofoam
. With a density of 45-150 kg/m3, its thermal conductivity is 0.041 W/(mK). This insulation has good thermal insulation characteristics at low cost. The disadvantage of polystyrene foam is that rodents can live in it and during the combustion process it releases components harmful to people. - Ecowool
. The material has a density of 45-75 kg/m3 and a thermal conductivity of 0.038 W/(mK). At sufficiently high temperatures it only melts and is characterized by environmental friendliness and sufficient thermal insulation properties. To install ecowool you need a special device. - Expanded clay
. Its density is 800-1200 kg/m3, and its thermal conductivity is 0.18 W/(mK). The advantages of the material include non-flammability, environmental safety and ease of installation. The disadvantage of expanded clay is its heavy weight and the fact that its thermal insulation properties are worse than those of other insulation materials. - Sawdust
. Their density is 200-450 kg/m3 with a thermal conductivity of 0.08 W/(mK). The cheapest heat insulator. But wood processing waste can harbor rodents. Sawdust is not resistant to fungus and rotting.
When purchasing insulation, you need to remember that the lower the thermal conductivity coefficient, the better its thermal insulation properties. Before making a ceiling in a wooden house, you need to insulate it, for example, using rolls of mineral wool.
The sequence of actions during its installation will be as follows:
- First, level and clean the surface of the rough base.
- A waterproofing film is laid and fixed on it. Its canvases are overlapped and adhesive tape is glued on top.
- A sheathing is nailed to the base, which serves as a frame for installing insulation. To assemble it, use a metal profile or wooden beam. The distance between the elements of the sheathing should be made 1-2 centimeters less than the width of the mineral wool roll in order to achieve reliable “adhesion” of the heat insulator to the frame.
- Sheets of insulation are placed between the profiles or beams. The minimum thickness of thermal insulation should be 50 millimeters. When laying several layers of this insulation, you need to cover the joints of the rolls of the lower layer with the top layer.
- The lathing and heat insulator, before making the ceiling in a timber house, are covered with a vapor barrier film on top.
If the sheathing for insulation was assembled from wooden beams, it should be treated with antiseptic compounds. Only after completing the preparatory work do they begin to arrange the ceiling in a wooden structure.
Attaching false beams to the ceiling
Work on the construction and renovation of a property begins with careful planning of upcoming events and with the preparation of diagrams and drawings. Thanks to this, you can determine as accurately as possible the amount of building materials and the list of tools.
To find out the area of the ceiling, its width is multiplied by its length. The result obtained is divided by the area of one false beam and the number of panels required for cladding is obtained. It is not difficult to calculate how many fasteners you need: the number of fasteners required to fix one board is multiplied by the number of slats. The diagram should contain information on where to start installation. You need to buy materials in reserve.
List of materials and tools:
- false beam;
- metal profiles or wooden slats for the frame or sheathing;
- mounting nails;
- self-tapping screws 60-90 millimeters long;
- dowels;
- screwdriver plus attachments;
- hand saw;
- hammer;
- perforator;
- tape measure, cord, pencil;
- wood antiseptic.
Lining
Very often, when deciding what to make the ceiling of a house made of timber with their own hands, owners of country real estate choose lining, which is planed boards. They have a tongue, which is also called a ridge or protrusion, on one edge, and a groove on the other.
The board for the ceiling in a wooden house is inserted with a tongue and groove into the groove of the previous product. This is how the ceiling boards are attached to each other. The lining differs in the length and width of the boards, material of manufacture, color and texture. On sale there are products stylized as a log house.
The main advantage of lining is the wide range of these products, from which you can always choose the boards that are most suitable for interior decoration.
The advantages of this finishing material do not end there:
- High sound insulation qualities. In rooms lined with clapboards, the sounds of movement and conversation on the floor above will not be heard, especially if a thermal insulation layer is laid before sealing the ceiling in a wooden house.
- Durability. Planks treated with antiseptic compounds, varnishes or other coatings can last for many years without replacement.
- The ideal combination of lining with wooden walls.
- Vapor permeability. Since this finishing material “breathes,” moisture and condensation will not collect between the finishing material and the rough base, which can reduce the service life of the ceiling and reduce the effect of laying the heat-insulating layer.
There is a nuance in how to properly make a ceiling in a wooden house using lining. The fact is that finishing from this material is not suitable for all rooms. For example, ceiling surfaces made of such wooden planks in large rooms look boring and unattractive.
This problem can be solved by using boards of different colors. This technique allows you to divide the space of a room into several functional zones - it is especially relevant when decorating a hall or living room. You can diversify the ceiling decoration using patterns, paintings or carvings applied to the lining before its installation.
There is another original way to decorate the ceiling in a wooden house. It consists in the fact that the planks on the outside need to be artificially aged. As a result, the interior of the room resembles the atmosphere of an old mansion.
Finishing boards called eurolining are available for sale. They are manufactured according to DIN 68-126 standard. This material is characterized by higher quality surfaces and tongue and groove design.
Installation of a ceiling in a wooden house using lining is carried out in stages:
- Measure the distance from the floor to the ceiling in all corners of the room. Then select a corner with a lower height and measure down 50 millimeters from it.
- Using a laser level or a marking thread, draw a line for installing the frame from the point selected in the previous step. As a result, the ceiling is perfectly flat relative to the floor surface.
- To assemble the frame, a wooden beam of small cross-section is used. The sheathing installation lines are positioned perpendicular to the future finishing. The gap between them should be from 40 to 50 centimeters. It is necessary to maintain a distance between the timber and the walls of the room of 10 to 15 centimeters. Before installing frame elements, they must be treated with an antiseptic and fire retardant.
- In the case when we are making a ceiling in a wooden house from lining, and the boards are not previously painted or varnished, then an appropriate coating is applied to them.
- Wooden planks are cut according to the width of the room, but at the same time, a gap of 10-20 millimeters must be maintained between them and the walls on each side, so that if the material expands under the influence of moisture, swelling and deformation do not occur.
- The first board is attached to the frame using clamps, nails or screws.
- Mount the next plank by inserting the tongue into the groove of the previous board. The lining must be carefully adjusted to one another using a rubber mallet.
- Repeat the previous step for all installed strips.
- The last of the boards is cut, if necessary. As a rule, it is attached to the sheathing with nails, which are forgotten “at an angle.”
- Compensation gaps between the walls and the lining are covered with ceiling plinths.
What are we dealing with?
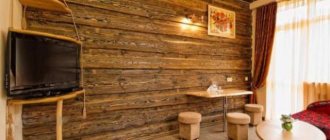
So what is it - imitation timber ?
Appearance
Before us are ordinary boards, slightly beveled at the edges on the outside and having a tongue-and-groove . In essence, an ordinary wooden lining. Only the size is slightly larger.
On the back side, as a rule, longitudinal grooves are selected. They are designed to provide better ventilation of the wooden covering. At the same time, the grooves partially relieve the internal stress of the material that occurs during drying, protecting it from cracks.
This is what our hero looks like in profile.
Manufacturing
How is the material we are looking at today produced?
- The log is cut at a sawmill into edged boards with some margin in thickness. The key requirement is the complete absence of wane.
- The board spends several days in the drying chamber. Drying on pads ensures no deformation.
- The board is planed: the outer surface becomes smooth, the board acquires a tongue and groove, and ventilation grooves are selected on the back side.
- The grinding machine brings the front surface to perfect condition.
- The board is cut to the required size and packaged.
Important: imitation timber, like any other wood, can only be stored in a covered, dry warehouse. Storing unsealed packaging outdoors means ruining the building material.
Read also about finishing the ceiling with clapboard.
This is what the imitation timber looks like, stored in packages.
Wood veneer
An alternative solution when choosing how to make a ceiling in a house made of timber is to use veneer panels, which are strips with locks for fixation and installation. On the outside they are covered with veneer - this is the name given to a thin wooden sheet just a few millimeters thick.
Typically, valuable tree species are used to produce such panels. Due to the thin thickness of the veneer, it can be used to create a beautiful ceiling finish at an affordable price.
The technology for installing veneer panels has much in common with laying lining:
- first mark the ceiling base;
- then the sheathing is assembled;
- the first panel is attached to the frame with nails or self-tapping screws;
- The next finishing strips are connected to the previous elements using tongue-and-groove locks.
Installation
So how is the ceiling finished with imitation timber?
- The material is unpacked and carefully laid out in the room where finishing will take place. The period is several days. The goal is to equalize the humidity of the boards with the humidity of the atmosphere in the room so that they do not change their linear dimensions after installation.
- In the meantime, a lath made of bars measuring 30x30 millimeters is assembled on the ceiling. It would be a good idea to pre-treat the timber with an antiseptic solution and dry it twice or treat it with a hydrophobic primer.
The sheathing pitch is 50 - 60 centimeters. It is mounted perpendicular to the direction in which the imitation timber will be attached to the ceiling. For fastening, you can use long screws with plastic dowels or anchors.
The sheathing pitch is about half a meter.
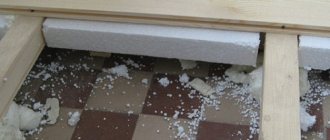
Tip: in a city apartment, it would be a good idea to lay foam plastic of the same thickness as the slats between the slats of the sheathing. With a lathing pitch of 50 centimeters, there will be almost no waste, and the installation of foam plastic will be simplified to the extreme: sheets measuring 50x100 centimeters will simply be inserted spaced apart between the slats. This simple and inexpensive ceiling modification will significantly improve interfloor sound insulation.
- When the board has lain in the room for several days and the sheathing has been assembled, you can begin lining the ceiling. The boards are adjusted to size using a jigsaw, circular saw or hand saw. A small chamfer is removed on the transverse seams. The transverse seams themselves must be installed staggered, moving from row to row.
- How is imitation timber attached to the ceiling? Either with a self-tapping screw into a tenon (in this case, the head of the self-tapping screw is closed by the groove of the next board), or with a clamp - a galvanized bracket, sold specifically as a fastener for simulating timber and wooden lining. The second method is suitable for thin and, as a result, not too heavy boards.
Thus, the board is secured using a clamp.
Important: if you fasten the boards with self-tapping screws, be sure to drill into the wood. Trying to screw in a screw without drilling is likely to split the wood.
Be sure to drill out the tenon before screwing in the screw.
Plywood sheets
There is an opinion that plywood is not only a cheap material, but also not very visually attractive to use for ceiling decoration.
But now manufacturers produce such high-quality varieties of plywood that they are the material from which ceilings in a wooden house are made. Externally, this finish looks aesthetically pleasing, no worse than a surface made of lining or veneer panels.
Advantages of this material:
- low cost;
- resistance to high humidity in the case when the plywood sheets have been subjected to appropriate processing and are covered with a laminate on the outside.
Timber simulation selection options
When deciding which material to choose, several nuances are taken into account:
- Humidity level in the room being renovated
. This indicator is of no small importance when decorating a bathroom, kitchen, or bathroom, and therefore aspen or larch are suitable for them. These materials are distinguished by increased moisture resistance and ease of maintenance. Coniferous imitation timber is suitable for decorating a bedroom or living room. The panels are impregnated with an antiseptic and coated with a coloring compound or varnish. - Degree of illumination
. It is advisable to clad rooms with windows facing north with products in light shades. If the timber is initially dark, it is painted in light colors - cream, yellow and beige. Southern rooms are usually finished with alder and oak products. Alder will fit well into the interior of a child's room. - Functional purpose of the room
. In country houses, pine slats are usually used. For larch and cedar, a suitable place is to trim the living room ceiling with timber. It is better not to use them in the bedroom as they have a strong odor. - Features of the surface to be coated
. For the ceiling surface, it is advisable to use panels 15-30 millimeters thick and about 3 meters long.
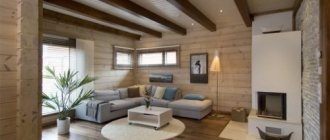
Natural wood
Flooring made from planed boards made from precious woods fits perfectly into most interiors. This is one of the options for making a ceiling using wooden beams. To create the atmosphere of a country house, the finishing of this material is complemented by a surface made of slab or obapola - lumber obtained from the side of logs.
The technology for decorating a ceiling made of planed boards is similar to the method for arranging a false ceiling. First of all, beams are mounted using large cross-section timber.
Then boards are hemmed underneath them, which are secured with self-tapping screws and carefully adjusted to each other, trying to keep the gaps to a minimum size. Before installation, both boards and sheathing are treated with protective agents, and at the end of the work they are varnished.
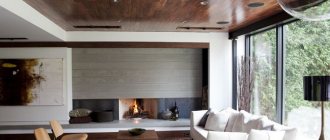
Another original addition to the design of a house made of natural wood are ceiling beams. This finishing method is sometimes used when a wooden house without a ceiling, or rather without an attic, is being furnished. Cutouts in the walls for the installation of ceiling beams must be provided at the stage of construction of the building.
These wooden elements should be treated with special compounds that protect the wood from decay processes, they are varnished and, if necessary, aged.
If you don’t want to make cutouts in the wall and install heavy beams, but want to see them under the roof, then you can use false beams made of wood or plastic, but hollow inside. They are much lighter and therefore easier to install than elements made from solid timber.
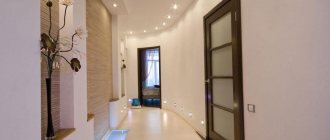
Lighting Features
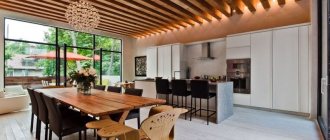
Wooden surfaces absorb light, so in addition to a general diffuser, lighting of the walls and ceiling is needed. Fabric and ceramic lampshades, bus systems, chandeliers with forged parts, and wooden elements are combined with wood. There are many lighting options; the house will not resemble a modest village hut. To illuminate paintings and decorative elements, you can install halogen spotlights. There are no windows in the hallway so that the room is not dark; pendant lamps and sconces are installed. To visually increase the space, choose chandeliers with shades upward. In the kitchen, fluorescent lamps are installed in the work area. Frosted lamps are used to create a pleasant atmosphere around the dining table. Diffusive, relaxing lighting is created in the bedroom, and sconces are installed for reading.
When installing wiring, you need to eliminate the possibility of a short circuit:
- it is impossible to install hidden electrical wiring using PVC ducts and corrugations in the voids of the floors, under the ceiling cladding;
- It’s safer to run the cable outside in order to notice and respond to an emergency in time;
- For flammable materials, the cable is laid in metal boxes and pipes;
- wiring is made with copper cable, which oxidizes slowly and is more resistant to bending;
- wires are chosen with double or three-layer insulation.
Drywall
To make gypsum boards, two layers of thick cardboard are used, between which there is a core of gypsum dough with different fillers. This finishing material is easy to use. It is used in the construction of multi-level ceiling structures suitable for decorating spacious rooms for various purposes.
Using gypsum plasterboard for finishing is one of the options for making a ceiling in a country house. It is convenient to cut holes in this material for installing spotlights that can highlight the features of the interior and illuminate individual areas in the room.
A plasterboard ceiling in a wooden house is installed in the following sequence:
- A frame made of metal UD and CD profiles is laid on the insulation sheathing. Its elements are placed perpendicular to the wooden sheathing. A compensation gap of 10-15 millimeters is left between the wall and the profile so that when the ceiling structure shrinks, the drywall does not sag.
- The gypsum boards are fixed to the frame with self-tapping screws using a screwdriver.
- The joints of the sheets are puttied.
- Drywall is finished with relief plaster, wallpaper, paint or other materials.
When installing spotlights, their locations are marked in advance, electrical wiring is done, and before installing the gypsum boards, cutouts are made for the devices.
Useful little things
- Boards that imitate timber can also be used for finishing wet rooms, but with certain reservations. The wood is treated with a transparent antiseptic and, after drying, becomes dry at least twice. Particular attention is paid to the ends. Instead of wooden sheathing, a galvanized profile for drywall is used.
- Imitation timber on the ceiling, unlike walls, is never attached using a furniture stapler. The fastening will be extremely unreliable and short-lived, since the load is directed towards tearing off the bracket, and not perpendicular to it.
- A thick board can be secured by drilling holes for self-tapping screws with a smaller diameter and for caps a third of the thickness of the board with a larger one. After installation, the caps are puttied with a mixture of transparent glue (varnish) and sawdust.
This type of fastening is the most reliable, but the recessed screw heads will have to be masked.
How to make suspended ceilings in a wooden house
For suspended ceiling structures, a fabric made of polyvinyl chloride or polymer fabric is used, which is fixed to a frame made of aluminum or plastic profile.
This type of finishing is suitable for newly built log houses, where the floors will shrink over several years, and this circumstance makes plastering or painting impossible. The disadvantage of suspended ceilings is that they significantly reduce the height of the premises.
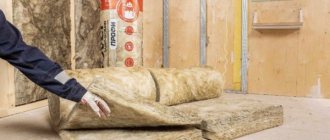
Insulation and sound insulation
Ceiling insulation
If there is a desire to provide additional sound and heat insulation, then for the sheathing you will need to select boards of greater thickness, for example, 5 cm. Polystyrene foam is cut to fit the space between the sheathing strips. The width should be chosen so that it fits flush. It must be inserted during the installation of the planks in order to immediately fix it. As an option, you can use mineral wool, but in this case, the top will once again need to be covered with oilcloth so that over time its fibers do not begin to fall out through the cracks.
Photo
Unedged board
Slat ceiling
Board covered with stain
Coffered MDF
Raw board
Slat pattern
Installation of boards at the end
Large beams
Wooden hanging
Did this article help you?