A toilet tank is a sealed container into which tap water flows in order to flush at the right time. Thanks to its extremely simple design, you can easily repair this plumbing fixture yourself. And for this you need to know how to properly disassemble and reassemble. Do you agree?
We will tell you in great detail how to disassemble a toilet flush cistern, in what order the container is dismantled and the functional mechanisms are removed from it. Let us indicate in which situations it is necessary to remove it, and in which it is enough to perform actions without disassembling.
The article presented for your review lists typical malfunctions and cases requiring mandatory intervention. We have looked at repair options for old and new models. For visual perception, the information was supplemented with photo collections, diagrams, and videos.
Types of toilet cisterns
The flush tank is a container with a lid, equipped with a water supply mechanism and a drainage device. Depending on the location of installation, tanks are divided into three types:
- hanging;
- built into the wall;
- compacts.
The hanging tank is mounted on the wall above the toilet at a certain height and is connected to the bowl using a drain pipe. A chain with a handle is attached to the flush device lever. The upper location of the container provides high water pressure when draining.
The built-in tank is a flat container made of high-strength polymer. It comes with wall-hung toilets. The container is hidden behind decorative trim; only flush control buttons are mounted on the outside.
The compact tank is installed on the rear shelf of the toilet bowl. It is equipped with a lever or push-button mechanism. Water supply is carried out from the side or from below.
Classic compact toilet with bottom water supply Source vannstudio.ru
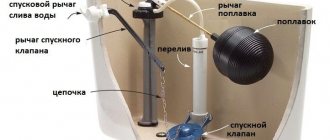
Water collection mechanism
In a classic tank, the hole for the water supply device is located in the upper part of the side wall. The traditional mechanism is equipped with a valve, which is operated by a lever with a plastic float. When water is drained from the tank, the valve automatically opens to quickly refill the tank. When the float on the horizontal lever rises along with the water level to the original level, the valve will shut off the flow.
The disadvantage of side supply is considered to be the excessively loud noise of water in those minutes when it is drawn into the container. Most foreign manufacturers of compact toilets, like many Russian ones, have switched to producing tanks with bottom water supply. The principle of operation of the device is similar to the traditional one, but due to the fact that the water comes from below, the noise is practically inaudible. In the bottom version, the float is attached to a vertical rod, which is located in the supply pipe.
What can break inside
If the float is damaged, it stops holding water inside the tank, and it begins to overflow over its edges. In this case, the old float must be replaced with a new one. When the float is empty inside, depressurization may occur since it is constantly in contact with water.
Helpful advice! The crack or hole is temporarily sealed with a soldering iron, but after 1 or 2 months the float will still have to be replaced.
If the lever part of the float fails, it must also be completely replaced.
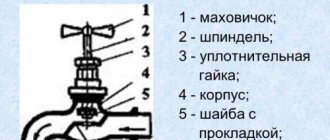
A defect in the fittings can be caused by improper actions of the plumber. If the installation of backlash connections was carried out with deviations from accepted standards, the fixing elements become weakened. This defect is easy to fix. Simply turn the top clockwise.
If the shut-off valve is faulty, water may leak out. Testing the shut-off valve is simple: press it slightly by hand. If water flows, it means the cause of the breakdown is in it. The fittings are disassembled, the container is cleaned, including its bottom. If necessary, replace the old gasket with a new one. The same is done when the siphon membrane is deformed.
Drain mechanism
The flush mechanism allows water to be released into the toilet bowl to flush waste into the sewer. It is activated by pressing a lever or button.
Toilet with overhead tank and lever Source salonika.pl
Drain devices vary in design, but in most cases they are interchangeable if they are designed for installation in tanks of standard dimensions, with holes of standard sizes. The general operating principle of the mechanism is as follows:
- the drain hole is closed with a valve that retains water;
- when you press a button or lever, the valve rises and water rushes into the bowl in a powerful stream;
- the valve drops into place.
The design includes an open top overflow pipe. Water that has risen above a predetermined level flows through it into the toilet bowl - this prevents the tank from overflowing and prevents water from leaking through the edges of the tank onto the floor.
Dual-mode drain
The working volume of the toilet tank is 4 or 6 liters. In order to save water, flushing mechanisms with two operating modes were developed:
- in the standard version, the entire volume of liquid from the reservoir is drained into the bowl;
- in “economy” mode – half the volume, i.e. 2 or 3 liters.
Management is implemented in different ways. This can be a two-button system or a one-button system with two pressing options - weak and strong.
Dual-mode flush mechanism Source smesiteli-tomsk.ru
The advantages of dual-mode flushing include more economical water consumption. But we must not forget about the disadvantage - the more complex the mechanism, the more elements it contains, the higher the risk of breakdown and the more difficult it is to eliminate the malfunction.
How to remove the lid from the tank
If the tank stops filling, begins to leak, or water continuously pours into the bowl through the overflow tube, the fittings need to be adjusted or replaced. To access the inside of the tank, you must remove the lid.
Difficulties may arise if a flush tank mechanism with a button is installed. To remove the button on the cover, you need to press it and turn the ring. If you cannot turn the flat ring with your fingers, you need to press the button and find special slots on the inner rim of the ring. By inserting a narrow flat screwdriver into one of the slots, turn the ring and then unscrew it with your fingers.
The button ring can be easily unscrewed with your fingers Source psk-remont.ru
After the button is removed (by removing the ring, just pull it up), you can easily remove the cover and examine the structure of the drain tank, checking the mechanisms for damage.
Recipes for homemade adhesives
For gluing porcelain and earthenware, you can prepare your own compositions from the following components (optional):
- 1 part glass to 2 parts sifted sand. Then add 6 parts sodium silicate.
- 1 part lime to 2 parts chalk and 2.5 sodium silicate. After mixing, the composition must be applied immediately.
- 1 part turpentine to 2 parts shellac. After mixing, the composition must be heated and then cooled. Before each use, the mixture should be melted over a fire.
- The gypsum is kept in alum for 24 hours. Then the composition is dried, calcined and divided into several parts. Next, each piece is diluted in water until a creamy mixture is obtained.
It is recommended to apply the above compositions to problem surfaces immediately after preparation.
Dismantling the tank
The old tank drain fitting cannot be replaced with a new one without completely dismantling the tank. Before starting work, it is necessary to shut off the water supply - if there is no shut-off valve on the supply to the tank, the cold water supply to the entire branch is cut off.
Next, water is drained from the tank. Using keys, remove the side or bottom supply hose, depending on the design of the tank.
The reservoir needs to be disconnected from the toilet bowl. It is secured with two bolts, the nuts are located on the underside of the rear shelf of the bowl. To unscrew them, you will need an adjustable or open-end wrench. It is first recommended to lay a rag on the floor or place a container - the water remaining at the bottom of the tank will certainly spill out when the fasteners are removed.
If the tank was installed many years ago and the nuts are completely rusted, the bolts are simply sawed off - the metal hacksaw blade moves freely in the gap between the tank and the bowl shelf.
The mounting nuts are located on the underside of the toilet shelf Source gidroguru.com
See also: Catalog of companies that specialize in engineering systems: sewerage, water supply and heating
After unscrewing the nuts and removing the bolts, the tank is carefully removed from the toilet. The old deformed rubber or polymer sealing gasket is discarded. Even if it has retained its elasticity, there is no guarantee that it will be able to provide a tight seal when used again.
The tank is placed on a flat surface. Unscrew the large plastic nut located on the side of the drain hole - it secures the flush mechanism. The water supply device on the side or bottom of the tank is also dismantled.
The container is inspected from all sides for cracks and chips. The inner surface is cleaned of accumulated sediment and rust particles. It is recommended to thoroughly rinse the inside of the tank so that when installing new fittings, solid particles do not get under the seals - they can break the tightness of the connections and cause a leak.
Installation work
Removing the old cover
So, a new seat has been purchased, before installing it, you need to remove the old one. This operation will not take much time to complete.
The only thing you may need is some tools:
- Socket wrench;
- Pliers;
- Hacksaw.
Instructions for removing the cover are as follows:
- Regardless of the type of construction, the seat is fixed with two nuts
. Before using the tools, you can try to unscrew them by hand. - If the nuts do not “give”, you should use a socket wrench
. - In some cases, the bolts may turn
. To prevent this, they should be clamped with pliers. - If for some reason it was not possible to unscrew the fasteners, the bolts must be cut off with a hacksaw
. However, before taking drastic measures, you can lubricate the thread with silicone or oil and try to unscrew it again.
Installing a new cover
Now let's look at how to install a toilet seat.
It should be noted that depending on the product model, the installation diagram may differ slightly, but in general, the sequence is as follows:
- First of all, you need to install fasteners into the seat structure.
- Then you need to get the bolts into special holes in the toilet and attach nuts to the bolts.
- Next, you need to adjust the position of the lid relative to the toilet and tighten the bolts. If you are installing a cover with a microlift, before tightening the bolts, you should make sure that the structure fits tightly to the plumbing. Otherwise, the position should be adjusted using special adjusting elements.
For products with microlift, adjustment is of great importance, since their durability depends on it.
- When installing complex ones, it may be necessary to connect the structure to water supply and electricity.
- After installing the toilet seat with your own hands, the structure should be raised and lowered to ensure its functionality.
This is, perhaps, all the information you need to know in order to remove and install the seat yourself.
Installing fittings
A new mechanism for the flush tank is selected in advance. This takes into account:
- height and volume of the tank;
- location of the water supply hole;
- location of the hole for the button or lever.
Fitting kit for installation Source moskva.meduzza.ru
Place the housing of the drain mechanism into a clean tank lying on a flat surface, having first unscrewed the lower mounting nut from it and installed an elastic sealing ring on the pipe. A plastic nut is screwed onto the thread of the stand from the outside of the tank. Screw it in with your fingers until it stops, then tighten it slightly with a wrench. Do not overtighten the fasteners - the plastic may burst.
A new sealing ring is placed on the toilet bowl shelf - it should be located around the drain hole. The surface of the shelf is first cleaned of dirt and wiped dry.
New bolts with elastic gaskets are inserted into the mounting holes inside the container to ensure the tightness of the connections. The drain tank is placed in place without leveling yet. It is necessary to insert the bolts into the mounting holes of the toilet shelf and screw the nuts on them.
The next step is to level the tank and tighten the nuts with a wrench. It is important to tighten the fasteners gradually and alternately, sometimes right, sometimes left, to avoid skewing the tank.
Installing and fixing the tank Source fb.ru
Next, install the side or bottom supply valve of the drain tank, having first put the o-ring on the pipe. The mechanism is also secured with a nut located on the outside of the tank. A flexible water supply line is connected to the inlet valve; the threaded connection is sealed with fum tape.
Before connecting the flexible line, it is advisable to briefly open the water supply to remove rust particles and other debris from the pipe that got there during dismantling.
After connecting the flexible line, turn on the water to check the tightness of all connections. If necessary, fasteners are tightened with a wrench. Then they check the operation of the mechanisms and adjust the fittings so that the system functions properly.
Before installing the cover, the mechanisms are checked and adjusted Source calgary.isgreen.ca
At the final stage, the lid is installed and the button is put in place - just screw the ring around it with your fingers. After final testing, the tank is completely ready for use.
We adjust the water level
Manufacturers of drain fittings supply devices that are, by default, configured for the maximum volume of water in the container. Often this level is excessive. The filling capacity of the tank can be reduced by adjusting the mechanism.
If water is supplied from the side using a float valve, it is enough to change the position of the float. To do this, change the bend of the lever. The adjustment principle is simple, but to achieve the desired result you have to bend the lever several times, using trial and error. If the float is held on a rigid metal rod, it will require serious physical effort to bend the lever even slightly. In newer models, the lever is made of plastic - to adjust the level of water intake, the float is moved along the rod.
Video description
This video clearly shows how to set up the filling mechanism.
Let's look at how to adjust a flush tank with a button and a lower inlet valve. First of all, you will need to turn off the water supply, drain the contents of the container, remove the button and remove the tank lid. An adjusting screw is provided on the float mechanism. It is twisted to lower the float down and reduce the filling of the tank. Having set the screw to the optimal position, you can close the lid, install the button and turn on the water supply.
The water has stopped flowing
If water has stopped flowing into the tank or is filling too slowly, the side or bottom feeder should be inspected. Usually the problem is associated with clogging with rust particles and other mechanical impurities.
At the first stage, you need to turn off the water and disconnect the flexible line from the tank. If a filter is installed at the inlet of the feed unit, dirt may accumulate in the hose. To remove it, lower the free end of the line into a bucket or direct it into the toilet and turn on the water supply.
The bottom water supply valve is dismantled and cleaned of contaminants Source stroy-podskazka.ru
In more complex cases, it may be necessary to remove the feeder. The mechanism is washed under running water to clean the body, tubes, and valve from dirt. If the structure includes a membrane, it is removed and thoroughly cleaned of accumulated solid particles.
Next, the supply device is installed in place, the flexible connection is connected and the tightness of the connections is checked, as well as the pressure of the water entering the tank.
Self-replacement of the drain device
To replace the flush assembly in the tank, you need to prepare:
- pliers;
- adjustable wrench or wrench;
- spare parts or a completely new mechanism.
All work is carried out as carefully as possible, since individual parts are very fragile. If excessive force is applied, the kit may be damaged.
Easy replacement of the drain mechanism
As a rule, the mechanism for the toilet tank, which is responsible for flushing, can be easily adjusted or repaired, since it is a really simple and understandable design, as can be seen in the diagram. However, it also happens that the mechanism breaks down completely, then there is no way to do without its complete replacement, for which you must first deal with the dismantling of the old mechanism.
Remember
All work on replacing, adjusting or repairing the drain mechanism should only begin when you have completely cut off the water supply to it. The easiest way to do this is to turn off the common taps in your house or apartment. If these are not found, then you will have to contact the housing office with a request to close the riser for a certain time, which must be met.
Complete replacement of components
Modern plumbing stores employ competent and experienced consultants who can simply describe the flush mechanism you need for an old-style toilet cistern, with a button or two buttons, so that they understand and advise exactly what you need.
- Turn off the water and press the tank drain button to release any remaining liquid from the system, which may leak onto the floor during disassembly, which is completely unacceptable.
- Unscrew the flush button and remove the toilet lid. There is already an article on our website on how exactly this can be done with different button options, it’s worth reading it in more detail.
- Carefully disconnect all visible hoses and remove the internal part of the drain mechanism with overflow and float.
- From the bottom of the toilet, unscrew the screws that securely fasten it to the tank.
- After removing the tank from the mount, we dismantle the lower part of the drain mechanism with the large main gasket on it.
- Into the hole in the tank thus freed, we begin to gradually and methodically insert the necessary parts one by one, repeating all the steps in reverse order.
If the tank's mounting screws have succumbed to corrosion, then they also need to be replaced, even if they are not included in the repair kit. Then you will have to purchase these elements additionally, fortunately, their cost is affordable for everyone. Next, all that remains is to complete the assembly, but not completely, since the first draining of the water must be done immediately, before you have screwed the tank cap into place. The flush mechanism of a toilet cistern with a double button is replaced in the same way as with a single button. The main thing is to purchase the right set of spare parts so as not to make a mistake.
With bottom water supply
When the inlet valve for introducing water into the tank is not located on the side, as in most cases, but from the bottom, then you will have to tinker a little longer. The thing is that there will definitely be not just a valve, but a special membrane, which will be quite difficult to “get close to” and unscrew due to the lack of free space. The tank is most often located close to the wall, so it will be really difficult to turn around.
Experts recommend either using special sockets, which not every home craftsman has, or cutting off part of an ordinary wrench with a grinder, or trying to do something like that. All other actions, except for unscrewing the intake fittings, must be repeated according to the proposed plan, and new parts must be installed in place of the old parts. Remember, such actions will have to be repeated every 5-7 years, if during this time it does not mean repairs to the bathroom and a complete replacement of the tank. So be prepared for such ups and downs, and experience usually comes with age.
Step-by-step instructions for replacing the flush mechanism in a toilet
The flushing mechanism is installed as follows:
- Close the valve through which water enters the tank and drain the remaining contents of the container.
- If the toilet has a button, dismantle this element.
- Remove the tank cover.
- Remove the release lever.
- Unscrew the drain valve with the seat.
- Disconnect the tank by unscrewing the fasteners that connect it to the toilet.
- They take out the plastic nut that held the mechanism.
- Remove the gasket located under the tank, wash it or replace it.
- The gasket is returned to its place.
- Install the mechanism in the drain tank, screw a new nut on the bottom.
- Secure the tank.
- Adjust the location of the drain lever according to the height of the container.
- Turn on the water and fill the tank.
- Adjust the settings of the drain mechanism.
- Place the cover in place.
- Screw the button.
Continuous filling and leaking
To figure out what to do if the drain tank does not hold water, you need to find the cause of the problem. For this purpose, it is opened and the mechanisms are inspected, having previously shut off the water supply. Some faults can be resolved within a few minutes; in difficult cases, the fittings will need to be replaced.
Skewed float or drain valve
Water will constantly drain if the shut-off valve (bulb) is skewed and does not fit against the seat. It is enough to correct it so that the tank mechanism begins to function correctly. This problem most often occurs with outdated drain systems with a lever or vertical rod equipped with a handle.
Old style drainage device Source leroymerlin.ru
A skewed float prevents the supply valve from closing. The tank is continuously filled with water, which flows into the toilet bowl through the overflow tube. To fix the problem, you need to adjust the float, at the same time checking its tightness.
Leaky float
A float made of plastic may lose its seal over time. Water penetrates inside the body and the float is not able to fully rise to the surface. As a result, the lever remains in the lowered position and the supply valve does not close.
There are two options to solve the problem:
- purchase and installation of a similar or similar float;
- repairing a worn float using sealant, glue, heated plastic and other available materials.
After repairing or replacing the float, the filling level of the tank should be adjusted.
Instructions
The reason for dismantling the cover is the same in almost all cases - the main mechanism is located in the tank. It is responsible for both collecting water and draining it. The mechanism can break at any moment.
The container is filled to the set level, after which the water supply stops. The liquid is retained thanks to a shut-off valve. The device is activated by pressing the release button. The valve is instantly lifted by a lever and the water drains into the toilet.
The principle of the mechanism is quite simple. Almost all parts are made of plastic. Some components are made of rubber. A typical reason for dismantling is poor-quality assembly of the structure.
All sealing elements and other consumables require replacement over time. If they are not carried out, problems will arise:
- constant pouring of liquid into the toilet;
- lack of water for flushing;
- water does not pass through the drain;
- leakage directly from the tank.
With constant spouting, foreign objects may get stuck under the valve. If the tank is leaking, the reason is a failure of the inlet hose.
One-button model
If your toilet flush button starts to stick, it's time to use your home tools. To remove one button, you only need pliers as well as a flathead screwdriver.
From the outside you can see that the button is located in a ring. It is an integral part of the sleeve, which must be dismantled. The ring often has a special groove. A screwdriver is inserted into it, and the structure begins to scroll. If no groove is found, then the sleeve can be unscrewed with your fingers. Pressing the ring down tightly, you need to turn the sleeve counterclockwise
The main condition is that you should unscrew it as carefully as possible, because the elements may suffer from physical impact
It is recommended to count the number of revolutions during dismantling. This will help install the part in place faster. This way you can calculate the optimal length of the adjustable rod.
After removing the button, the lid is removed to the side and repairs to the drain mechanism itself begin.
Two-button model
A system with two buttons, like that of the Roca brand, has become widespread. Opening a toilet cistern with a double button is easy. The principle differs only in that the system is not unscrewed along with the sleeve. It is taken out separately from the glass.
You will need a screwdriver during this process. One of the buttons should be slightly pressed down, and at this time the second one should be carefully pryed off with a screwdriver. Under the button itself you can find small fasteners. They can be different:
Regardless of the modification and manufacturer, any of these fasteners can be simply removed. After this, the button is much easier to unscrew. The last step is to remove the lid from the tank.
If upon inspection the problem turns out to be much more serious, you can completely disassemble the toilet cistern with two buttons. Each step must be remembered or recorded on a mobile phone camera in order to put everything back together.
Installation
The type of wall-hung toilets is considered innovative, although it has long been installed in private houses and apartments. The design of the model looks much more solid. However, there are certain difficulties in maintaining it.
Installation involves hiding the tank in a special cavity in the wall. It is equipped in advance. The tank is carefully covered with a shield, plasterboard sheet or wood with a special lining.
Cover removal method:
- press the button at the bottom and try to pull it out with gentle up and down movements;
- unscrew all fastening screws using a screwdriver;
- release the tight latches;
- pull out the pushers (they are made of plastic);
- remove the brackets;
- dismantle the partition by removing the special clamps at the top;
- turn off the water supply at the tap;
- dismantle the rocker and valve mechanism;
- remove the latch (to do this, bend the small petals with moderate force);
- remove the top part of the tank without pulling out the drain valve (to prevent it from jamming, you should turn the part from side to side).
If you encounter problems when assembling it yourself, it is better to refer to the manufacturer's instructions for useful information. Roka and other brands provide step-by-step guides on the correct installation of plumbing fixtures and its individual parts.
Damage not related to fittings
It is important to know how to repair the cistern or the toilet itself if cracks appear in the body. Leaking water can cause a flood, so if a problem is discovered, you should act immediately. Ceramic glue will help seal the crack, but the plumbing will have to be replaced in the near future.
A leak may also occur if:
- The nuts on the bolts that secure the tank to the toilet have come loose. The fasteners must be carefully tightened with a wrench. If the seals need to be replaced, the tank will have to be removed and reinstalled.
- The connecting cuff between the tank and the toilet shelf is deformed or damaged . It must be replaced, but as a temporary measure, the resulting gaps can be sealed with silicone sealant.
Problem #2: External leaks
If an external leak appears, you can repair the toilet yourself and not call a repairman. Typically, problems arise due to a loose seal between the toilet bowl and the tank, or if the seals under the screws are worn out.
In the first case, it is enough to remove the tank, check the gasket and, if it has become too hard or cracked, replace it.
It happens that the reason for such a leak is trivial - the gasket is installed incorrectly. Then it’s enough just to put it in place, or better yet, change it.
If a leak appears at the connecting screws, they need to be unscrewed and the rubber seals replaced. To do this, it is not even necessary to remove the tank itself.
When choosing new seals, it is better to give preference to cone-shaped ones rather than flat ones. They adhere much more tightly to surfaces.
When tightening the screws after replacing the seals, it is important to ensure an even distribution of forces to prevent distortions, otherwise a new leak may appear. To do this, tighten the screws little by little and one at a time.
Preventive measures
To avoid problems associated with leaks and excessive consumption of water constantly flowing into the toilet bowl from the reservoir, it is important to know the structure of the flush tank and be able to adjust and repair the mechanisms.
It is recommended to systematically:
- check the condition of the flexible connection and connection unit;
- inspect the fittings inside the container, clean it of lime deposits and other contaminants;
- check the tightness of the connecting collar and bolted fastenings using a paper napkin;
- Inspect the tank and toilet for cracks.
Preventive measures can extend the service life of mechanisms.
Rules for caring for plumbing fixtures
In order for your plumbing fixtures to serve for a long time and not fail at the most inopportune moment, it is important to take care of proper care of them. Products made from sanitary ceramics require regular cleaning, and this should be done using special chemicals.
They contain caustic alkali, which destroys accumulated organic deposits and removes rust. The cleaning product can be easily purchased at any hardware store.
However, it is not recommended to clean sanitary ceramics with products based on soda and other abrasive substances. They scratch the surface, which leads to the formation of tiny scratches on it. Dirt and rust accumulate in them quite quickly, so repeated cleanings will have to be carried out more often. Over time, it will no longer be possible to clean the plumbing fixtures.
Problems with the toilet flush mechanism often arise due to clogging by impurities present in tap water. To prevent contamination, it is recommended to install a coarse filter at the entrance of the water supply system to the apartment. This will significantly increase the trouble-free service life of all home plumbing fixtures.