Have you discovered that your toilet flush tank is refusing to do its job? Agree that the toilet has long been one of the most necessary types of plumbing equipment for a comfortable human life, so its breakdown can hardly be called a joyful event. Do you want to repair the toilet cistern yourself, but don’t know where to start or where to look for the problem?
We will show you how to detect the source of trouble and fix it on your own - the article outlines ways to eliminate common malfunctions. The procedure for dealing with all common breakdowns is discussed in detail.
Repair tips are provided with photographs that will help you understand in detail the structure of the drain mechanism. To help the home handyman, video recommendations are provided for disassembling the tank, eliminating leaks and replacing fittings.
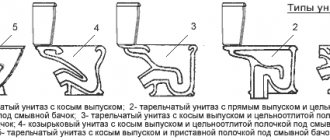
Types of cisterns
Before you start repairing equipment, you need to get acquainted with its structure and operating principle. The toilet itself consists of a bowl and a container filled with water. It is the container that is called the cistern.
The water in it enters the bowl, where it washes its contents into the sewer system. The drain system is activated by pressing a lever or button. This depends on the equipment model.
You can find various types of cisterns on sale. There are several classifications of such equipment. Based on the location of the tank relative to the bowl, there are two main categories.
Completely separate designs . It is assumed that in this case the tank and bowl are separated. This is the very first existing toilet option. The height of the tank can have different modifications.
A high position assumes that the cistern is located a meter or more away from the bowl. The elements are connected to each other by a pipe. This option was relatively recently the most common.
Separate design with low-mounted tank. In this case, the water drainage mechanism can be not only lever
This is explained by the fact that the high location of the flush tank guarantees high speed and good pressure of water entering the flush. Today such models are used less frequently.
Modifications with a cistern hidden in the attic or under a false ceiling are popular.
Another variety is built-in cisterns , which are equipped with wall-hung toilets. They are fixed in a special installation.
The low location of the tank suggests that it is mounted on the wall at a short distance from the bowl. They are connected by a short pipe. The drain fittings are located on the tank body.
Since the height from which the water drains is smaller, its speed and pressure are somewhat lower.
The flush cistern for compact toilets is placed directly on the bowl. For this purpose it is equipped with a special shelf. Such models are very convenient to install and operate, but the water pressure and its speed during flushing are minimal.
Compacts are produced with tanks of trapezoidal and triangular shape. Such toilets are called corner toilets. They fit very well into the corners of rooms, it is especially convenient to install them in small bathrooms.
Monoblock toilets . The design is a toilet with a flush cistern built into the body. Such equipment is very easy to install. All you need to do is supply water and connect the device to the sewer.
This can be considered the main advantage of the candy bar. If serious damage occurs in any part of the monoblock, it most often has to be replaced, since the monolithic design most often prevents a full repair.
You can read more about the different types of toilets in this material.
Video explanation of why water does not fill the toilet tank
It can be difficult for a person who has never dealt with plumbing work before to figure out what’s what. You need to understand how everything should work and why it doesn’t work out that way, that without professional knowledge it can be difficult and for some, in fact, it’s easier to call a real master than to suffer yourself. For those who really decided to study the issue and solve all the problems with the tank on their own, you are invited to watch the video below, where everything is quite accessible and simply explained, and is also shown with examples.
Design of various drain mechanisms
A water release mechanism is installed inside each drain tank.
Today there are several varieties of this design:
- Lever . It is a lever that, when pressed, activates the release of water into the bowl. Mounted in separate toilets, in tanks with an upper and lower location.
- Pneumatic . The trigger mechanism is activated by pressing the button of the pneumatic chamber, which is connected to the release valve using a flexible air duct.
- Stock . To open the drain valve, it is necessary to lift the vertical rod, which is located on the top of the tank lid.
- Push-button . The drainage mechanism in this model is started by pressing a button on the lid of the drain tank. There are two-button variations, in which one of the buttons is responsible for draining half of the tank, the second is responsible for draining all the water in the tank.
All tanks are filled with water strictly to a certain level, after which their filling automatically stops.
Lever mechanism for draining water. Used most often in old models of flush cisterns or in antique-style design devices
Depending on the method of supplying water to the tank, valves of different types can be built in. Floatless valves can be bottom or side.
In this case, the design contains a special chamber, which in appearance resembles an inverted glass.
The operating principle of the device is based on Archimedean force. It changes its value depending on the degree of filling of the tank and changes the position of the chamber that shuts off the water supply.
The side float valve is either a diaphragm or a piston type. In any case, it shuts off the water when a certain volume of liquid enters the tank.
All reinforcement can be presented as independent interchangeable elements or as a single structural set.
Toilet cistern with bottom water supply. The most trouble-free and silent option, therefore it is especially popular in city apartments
According to the type of connection of the water supply fittings, all drain tanks are divided into two groups.
- Lateral . The liner is connected on the right or left. The tank is usually equipped with two holes. The non-working part is covered with a special plug. The main disadvantages of such tanks are considered to be noise when filling the container with water and an unaesthetic connection to the water pipe, which cannot be disguised.
- Lower . The water supply pipe is connected from the bottom of the tank. This way you can hide the water fittings. In addition, when filling the container with water, minimal noise is created.
Each type of flush cisterns finds its consumers and is used in various models of toilets.
Preventive measures
Tablets for the toilet tank prevent the button from sticking and soften the water.
In order for the tank and toilet to work properly, you must follow a few simple rules. Their implementation does not take much time and allows you to do without urgent repair work.
At the entrance of the water pipe into the house, as well as at the water distribution, you need to install a cleaning filter . The coarse cleaning model is quite suitable. Its task is to prevent large particles from entering the system, which most often get stuck in narrow openings.
The cleaning filter should be checked and cleaned as needed. The device is mechanical; it is enough to simply wash it with hot water. The frequency of cleaning depends on the quality of the tap water. It is worth remembering that such a filter only filters mechanical particles: sand, rust particles, plaque particles from main pipes.
The fittings of the drain tank must be washed periodically . Over time, a sludge-like mass of organic particles settles on the surfaces of parts, which the filter does not screen out. This mucus traps larger particles of debris and pieces of scale. The frequency of cleaning also depends on the quality of the supplied water.
Connections should be periodically . If leaks or even just wet spots are detected, you need to immediately disassemble the device and evaluate the tightness of the connection. When dismantling, it is easy to determine which gasket rings are worn out and what exactly needs to be replaced.
Basic elements of a drain tank
Structurally, all variations of flush cisterns are designed approximately the same. Each of them has three main mechanisms.
Drain or shut-off valves are designed to regulate the flow of water into the toilet bowl. Prevents liquid leakage from the reservoir.
During the process of filling the container, the water in it causes the shut-off valve to be pressed as tightly as possible against the drain hole, which prevents water from flowing into the bowl.
If there is constant water leakage, this may be due to a problem with the shut-off valve. Read more about the shut-off valves of the drain tank below.
The filling valve is combined with the water supply device. Designed to control the liquid level in the drain tank. Stops water supply as soon as it reaches a certain level.
To determine the amount of liquid in the tank, a float is used, connected by a rod to the filling valve.
Regardless of where the fill valve is located - the valve is on the side or below - the float is placed vertically in the tank. In older models - horizontally.
The overflow and drain mechanism is represented by fittings equipped with a start button or lever. Designed to prevent water from overflowing from the tank if the float valve breaks.
The overflow system is connected to the drain; when you press the start button, it is activated. Excess water is discharged to the sewer. An important element of the mechanism is the float valve. Water leaks from the tank are most often associated with its functioning.
The float valve was ubiquitous in older models. The float rises along with the water arriving in the container and closes the valve at a certain level
You need to understand that all common malfunctions of the drain tank are associated with these mechanisms. And to eliminate the problems, it is these elements that will have to be replaced or adjusted.
If chips or cracks appear on the surface of the tank, most likely it will have to be replaced. Despite manufacturers' statements, most modern adhesives used for repairs cannot cope with this task.
Image gallery
Photo from
Permanent damage to the toilet cistern
Repairing damage with universal glue
Application of epoxy resin
Using silicone sealant
Water does not fill into the toilet cistern: we are looking for the reasons ourselves
Sometimes breakdowns occur in a house or apartment, which can be quite difficult for a non-professional to deal with, due to new designs that, in the eyes of an amateur, are not at all clear how they work. When the toilet does not fill the tank with water, you should devote enough time and effort to the problem, otherwise this risks complete failure of this plumbing fixture, which will inevitably lead to its replacement. But why pay a lot of money for new equipment if, if you wish, you can try to fix such a malfunction on your own, first figuring out what reasons could have caused the breakdown.
Important
Before you disassemble the entire structure down to the screw, when water is slowly being drawn into the toilet tank or is not being drawn at all, you should check whether there is water in the plumbing system. No matter how funny it may sound, about forty percent of drainage problems are, as professional plumbers say, that the water simply does not reach the tank. First, make sure that the water is not blocked in the entire house or riser, and only then proceed to look for other causes of the breakdown.
If there is water in the system and its pressure is sufficient, but it does not flow into the toilet cistern or flows slowly and poorly, then you can begin to look for other reasons. To finally make sure that everything is in order with the water, since risers for toilets are sometimes separate, with the possibility of being completely plugged, look for common taps in the basement, but most often it is enough to talk with the neighbors above or below to understand what’s what.
- An incorrect position of the float can lead to poor water flow into the toilet tank. This needs to be checked first, because it is the float that allows or blocks water, being in different positions.
- A clogged or damaged underwater water supply pipe may well lead to slow water intake from the system, and sometimes to its complete absence.
- The presence of residues of corrosion processes (rust) or sand in the place where the pipe is connected to the tank will lead to breakdowns, as well as sand and rust in the filter. Often such problems arise after repairs to plumbing systems are carried out.
- A damaged, broken or clogged inlet valve may be the reason why water does not flow into the toilet tank.
Excessively tightened bolts, nuts and other structural fasteners can also cause failure. It is worth checking everything very carefully, twisting all the connections and making sure that everything is assembled tightly, but not overtightened. It is necessary to check whether mucus and plaque have accumulated on the internal elements of the plumbing, because this can also lead to its breakdown.
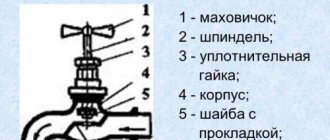
Intake Valve Replacement
Before repairing the toilet, you should turn off the water supply valve. It is connected to the pipeline from the riser. Then the flexible hose is unscrewed from the inlet mechanism. It can be easily removed if the fastening is loosened. A new or repaired one is installed in its place. Assembly is carried out in reverse order. Plastic threads do not require sealing, and fluoroplastic tape is wound onto brass threads.
How to put everything back?
To put the toilet tank back together, you need to carry out the following operations:
- secure the fittings responsible for filling/draining water, using rubber gaskets where necessary;
- adjust the position of the float and drain valve;
- cover the tank with a lid;
- screw the push-button glass (in models with one button) or tighten the fastening screw and latch the control buttons - in two-button versions.
As can be seen from the above, there is nothing complicated about self-installation, repair and configuration of flush cisterns for toilets with a button . And for most people with at least some technical skills, it will not be difficult to carry out these procedures on their own, saving on calling a plumber.
What do you think of this article?
general information
The most common design of a modern toilet is the “compact”, which involves installing the tank directly on the toilet. Control mechanisms were initially produced in two types : a ball attached to a retractable rod attached to a “pear” - a rubber plug that covers the drain hole and a lever located on the side surface of the container.
Today, almost all manufacturers have switched to producing push-button models of tanks.
There are two main types of these modifications:
- with one button;
- with two buttons or one button divided into segments.
The second variation involves a slightly more complex design of the valves for controlling the drainage processes , but it pays off quite quickly due to the possibility of choosing one of the modes:
- when you press one button, the tank is completely emptied;
- when the second is activated, it is partial, which allows you to significantly save on water consumption.
You can learn more about the operating principle and design diagram of toilet flush cisterns with a button from the materials on our website.
Float misalignment repair
If the toilet does not fill with water at all, this is unlikely to happen as a result of the float being misaligned. But in the case when it enters the system, but not in the required volume, then the float should be checked for its correct location.
To do this, you need to open the lid - under it you will see water, with a mechanism located in it and a lever, at the end of which a special buoy is attached - a float. It is this part of the device that is responsible for drawing water to the required level, after which it closes the inlet valve. It also happens that the toilet leaks after flushing; this may also be due to the float.
In case of misalignment, it begins to prematurely interrupt the supply of liquid, which ends in the inoperability of the device. The displacer is carefully placed by hand into the required position - after this, the operation of the system should be restored.
Problem with the toilet bowl installation
Breakage of the bowl is extremely rare. This is only possible if the toilet was initially fixed incorrectly to the floor or wall. Therefore, you should install the device correctly and repair the installation in a timely manner, thanks to this you can avoid serious and costly breakdowns. If a puddle appears on the floor around the toilet, then most likely the breakdown will be in the tank itself. Here are some possible reasons:
- the seat is damaged due to corrosion;
- the pear does not stick tightly enough;
- float valve is not adjusted correctly;
- insufficient tightness of the nut connection.
When any gasket wears out, it should be replaced immediately with a new one.
Replacing the installation gasket
In order to tighten the loose nut at the base of the overflow in the tank, you need to remove it and tighten the nut. However, sometimes a retaining clamp can be used. You can also replace a worn cuff.
Types of breakdowns and their elimination
There are several common malfunctions that manifest themselves as follows:
- water continuously flows from the cistern into the toilet;
- constant flow of water from the water supply into the container;
- To drain the water, you must press the button repeatedly;
- the button on the drain tank does not work completely;
- the toilet is leaking;
- The collection of water into the cistern is too noisy.
In any of the above cases, you can carry out repairs yourself, because the process of such work is not very complicated. The most important thing is to determine the cause of a particular problem and eliminate it.