The internal structure of the cisterns of many modern toilets, at first glance, is completely different from what was used 30-40 years ago. Therefore, when many questions arise related to the maintenance of sanitary fittings, for example, how to adjust the float in the toilet or adjust the outlet valve, apartment owners sometimes have uncertainty - should they solve the problem themselves or invite a third-party specialist? However, the functionality of current devices is based on the same principles as before. Their understanding, as well as knowledge of plumbing maintenance algorithms, makes it possible to maintain it in working condition on your own.
Picture 1
The main causes of extraneous noise in the tank
To deal with a problem, you need to understand its source. In the case of noise in the tank while filling with water, experts identify the three most common problems that cause the toilet to “sing”:
Faucet gasket wear
A shut-off valve is installed in the toilet cistern, which is responsible for shutting off the water supply to the toilet if necessary. With prolonged use, the rubber gasket near the faucet begins to wear out and tear. When the flow of water passes through this damage, a strong noise and hum appears.
No tube on tap
Each tank with top water supply is equipped with shut-off valves, which have a bottom water outlet. It is in this area that there should be a tube, which is responsible for ensuring that water flows down the wall of the tank or is supplied to the very bottom when collected. If there is no such tube, the strong water pressure when drawing water will create noise.
Salt coating
It's no secret that the water flowing through our water supply system leaves much to be desired. Impurities, salts, etc. settle on the inner walls of the tank, inside taps, tubes, floats and other mechanisms. This plaque prevents the normal supply of water, and as a result, a decrease in pressure causes extraneous sounds.
Preparation for repair
Before work, turn off the shut-off valve on the cold water pipe. Such a tap should be in a private house and apartment. If it is missing, in a high-rise building they shut off the valve on the pipe in the basement, depriving residents of apartments on the upper and lower floors of water through the riser.
Prepare tools for work :
- pliers, a universal screwdriver with different attachments;
- a set of open-end wrenches or an adjustable gas wrench;
- side cutters, rubber spatula;
- a gun for squeezing sealant out of a tube.
A pipe remover is used, which allows you to clean the inside of the connections and pipes. You can use a countersink instead.
The materials you will need are rubber or polymer gaskets; the need for them will be determined after inspection. Spare parts are purchased for those that have become unusable and cannot be repaired. You will need silicone sealant.
Causes of tank leaks and their elimination
If the water in the toilet tank does not hold, this can be caused by two reasons:
Below we will take a closer look at the possible causes of malfunctions in these mechanisms and their correction.
Tank overflow
The tank may overflow for the following reasons:
- The position of the float is incorrectly adjusted
- adjustment can be done in different ways, depending on the design of the valve. For example, if the lever is metal, then you just need to carefully bend it. Plastic levers may have a ratchet or an adjusting screw. - There is a hole in the float
- in this case, the part can be temporarily sealed and then replaced. - The float is covered with dirt
- as you might guess, the part just needs to be cleaned of dirt.
Membrane malfunction - if the water does not shut off in any position of the float mechanism lever, then there is only one way out - replace the shutter valve. The price of the membrane is low and it is not difficult to find it on the market or in specialized stores.
Dismantling the parts is not at all difficult. In some models, all fasteners are plastic, so dismantling can be done even without tools.
Doesn't hold valve
If the water supply is turned off, but the flow does not stop, it means that the valve in the toilet tank is not holding properly.
There can be two reasons for this malfunction:
- The rubber valve has dried out;
- Debris got under the valve.
In any case, to eliminate the malfunction you will need to dismantle it. The design of the drainage device can be different, and accordingly, dismantling can also be carried out in different ways. Most often, the mechanism is disassembled into two parts, as a result of which the valve can be removed.
The instructions for fixing this problem are extremely simple:
- First of all, you need to clean the valve and drain hole from dirt;
- Then the device must be assembled and installed in place;
- If the toilet still does not hold water, you need to disassemble the mechanism again and replace the valve.
Other faults
In addition to those described above, some other malfunctions may occur in the drainage system; the most common ones are listed below:
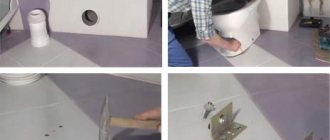
The connection between the tank and the toilet is leaking - in this case, it is necessary to completely dismantle the tank and replace all existing gaskets, including screw seals.
In the photo - dismantling the drain tank
Mechanical failure of any elements of the shut-off valves - this problem can only be solved by replacing the broken parts.
This is actually all the information you need to know in order to fix such water breakdowns yourself.
List of required tools
In order to eliminate the leak, you need to acquire some tools and consumables. During the repair process, it is necessary to replace unsuitable seals, hoses, and gaskets.
When the toilet cistern is leaking, you may need:
- sealant for plumbing work (silicone);
- sandpaper;
- limescale remover;
- Screwdriver Set;
- knife;
- pliers;
- a set of keys;
- fum tape (sealing tape for water).
General information
Many people are afraid to “touch” plumbing with their own hands and call specialists if any breakdowns occur. However, the design of the drain tank is quite simple and understandable, thanks to which anyone can repair it without having any social knowledge. To do this, you only need the ability to handle basic tools.
Some breakdowns may require replacement of failed parts. In this case, you need to dismantle the faulty elements and take them to a plumbing store to select a suitable repair kit.
Separately, it should be said about the repair of a wall-hung toilet cistern, which is a much more complex procedure. This is due to the fact that the container is hidden in the installation, as a result of which the decoration of the room will have to be disrupted. In this case, the tank itself may differ in shape from the traditional one, however, the principle of its operation is the same.
Shut-off valve arrangement
The drain mechanism of a tank is called a shut-off valve in the professional world of plumbers. Before you start repairing it yourself, you should understand how it works.
So, if an uninformed person opens the lid of the container, he will see only two parts there:
Float mechanism;
Below we will take a closer look at their device.
Float mechanism
The float mechanism consists of two parts:
- A housing with a membrane that shuts off the water supply;
- A float with a lever that regulates the position of the membrane in the housing.
The water filling level can be adjusted by the position of the float.
The drain mechanism usually includes three main parts:
- Valve;
- Frame;
- Drain button with lever system.
The operating principle of this device is quite simple - the position of the movable valve, located in a plastic case, is changed using a system of levers by pressing a button. In addition, the tank has an overflow that directs excess water into the toilet bypassing the valve, which helps prevent it from overflowing and, as a result, flooding of the apartment.
How does the drain mechanism work?
The flush is based on the principle of pushing out the float module. When we press the button, the water drain valve rises and it quickly flows through the drain pipe. As soon as water begins to flow from the drain tank, the float lowers and opens the water supply. As the water level rises, the float rises and closes the flow.
Maybe the article “Installing a toilet with your own hands: step-by-step connection instructions” will be useful to you. Go>>
The water in the toilet tank does not shut off. What can be done
Hello, such a problem, in the tank at the outlet of the valve, water is leaking all the time. Those. It feels like the float doesn’t press hard enough and the valve doesn’t close. I tried bending the float a little to make it press harder, but it didn’t give the desired effect. The toilet is old Soviet.
I think the valve is clogged, I haven't checked it myself. If the problem really is with the valve, is there any way to fix it yourself?
Please answer quickly, otherwise the toilet does not flush and the owner’s door may ring from below)))))
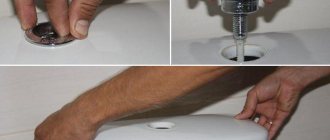
I'll start by answering the question “where does the water drain?” If you look at the photo below, you can see that there is a tube sticking out of the tank. This tube is the overflow into which water is drained if the supply valve does not close. Thus, the water does not flow onto the floor, but into the toilet.
If there is no such overflow tube, then another drain valve may be installed, and the overflow tube is made inside the valve itself. See photo below, shown by arrows
where does the water go?
If there is no overflow, which is extremely rare, then it is necessary to turn off the water and disassemble the supply valve.
Let's assume that you have already unscrewed the flexible line and removed the supply valve from the tank.
Next, remove the plastic plug:
After this, straighten and remove the cotter pin with pliers:
Next, hold the valve body with one hand, and with the other hand, pull the float holder out of the valve body as shown in the photo:
It can be seen that the “lever” with the rubber gasket that locks the water has been pulled out.
If you now look into the valve body, you will see a through hole:
Water passes through this very hole into the toilet tank. And it is this hole that locks the “lever” from which the rubber gasket fell out.
Now we have the task of clearing this hole if it is clogged. To do this you will need a thin knitting needle, a large needle or a suitable wire:
After cleaning, we look at our “lever” with gasket:
Please note that the gasket has already been pressed in. Usually such a gasket can no longer block water
There are several ways to solve this problem:
4.Replace the valve.
3. Replace the gasket
2. Smooth out the dented area with a knife or sandpaper and carefully stick on a round rubber band that can be cut from a bicycle inner tube.
1. Turn the gasket over. This is the simplest method and should be done first.
We take out the gasket from the holder
And we turn it over
As you can see, on the other hand, the gasket is even and it will serve for some time.
Now reassemble everything in reverse order and do not forget to insert the cotter pin or locking wire.
This is such a simple matter.
The situation becomes more complicated when the float holder inside the valve rots. Then you will not be able to do without replacing the supply valve.
You don’t have to buy exactly the same one, you can buy something like this:
The most important thing when buying is to take a valve with a side supply and not from the bottom. Otherwise you won’t be able to put everything back together. )
Preventive actions
If you do not want to frequently repair plumbing equipment, you should take a number of preventive actions. Once every six months it is necessary to clean the toilet tank and its bowl. It is necessary to regularly inspect the condition of fittings and related fittings.
Any toilet, regardless of the manufacturer, reacts poorly to mechanical damage and temperature changes.
Timely preventive maintenance extends the service life of plumbing fixtures. If your toilet tank is dripping, repairs should begin immediately. Its design is so simple that it does not require any special tools. You can do this work yourself. If there is a leak, it is better to fix simple breakdowns first, and then begin to eliminate more complex problems.
Constantly filling the tank with water
Repairing a toilet cistern with such a malfunction involves aligning a displaced or skewed float lever. The problem can be solved by placing the lever below the entrance of the water supply pipe at a distance of 2.5 cm.
If you don't have specific construction skills, you may only make things worse
It is worth assessing the condition of the float. There may be damage to the element body and accumulation of water in it, which leads to weighting of the part. In the event of such a malfunction, a leak in the tank can be eliminated by freeing the float from water and sealing the hole, after which the element is placed in the place provided for it in the tank. To seal a hole or crack, use plastic heated to a plastic state or a plastic bag that is always on hand and tightly fixed to the element.
If water constantly leaks from the tank and it is possible to flush only after frequently pressing the button, the problem is a malfunction of the siphon membrane. To replace it, first replace the tank lid with a crossbar, to which the float lever is fixed by tying it up. The tank is emptied of water, the fixing nut used to connect the tank to the flush pipe is removed, and the siphon nut is loosened. After disconnecting and removing this structural element, remove the damaged membrane, replacing it with a new analogue of a suitable size and identical shape. Then perform the steps described above in reverse order.
If there is damage to the flush button, if the toilet tank does not leak, repair the faulty rod by disconnecting the broken part and replacing it with a piece of thick wire. In order for the toilet to work properly after repair for a long period of time, it is better to immediately install a new draft.
Signs of leakage
If the tank is leaking, you can observe the following:
- you can hear falling drops of water or a flowing stream;
- you can see rusty stains, lime deposits on the walls of the tank;
- a small wet trace is visible in the toilet bowl, which remains after flushing;
- the appearance of condensation on the outside or on the hoses;
- The water does not go away quickly after pressing the button.
If the water does not drain quickly or the level is incorrect, then the water pressure is not sufficient to pass the waste through the water seal. And some of it remains in the toilet bowl.
As soon as you detect one of the listed symptoms, you need to determine the cause and eliminate the problem.
When the problem is with the bowl
Problems associated with the breakdown of the toilet bowl itself are extremely rare. Typically, an unpleasant situation occurs due to improper fixation of the housing to the wall or floor, as a result of which the toilet leaks. When the structure is assembled (especially when choosing one built into the wall), it is quite difficult to solve the problem that has arisen, so you should take care of the correct installation at the installation stage, otherwise you will have to disassemble the complex structure, assessing the condition of the gaskets and the quality of the connections.
In some cases, in order to eliminate a leak in the toilet, you still need to carefully inspect the tank first, since the constant formation of a puddle on the floor can be explained by an insufficiently tight fit of the bulb, damage to the seat due to corrosion processes, improper adjustment of the valves, or a violation of the tightness of the nut connection. In some cases, simply replacing the gasket or worn cuff with new elements or tightening the loose nut at the base of the overflow is enough, for which you first remove the tank. For maximum reliability, a fixing clamp is additionally applied.
If water constantly flows in the toilet, but repairs are not carried out immediately after a malfunction is discovered, limescale may form on the walls. A mixture of water and citric acid, which is applied to contaminated areas and left overnight, can eliminate the unsightly formation. Similar steps can be performed to clean the tank itself.
Provided that the repair is carried out correctly, the tank and the toilet bowl itself will work properly for a long period of time, without requiring a complete replacement of the plumbing fixture. Do-it-yourself repairs are an economical and simple option, so it’s worth thoroughly studying the problem and solving it using one of the methods suggested above.
Plumbing fixtures have become so commonplace in our apartments, houses, and office spaces that their presence is taken for granted.
But some fifty years ago, the majority of Russians did not even imagine that a “latrine” could be arranged inside a house or apartment - almost everywhere they used free-standing sheds installed above cesspools.
And today, problems with plumbing terrify ordinary people - after all, without a properly functioning toilet, the advantages of apartments are negated.
One of the most common malfunctions of the toilet cistern is the constant accumulation of water, which occurs due to the fact that water from the toilet cistern leaks into the toilet
or on the floor of the bathroom (read more about this situation). Naturally, this state of affairs cannot suit anyone, because it leads to the following consequences:
- Unreasonably high water consumption
. This natural resource is becoming more and more expensive every year, and given the widespread installation of water meters, its constant consumption leads to prohibitively high utility bills. - Constant noise in the toilet room
. Taking into account the acoustic characteristics of our apartments and thin walls that do not have high-quality sound insulation, the sound of flowing water does not in any way contribute to the good mood of the residents, especially at night, when the overall noise level decreases. - A malfunction of the toilet cistern threatens to flood the bathroom
with all the ensuing (in the literal sense of the word) consequences, leading to the need to repair the flooring and, in the case of low-quality waterproofing of the interfloor ceiling, the underlying neighboring room.
Button repair
Despite careful use of the key, it becomes unusable over time.
- The key on the cover may become stuck and remain pressed when released. If the system has two buttons, one or two “stick” at once.
- Sometimes the button is loose, so pressing it does not always lead to draining - you need to choose the correct position.
- In the third case, the pressure occurs with force.
Valera
The voice of the construction guru
Ask a Question
For many users, the difficulty is removing the cover to take a closer look at the problem. You won't be able to unscrew the button right away; it will turn freely. To remove, press down on the key, then carefully rotate the bezel counterclockwise to unscrew it. Then remove the cover.
If the button gets stuck, disassembly is not always required. First, press the key several times, sometimes this action leads to the start of normal operation. If it doesn’t work, unscrew the locking rim and then look at the circumstances:
- install a new part;
- clean the shaft (seat) and put the old part back.
To repair a tank with a double-type button, they operate on the same principle.
Trouble-shooting
So, your toilet tank is leaking - what to do in this situation? First of all, you need to find out the reason why the leak occurs. There may be several options:
Incorrect setting
Most often, the reason for constantly bubbling water in the toilet is trivial - the float of the locking mechanism is incorrectly configured or its setting has gone wrong. As a result, the valve does not shut off the water before it enters the overflow system.
In this case, you need to lower the float to a lower level with the shut-off valve completely closed.
The setting process largely depends on the design of the locking mechanism:
old model - in this case, the shut-off valve and the float are connected by a metal lever. To change the water level at which the valve will operate, you just need to slightly bend the lever with your own hands.
Some models of Soviet-style fittings have a plastic lever and consist of two halves connected by a plastic bolt. In this case, you need to loosen the bolt, change the angle between the levers, and then tighten the bolt to fix them in this position;
modern model - the position of the float changes relative to the lever by moving it. To do this, you need to apply some force or even press the spring locking mechanism.
As a rule, setting the float takes only a few seconds. The only difficulty may arise with dismantling the tank cap.
Usually, to remove it, you need to unscrew the ring surrounding the button. Old plastic tanks have clips on the sides.
Depressurized float
After adjusting the float, make sure that it floats on the surface of the water and the locking mechanism works as expected. If it turns out that the float is “submerged” or even submerged in water, it is useless to adjust it, since it has become depressurized.
In this case, this part must be replaced. As a rule, it changes along with the shut-off valves.
Therefore, the dismantling instructions look like this:
- turn off the water supply;
- flush the existing water into the toilet;
- unscrew the nut of the flexible connection;
- then unscrew the nut that secures the shut-off valve.
After this, you need to take the shut-off valve and go with it to the nearest plumbing store to purchase a similar mechanism. Install the new part by performing the steps in reverse order.
Locking mechanism malfunction
If it turns out that the float is working and adjusted, but the toilet tank is still leaking, what should you do? In this case, make sure that the shut-off valve shuts off the water.
To do this, follow these steps:
- drain the water from the tank;
- lift the lever with your hands until it stops;
- see if water flows through the valve.
If water continues to flow after lifting the lever, the shut-off valve is faulty. In this case, it must be dismantled according to the scheme described above.
In principle, you can try to disassemble the valve and replace the rubber bands. But finding a repair kit on sale is not easy. Therefore, as a rule, the best option is to buy a new valve.
The price of a valve with a float ranges from 100-500 rubles, depending on the type of design and manufacturer of the fittings.
Water discharge system malfunction
All the malfunctions described above lead to water flowing into the toilet through the overflow system. However, often the cause of a leak is the drainage system. To check this, simply turn off the water.
In the photo - an old-style plum pear
Often, the drain system leaks water due to a loose fit of the shut-off membrane or bulb. A similar situation can arise if any debris gets under the rubber band.
In this case, you need to dismantle the drain mechanism, then wash it, and also wipe the exhaust valve seat (the place where the bulb meets the exhaust hole). The dismantling process depends on the type of mechanism.
For example, if a toilet cistern with a button leaks, i.e. The fittings are modern, then just grab it with your hand and turn it counterclockwise. As a result, the body will come out of the hooks and you will be able to pull it out.
In old tanks, to gain access to the bulb and drain hole, simply remove the lid. Their drainage mechanism is not fixed in any way.
Flush mechanisms with bulbs are more durable, so their replacement is required very rarely. However, keep in mind that, in principle, they can also cause leakage.
In fact, that’s all I wanted to tell you about eliminating a leaking toilet cistern.
Lever misalignment
A malfunction of the tank may be caused by a misalignment or strong displacement of the lever holding the float. There are many reasons why misalignment occurs. The lever may have moved to the side due to prolonged use. The reason why the toilet tank leaks is often due to low-quality parts for plumbing equipment purchased at the store.
If the float is of poor quality, it should be replaced with a more reliable product. If a small hole appears in the element, it can be easily sealed with ordinary polyethylene. In addition, you can use a lighter to heat a piece of plastic and thereby eliminate the damage. But this measure is temporary and the float needs to be replaced.
Lack of water in the tank
It is not always the case that a faulty plumbing system results in a leaking toilet. Sometimes it is impossible to drain water due to its absence in the tank (the reason is not related to a violation of the general water supply). If sagging of the handle or button is additionally detected, check the connection between the siphon rod, which performs the lifting function, and the lever responsible for lowering. We are talking about a wire link having a C- or S-shaped configuration. Usually this link opens, so restoration of the tank’s operation is possible after ensuring the connection is closed. Sometimes, to eliminate a malfunction, you need to insert your finger into the siphon and point the plate upward to exit the end of the rod outside.
The inability to drain water is also associated with a low level in the tank due to incorrect adjustment of the angle of the float valve lever. If you have a plastic valve, you can solve the problem by tightening the adjusting screw with a screwdriver. If the valve is made of brass, for repair and adjustment, slightly bend the float lever upward or loosen the fastening nut of the moving element, after which the fastening is shifted upward.
Choosing a suitable design
If the float breaks down and it is impractical to repair it, you must purchase a new device similar to the previous one. It is recommended to select an analog model for purchase, even if the broken one has an outdated configuration.
If a spherical element breaks, it is removed and purchased separately from the entire system. This makes it easy to replace and install the plastic ball. The new device is selected in accordance with the pressure in the water pipe and the quality of the material for its manufacture.
The float valve for the toilet is divided into several types according to the pressure indicator:
- at low pressure with the presence of a special supply amplifier;
- at a pressure of average filling speed and power;
- with strong water pressure in the water supply;
- stabilizer valve - with different water pressure, the device will stabilize the power without reducing the service life of the mechanisms.
It is important to take into account the load capacity of the float, so at high pressure the indicator should be correspondingly high. Ignoring this requirement, even a high-quality valve will let water through due to mismatched parameters.
If a wall-hung design with a double flush button is installed, it is recommended to choose a model for medium pressure power. Then a stable supply of large or small quantities of water can be ensured.
Features of the toilet device
The assembled kit consists of a bowl and a drainage container, which contains such elements as a float, a bulb, gaskets, a lever system, fasteners, a toilet tank lid, and a flush button. The drain tank operates on the principle of a hydraulic seal. By pressing the button, the flushing system is activated and water is directed into the bowl to remove waste. Upon completion of this process, water begins to flow through a hose attached to the container until it is completely filled. When the required level is reached, the button is ready to operate again.
It's easier if the lid simply lies on top of the tank and is held in place by its weight. In most modern models, the flush button is installed from above into the lid that covers the tank. As a result, repairing the cistern with your own hands is possible after disconnecting the button by removing the decorative ring holding it. The ring is carefully pryed off with a sharp object and then removed. If there is additional fixation of the tank in the form of fasteners, they are unscrewed. If a flushing system is provided in the form of a combination of two buttons, press both buttons alternately and rotate the device until it is completely disconnected.
To repair the toilet without creating additional problems, you need to handle the lid as carefully as possible, since it is not intended for sale in a separate form. Therefore, the appearance of a crack may result in a complete replacement of the toilet.
As for the internal structure of the tank, which contains a toilet bulb and other elements, it may vary depending on the brand, so it is advisable to carefully study the instructions, paying attention to the characteristic features of the model
Leak prevention
It is easier to prevent a problem than to correct the consequences later. To prevent the tank from leaking, you should follow a few simple recommendations.
- Avoid shock loading , especially if the body of the product is made of ceramics.
- Avoid heating . This concerns the accidental supply of hot water or an attempt to rinse the tank, work performed with an increase in temperature. During repairs, when it is necessary to use welding equipment, plastic and ceramic containers must be closed.
- Once a year or more often you need to clean the container , as well as inspect all drainage units and, if necessary, disassemble the mechanism and clean each part.
- When purchasing plumbing fixtures, you need to carefully inspect not only the toilet body, but also the drain fittings. It’s a good idea to at least check the movement of the lever and the operation of the button.
If, after disassembling the mechanism, cleaning and replacing the o-rings, the problem is not resolved, you need to contact a specialist. Perhaps the cause of the leak is different and more qualified repairs are required.
Ways to eliminate extraneous sound in a toilet cistern
As you can see, the reasons for the noise when water is filling the toilet tank are quite commonplace. Therefore, there will be no problems eliminating them. So, what to do if your toilet starts singing?
First of all, remove the shut-off valve and replace the old rubber with a new one. Some people prefer to completely change the entire fittings, but frankly speaking, this is not at all justified;
The solution to the second reason is obvious; in order for your toilet to stop making noise, you need to install a tube on the faucet. Since the standard internal diameter of the tap in the tank is 5-8 mm, you can choose a suitable tube at any hardware store;
You can and should fight plaque, otherwise the service life of your plumbing fixtures will be significantly reduced. Fortunately, salt deposits can be removed very easily and quickly. It is enough to pour descaler for washing machines or regular table vinegar mixed with baking soda into the tank. A few hours is enough for the plaque to decrease and the noise when drawing water to completely disappear.
Other people's experience proves that the above actions are an excellent way to cope with extraneous sounds in the toilet cistern. Try it too, and very soon the annoying noise will no longer cause discomfort.
Replacement of fittings
It is difficult to repair complex defects and breakdowns of internal mechanisms on your own, so the devices are dismantled and serviceable ones are installed in their place. Many modern models of tanks are designed in this way to allow modular repairs, rather than each spare part individually.
There are many options for the design of tanks with bottom connections, so for replacement they take an identical mechanism, which is selected based on the removed unit.
Sequencing:
- The liquid is drained from the container and the supply from the central system is shut off.
- Unscrew the button with the locking ring and remove the cover.
- Disconnect the supply hose.
- Remove the fasteners that secure the tank to the toilet shelf.
- Find the fitting clamps inside the tank and disconnect it.
- The old drain assembly is removed.
- Assembly with the new mechanism is carried out in the reverse order and connected to the water supply.
More often, fittings are made from polymer materials. It costs more than metal. A system made of plastic parts is considered more reliable and durable, if it is not a fake from well-known manufacturers. Bronze and brass fittings serve impeccably, but the price exceeds the cost of devices made from polymer spare parts.
Plumbing tricks for convenience and comfort
Wanting to achieve greater comfort, people invent new devices that can improve their lives, eliminating the slightest moments that can cause irritation. For example, many people are annoyed by a falling toilet lid. That is, not even the fact of falling, but the sound that is made.
In this regard, a toilet lid microlift was invented not long ago. This mechanism has recently become increasingly popular and is gaining new fans. It allows you to eliminate the problem described above - the sound of a falling toilet lid. The microlift is not only silent, but also allows the lid to lower smoothly, without sudden movements. There is no need to control this process, which is also very convenient.
Thus, we examined the mechanism of operation of such an important piece of plumbing as the toilet. We learned how water is drained and plunged a little into the world of modern plumbing with its new products
Work principles
For proper installation of fittings and repairs in case of breakdown, it is important to understand how the drain mechanism itself works. Let's take a closer look at it:
Let's take a closer look at it:
- When you press the drain button, a rod appears, under the action of which the drain valve opens.
- In this case, the flow to the drain mechanism is blocked, and a drain occurs.
- When the water in the tank reaches a minimum, the release mechanism closes, blocking the drain.
- After this, the float hole opens.
- The vertical valve slides into place, blocking the drainage passage.
- When the water level decreases, the float lowers, opening a passage through which the drain tank is filled.
- When the water level reaches its maximum, and with it the float rises, the float valve closes, limiting the flow of water.
The drainage mechanism is quite easy to understand. For clarity, you can remove the lid of the drain tank.