Most people have encountered serious plumbing problems at least once in their lives. At the same time, such devices are among the most important and used in the home. The high loads to which bathtubs, sinks and toilets are subjected lead to the need to ensure they are in good condition.
Any leak can lead to a serious blow to the family budget, because in this case you will have to pay not only for the repair of devices, but also to eliminate all the consequences of flooding of the neighbors below. The cause of problems in the operation of the toilet is, as a rule, its tank.
In order to repair the device, you need to know how to remove the toilet lid with the button, which is equipped with most of all modern devices.
Why and how to remove the cover
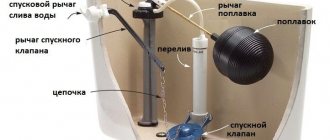
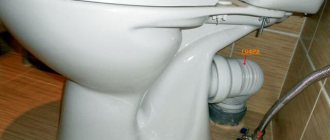
The reason for the need to remove the lid from the toilet tank lies on the surface. Inside this structural element is the entire trigger mechanism, as well as a device for supplying water.
Due to the use of plastic and rubber for the manufacture of components of the internal space of the tank, their service life is not as long as we would like. Over time, parts begin to deteriorate and the device breaks down.
The main failures are the lack of response of the device to draining water from the tank, leaks under the tank, lack of water for draining, and constant leakage through the overflow neck.
When the first signs of problems appear, you need to disassemble the drain tank. At the same time, it is important to follow a few simple rules that will avoid even greater damage. These tips include:
- remembering the sequence of operations performed;
- accuracy;
- a gradual increase in the force of manipulation on the main components of the tank.
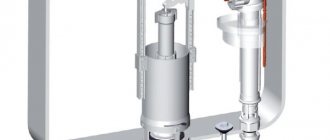
Regardless of the type of flush mechanism, removing the water tank lid is not difficult. To do this, you need to disassemble the upper part of the drain fittings.
Instructions for two-button models
The topic of resource conservation touched upon the cistern. The fact is easy to explain. The second most expensive water intake point is the toilet. Or rather, a drain tank. This statement especially applies to older models.
The flush tank with two buttons is designed to operate in two modes: standard and economy, which can significantly reduce water consumption. The only but significant drawback of the innovation is the difficulty of diagnosing and repairing the toilet cistern.
There are no fundamental differences between the disassembly/assembly of conventional and two-button equipment. To understand how to disassemble a toilet cistern with a double button, it is enough to study the step-by-step guide to single analogues. There is a point to consider. To take the toilet tank lid of a model with two buttons, the operations will have to be repeated twice, alternately for each button.
Method for removing the lid with a push-button drain
A push-button drain is much more difficult to repair than the outdated classic version. To remove the toilet cistern lid, you need to prepare a tool. You will need flat pliers, a set of keys and a screwdriver. The procedure looks like this:
- Inspect the button located on the toilet. Most often, it is framed by a ring, which represents the upper part of the sleeve recessed inside the tank. The control element moves inside it;
- Unscrewing the sleeve. The fittings are made of plastic and metal. Some have notches for a screwdriver, while others are completely smooth. The former must be unscrewed counterclockwise using a tool, and the latter must be pressed down more firmly with your hands. It would be useful to count the number of revolutions, as this will greatly facilitate the task when assembling the device;
- Removing the sleeve. To do this, you need to lift the toilet lid until the button is released from the groove.
After removing the lid from the toilet tank, you must remove it from the toilet so as not to accidentally break it. Then you can begin repair work.
Innovations in plumbing: we disassemble and repair a microlift
A modern modification of a regular toilet lid, called a microlift, has its own characteristics, which are easy to appreciate as soon as you start using them. The main purpose of such a design is to smoothly raise and lower the lid, completely eliminating the possibility of sharp impacts on the sanitary ware from which the toilet bowl is made. This will prevent its preliminary damage, which can significantly reduce costs from the family budget.
Design Features and Benefits
The principle of operation of a toilet with a lid that has a built-in microlift is akin to a conventional door closer, which is already so familiar to most modern people. The microlift is usually already pre-installed in the lid, so it is unlikely to be purchased separately. The microlift is made from durable plastic or its analogue, a material called duroplast. It is entirely a polymer, although in appearance it can be confused with metal or even ceramics, and in properties it is closer to it.
This mechanism implies a rigid fixation to the toilet, but the designers did not forget about air shock absorption. The lid must have compartments with shock-absorbing silicone.
- Polymer toilet seat and lid.
- A special rod that secures the lid to the toilet bowl.
- A metal or duraplast spring that regulates and balances the weight of the entire structure.
- Microlift, that is, a hinge mechanism, which ensures a smooth change of lid positions.
You need to know that in more expensive designs, instead of rods and springs, specially designed pistons and cylinders in which they run can be used. Such models are generally considered non-separable; they operate on the basis of pneumatics or hydraulics, and can only be replaced, not repaired.
Simply remove the lid of a toilet with a microlift
Contrary to expectations, almost all toilet lids are equipped with ordinary, standard fasteners, which makes them easy to remove from their place and replace. The design can be incredibly complex and even equipped with electronics, but the fastening elements remain traditional.
- Lift the toilet lid as if you are going to use it. That is, the lid must be raised, while the toilet seat remains in place.
- On the left and right below the rim of the bowl there are special fasteners, which can be plastic, metal or also duroplate. Unscrew the fastening nuts first from one side and then from the other.
- Gently pull the toilet seat towards you so that the pins come out of the holes and remove the lid.
As you can see, removing a toilet lid with a microlift is not at all difficult, at least no more difficult than a regular one, so even a complete novice in plumbing can handle it. In a similar way, but in reverse order, you can easily install a new toilet lid, both with and without a closer.
Breakdown options
Even expensive plumbing equipment breaks down. You shouldn’t call a plumber for the slightest reason. Any user can fix the problem with his own hands.
- Float. If the water is not retained inside the tank, but overflows over the edges, then the operation of the float mechanism is most likely impaired.
- Misalignment during installation. If backlash connections were installed with deviations from the standards, then over time the fasteners become unbalanced. To eliminate the defect, it is enough to return them to their original positions by simply turning the upper part. Depending on the design, for example, in the luxury suntek model, the fasteners are re-fixed after adjusting the entire mechanism.
- Depressurization. Happens in the case of a hollow plastic float. The damaged integrity of a segment can be restored by soldering the damaged part with a soldering iron. But this is a temporary measure that allows you to extend operation for 1 - 2 months and no more. In the future, it is recommended to completely replace the part.
- Deformation of the lever part of the float. There are many reasons, but there is only one piece of advice: replace the mechanism. Of course, you can straighten a bent lever to a horizontal position. But experience shows that this will not help for long. Moreover, you can buy both parts of the drain mechanism and parts of the device, including the lid, in online stores.
- Stop valve. Not only the service life of the toilet cistern depends on the correct functioning of the shut-off valves. How can I check if this part is faulty? Having opened the tank lid from the edge, press the valve with your hand. If water continues to flow, there is a problem. There is no way to do this without dismantling. Having disassembled the structure, thoroughly clean all components, including the bottom of the tank. If necessary, replace the gasket. The most likely cause of the breakdown is this.
- Membrane deformation. Malfunctions of the siphon membrane are a common source of damage. It is not possible to repair the part.
The replacement is carried out in five stages. During work, special attention should be paid to the tank fastenings.
- Drain the water from the drain tank.
- Secure the lever by tying it to the bar.
- Unscrew the nuts. First, the one that attaches the pipe to the tank, then the one that secures the siphon to the lever itself at the base of the cistern.
- Replace the membrane.
- Assemble the device parts according to the manufacturer's diagram.
From the above it follows that information about the device and strict adherence to step-by-step instructions is sufficient for independent repair.
Toilet button malfunctions
All signs of a malfunction of the toilet flush mechanism button can be classified as follows:
- insufficient volume of water for flushing (full or partial);
- sticking;
- sinking (falling through).
In the first case, we are not talking about how to repair the button, but about adjustment.
Adjustment
The full flush volume is adjusted using a float - its position on the rod relative to the overflow tube ensures the water level in the fully filled tank. The standard recommendation is that the supply should be cut off when the water surface is 15-20 mm below the overflow edge:
- Setting the float. At the bottom feed valve, the rack rod is disengaged from the float, which is then moved up or down along the guide. The side feed valve is adjusted in a similar way - the only difference is in the relative position of the float and the shut-off valves of the water supply system.
- Adjusting the flush tank button comes down to moving the overflow tube relative to the “glass” of the push-button mechanism and adjusting its height. To do this, unscrew the fixing nut on the tube, disconnect the rod, move the tube to the required position and tighten the nut. Then, pressing the petals on the glass and moving the guides, the height of the entire mechanism is set. At the final stage, the rod is snapped back onto the overflow tube clamp.
The fittings of a two-level tank also have a small flush float, which must be moved along its own rack guide on the overflow tube. The position of this float determines the volume of water during incomplete flushing.
But if a button gets stuck or sticks, then what to do - adjustment or repair - can only be decided after finding out the cause of the malfunction.
Installations
Installations stand apart from the range of products for bathrooms. Often, in innovative toilet models, the cistern lid is removed only after dismantling a section of the wall.
How to remove the lid from the toilet tank in this case. General recommendations for analysis are as follows:
- Lightly press the bottom of the button and remove the button from bottom to top.
- Use a Phillips screwdriver to tighten the mounting screws.
- Remove the clamps and remove the plastic pushers.
- Remove the brackets.
- Unscrew the latches located at the top and remove the partition.
- By moving the tap all the way against the axis, turn off the water.
- Remove the filling valve mechanism with rocker.
- Remove the latch by bending the petals.
- Without removing the flush valve from the tank, remove its upper part by turning it counterclockwise and set it aside. Having thus reduced the size of the drain mechanism, carefully remove it out.
The mechanism is installed in accordance with the manufacturer's instructions.
Replacing the drain mechanism
Option 1
If you have a new tank with imported fittings, replacing the drain mechanism is indecently simple. It is a one-piece structure that does not require dismantling the tank for replacement.
The exhaust, seat and cuff between the reservoir and the shelf will remain the same: kits of this type are compatible with each other.
The outlet (left) remains in the reservoir. The mechanism can be removed by simply turning it.
- Turn off the water to the tank.
- Remove the drain button and cover.
- Turn the drain mechanism clockwise a few degrees and pull it up.
- Clean the outlet and the seat against which the gasket is pressed of any deposits or small debris.
- Install the new drain mechanism and turn it counterclockwise to secure it.
- Turn on the water supply and make sure that the mechanism completely shuts off the drain when closed.
By the way, a situation where a complete replacement of a unit is necessary is rare. In most cases, a water leak problem can be resolved by cleaning the seat or replacing the O-ring. The operation takes no more than a minute and does not require any special skills.
Option 2
For domestic kits with a separate shelf, replacing the drain mechanism is much more difficult.
No, all operations are intuitive; but the amount of work to completely replace the unit will take much longer.
To fasten this mechanism, bolts are used, which are difficult to get to by the shelf.
- Turn off the water to the tank.
- The lid for the toilet tank is removed after the nut under the flush handle is unscrewed.
- Then disconnect the flexible line from the fill valve.
- We unscrew the bolts holding the shelf and, often, the seat with the lid. Polyethylene bolts and nuts can be easily removed by hand; If brass or galvanized bolts were used when installing the kit, you will have to arm yourself with pliers and an adjustable wrench. Steel bolts without anti-corrosion protection will have to be cut with a hacksaw blade.
- Having pushed the tank back, we pull out the outlet of the shelf from the conical cuff. Be prepared to replace this cuff: the rubber loses its elasticity over time, and the connection may leak after assembly.
- Place the structure on a flat surface and sequentially unscrew all the bolts. Of course, avoiding distortions, strictly in pairs. Steel bolts, if some kind soul blessed the toilet owner with them during assembly, will have to be cut down.
- Having separated the shelf and removed the drain mechanism, carefully remove all debris and deposits around the holes.
Rust, deposits and debris can prevent gaskets from sealing properly.
- We install the new mechanism, not forgetting to install a gasket under the brass seat. Regarding the bolts, the rules already known to us apply: they are tightened strictly in pairs, one at a time - two turns at a time and without excessive effort.
- We attach the shelf. It is better to replace the oval gasket under it: it has probably ceased to be elastic. In extreme cases, silicone sealant for sewer pipes applied to both sides will help out.
- We check the structure for leaks: plug the shelf outlet with a rag and fill the tank with water while the bulb is raised.
- If there is no leak in the toilet tank, check the tightness of the drain: fill the tank with the bulb lowered.
- If everything is in order, you can install the tank in place. The conical cuff is pulled over the outlet of the shelf and rolled up to it with a wide socket. After the shelf fastening bolts are tightened, roll out the cuff onto the toilet bowl socket.
- We connect the flexible hose and turn on the water.
- After all equipment has passed the performance test, the toilet tank lid is installed and secured with a nut.
Useful tips
After removing the cover, it should be immediately placed away from the work site. It is made of fragile material (porcelain), so it can crack.
- the upper part of the tank is installed back only after a complete check of the system’s functionality - water should be well collected and flushed;
- Having repaired the main mechanism, it is worth checking the float;
- at the end, the reliability of the valve is tested, which should tightly shut off the liquid supply;
- The button should be pressed with optimal force.
Important! All components must be handled with care. If disassembling the cover does not help fix the problem, it is better to contact a professional plumber.