The time has come for repairs and even a plan of initial action has been chosen: the purchase of consumables and paints. It seems that everything is there for repair work. Really, I should just buy a couple of brushes with a roller and go ahead! But when walking through a hardware store, your eyes widen at the assortment presented. Then the question arises in your head: “Which painting tool is best to choose?”
It so happened that recently the range of finishing building materials has expanded significantly. Now customers are offered a million products to uniquely decorate their cozy corner. Progress has also affected repair tools, so that anyone can easily and quickly realize their dream.
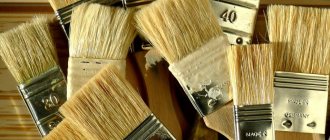
If previously only one or two brushes were enough, now the hardware store offers a catalog of the best painting tools for every taste and budget.
Basic Tools
Of course, with the development of high technology, more and more unusual tools for painting work appear. But you don’t need to immediately rush to buy everything in a row with the idea that the more you buy, the faster and more efficient your renovation will be.
This is by no means true; here you need to be able to work and handle the tool correctly. It’s best to start getting acquainted with all painting devices with the classics, which have been used for many years.
Surface characteristics before painting
The moisture content of plaster and concrete coating should not exceed 8% before painting, and wooden structures should have a moisture content of no more than 12%.
The paint and its compositions are adjusted to the required viscosity directly in production, and are delivered ready-made. When covering a surface with paint, no brush marks should remain, and the paint composition itself should not flow off the surface.
The painting technology requires a pre-prepared surface so that there is no dust or greasy stains; all small cracks that are present in the plaster must be embroidered and sealed with cement mortar to a depth of at least 2 mm.
Before painting, the metal surface is cleaned of scale and rust. Before the first painting, the wooden surface is prepared by cutting out knots and tars to a depth of 3 mm. After which these places are sealed with putty.
Painting technologies do not recommend painting facades in hot weather, when there is direct exposure to sunlight, or after rain, when the surface to be painted is wet.
In winter, interior work is carried out in closed, insulated rooms at a temperature of at least 10 degrees. For painting facades, it is better to use frost-resistant paint compositions. When painting facades, lime compounds are used at a temperature of at least 5 degrees.
Also, technological standards stipulate that after painting with water-based compositions, the surface should be uniform and carefully shaded. For simple painting, brush marks should not be visible at a distance of 3 meters.
When painting with oil and enamel compositions, the surface must be uniform; drips, omissions, translucency of underlying layers. The surfaces on which paint was applied using a roller or sponge must have a uniform pattern; distorted lines, spots, and omissions are not allowed. The displacement of the pattern at the joints when rolling the roller should be no more than 0.5 mm.
Every year, the technology of painting works is improved and with the development of new technologies, new standards are applied that must be present.
Spatulas
A spatula is the main painting tool, without which it is difficult to imagine any similar work. Spatulas come in a variety of materials, shapes and functionality.
- Its main function is to apply the putty mixture and distribute it over the entire surface to be treated.
- The most reliable option is to purchase a metal spatula.
- Its structure is quite simple: a blade whose width varies from 50 to 100 millimeters and a small handle.
- The blade is most often made from alloys of several durable metals.
If the spatula is more or less expensive, then the blade most likely has good corrosion protection and heat resistance. You can work on wood and any other material; the processing process itself is quite pleasant using a metal spatula.
How to properly care for your instrument
In order for devices to serve for a long time, they must be thoroughly cleaned after each use:
- Tassels. After painting, wash with thinner, then treat with soapy water and dry. It is important to clean the bristles of the brush down to the roots: this is where varnish and paint accumulate most. The next time you use it, dried lumps may damage the surface to be painted.
- Rollers. Foam rubber ones are used once, while fur ones require care. First, they need to be rolled on a clean surface. To subsequently remove water-based paint, it will be enough to use a soap solution; removing enamel requires daily soaking in a thinner.
- Other devices. Carefully remove paint residues using a solvent or rag, dry, and store in a dry place.
It is advisable to store clean painting tools in a vertical position with the bristles facing up.
In order for a painting tool to serve for a long time, it must be thoroughly cleaned after each use Source diy.obi.ru
Wooden spatula
Wooden spatulas, as you might guess, are made from completely different types of wood. Most often, some strong and durable species are used.
- The advantage, compared to metal spatulas, is greater environmental friendliness, no risk of corrosion, safety and a large blade width.
- Wooden spatulas can be used when you are working on a large surface and need to finish the job as quickly as possible.
- Most often, this type of tool is used for working with plaster and wood.
But, if there are no other spatulas, then this one is quite suitable for working on other materials, this is not critical.
Ventkam.ru
Basic painting tools are shown in Fig. 1. To apply paint and varnish coatings, various brushes, rollers, spray guns (spray guns), and spray guns are used.
Rice. 1. Tools for painting work: 1 - hand brush; 2 — flute brush; 3 — brush-brush; 4 — handbrake; 5 - file brush; 6 — finishing brush; 7 — steel brushes; 8 — roller; 9 - metal spatula
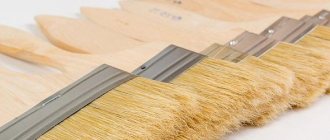
Brushes. High quality hard brushes are made from pig bristles. They make it possible to obtain coatings of excellent quality. For fine works, soft art brushes made from squirrel and kolinka wool are used. In addition, synthetic fibers are used to make brushes, brushes made of which are more durable than natural ones. Brushes should also be selected according to the type of work. Swing brushes are used for painting walls, ceilings and other large surfaces. They are made in the form of a bundle of hair up to 180 mm long. Before work, new fly brushes (like handbrake brushes) should be wrapped with strong twine 2/3 of the length of the hair, and as the hair wears out, the binding should be gradually reduced. After wrapping, the brush becomes more elastic, rubs better and becomes less clogged with paint. Brushes for adhesive paints are tied somewhat looser than for oil paints.
Hand brushes are used to paint small surfaces (radiators, windows, doors). Handbrake handles come in diameters from 26 to 54 mm. They are used for working with alkyd paints and enamels. When whitewashing ceilings with adhesive and lime paints, as well as applying paste to wallpaper, a paintbrush is mainly used. If you don't have one, you can use a hand brush. The brushes are round, with a diameter of 120 and 170 mm, with a bristle length of up to 100 mm, and rectangular. They have high performance, like whitewash brushes. Both fly brushes and brushes are made from pork bristles, horsehair or nylon. When painting the surfaces of rooms with adhesive lime compounds, and especially when whitewashing the ceiling, it is better to use brushes made of pig bristles, since brushes made of horsehair and nylon do not hold the paint, and it drips onto the floor. When painting windows and doors with oil paints, the hand brush should have a diameter of 2-3 cm, and when painting walls - up to 4 cm.
Even with the most careful painting, brush marks remain on the surface. Flute brushes are used to smooth out these irregularities. They can also be used to paint small surfaces with oil, enamel and nitro paints. Flutes are flat brushes with a width of 25, 60, 62, 76 and 100 mm, made from high-quality bristles. The best flutes are made from badger fur. File brushes are made of white, stiff bristles. Their diameter is 6, 8, 10, 14 and 18 mm. These brushes are intended for applying narrow stripes, called panels, and for painting places where it is inconvenient to work with a handbrake. Trimming brushes are rectangular brushes made of hard bristles. These brushes are used to treat freshly painted shagreen surfaces. Using a trimmer, light, even blows are applied to the paint that has not yet dried, smoothing out the unevenness left by the brush; in this case, the trimming hair should only lightly touch the surface. The crosscut must be dry and clean and should therefore be wiped down frequently.
Spatulas. To putty surfaces, use steel spatulas with a working element length of 7-10 cm, which can be made from an old saw. The edge of the spatula should be thin, straight and smooth, up to 16 cm wide. The widest spatulas are used for puttying floors, walls and other large surfaces. If a steel spatula is not available, it can be made from plywood or a thin board. It is advisable to use wooden spatulas for applying and leveling putty on wood and plaster. A blade 50-200 mm wide and 150-180 mm long should be well planed and cleaned. In Fig. Figure 2 shows techniques for applying putty using a spatula: a, b - the spatula is positioned at an angle of 40° and 60°, which results in a thicker layer of putty; c - when the spatula is positioned at an angle of 80°, the layer of putty is thinner; d - each subsequent layer of putty should overlap the previous one by 2-3 cm; d - puttying in cross directions.
Rice. 2. Techniques for applying putty
Paint rollers are used for painting large areas - walls, ceilings and other surfaces with oil, oil-enamel and other non-aqueous paints, as well as latex (water-dispersed). Labor productivity when painting with a roller is 3-4 times higher than when working with a brush, especially when painting rough surfaces. To obtain high-quality coating, extensive experience is not necessary. The disadvantages include the fact that when painting with a roller, paint consumption is higher than when working with a brush. In addition, a roller is inferior to a brush in terms of efficiency on uneven and shaped surfaces. The working part of the roller is a wooden, metal or plastic cylinder 10-25 cm long and 4-7 cm in diameter, covered with a rubber sponge, foam rubber or short-pile fur (Fig. 3).
READ ALSO: Technology for the production of local treatment facilities
Rice. 3. Roller: 1 - general view; 2 - axle with washer and nut; 3 - metal blowing; 4 - bath with mesh; 5 - sheet of steel with holes; 6 - bucket with mesh
The length of the pile determines the ability of the roller to hold paint, as well as the smoothness of the resulting coating. The smoothest coatings are those applied with short-pile rollers. The cylinder rotates around an axis or together with the axis. The roller is attached to the axle of the fork or console using a nut with a washer or a wire pin. Types of paint rollers: VM - fur-coated rollers for painting with oil paints and enamels; VP - foam-coated rollers for working with latex paints; VMU - fur rollers for painting corners. The first two types of rollers have different widths (up to 300 mm). A roller kit usually includes 2-5 spare covers. In addition to these three types, narrow panel rollers are used in painting to carry decorative panels and paint window frames. Knurling rollers make minor defects of the painted surface invisible and give it a decorative appearance. In modern fork-type paint rollers, the width of the fork is adjustable. Rollers of this type are simpler and more reliable than the cantilever ones shown in Fig. 3. But with a cantilever roller you can also paint the corners of the room, while when using a fork roller the corners are painted with a brush. For painting racks of balcony railings, pipes, etc. use a paired roller mounted in a special machine. When using a paint roller, use a bucket or baking tray in which a metal grid or mesh with a mesh size of about 15 mm is installed. During operation, the roller is dipped into the paint and rolled over the grid 2-3 times. In this way, the roller is evenly covered with paint, freeing itself from its excess, which flows through the grid into a bucket or baking sheet.
When painting walls, paint is applied to the surface in a zigzag manner, moving the roller from top to bottom and bottom to top. After painting a surface 1-1.5 m wide, it should be treated a second time with a semi-dry roller, moving it from left to right and from right to left - this will allow you to rub the paint evenly over the surface. The ceilings are also painted. Before painting with a roller, it is necessary to paint all places where this tool cannot reach (inner corners of the room, etc.) with a brush. Particularly good results are obtained when painting large surfaces with oil paints, as well as when applying adhesive paints to a well-prepared surface. In this case, the thickness of the hairline of the roller should be 15-20 mm. Table 1 shows which surfaces are painted with which rollers.
Table 1
| The resulting coating texture | Surface to be painted | Pile length, mm |
| Smooth | Walls, floors, furniture | 5-6 |
| Medium smooth | Walls | 10-15 |
| Rough | Textured walls, plaster, brick and stone floors | 20-25 |
| Very rude | Brick, concrete blocks, masonry, exterior plaster | 30 |
Naturally, you need to take care of the roller: moisten it with water before use, and after painting with oil paints, wash the roller, grates and baking sheets with gasoline or kerosene. For a short break and overnight, after rolling on the grid, the cleaned roller can simply be lowered into water. After painting with adhesive paints, the roller is rinsed in warm water. Rollers made of natural fur should not be used to paint surfaces with lime compounds, as they corrode the fur and it is destroyed.
Paint sprayers. When working with lime, glue and casein paints, a very effective painting tool is a paint sprayer. In 1.5 minutes you can paint about 1 m2 of surface.
The quality of the applied coating when using a paint sprayer greatly depends on the viscosity of the paints and emulsions used. An elementary way to determine the viscosity required for operation is to observe the drops falling: the drops should fall at a frequency of one drop per second and not be pulled into a thread. More accurately, the viscosity of the paint is determined by a special viscometer. Normal viscosity corresponds to viscometer readings of 13-16 m. The spray gun consists of a pump, a paint reservoir, which is also a pressure reservoir, and a tubular rod. When working with a hand pump, air is first pumped into the reservoir to a pressure of 1.5-2 atm, then a suction hose filter funnel is installed in the bucket with paint and the paint is pumped from the bucket into the spray gun reservoir. At the same time, the air in the tank is further compressed. When the valve of the injection hose opens, paint under air pressure flows into the injection hose, and from there into the tube with the nozzle, from where it bursts out in a cone-shaped jet (torch), consisting of tiny drops of paint. For the same purposes, a garden hydraulic spray gun and other types of spray guns are used. Water-based paints can be applied to the surface using a spray attachment from a vacuum cleaner. This attachment is used to coat furniture with varnishes, enamels and paints diluted to the required consistency.
READ ALSO: Modern building materials for the construction of walls
For whitewashing ceilings and spraying adhesive paints, the spray attachment of a vacuum cleaner can only be used with finely ground, high-quality sifted chalk or pigment. Usually a half-liter jar is used, which is due to the length of the suction tube of the spray nozzle. When whitewashing ceilings, it is more convenient to use liter jars, extending the suction tube to the bottom of the vessel. When painting walls, ceilings and other surfaces of the house with oil, synthetic, nitro and other non-aqueous paints, enamels and varnishes, a spray gun is often used. Some fast-drying and viscous nitro and salt paints are applied to the surface only with such a gun.
Instrument care.
Before use, a new brush should be washed in soap and water. The tuft of hair or bristles should be shaped into a cone. This can be achieved by first using the brush to prime rough, rough surfaces, and then cleaning it and using it for the final paint job. If you are going to paint with water-based compositions, then soak new brushes in water before working. Then they swell and soften, resulting in the paint applying more evenly. As you work, rotate the brush in your hand from time to time so that the hair wears more evenly. After lime painting, brushes and brushes should be rinsed several times in clean water, changing the water each time. You need to add a little vinegar to the penultimate water, and then squeeze the brushes and brushes well and hang them to dry.
Painting with oil paint. Squeeze the brush well on the edge of the jar, then wipe off the remaining paint on an old board, cardboard or piece of metal mesh, and place it in a jar of water so that the remaining paint does not dry out and make the bristles hard. The water should reach the string. When reusing, squeeze out the water thoroughly and thoroughly saturate the brush or brush with new oil paint. If repainting is not planned yet, the brush should be squeezed out and wiped, rinsed with gasoline, then washed in a hot soda solution, rinsed clean again, squeezed out, and hung to dry.
Water-dispersion (latex) paints. Immediately after use, the brushes should be thoroughly washed several times in clean water and left to dry. Under no circumstances should latex paints be allowed to dry out! Even during short breaks in work, it is necessary to leave the brush in the paint or water. After whitewashing, rinse the brushes several times in clean water, squeeze well, and hang to dry with the bristles down.
Varnishing. Washing and storing brushes and brushes after coating with varnishes is the same as when painting with oil paints. Usually the brush is left (overnight) in a glass or tin can with gasoline (but not in water!) and the container is tied with a rag. At the end of the work, rinse and rinse the brush in solvent, soda solution and water. After working with nitro varnish or alcohol varnish, the brush should be rinsed several times in acetone or alcohol, respectively, and kept dry. Brushes that have hardened in nitro varnish will become soft again if they are moistened with acetone.
Rubber spatula
This is a rather rare type of instrument that is not very popular. The main difference from analogues of other materials is that such spatulas do not have a handle. This greatly reduces the usability of this tool.
In the place where the handle usually stands, there is a thickened part of the tool in the form of a trapezoid. Rubber spatulas do not have as much functionality and are mainly used for filling seams and removing marks and small cracks.
Important nuances of painting
Surface painting is carried out in 1 or several stages. If the composition has low or medium coverage, it is necessary to apply it in 2-3 layers. Before starting the main work, you need to try on a small area how the coloring agent will apply.
Painting work is carried out in dry, warm weather with minimal humidity. It is not recommended to carry out painting work in rain and fog. The optimal air temperature should be no lower than 5 degrees. In the summer, windows are specially opened to ensure air circulation.
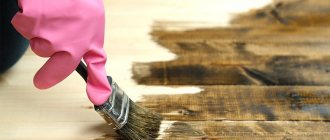
To work with a brush, use containers of a smaller volume than the one in which the coloring composition is sold. The tool is lowered into the jar with ¼ bristles. Remove excess paint by brushing along the edge of the container. Some craftsmen stretch an elastic band over the edge of the jar to avoid staining the edges.
If the paint is liquid, it will certainly flow onto your hands. Therefore, you need to carry out the work with gloves or attach half of a children's rubber ball to the handle. If you don’t have a toy, you can use a piece from a plastic bottle. Just cut out a circle and insert the brush handle into it.
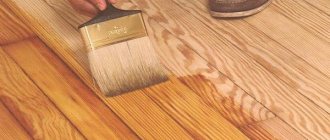
To ensure that the paint applies evenly and your hand does not get tired, the brush is held at a slight angle. They pass it from top to bottom and from bottom to top, covering the previous one with a new layer of material. First of all, corners, protruding edges and hard-to-reach places are painted, and then smooth surfaces.
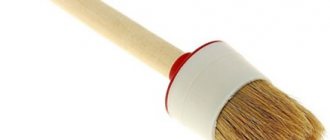
Brush
The second main tool, without which it is impossible to imagine such work, is a brush.
Particularly inventive builders make their own brush from scrap materials, but this is not recommended. It is best to purchase a high-quality tool so that all repair work can be completed as quickly and efficiently as possible.
Brushes come in different shapes, from round to rectangular. You should choose the right brush shape depending on the area and topography of the surface you plan to treat.
It is most convenient to take a brush with a rubber handle. Wooden ones can begin to deteriorate under the influence of moisture, and metal ones can rust. Most often, a brush is used to apply or remove paint coating, wallpaper, and so on. Also, brushes can be used as a painting tool for painting cars.
Features of application
Beginners without experience use brushes immediately after purchasing or performing other work. This is a mistake, because the painting tool needs to be prepared. Consider the following tips:
- Before painting the surface, wet the brush in water to smooth out the pile;
- use protective gloves to prevent paint from coming into contact with your skin;
- Before using the brush, wet it well in the paint.
Following these tips will make your repair work much easier.
Brush
The following main types of paint brushes are distinguished:
- Filet brush. Round brushes. As you might guess, they are used to change the shape and align the panels. The diameter is selected depending on the size of the working surface.
- Trimming. The largest brush, a working tool, is made in the form of a large volumetric rectangle. Used for quickly applying glue or other substance to a large work surface.
- Brush-handle. The most popular type of brush. A small tool, very easy to use, even children can work with it. Suitable for calm, leisurely processing of small surfaces.
- Swing brush. Also a large brush, the functionality is the same as the end brush. The difference is that there is no separate handle made of a different material, so you must work in a suit, since paint or glue splashes very much when you work with a swing brush. Their advantages: low cost and large processing area.
In addition to the use itself, the brush needs to be looked after. Wash it regularly, clean it of debris, wipe the handle. This will make subsequent work easier and will result in the tool serving you longer.
Accessories
Along with the basic tools, to facilitate their work, specialists use the following devices:
- baths;
- cuvettes;
- brushes;
- spray gun.
A paint bath is a plastic container with a textured bottom. Serves to brush off excess paint from the roller, thereby getting rid of accidental splashes in the workplace.
A cuvette is a deep plastic box used for the convenience of mixing various solutions or paints and varnishes.
The spray gun is a very convenient car painting tool for extensive painting in a short time. It is notable for the fact that it helps the painter apply the paint coating in an even layer.
There are 2 models: electric and pneumatic. In the first case, the paint is supplied using a built-in pump, and in the second it is powered by a compressor.
With a large selection of working equipment, the main thing is not to miss out on quality products from the best manufacturers of painting tools. For example, the following companies have proven themselves well:
- the German company “Matrix” presents a huge range of products with the strictest quality control;
- The Swedish company “Anza” has proven itself in the field of production of painting tools, thanks to the constant improvement of its
- goods and selection of the highest quality and durable consumables;
- The Finnish company Sokeva has conquered the construction market by producing brushes that perfectly retain their original properties even after repeated use.
Russian manufacturers, organized on the basis of specialized enterprises, are also trying to keep up. Companies from the former Soviet Union (Ukraine, Belarus) are also trying to produce the same high-quality products. Especially when you compare them with Chinese goods.
Roller
The final hand-held painting tool from the classic trio that will be considered is the roller.
There are two types of rollers:
- Fur roller. A roller that is quite capricious when it comes to lime. You should not use such a tool if you work with similar materials. However, a fur roller can ideally distribute water over the working surface. Thanks to its material, it perfectly absorbs and releases water, without splashing or loss of liquid. In addition, fur rollers are sold almost everywhere and cost little money. The manufacturers of this painting tool made sure that the price suits absolutely all groups of the population.
- Foam roller. In general, it is a fairly universal tool that is suitable for working with any construction substances. They produce foam rollers with different sizes of handles and working tools.
In addition to purchasing the rollers themselves, for greater convenience, it is best to purchase special buckets with a squeezing mesh, cloths for cleaning tools and gloves. This, of course, is not necessary, but it will make the work easier and more enjoyable.
There is no catalog of the best painting tools with an objective assessment of this issue. Everyone chooses for themselves.
Optional equipment
In addition to rollers and brushes, other equipment may be required to perform painting work. The most important assistants include:
- Ditch. A plastic container with high sides designed for mixing different compositions.
- Pallet. It has a recess for paint and a corrugated inclined part for rolling out the roller. Using such a tray, you can wet the roller, distribute the paint over the surface and remove excess. The unnecessary composition flows back into the main container, thanks to a special slope.
- Metal brushes. Used for surface treatment and removal of contaminants before finishing work.
- Spray gun. Helps automate and speed up the coloring process. Replaces rollers and brushes when they are not suitable for the task at hand.
Knowing what types of painting tools there are and what their features are, you can optimize your work and eliminate errors.