Much to the regret of many apartment owners, sometimes after wallpapering an unpleasant phenomenon occurs in the form of discrepancies or local peeling of the wallpaper from the wall at the joints of the panels. Despite the apparent problem and spoiled appearance, this situation can be easily corrected if you use glue for the wallpaper joints.
It should immediately be noted that the earlier a defect is detected and measures are taken to eliminate it, the better the final result will be.
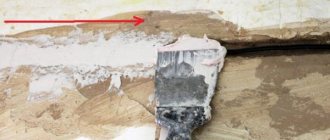
Local lag in the wallpaper section at the junction.
Glue selection
There are no problems with purchasing such glue, which is suitable for joints/seams; it is sold in any fairly large hardware store
But it is important to understand exactly how it differs from more traditional variations of adhesives
Its consistency, when compared with conventional glue, is thicker. Traditionally, it is based on a polyvinyl acetate emulsion, although there may be alternative options.
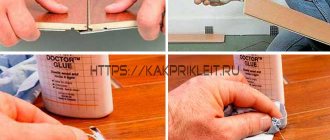
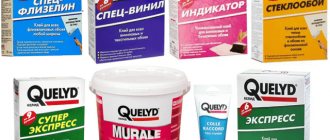
Another French manufacturer presents a special composition
Many people believe that it is possible to glue joints with ordinary PVA glue, but this is not true; it does not have a certain set of properties, which is inherent in any glue that is focused specifically on these purposes. Here are its most characteristic features:
It has not only an emulsion, but also various types of additives that add positive properties. In particular, the setting time becomes more compressed
This is very important, because the faster the joint is fixed, the better the subsequent result will be. While such glue is not dry, it can be easily removed from the surface with a damp cloth, so even if you are careless, it will be very easy to solve the problem by wiping the surface - not a trace will remain. After drying, a transparent waterproof coating appears, which will be relatively invisible on most surfaces. The packaging of this glue differs from more traditional ones.
Usually there is a dispenser for thinner and more convenient application. Sometimes the kit also comes with a specialized brush, which allows you to apply glue more evenly even in those places that are relatively difficult to reach for the dispenser.
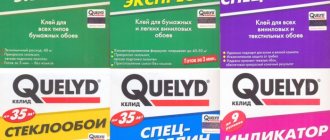
A popular brand is Methylane; for many, it is Methylane that is primarily associated with such adhesives, but there are many other solutions on the market.
A well-known brand implies German quality
Application
Let's figure out exactly how to apply glue if problems arise. If they exist in several places at once, then they need to be solved sequentially, moving from one problem area to another. The following actions must be taken:
- The damaged area is wetted with a spray bottle so that the coating becomes slightly wet and does not tear during operation.
- The lagging part of the panels is carefully separated from the wall with a metal spatula, then wallpaper glue is taken and everything is thoroughly coated from the inside with it.
- Cardboard is placed on the coated area, which covers the place where the panels are connected, then everything is pressed firmly against the wall.
- A hair dryer is brought to the cardboard, with which the given area is treated for about twenty seconds using a stream of hot air.
- The cardboard is quickly removed to prevent sticking, then the surface is rolled with a wallpaper roller, wiped with a damp cloth and left to dry until it is completely dry. Ready.
Elimination of wallpapering defects
In order to avoid the repetition of unpleasant situations in the future, this article will tell you why wallpaper peels off at the joints and indicates the main reasons for the occurrence of such wallpapering defects.
In addition, the reader will be offered step-by-step instructions, which describe in detail the materials used and the method for eliminating lag and divergence of wallpaper at the joints of the panels.
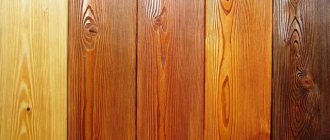
Adjusting the joint of non-woven wallpaper.
Reasons for divergence of joints
In order to find a solution to any problem, first of all, you need to understand the cause of its occurrence. The lag from the wall and the increase in the gap between the panels can only occur if the wallpaper was glued end to end without overlapping adjacent panels on each other.
There may be several reasons for such a defect:
- The wallpaper adhesive does not match the material and thickness of the wallpaper used. Heavy and thick materials (double-layer vinyl wallpaper, as well as coatings on a textile, non-woven or fiberglass base) require the use of special glue with a higher level of adhesion.
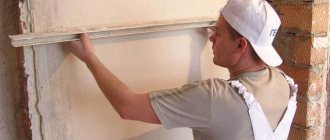
- Insufficiently thorough surface preparation can be observed in cases where a continuous layer of finishing putty was not applied to the entire area of the wall made of mineral materials, as well as if it was poorly sanded or after puttying the wall was not treated with a penetrating primer.
- Violation of temperature and humidity conditions during drying of the newly glued coating. Drying should occur under natural conditions at room temperature and relative air humidity of no more than 70%. To speed up the process, it is not allowed to use heating devices or artificially create drafts in the room.
- Another common reason for wallpaper peeling can be prolonged exposure to large amounts of water or water vapor, for example, in the event of an accident in the steam heating system or flooding by neighbors from the upper floor.
The photo shows the sticker of panels end-to-end without overlap.
Advice! If, after you have hung the wallpaper, the joints of the panels are visible, first of all you need to find out the reason that caused their appearance, and then eliminate the defect itself.
Composition for gluing joints
As a rule, wallpaper glue for joints can be purchased at any large hardware store. It has a thicker consistency than regular glue and is made on the basis of polyvinyl acetate emulsion.
At the same time, you should know that ordinary construction PVA will not be suitable for these purposes, since the special composition for joints has some features that are not inherent in other household adhesives.
- In addition to the emulsion itself, it uses various additives, which, in addition to a strong adhesive seam, provide a quick setting time. This point plays a big role, since the quality and reliability of the adhesive connection largely depends on the fixed fixation.
- For ease of use, the packaging is usually equipped with a dispenser, and some types of compositions have a convenient brush for uniform application of glue in hard-to-reach places.
- Before complete drying, such compositions can be easily removed from the surface with a wet cloth, and after polymerization they form a waterproof transparent coating, so if some of the glue is squeezed onto the wallpaper, it is enough to wipe it with a damp cloth and after drying it will be invisible.
Special glue for joints.
Advice! When purchasing a composition for gluing joints, you should give preference to well-known brands that are in demand and have proven themselves well. In this case, you need to pay attention to its cost, since a fairly high price can serve as a good indicator of the quality of the product.
List of required tools
Gluing and fixing loose joints is best done from a low stepladder, which, thanks to its mobility and light weight, is convenient to move from place to place. During the work, a lot of debris and construction dust are not generated, so any protection of the room is not required.
To eliminate such defects with your own hands, in addition to glue and a stepladder, you will need the following set of tools:
- Construction knife with replaceable blades.
- A narrow metal spatula and a metal ruler.
- A thin paint or art brush.
- Household spray bottle with water and a damp rag.
- A piece of thick cardboard or other thin rigid material measuring ~ 200x300 mm.
- Construction hairdryer.
Set of tools for wallpaper work.
Work order
If the wallpaper has peeled off at the joints in separate places throughout the room, the work must be done sequentially, moving from one defective area to another.
- First of all, the damaged area should be moistened with water from a spray bottle and the coating should be allowed to soak a little so that it does not tear during operation.
- Use a metal spatula to separate the remaining part of two adjacent panels from the wall and, using a thin brush, thickly coat the inside with glue..
- Place cardboard on the coated area so that it covers both panels and press firmly against the wall..
- Smoothly bring a turned-on hair dryer to the pressed cardboard and warm up the area to be treated with a stream of hot air for 15-20 seconds..
- After this, immediately remove the cardboard to prevent it from sticking, roll the surface with a special roller for wallpaper, wipe with a damp cloth and leave until completely dry..
In a similar way, step by step, it is necessary to sequentially process all problematic wallpaper joints throughout the entire room.
Special roller for rolling joints.
No. 1. What should you consider when choosing wallpaper glue?
There are, to put it mildly, a lot of different adhesive compositions in stores. There are adhesives that need to be diluted from powder, there are ready-made compositions, there is even wallpaper with glue already applied (self-adhesive wallpaper). Adhesives also differ in composition. Some will glue the wallpaper the way you want - you can’t tear it off, but it will smell unpleasant and poison the air, others will be environmentally friendly, but will not be able to hold the canvas properly. To avoid mistakes when choosing, always consider the following factors:
- wall and wallpaper material;
- wallpaper weight;
- purpose of the room (what humidity and temperature will be in it);
- primary and final adhesion;
- mobility, which determines whether you can slightly adjust the position of the sheet on the wall;
- environmental Safety;
- the presence of antifungal components in the composition;
- moisture resistance;
- The pH should be within 6-7, otherwise yellow spots may appear on light-colored wallpaper;
- durability;
- the ability to restore adhesive properties after getting wet;
- glue consumption.
All these properties directly depend on the composition of the glue, so we immediately move on to studying it.
How to re-glue a large area
What should you do if the wallpaper comes off completely, in a large area? There is also a sequence of work here. The tools are still the same. Problem solving technology:
We eliminate all drafts inside, close the doors and windows. You need to remove debris and adhering putty from fallen wallpaper. The wall is protected in a similar way. There should be no dust or dirt. They weaken adhesion. You can use a vacuum cleaner and thoroughly clean the problem area. The large peeled strip is coated with glue. She needs to let the glue soak in for 10 minutes. Glue is also applied to the wall. At the same time, you need to be careful if you work with a partially peeled trellis
It is important not to stain the front part with glue and not spoil it. The strip is neatly straightened and fixed in place
Ideally, this work should be done together to avoid creases in the material and the appearance of air bubbles. The final stage is to go over the wallpaper well with a rubber roller so that the trellis sticks securely. This removes excess glue and air. Remains of glue are removed with a damp cloth.
If everything is done correctly and efficiently, then the canvas will not peel off in the future.
Features of gluing different types of wallpaper
Regardless of whether the finishing is being restored or the coating needs to be replaced in certain areas, each material dictates its own rules.
Non-woven
The glue is applied only to the wall. In order for non-woven wallpaper to lie smoothly and not separate at the seams, they should be glued only to a carefully prepared base: without remnants of the old finish or defects, pre-primed.
Vinyl
During operation, the room temperature should be between +18-20°, doors and windows should be closed to prevent drafts. By analogy with non-woven wallpaper, peeling of seams can be avoided if you take the time to pre-clean, level, putty and prime the walls.
Paper
In this case, it is important to work more carefully with the glue: if you do not remove the excess immediately, it will be difficult to remove dried residues. Special conditions for gluing are not needed; it is enough to adhere to the specified temperature regime and avoid drafts.
Varieties
Kleo glue is available in a wide range, with each model designed for a specific type of wallpaper. Products differ in cost, composition of the dry mixture, purpose and duration of preparation. There are fourteen types of glue in total, each of which has special qualities inherent only to it.
Before you start choosing a composition, you need to familiarize yourself with its characteristics and functional features.
- "Kleo Optima". This glue is intended for paper wallpaper. It is reliable in operation, easy to breed, absolutely harmless and odorless. It takes about three minutes to prepare the composition.
- "Kleo Smart" is used for vinyl wallpaper and has a reinforced formula. Cooking time is seven minutes. The composition includes special starch and antifungal additives. A variation of this model, “Smart indicator”, contains phenolphthalein, which has the ability to change color when dried. This allows you to accurately determine the moment when the canvas has completely dried.
- “Kleo Extra” is an especially strong adhesive for wallpaper on a non-woven basis, capable of holding a heavy and voluminous canvas to the wall. It has a transparent texture, so it is absolutely invisible on the front surface of the wallpaper. The glue dries quickly, so you can start painting the non-woven covering a couple of hours after installation.
- “Kleo Ultra” is the most durable adhesive of the entire presented line. It is intended for glass wallpaper, heavy non-woven models and textile fabrics. The dilution time is five minutes.
- "Kleo Kids" is a specially developed adhesive that has a neutral PH composition and is recommended for use in children's rooms. It is absolutely safe for health, odorless and does not contain harmful components.
- “Kleo deluxe” – consists of a primer and adhesive flakes. The primer is made of modified starch and special stabilizing additives, and the adhesive mass is made of methylcellulose, starch and antiseptic additives. The technology for using this brand is different in that before installing the wallpaper it is necessary to prime the wall. This improves its adhesion to the canvas and improves the quality of the work performed.
- "Kleo ultra" is a ready-made composition with a thick consistency, used for any type of heavy wall hangings. Suitable for gluing ceilings. Consists of specialized additives, polyvinyl acetate and an aqueous solution. The product should be applied using a spatula. It is not recommended to use at temperatures below 10 degrees.
- “Kleo Strong” was created to secure joints; it is used in case of detection of installation defects and for fixing unstuck areas. It consists of a polyvinyl acetate component and acrylic, due to which it has high adhesiveness and a thick consistency. The composition is placed in a tube that prevents spreading and provides ease of application. The glue has low heat resistance, so freezing it is prohibited.
- "Kleo border adhesive" consists of inorganic alkalis, PVA and sodium phosphate. When working with it, it is recommended to use rubber gloves and goggles. Suitable for all types of borders, allows you to adjust the location of elements and does not spread.
- “Kleo Photo” is intended for gluing photo wallpapers that have a slippery and smooth surface. Ideally holds the canvas on the wall, does not leave stains on the front surface and dries quickly.
- “Kleo Total 70” is a universal composition suitable for any type of wallpaper, with high adhesive qualities and ease of use. The glue does not leave yellow stains and is suitable for translucent wallpaper.
- “Kleo Nature” is a specialized product designed for gluing bamboo sheets and cork wall coverings.
- “Kleo Line Special” is an adhesive with a reinforced formula, which has a methylcellulose base and guarantees reliable fixation of the canvases. Can be used for any type of wallpaper.
- “Kleo Professional” is a professional product that contains methylcellulose, antiseptic additives and starch. Allows you to perform any type of room pasting and combines the best qualities of other models.
This is interesting: Types of foundations for private houses: we study in general terms
Causes
Most often, the reasons for wallpaper coming off are mistakes made by the repairman.
When undertaking an interior renovation, it is important to approach the procedure as responsibly as possible. So, if the wallpaper has come apart at the seams at the joints, most likely, the following shortcomings were made during work:
- the walls were not checked for deformation;
- the old coating was not removed: previous wallpaper, whitewash or enamels;
- the wallpaper in the corners was pasted incorrectly;
- the glue was applied incorrectly;
- neglect of the rules of sticking;
- the glue was not selected for a specific type of wallpaper;
- the wallpaper had a paper base.
Carefully sealing wallpaper at the joints after repair is much more difficult than preventing it from peeling
So, it is important to tap all the walls with a hammer before applying glue to the sheets of wallpaper. If you see scratches, cracks, dents and chips, you need to apply cement mortar, and then plaster and prime the surface
It is the small fragments that have fallen away from the wall that begin the slow destruction of the aesthetic appearance after repair.
In addition, you should think several times before gluing trellises onto the old covering. Of course, when there are many layers of previous trellises, and some of them are thin paper types, the process can become very labor-intensive, and each person experiences conflicting feelings, caused primarily by laziness. But it is worth remembering that, firstly, the old coating may come off, and secondly, a fungus may be hiding behind the old wallpaper, which also causes the coating to come off the walls.
Another possible mistake that causes peeling is improper application. Here you should strictly follow the instructions, allowing the trellises to soak for the required amount of time.
By the way, the instructions will tell you which glue should be used for a particular type of wallpaper, and therefore it is extremely important to study it carefully. It is also worth remembering that wallpaper does not always peel off due to a lack of glue at the joints, because often an excess of adhesive does not allow them to dry correctly, which is why their displacement is inevitable
Very often the wallpaper peels off in the corners, and again the inexperience of the craftsman is to blame. When the seam is located in a corner on a bend that is incredibly difficult to adjust to a level, the wallpaper inevitably diverges. The solution here is simple: the corner is made of two sheets with minimal overlap.
In more expensive copies, as a rule, this problem does not exist. However, restoration may be required for completely objective reasons, for example, after flooding. At the same time, the trellises swell, acquire an unsightly shade and lag behind the walls.
In this case, it is difficult to seal deformed wallpaper, and therefore it is important to know some tricks
How to glue wallpaper at the joints if they have come apart
It is not advisable to throw away the glue powder remaining after the repair; it will serve as insurance in case of defects in the finishing coating. It must be diluted with water in the proportions specified by the manufacturer.
The joints of the canvases need to be slightly widened to make it more convenient to distribute the adhesive composition. To ensure uniformity, a narrow brush is useful. The glue-treated canvas should be pressed tightly, smoothing the joint with a clean rag. If there are still air bubbles under the wallpaper, you can use a plastic spatula when smoothing.
To restore seams, it is better to use the glue with which the wallpaper was originally glued. If there is no leftover or the expiration date has expired, you can use other adhesives, such as PVA.
PVA glue is suitable for working with paper webs, although it should be remembered that it can cause other problems. The “behavior” of polyvinyl acetate products varies depending on the manufacturer; sometimes they leave brown or yellowish stains on the wallpaper. Craftsmen advise diluting PVA with water in a ratio of 1:1 or combining it with wallpaper glue in a ratio of 1:10.
This option is not suitable for vinyl and non-woven materials; for them it is advisable to select glue for the joints. The main advantage here is the versatility of the composition - it is suitable for all types of fabrics and creates a reliable connection. Special glue for joints is easy to apply: it is packaged in tubes with a narrow tip. The product is already ready for use; it does not need to be diluted. When gluing wallpaper, manufacturers recommend maintaining the room temperature at +10 - +25°.
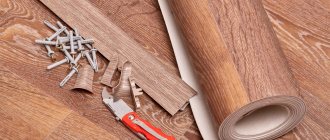
To prevent delamination of joints in the future even at the repair stage, you can glue paper tape between the canvases. This is a special narrow product that enhances the fixation of wallpaper. The solution is not suitable for thin non-woven and paper coverings, but works well with heavy vinyl sheets.
Finding a working glue is only the first stage of joint repair; the gluing process deserves more effort and responsibility. Operation Guide:
- The panels at the joint should be carefully unscrewed.
- Use a vacuum cleaner with a narrow attachment to remove dust and debris. If an old layer of whitewash or loose putty is visible, they need to be removed.
- If the putty layer is destroyed, the seam area must be worked over again with putty and coated with a primer, and then wait until it dries. Glue is evenly applied to the joint, and the edges of the wallpaper are pressed and rolled with a rubber roller.
- The entire surface should be smoothed with a plastic spatula, simultaneously wiping off any excess glue with a clean rag.
Often, during gluing, voids are formed - air bubbles; they should be carefully pierced with a needle. Joint glue or wallpaper solution is injected into such areas using a syringe, and excess should be removed with a rag. If simple PVA is used for gluing, craftsmen advise immediately treating the joints with an iron or hairdryer: high temperature promotes the formation of a strong connection.
If the wallpaper paste has expired, it will not be able to provide the expected effect.
Do not skimp on the mixture: you need to coat the wall and wallpaper generously. In some cases, in order for them to soak well, you will have to wait 10-15 minutes according to the recommendation of the material manufacturer.
Is it possible to disguise the joint?
The question is relevant in situations where a thin strip of the wall is visible in the restored seam, which is especially noticeable on dark wallpaper. To prevent the light strip from standing out, it can be painted over to match the color of the trim. In such a situation, water-based paint is suitable; if the pigment is too saturated, then a little of the product is diluted with water.
Dip the tip of a knife or spatula into the paint and carefully move it exactly along the joint. At first it may seem that the seam has become more noticeable, but it needs to be grouted with a damp cloth, the result will be a stripe that does not differ in shade.
What glue do you use for wallpapering?
Wallpaper
PVA
Causes of defects
First of all, you should understand the main reasons for the formation of defects.
- 1. The divergence of the edges of the canvases. When a layer of adhesive solution is applied to the material, the absorption process begins. The variety of bases used in finishing coatings is very wide, but the cellulose component is a traditional material. The properties of the base under consideration depend on many decisions of designers, including the development of the type of coating, shape, relief and width, but the very fact of moisture absorption and expansion of its original dimensions is undeniable. No matter how much glue is applied to the joints, they will definitely move and change their original position.
- 2. The applied adhesive does not correspond to the category of wallpaper used. Materials with great thickness and weight (2-layer vinyl, textile, non-woven or fiberglass) require the application of a special adhesive with a high degree of adhesion.
- 3. Insufficient number of preparatory operations or their low quality. This factor becomes significant when a uniform layer of “finish” putty was not applied to the surface of mineral compositions, or it was not sanded well enough, or was not treated with a deep-penetrating soil solution.
- 4. Failure to comply with optimal temperature and humidity parameters during the drying process of the freshly glued coating. The room must be dried under natural conditions at 20…22º and humidity below 70%. To speed up drying, do not use heaters or create drafts.
- 5. Prolonged exposure to dampness or water vapor, for example, in the event of an emergency in a steam heating structure or a roof leak.
Why does wallpaper peel off at the joints?
There may be several reasons, let's look at each of them.
Poorly prepared surface
Before you start wallpapering, you need to properly prepare the base. It is especially necessary to approach this seriously if the trellises are thin and smooth. It is necessary to remove the old coating from the surface and evaluate the base. Read how to quickly remove paper wallpaper from different surfaces.
If there are unevenness or cracks, they should be puttied. Prime the surface with wallpaper primer, for example UNIS. If the base is well prepared, then you can use a primer with glue.
Wallpaper glue
One of the important aspects is the correctly selected adhesive composition. For each type of wallpaper there is a specific type. You shouldn’t skimp on glue; it’s better to have a little left over than not enough.
Dilute the adhesive mass only strictly according to the instructions on the package. Do not do this by eye, as you will violate the proportion that implies 100% adhesive ability.
The technology of wallpapering is not followed
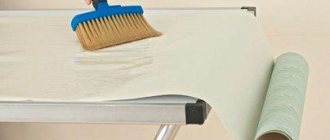
We coat the wallpaper with a base on paper with glue, more generously along the edges, since when you fold them for impregnation, the edges “dry out” a little, which is why the wallpaper peels off at the joints.
If the trellises are on non-woven fabric, then only apply the adhesive to the wall. After fixing the canvas on the wall, leveling it, smoothing it, go over the edges of the canvas again with a brush with adhesive mass, and only then smooth it completely. This will to some extent allow the joints to stick well.
Drying conditions for pasted wallpaper
Moisture evaporating from the adhesive mass creates increased humidity, which ensures the technologically specified drying period. The recommended air temperature for wallpapering is +23 degrees. All these factors will ensure high-quality gluing of the trellises to the surface and prevent them from peeling off at the seams.
Unseen circumstances
An emergency situation may also arise when your upstairs neighbors flood you. If the exposure to water is prolonged, and it comes from a hot tap, then you will not be envied, as I know this from my own experience. In this case, the wallpaper at the joints actually peels off, and maybe even the trellises themselves.
We were all at work, and when the water flooded the two floors below me, the neighbors called. Water flowed from all the openings of the chandeliers, passing through the voids of the floor slabs, getting into almost all the rooms of the apartment, dripping from the ceiling, flowing along the walls. The emergency service turned off the water and turned off the lights in the apartment for three days to allow the moisture to evaporate.
The wallpaper was almost undamaged, but in some places it peeled off and the seams came apart to a minimum in the hallway. But the ceilings were all damaged. A small digression, but on topic. Such an unforeseen picture may occur, but this is an emergency scenario and rarely happens. Go ahead.
What should you do if the wallpaper has already peeled off at the seams, you ask. If the fact already exists, then we will try to correct the situation.
Do it right: how to glue wallpaper so that the joints are not visible
In order not to endlessly re-glue the wallpaper, so that it does not come off at all at an inopportune hour, you need to do everything correctly from the beginning. You can immediately paste the wallpaper so that no joints are visible at all. How is this done? Everything is quite simple.
First, dose the glue correctly. You don’t need too much of it, it often makes the edges heavier, which makes it difficult to fit the pattern correctly and to glue the joints well.
Secondly, be sure to use a roller to press the seams. And before this rolling, it would not be amiss to moisten the wallpaper at the joints. It makes no difference whether the wallpaper is dark or light, thick or thin, there is always a risk of the joints peeling off.
So, the action algorithm will be like this:
- Cut the wallpaper into sheets, adding about 5 cm to the length;
- Coat the canvas with glue, spreading the glue from the center to the periphery;
- For further impregnation, the canvas can be folded in half;
- Glue the wallpaper strictly from top to bottom, from the window, you should have a vertical line as a guide;
- When the wallpaper has dried completely, excess pieces of the canvas are cut off with a sharp knife;
- The canvas is smoothed with a wallpaper spatula, excess glue is removed with a dry cloth;
- Once again, go over the seam with a roller, after wetting it a little;
- The next canvas is glued in exactly the same way, flush with the previous one, with the edges touching each other.
Make sure all windows and vents are closed. That the air temperature in the room is not low (optimally - above 20). After gluing, do not open the vents and windows for at least 12 hours, or even more.
Conclusion
Share on social media networks:
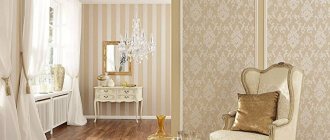
Nowadays, construction stores have goods for any type of repair, for any budget. If earlier we had a meager choice of paper wallpaper, now they offer many options for wall decoration: vinyl, non-woven, glass wallpaper and others. At the same time, paper ones also continue to firmly hold their positions. For each type of wallpaper, the store will offer you its own type of paste that is ideal. Depending on the manufacturer, quality and price will be different. But during minor in-line repairs, many people use PVA glue for wallpaper. Is this correct? Or maybe you can put all the wallpaper on it? In this article you will find answers to these questions and learn all the nuances of the correct use of such a familiar glue - PVA.
Read with this
- How to glue wallpaper: common mistakes in gluing yourself
- How to glue vinyl wallpaper on non-woven backing?
- Wallpaper for the bedroom
- How to calculate wallpaper: how many rolls and glue are needed to cover a wall. methods for calculating and determining the quantity of materials
- How to glue wallpaper on painted walls: water-based, oil and acrylic coating
- How to tear wallpaper off the walls if it won't come off
- How to glue fiberglass correctly?
- Technology of painting wallpaper with water-based paint
- How to glue corners with non-woven wallpaper
- How can you glue old wallpaper that has come off the walls and how to do it correctly?
Butt or overlap: how to glue paper wallpaper
So, how to properly glue paper wallpaper? Once upon a time they were glued only with an overlap, and this was due to the fact that previously there was a special strip on the wallpaper, which was glued with the next sheet. This made it possible to stick the wallpaper evenly, achieving verticalization.
Today, wallpaper is rarely glued overlapping, especially since the pattern needs to be flattened. Yes, you will have to be careful with the seams, measure and try on. But with careful sticking, the joints are not visible, and there are no distortions that can happen with an overlap. But if this is a matter of convenience, glue it as you like - the main thing, of course, is a good result.