When making major repairs or finishing a new building, all craftsmen are faced with the need to supply communications and disguise wires. The best way to lay utility networks is to place them in the wall. The work is quite labor-intensive and requires certain skills and special tools.
We will tell you how and what to use to tap walls for wiring, when you can get by with improvised equipment, and when it is better to use professional equipment. We will also describe the features of preparing grooves on different walls, and provide a step-by-step guide to grooves and sealing channels.
In what cases are walls tapped for wiring?
Creating a groove is an invariable attribute of hidden wiring. A groove is understood as a recess made in concrete, brick, plaster or other material for laying wires. With the help of the latter, household voltage is supplied to sockets, switches and lamps.
An alternative option is to create external wiring, when the wires are on the surface of the wall or placed in special boxes.
Hidden wiring is more in demand, because with its help you can hide communications in the walls and thereby improve the appearance of the interior.
The problem is that creating a groove requires preparation, considerable physical effort and time. In addition, it is important to know the requirements of the PUE and PTE, without which installation of wiring can lead to many problems.
It is also important to study the resolution 508-PP “On the organization of reconstruction and (or) redevelopment of residential and non-residential premises in apartment buildings and residential buildings.”
Finishing movements
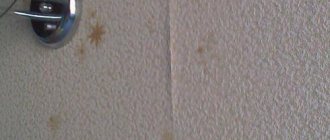
After the main groove has been laid, the recess is thoroughly cleaned of debris using a brush or a clean paint brush. If necessary, the edges of the cut lines are sanded until smooth.
Now you need to seal the recess to the same level as the main surface.
The recess is primed in two layers, leaving each to dry completely for 10-12 hours. You can, of course, skip this stage, but then cracks will almost certainly gradually appear - without adhesion, the putty will fall off.
The primer will provide the necessary level of adhesion, and putty is used as a filler. Use a spatula to scoop up a small amount of solution, apply the tool forcefully to the wall and move it to the side.
Closing the wiring
You can complete the sealing in several steps, gradually increasing the void, but then you need to think about what and how to compact the putty.
When the solution is completely dry, the wall is sanded with abrasive paper manually or using a sanding machine.
Then it is enough to cover everything together with the rest of the surface with a primer to begin the cosmetic finishing of the room.
What kind of walls are there in houses, and what tool to choose for a particular case
Before considering the technology, we will understand what kind of walls there are in houses/apartments and provide recommendations on the tool used.
Let's highlight the main points:
- Wood. Walls made of this material require special attention when creating grooves, because fire safety and protection of wires from accidental damage depend on the correct operation. For work, you can use a circular saw or a hand router. The best solution is to completely abandon grooves in wood, giving preference to external wiring or the use of cable channels made to look like wood.
- Concrete. Plates made of this material are difficult to impact, so the best solution is to use a wall chaser. As an alternative, it is possible to use a grinder or a hammer drill, but in this case it will take more time and effort to make a groove in the wall.
- Aerated concrete. This is a soft material, so there are rarely any difficulties with its gating. It is best to use a wall chaser designed for aerated concrete. You can use a homemade tool in the form of a curved metal tube with a hand tool on one side and a protrusion for recesses on the other. If such a device is not available, you can use an angle grinder or a circular saw, but in this case there will be a lot of dust in the room.
- Brick. Chiselling a brick wall cannot be called an easy task, because the material is resistant to mechanical stress. In this case, wiring in brick is done in rare cases. As a rule, a cable is laid along a brick wall, after which it is covered with a layer of plaster. The latter has a thickness of at least 30 mm, which is enough for 3x4 or 3x2.5 sq. cables. mm. If you still need to tap a brick wall, you can use the same tool as for a concrete wall.
- Monolith. Monolithic slabs require the same approach as concrete and brick. Here it is better to use a wall chaser, and in extreme cases, an impact hammer or grinder will do. Remember that when doing work there will be a lot of dust, so use glasses and a respirator.
Not only the production time of the groove, but also its quality depends on the correct choice of tool. If you have the opportunity to buy or rent a wall chaser, do it.
Using a regular chisel and hammer may only be suitable for plastering, but even here the work takes longer and requires a lot of effort (especially if we are talking about wiring the entire house or apartment).
We will tell you in more detail about how to dab walls made of different materials further.
Keep in mind
The instructions provided above are suitable if you want to make a groove in a monolithic or brick house with appropriate walls. However, today aerated concrete, wooden and plasterboard partitions can be erected inside housing. We’ll talk further about how to groove one of the non-standard wall options yourself.
When installing electrical wiring in a bathhouse or wooden house, you will encounter walls made of logs or profiled timber. Making grooves in wood is prohibited due to safety regulations, and this is not advisable, because... You will not have to chisel the log, but rather cut special recesses in it. This task will be very difficult and will take a lot of time, so in the case of wooden walls, installation of open electrical wiring is used.
If you need to lay a cable in a wooden floor, gating here, again, is impossible, so you need to consider the option of laying it under the boards behind the chipboard, insulation and other layers of the pie. In this case, the cable is laid in pipes with localization capability, that is, metal tubes. In general, electrical wiring in a wooden house is not difficult, but there are a number of nuances. Hidden electrical wiring in combustible walls and ceilings is also possible in metal pipes, but not in corrugated pipes.
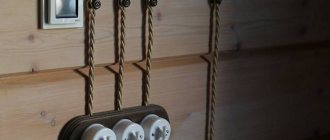
Open electrical wiring in a wooden garage (using wood-look cable channels)
If you are still going to lay wiring in corrugated floors or walls made of wood and other flammable materials, you must provide protection with a 10 mm thick layer of non-combustible material. This can be plaster, alabaster, etc. (PUE 2.1.40, Chapter 2.1).
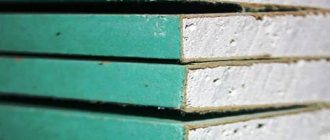
It will also not be possible to cut horizontal and vertical lines in plasterboard walls, because... The gypsum board sheet is very thin and fragile. The cable is simply laid behind the plasterboard partition in the corrugation, between the profiles. The only thing you can do in drywall is to drill holes for sockets and light switches with a crown, as shown in the photo.
If you need to make a groove in a tiled floor (for example, in a bathroom or kitchen), there should be no difficulties; it will be most convenient to use a grinder or wall chaser. You should not punch the tiles with a hammer drill, because... You will only damage the material - the tiles will crack, after which you will have to completely replace the floor covering. Do not forget that when working with stone and tiles, you need to install a diamond blade that is designed to work with such material.
Well, the last of the popular materials is aerated concrete. You can make a groove in aerated concrete yourself using a special manual wall chaser, the cost of which does not exceed 1000 rubles (and even then this is a model from the manufacturer). Using this tool is quite simple, as you can see by watching the video tutorial below.
Requirements and standards for wall gating
Before carrying out work, understand the standards that apply to electrical wiring in general and wall gating in particular. The first step should be to draw up a drawing in compliance with the requirements of the set of rules SP 76.13330.2016 “Electrical devices” Updated version of SNiP 3.05.06-85 (approved by order of the Ministry of Construction and Housing and Communal Services of the Russian Federation dated December 16, 2016 N 955/pr) .
Requirements and standards for wall gating
It indicates all installed points (sockets, switches, boxes) and the routes of wires.
Having a diagram is a must, because with its help it is easier to make repairs in the future and find a place to drill screws or drive nails.
It is necessary to trench walls for wiring taking into account the following points:
- The depth of the gates is up to 20-30 mm, width - up to 30 mm.
- The greatest distance of the recess between the distribution box and the electrical point is up to three meters.
- Ways to make grooves are vertical and horizontal. In the second case, the parallel arrangement is checked using a level. It is prohibited to “cut” the path to the outlet by laying the wire “directly”. This also applies to wavy styling. An exception is the attic floor with a sloping roof, where the wiring is laid parallel to the ceiling.
- The distance between the vertical groove and the window/door is at least 100 mm.
- Between the floor slabs and the grooves made horizontally there should be 150 mm or more.
- The distance from gas or heating routes to the place where the wire passes is from 400 mm and above.
Please note that chiselling in corners, floor slabs and load-bearing structures is prohibited, as this leads to a decrease in the strength of the building and can lead to damage.
When planning your circuit, try to keep the number of wire bends on the way to electrical points to a minimum. The best option is that there is only one right angle from the box to the socket/switch.
Correct drawing up of the drawing and subsequent gating, following the above rules, allows you to avoid many difficulties during operation.
Distances, depth, groove width
What nuances should you pay attention to when cutting walls for cables? Firstly, these are the minimum distances and indentations. Here, adhere to the following recommendations and rules:
| Name of the dimension up to the groove | Minimum distance |
| From the corner of the wall | 10cm |
| From the door frame | 10cm |
| From the ceiling | 15-20cm |
| From the floor | 15-20cm |
| From the window slope | 10cm |
| From a gas pipe | 40cm |
- max groove depth - 25mm
- when installing one cable without corrugation, a width of up to 5 mm is sufficient
- when using corrugation - 20-25mm
Also pay attention to the location of the furrow relative to the socket box. It shouldn't go straight down the middle.
Always orient it closer to the edges. Moreover, left or right also plays a role.
If the future socket or switch is located close to the doorway, then it would be more correct to draw the groove exactly to the far edge from the door. Otherwise, when installing doors, installers will damage the cable with a long dowel when drilling.
When cutting, a laser level is often used. Firstly, it makes work easier and faster. And secondly, the cable will be laid perfectly straight.
In the future, when you drill a screw into the wall for a picture, you will know exactly how many millimeters away from the outlet you have a cable under the plaster.
You won’t need to use all sorts of fancy devices and fancy wall scanners to detect wires under plaster.
The correct cutting direction is top to bottom. You will be less tired, and gravity, on the contrary, will be an assistant when working.
It is enough to attach the wall chaser to the wall, and then high-quality discs and the force of gravity of the earth will do most of the work for you.
Work order
Wall chipping takes place in several stages - the preparatory process and the actual creation of the recess.
Let's look at the stages in more detail:
- Clear the room of extraneous things. Remove household appliances and furniture, sweep and wash floors.
- Cover the opening with a damp cloth to prevent dust from entering the living space.
- Remove wallpaper if there is any on the walls.
- Check areas where old wiring was lying. If you find one, remove it or retreat at least 100 mm.
- Make indentations using the selected tool (taking into account the characteristics of the walls).
- Clean the furrows and prime them.
- Wait until completely dry and lay the wires.
- Moisten the recess with water (a small amount).
- Fill the hole with plaster (plaster) or putty. For greater reliability, you can use reinforcement mesh.
Remember that grooves differ in purpose of use. Not only wires are laid in them, but also junction boxes, boxes for sockets, pipes and switches are installed.
Boxes for combining wires are located directly under the ceiling, and recesses for sockets are made at a height of about 300 mm from the bottom of the room.
To work, you will need two funnels per drill - one 65 and the other 85 mm. They are installed on the drill and help in making special holes. Sometimes there are situations when it is necessary to move the socket and make a groove.
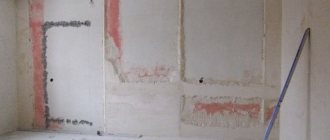
Surface marking
Preparation for gating walls is as follows:
- detect old wiring , for which testers and indicators are used. It’s good if you have a plan for the old wiring, but, as practice shows, not everyone is so lucky. The location of the old wiring must be marked on the wall;
- the old wiring needs to be disconnected, and if this is completely impossible, then the new line should not intersect with the old one;
- the new wiring route is also marked on the walls from the junction box to each connection point;
- It is better to cover doorways with a damp cloth. Even if the door leaf is closed, dust will find its way into the cracks and fill the rest of the room.
How to make aerated concrete or foam blocks
Aerated concrete is a type of cellular material, an artificial stone used during construction work. In its production, quartz sand, cement, special gas generators and additional mixtures are used.
The material has good qualities and is convenient in construction. It has a soft structure, so there are no difficulties with gating.
To tap walls in aerated concrete or foam blocks, you can use the following tool:
- A wall chaser that allows you to create an even groove and reduce the loss of time for completing the work.
- Hammer.
- Angle pin machine.
- Drill.
Can be used:
- Pobedite crown 68 mm.
- Screwdriver.
- 8 mm straight groove cutter for wood. Because soft aerated concrete will be an excellent solution. Or you can use a drill of the same diameter.
- Profile for drywall - so that the groove is even.
Alternatively, you can use a chisel with a hammer or a homemade chisel device. In the latter case, a pipe 30-40 cm long with a pointed edge on one side is used (we mentioned this above).
How to shingle brick walls
Brick is an artificial stone used for the construction of various objects. It is made from quartz sand, burnt raw material, unfired clay or limestone screenings. It differs in appearance, shape and characteristics.
Regardless of the material used, brick walls are difficult to chisel, so it is recommended to use professional tools to complete the job.
Optimal options:
- Bulgarian.
- Wall chaser.
- Chisel and hammer (for short sections).
When chipping, you need to be careful, because brick tends to crumble, so you can’t do it without safety glasses.
A small life hack is to use a ceramic drill and a screwdriver. The idea is to use the ceramic drill as a milling cutter, i.e. use the side edges for chipping bricks.
The channel is milled very quickly and without dust. This life hack is especially suitable for sand-lime brick.
Tool selection
There are several ways to make grooves on a concrete or brick surface. The technology for creating furrows is the same and differs only in the set of tools used. Popular tools for creating grooves yourself: hammer, drill and chisel.
To groove the walls you will need:
- Hammer and chisel.
This is an affordable option, but the work takes a long time and requires a lot of physical effort.
- Hammer.
The furrow is uneven. The work is done relatively quickly and cleanly.
- Bulgarian.
Even grooves are created, but a lot of dust is generated; in order to catch it, you must additionally use a vacuum cleaner. Please note that the household option will not work; you need to look for an industrial model.
- Wall chaser.
The groove turns out smooth, the work is done quickly, but the tool is expensive, so not every home craftsman has it.
When chipping with a hammer drill, it is best to use different attachments.
How to ditch a monolith
Monolith is a popular building material used in the construction of various objects. Its peculiarity is the use of metal reinforcement and concrete, which is poured directly at the construction stage of the facility.
This technology has gained popularity due to its low price and high strength of finished reinforced concrete structures.
There are many questions regarding permission to groove in monolithic walls.
Here you can consider the following points:
- GOST R. 50571.15-97 allows installation of wiring if the work does not affect the functional features of the facility;
- SP 31-110-2003 - installation of hidden, but not pulled, wiring is allowed.
It is prohibited to install wiring in concrete columns, external walls and elevator shafts.
Tool used:
- Angle grinder.
- Wall chaser.
- Rotary hammer (for short sections).
Granite monoliths are especially difficult to handle, so in this case it is better to turn to professionals.
How to groove concrete
Concrete slabs are an invariable element of modern construction. With their help, you can assemble a house like a constructor, and thereby speed up the construction process. Such elements consist of concrete and metal reinforcement.
For gating, it is recommended to use the following tool:
- Grinder with a diamond blade.
- Wall chaser.
- Rotary hammer (for short sections).
Not a big life hack - install two diamond discs on the grinder at once, thereby reducing the time for making the grooves by at least half.
How to make a concrete wall in a panel house
When choosing a gating method, decide on the scope of work and financial capabilities. For convenience, we provide brief instructions for different tools.
Hammer and chisel
The use of these devices is justified when you need to make a small groove (up to 60 - 100 cm).
The action algorithm is as follows:
- Make small indentations on the sides of the groove.
- Place the chisel along the opening and hit it so that it goes deep inside.
- Remove the top along the marked strip.
- Deepen the groove to the desired level of 25 mm.
- Clean the holes made from dust and apply a primer.
- After the primer has dried, lay the wiring and seal it with plaster or plaster, and then seal it with putty.
Hammer
A hammer drill looks more attractive from the point of view of efficiency. If you use it, you can dispense with the chisel and hammer.
An impact drill allows you to drill into a wide variety of surfaces, and to solve the problem you will need a small drill and a spatula.
Instructions:
- Make holes 25 mm deep. Try to keep a distance of 10 mm between them.
- Using a spatula, combine all the previously made indentations.
- Walk along the groove several times to clean the opening (if necessary).
Using a hammer drill is the optimal solution when it is necessary to drill a relatively small area.
Bulgarian
To obtain an even groove and speed up the process, it is recommended to use an angle grinder. It can handle any surface, including a concrete wall.
The algorithm of actions is as follows:
- Stock up on a diamond blade, because nothing else will work, as well as a razor and safety glasses.
- Make a couple of cuts along the entire length of the groove. Make sure the lines are parallel. Optimal values are from 20 to 25 mm width/depth.
- Remove the center using a chisel and hammer. If you have an impact drill handy, use it.
If everything is done correctly, the final recess for the wiring will look almost perfect. Dust, as noted above, can be easily dealt with using a vacuum cleaner or dampening the wall.
Wall chaser
The use of a wall chaser is the best solution for performing work of any complexity.
The device consists of the following elements:
- Powerful motor, reliably protected from overloads.
- Housing with adjustable position.
- Additional handle.
- Non-slip rollers.
- Target mark.
- Cutting discs.
- Side handle etc.
The process goes as follows:
- Make a mark where you will be cutting (draw a line with a pencil).
- Attach two diamond wheels.
- Adjust the position of the casing.
- Walk around the area where the wires should be.
- Clean up the residue with a hammer drill or chisel.
The use of a wall chaser guarantees maximum speed in solving the problem. The only drawback is the high price of the equipment.
How to seal the groove
After all work, all recesses are filled for subsequent painting. The operation algorithm is as follows:
- Cleaning the furrow from dust with a vacuum cleaner.
- High-quality priming of grooves. They are treated with a brush dipped in primer.
- Wetting the channels with water (after the primer has completely dried).
- Filling grooves. A plaster compound, construction gypsum or polyurethane foam for pipes is used.
You might be interested
How to choose workers to renovate an apartment 12 deception schemes when renovating apartments How you can save money when renovating
Grooving in a brick wall
The principle of creating a groove in a brick wall is similar to the instructions discussed above. To solve the problem, use any of the tools mentioned above.
If you plan to apply plaster to the brick, first secure the cable without making a groove. Next, it remains to cover the wiring with a layer of finishing.
How to make a groove in a wall without dust
It is no secret that the use of a hammer drill, grinder and wall chaser results in the appearance of a cloud of dust, which subsequently settles on all surfaces, including your lungs.
The professional tool has a built-in vacuum cleaner that sucks in dust. But there is a drawback - such equipment is expensive and is not always affordable for ordinary users.
There are a number of more budget-friendly options to reduce the amount of dust:
- Wet the surface to be treated with water. This is the simplest way to at least partially curb dust. The main thing here is not to overdo it, so as not to flood your neighbors.
- Application of wet cutting technology and grinders. Its essence is that water is supplied to the gating site through a hose. It is important to ensure that moisture does not end up on the equipment. The risk of flooding remains as relevant as in the past.
- Using a vacuum cleaner. In this case, it is advisable to have an assistant nearby who will place the vacuum cleaner nozzle at the place where the groove is created. Or connect a regular household vacuum cleaner to the grinder through a sewer pipe with a diameter of 50 mm.
A number of additional methods can be used to reduce dust formation. So, cover the floor with film, hang a damp cloth at the exit, and place a rug soaked in water at the entrance. Well, no one has canceled the means of protection.
Homemade dust catcher for an angle grinder
Craftsmen often resort to making their own protective casing for a sander under a vacuum cleaner. This curtain will help remove dust. To work you need to take:
- aluminum pan;
- measuring instruments;
- grinder;
- paint.
A casing is cut out from the bottom of the pan to fit the diameter of the grinder's impeller. Here you need to accurately calculate the depth of the disk. The height of the cut being formed depends on it.
A landing axis is cut out from the remains of the pan. A cross-section of the exhaust device is tried on the grinder. They fasten it securely.
Using the same method, a pipe for the hose of a simple household vacuum cleaner is assembled. The edges of the finished structure are carefully folded inward along a single line. This is needed to attach the side walls. They can be made from any material (metal sheet, etc.). All that remains is to give the finished device an aesthetic appearance: clean the joints and paint.
Before you start gating, you must mark the walls. This is necessary in order not to accidentally damage the old wiring, reinforcement of supporting structures and not to violate the basic requirements of SNiP for such work. Markings are made using a level/ruler and a construction pencil.
Subtleties of gating
Depending on the material being processed, various difficulties may be encountered. Let's consider issues that require special attention.
How to groove under an air conditioner
A conventional split system consists of two blocks. One is installed outside the room, and the other is mounted inside the room.
To lay the connecting elements, a groove measuring 60/50 mm (width/depth) is made. After installation, the “filling” is covered with gypsum mortar and covered with plaster.
How to cut drywall
In the case of plasterboard sheets, the creation of grooves is excluded due to the small thickness and fragility of the material. The optimal solution is to lay the wires behind the sheet.
As for the electrical points, they are mounted in a hole prepared in advance. The latter is done using a hammer drill with a crown attached to it.
Installing sockets in drywall.
Tiled surface
In a number of rooms, tiles are used on the walls. As a rule, this group includes the bathroom and kitchen. There will be no difficulties if you have a grinder with a diamond blade at hand.
The use of a hammer drill is not recommended due to the risk of cracking and damage to the tiles.
Is it possible to groove load-bearing walls?
In objects with walls made of monolith and concrete there are so-called load-bearing surfaces. Their peculiarity is the presence of a metal frame and a base in the form of a concrete mixture.
Applying a groove reduces the thickness and, accordingly, the strength of the surface. It is not surprising that difficulties often arise in the matter of coordination.
According to all the rules, it is prohibited to groove load-bearing walls, because when using a wall chaser or an angle grinder, metal reinforcement may be damaged or exposed.
The following possible solutions to the situation are:
- Officially approve the task with the local building department and obtain permission. In this case, it is necessary to prove that creating a groove will not damage the built-in reinforcement mesh or the main structure. If we are talking about a panel house, permission will be refused in 9 out of 10 cases. As for a frame-brick facility, there will be no difficulties in obtaining approval.
- Apply a layer of plaster to the surface of the slab and then dig into it without going deep into the slab itself. As a rule, the reinforcement is located at a depth of 15-20 mm, so the likelihood of damage is minimal.
- Use a plasterboard structure and hide the wiring in it.
- Place wires in electrical skirting boards.
- Lay wiring under OSB board, etc.
As you can see, there are enough options to get out of the situation to choose the optimal gating option.
Features of working with various materials
If you have a correctly made diagram and suitable tools, it is not difficult for even a beginner in the construction business to perform wall gating. But this is the case if the wall is not load-bearing and is covered with a thick layer of pliable plaster.
But what if the internal partitions are made of high-strength concrete, lightweight aerated concrete or even wood? Let's consider the nuances of working with various materials.
Grooves in concrete and brick
On brickwork fastened with a mixture of sand and cement, you can even gouge out horizontal grooves with a chisel and hammer if you “get” into the seam. For vertical grooves, it would be better to use a power tool - an angle grinder, a hammer drill or a wall chaser.
If the masonry is covered with plaster, you can do it with primitive manual equipment, although the process will take a lot of time.
Rules for marking grooves for wiring on brickwork: horizontal channels are knocked out at the junction of rows, vertical channels - between rows of bricks
In principle, there is nothing difficult in working with concrete - although the material is quite strong, grooves on it can be made with any tool suitable for slitting, with the exception, perhaps, of a hammer and chisel.
But the best choice would still be a hammer drill, although the evenness of its grooves leaves much to be desired (however, plaster will correct all the nuances).
The noise level from the hammer drill exceeds 60 dB, and in order not to injure neighbors, work with it is allowed only on weekdays and during the daytime, taking periodic breaks for 1-2 hours
This impact tool has high power, so it can handle any hard surface. It does not create such a large dust cloud as an angle grinder, and does not require additional tools to clean out the remaining material inside the furrow.
A hammer drill and a hammer drill are suitable for forming round holes, although for this the master will need experience:
Image gallery
Photo from
Step 1: Marking the hole for the socket box
Step 2: Outlining the contour of the future recess
Step 3: Connecting the Dots to Form a Solid Circle
Step 4: Remove excess with a regular chisel
In addition, on high-strength concrete walls, using a grinder (and its analogues - a circular saw, an angle grinder) is unsafe - the wheel may break if pressed hard.
How to work with wood and aerated concrete
You can make grooves in walls made of aerated concrete or foam blocks using a grinder, drill, hammer drill or circular saw. But if you want to minimize the amount of dust, use a special manual wall chaser designed for working with pliable material.
Its pointed arc easily cuts a neat groove, and the desired depth can be achieved in just 3-4 passes.
By the way, it’s easy to make such a tool with your own hands from a plate sharpened on one side or hard punched paper tape. To do this, you need to bend a small piece of improvised material into an arc and secure the edges with wire or electrical tape.
For small volumes, such a device is quite sufficient, but if you need to install a network of channels with a total length of more than 20 m, it is worth equipping the device with a convenient pipe handle.
If there is no suitable material for a wall chaser, you can buy a ready-made tool in a store - a simple model will cost between 500-1000 rubles
As for walls made of profiled timber or rounded logs, according to fire safety rules, it is recommended to install open electrical wiring so that in the event of force majeure the source of ignition can be quickly neutralized.
As a last resort, for wooden walls you can use a special router, a grinder with a circular disk for wood and a chisel, with which you can remove the material remaining between the cuts.
But, we repeat, it is better not to take risks with masking the wires and carry out the installation without violating the PUE standards and the integrity of the wooden covering.
Nuances with load-bearing walls
As already mentioned, it is prohibited to ditch load-bearing structures - if the top layer in the wall is damaged, the reinforcement is exposed, which can result in corrosion that will weaken the entire frame of the building. But what about the owners of apartments in a building where some of the partitions are made of reinforced concrete or most of the walls are load-bearing?
There are several options here:
- Official approval - obtain permission to carry out gating work from the local building department. You can try if you can prove that the depth of the grooves will not affect or damage the reinforcing mesh, the deformation of which leads to softening of the load-bearing structures. But if we are talking about a panel house, the chances are almost zero, but for a frame-brick building, a permit will most likely be issued.
- Apply a layer of plaster to the wall and carry out gating without delving into the structure of the slab itself. Typically, the reinforcement lies under a 1.5-2 centimeter layer of concrete, so if you level the wall with a plaster mixture, the depth of the grooves will not affect the metal.
And the last way that will help solve the problem with any problematic wall is to hide the wires behind drywall or in special electrical skirting boards.
How to make a recess for a socket and switch
For many beginners, the greatest difficulty is creating recesses for sockets and switches. There are several options here.
Crowns
On sale you can find special shorts that have different diameters and allow you to make recesses for boxes and socket boxes.
The device is a piece of pipe with a diameter of 68 to 80 mm, a pin for mounting in a hammer drill and a drill with which the direction is set.
To drill a hole, do the following:
- Decide where the box will be placed.
- Find the center.
- Make a hole using a hammer drill.
- Assemble the crown and install it into the instrument.
- Insert the pilot drill into the finished hole.
- Turn on the hammer drill and make a hole.
As soon as the crown enters the hole 2/3 of its depth, you can remove it from the opening.
To align the hole, you can use a hammer drill with a drill or a chisel with a hammer.
Hammer and crown
There are situations when the crown does not cope with the task, and then it is necessary to look for alternative solutions.
Take the following steps:
- Repeat steps one through five of the instructions above.
- Turn on the hammer drill and try to go as far into the surface as possible.
- Remove the crown, insert the drill and use it to make several holes around the perimeter at a distance of 10-15 mm. The more such holes, the better.
- Put the bit back on the impact drill and try again. In this case, everything should go faster, because the resistance of the wall is already lower.
Remember that there may be some shock when drilling a hole, so hold the impact drill as securely as possible to prevent it from being pulled out of your hands.
Hammer without crown
If the crown is not at hand at all, use only a hammer drill. Additionally, you will need a chisel and a drill.
The algorithm of actions is as follows:
- Mark the future hole with a pencil.
- Use a puncher to make many holes along the contour (there should be more than 20).
- Knock out any remaining concrete between the holes. Be prepared for a long time of work, because you will have to use a chisel and a hammer.
This method is good if you need to make one or two recesses for the box. If the task is to wire the entire apartment or house, it is better to fork out money to buy a special crown.
Bulgarian
If none of the above is at hand, use a grinder with a diamond blade.
The algorithm of actions is as follows:
- Make an outline of the future recess.
- Prepare the angle grinder for use.
- Wear a respirator and goggles. As a last resort, use a gauze bandage soaked in water. Put a hat or cap on your head.
- Use a grinder to make indentations around the perimeter of the future box.
- Use a chisel and hammer to remove any remaining concrete from the center.
When working with an angle grinder, be careful and keep it perpendicular to the wall. If this rule is violated, there is a high risk of damage to the disc and flying fragments. Further consequences are difficult to foresee.
Step-by-step description of the gating process
First you need to draw up a diagram with a detailed indication of all the elements of the electric highway. Those who are computer friendly can use special programs, for example, Compass Electric , ProfiCAD , QElectroTech or other graphic editors.
In specialized programs you can draw various plans and wiring diagrams for electrical wiring, however, it will be difficult for a non-professional to understand them, so most people use a simple drawing on paper (+)
Step-by-step process for gating walls using wiring:
- If possible, we protect the room from construction debris - we close the doorway with a damp cloth, remove furniture and equipment or seal it hermetically.
- If there is wallpaper on the walls, it must be removed so that pieces of paper do not get stuck in the power tool.
- Then we transfer the wiring diagram to the walls using a drawing drawn up in advance, a marker and a building level.
- We check the marked area with an indicator or metal detector for the presence of old wiring - if any is found, you will need to dismantle it or make an indentation of at least 10 cm. Ideally, the apartment should be de-energized and the wire extended to the neighbors, because if you accidentally stumble upon a cable that was missed during inspection under voltage, serious injury may occur.
- Now you can make grooves using protective equipment and any tool convenient for you that is suitable for the wall material.
- When the entire route has been completed, the grooves must be cleaned of residual material and dust, then treated with a deep penetration primer.
- When the impregnation dries, you can install the wiring.
Please note that the grooves are different, because the grooves are intended not only for the cables themselves, but also for masking socket boxes, switches and junction boxes.
Typically, the boxes themselves are placed immediately under the ceiling (in the place where the main power line runs), and the sockets are placed 30 cm from the floor level. And for them you will need to make a recess in the shape of a circle.
Prepare two types of “crowns” - 80 and 65 mm, with the help of which round holes are cut for the junction box and socket boxes
Of course, you can hollow out such grooves for installing socket boxes manually by marking a circle line with a drill or chisel, but it is much more convenient and faster to do this using a hammer drill and a “crown” of a suitable diameter. The same attachment can be used to make a recess for switches.