- June 27, 2020
- Repair Tips
- Tatiana Rodina
The question “How to repaint chipboard furniture with your own hands?” asked by those who want to update their home and save money. Is it possible to repaint budget furniture? Yes, you can. It is easy to transform interior items made from laminated chipboard yourself by changing the color and texture.
In order to start thinking about how to paint chipboard furniture, it is important to understand what particle board is and have the necessary tools available.
What is chipboard
Chipboard is a special type of sheet construction and finishing material. The abbreviation comes from the full name: particle board. It consists of sawdust compressed under pressure and at high temperature, combined with special compounds (natural or artificial).
Chipboard is made from residues after wood processing. Use sawdust, small shavings, and so on. Sometimes non-commercial wood or re-grade wood is shredded.
Production technology
The chipboard manufacturing process is as follows:
- The chips are sorted by size - layers of different chips are alternated in the slabs. Larger chips are located in the center, smaller chips are located at the edges. This is how the strength of the material is achieved.
- The workpiece is sent to a press, where under the influence of high temperature and pressure the chips are converted into a monolithic slab.
- After the slab has cooled, it is cut into pieces of the desired size.
- After inspection, the chipboard is sent to the workshop for sanding, lamination and other processing methods.
Technology can change. For example, to produce single-layer chipboard, large chips are additionally crushed using special equipment.
If there are insufficient quantities of natural binding elements (contained in coniferous wood), synthetic binding agents are added to the chips during production.
Types of chipboard
Chipboard has several varieties. First of all, it is divided by area of application:
- Construction boards. Used for external and internal work. They are durable, moisture-resistant, protected from the development of fungus and bacteria. To obtain such slabs, special components are added to the chips. This material can be either polished or unpolished.
- Standard slabs. Suitable for indoor use, they are not treated to enhance their protective properties. Furniture is made from such chipboard.
- Special plates. Such material is required to satisfy all additional customer wishes. They can be fire-resistant and have enhanced protective properties.
Each type of work involves choosing a certain type of chipboard.
To varnish or not
The varnish coating fixes the color, protects the surface of the furniture, and the product looks antique and well-groomed. Be sure to protect with varnish the furniture that is often opened and closed.
For varnishing, use specialized furniture (not parquet) matte or transparent varnishes. The second layer is applied 24 hours after the first coating.
Varnish choice:
Alcohol varnish is used when restoring antique objects.
New, popular acrylic varnish, odorless, suitable for indoor and outdoor use. Economical product - water is used for dilution.
More: How to transform an apartment on a budget
Durable alkyd varnish film withstands abrasion. A solvent is used for dilution.
Little oil varnish is used; it is often used to cover the floor. For dilution you need drying oil that dries for at least a day.
Polyurethane (ship) varnish has increased wear resistance due to the appearance of a protective, quick-drying film.
Nitrovarnishes are inexpensive and form a durable protective film. No special primer is required before coating. When applied, it is diluted with a solvent.
Decorative chipboard coating
Decorative coatings are often applied to standard slabs. These include:
- Melamine film and subsequent coating with a layer of varnish. In this way, a laminated material is obtained, which can be identified by looking at the marking: the letter “K” is added to the name.
- Melamine film pasted under high temperature and pressure is a lamination process. The letter "L" is added to the name. This type of coating significantly increases resistance to moisture and improves appearance.
- Veneer is a very thin cut of wood. It is glued to the surface of the slab and coated with varnish. Externally, such slabs differ little from real wood.
When wondering how to repaint chipboard furniture with your own hands, it is important to have knowledge of which types of boards are better: chipboard, laminated chipboard or veneered. The worst option is laminated slabs. The varnish wears off quickly, the design disappears, and furniture made from such material cannot be restored.
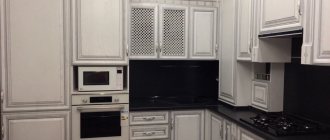
Veneered chipboard and laminated chipboard have approximately the same properties in terms of coating strength, but the former is less resistant to moisture and is much more expensive. It is not always wise to use it in rooms with high humidity: kitchens, bathrooms, and so on.
Advantages and disadvantages of furniture made from chipboard
To understand the nuances of repainting furniture chipboard for specific furniture, you need to know its pros and cons. All chipboard is made from sawdust and wood shavings, which are impregnated with formaldehyde as a binder. In the future, during operation, chipboard is capable of releasing formaldehyde, which negatively affects the environment and the human body, but the advantage of laminated chipboard is its top layer - a protective film that prevents the harmful substance from evaporating.
Laminated chipboard is quite resistant to mechanical and temperature damage and has a huge number of variations of different textures and colors. It can imitate the appearance of valuable wood, and you can put anything hot on it.
MDF furniture
MDF is also a chipboard material, but it is produced using improved technology. The slab includes small compressed fractions of sawdust. Because of this bonding, MDF becomes a homogeneous, high-strength and safe for human health board. But it costs more than chipboard.
The main difference between MDF and chipboard is its coating. It is pressed into the structure of the slab, which makes it stronger and more resistant to water. These slabs can also be found in a variety of patterns and textures.
Due to its environmental friendliness, furniture for children's rooms is often made from MDF.
This is a fairly dense material, which is why it is indispensable in the manufacture of furniture with an unusual design: elegant lines and roundness.
The disadvantages, in addition to the high price, include low resistance to damage and easy flammability.
Design ideas
On the way to improving outdated (or boring) furniture, do not be afraid of experiments. It is unlikely that an exact repetition of an old idea will help make an old cabinet or chair part of a modern interior. The following ideas will help you come up with a new image for an object:
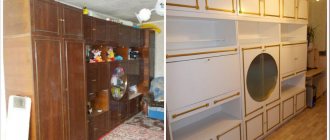
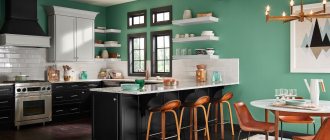
Color update. It is not necessary to maintain the original color of the product. Try to match the paint to the room's palette. A contrasting color will turn a piece of furniture into a highlight of the interior; For this purpose, bright and rich latex paint is best suited.
For connoisseurs of original solutionsSource loveincorporated.net
Simple and effectiveSource loveincorporated.net
Focus on details. It is very easy to transform old furniture with the help of new details: unusual fittings, original (stained or frosted) glass, curly furniture legs.
Details make all the differenceSource influenceimmo.com
Furniture is like a board for notes. Chalkboard effect paint is a stylish solution for modern interiors in an industrial or Scandinavian style. You can use the composition to decorate the front of a cabinet or tabletop, and then take notes, make shopping lists or learn a foreign language.
An idea that kids will loveSource ivybush.ru
About the techniques for decoupaging a chest of drawers in the following video:
Repairing furniture yourself
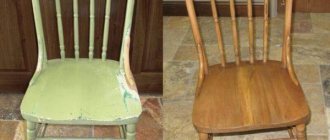
No matter how carefully people treat everything that surrounds them in their home, in any case, sooner or later the furniture needs to be repaired. This helps restore damaged elements and worn upholstery to their former beauty. It is possible to carry out the work yourself; you just need to try a little for a beautiful and high-quality result.
Major repairs and furniture production are complex processes that require the involvement of professionals, but minor defects can be tried to be corrected at home.
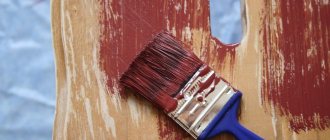
How to paint chipboard at home
Over time, panels tend to fade, fade in the sun, or they simply become boring. Then you can pick up paint and a brush. This way you can save a significant amount, because if the wallpaper is changed every couple of years, and the curtains are changed at least every month, then furniture is usually bought to last for many years.
First of all, you need to figure out what kind of paint composition is needed to repair furniture. There is a huge range of paint on the market, but not every paint is suitable for the required work.
Preparing for painting
The laminated surface of furniture elements is a special type of plastic that is resistant to moisture. Paint will not adhere to such smooth materials, regardless of its characteristics. Therefore, before painting old chipboard furniture made by yourself, you need to carefully prepare.
First, remove all dust, dirt and grease from surfaces using solvents and special cleaning agents. This work is very important to ensure that the paint holds up in the future.
Furniture can be disassembled for convenience. In the case where only the facades are to be painted, they are removed from their hinges and laid horizontally. Fittings and furniture handles should be protected from paint using masking tape.
We use self-adhesive film
Self-adhesive film will help quickly renew shabby tables and worn-out kitchen units made of chipboard. The variety of textures and colors of the material will allow you to create a new style of furniture and fit it into the modern interior of your home.
For work you need to prepare: self-adhesive film, knife, soft rag.
Algorithm of actions:
furniture unwinds into its component parts; surfaces are thoroughly cleaned and degreased. Secret: water with the addition of liquid dishwashing detergent will help clean surfaces
A solution with vinegar will help degrease furniture; the prepared surfaces are covered with self-adhesive film. Important: film cutting is carried out taking into account 10 mm allowances. Before pasting, the furniture is lightly moistened with water from a spray bottle.
This will help you easily correct folds and distortions during operation; The pasted surfaces are smoothed with a soft cloth. If a bubble remains under the film, puncturing it with a needle will help remove it.
Removing the top laminated layer
To protect the painted surface from swelling and cracking, the top layer should be removed from furniture elements. To do this, use sandpaper. Firstly, you will need coarse-grained sandpaper for cleaning at the main stage, and only then fine-grained sandpaper to consolidate the result and create a surface for painting kitchen furniture made of chipboard or bedside tables. This action creates roughness and the paint will stick.
During work, personal respiratory protection should be used to prevent dust from entering the lungs.
Necessary materials
In addition to tools, you will need painting materials, which include solvent, primer, paint and putty.
The solvent is needed to remove old paint or varnish, if we are talking about used furniture, as well as to degrease the surface before painting. A primer will be needed to level the panel and impregnate it, which will prevent excess paint absorption into the chipboard and help create a more even layer.
Painting cannot occur without the use of paints and varnishes. To restore the coating, you can use acrylic or water-based enamel. Both types of paint have their advantages, for example, acrylic is considered quick-drying and allows you to complete the work in a short time.
You may need putty to smooth out chips and scratches. This material is sold in a ready-to-use form and upon contact with a wooden surface it thickens and forms a monolithic coating. There are also dry putty materials that need to be diluted.
In addition to the listed painting materials, there are also many different additives and varnishes that improve the properties of the paintwork, which increases its service life.
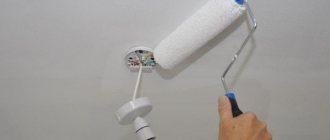
Padding
Applying primer to the entire surface is a mandatory step before painting. High-quality material will not allow the paint to peel off and prevent the formation of bubbles.
It is better to choose a primer based on polyurethane; it applies to any surface, even glass and ceramic tiles. The furniture should take about 20 hours to dry at this step.
How to choose paint
Choosing paint is the main task for anyone who is looking for a way to repaint chipboard furniture themselves. Of course, it is better to stick to special paints that are marked “for furniture,” but alkyd or polyurethane paint is also suitable for these purposes. Formulations with a strong odor and those that take a long time to dry should be avoided.
To paint chipboard furniture, you can also choose interior acrylic paint, but in this case the primer should be applied at least twice.
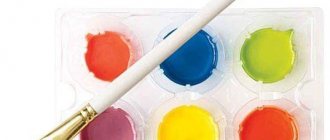
There are several components in acrylic paint and varnish compositions:
- Water as a solvent. By evaporating, it ensures rapid drying of the material.
- Coloring pigments give the composition the desired color.
- Acrylic resin acts as a fixative - it forms a strong and elastic film on the painted surface, resistant to temperature and mechanical influences.
For furniture located in rooms with high humidity, it is advisable to use interior acrylic paint containing latex or silicone. These components provide the coating with resistance to water and detergents.
The stores offer a huge palette of paint shades, but when the finished product is not suitable for the implementation of the plan, you can buy white water-based paint and tint it in any color.
Is it necessary to paint the fiberboard?
It would be appropriate to use hardboard both as a finishing for the floor and in the form of wall panels, and even for decorating the ceiling. However, you should be prepared for the fact that if the fiberboard surface is not laminated, then after installation it will need to be painted.
Interesting materials:
How long does it take to get a visa to Estonia? How long does it take to get a visa to Germany by invitation? How long does it take to obtain a visa to Italy 2022? How long does it take to get a visa to Italy? How long does it take to get a visa to Latvia? How long does it take to get a visa to Lithuania? How long does it take to get a visa to France 2022? How long does it take to obtain a foreign passport with temporary registration? How long did it take to make Red Dead Redemption 2? How much cardio should you do to lose weight?
Painting
Tools with velor or foam tips are suitable for creating a smooth surface, while those with long piles are suitable for adding texture. The ends, corners and other hard-to-reach places are treated with a small brush. It is easier to determine the required size while working with paint for chipboard furniture.
The composition of the selected color should be applied in one direction with quick movements, without paying attention to stains that appear after absorption. The second layer is applied a day later with a thicker composition. After drying, apply the finishing coat.
So, you will have to paint in two layers, allowing the first layer to dry well.
Professional recommendations
Advice from experienced painters will help you paint quickly and accurately, save budget money and get high-quality results on the question of how to paint chipboard:
You can get a darker shade by applying 2 layers of primer.
Applying Primer Source s3-ap-southeast-2.amazonaws.com
- The product will be more durable if it is treated with impregnation before painting.
- The compatibility of the paint, varnish and primer used will be complete if you buy them from the same brand.
- To prevent mistakes, the surface that is not to be painted should be covered with film and masking tape.
- To paint without using a spray can, you need to use thin and thick brushes.
- You can get a smooth surface by using a roller with fine pile; long pile will add texture.
- A lighter palette of colors will help to visually expand the space.
- To eliminate the effects of unpleasant odors, work in a respirator and ventilate the room after work.
Give free rein to your imagination and design flair and painting chipboard will transform your interior items into new ones, add zest to them and give you satisfaction from your creative impulse.
Protecting the painted surface
In cases where furniture is actively exposed to water or dirt (for example, kitchen facades or hallway furniture), it becomes advisable to apply varnish to the painted surface. It should also be chosen with acrylic in its composition, just like paint. Varnishes can be either glossy or matte. It is applied with a brush or roller to completely dry paint.
So, repainting chipboard furniture with your own hands will not be difficult, especially if you first carefully study all the nuances. After all the work, you can really get furniture that will become the highlight of the interior and bring individuality to the design of any home. Thus, with the help of paint you can transform an old kitchen, dining area, chests of drawers and bedside tables, wardrobes and bedroom sets.
Despite the apparent complexity, the work does not take much time, if you do not take into account the drying time of each layer, and allows you to get truly exclusive furniture while saving money.
Coloring stages
All work is carried out in several stages. It is not recommended to cover furniture with new paint without removing the varnish - this will greatly deteriorate the quality of the finished surface. It is better to carry out the restoration in accordance with the advice of professionals, which will make the result beautiful and durable.
Surface preparation
Removing the old coating is the main stage of preparing furniture for repair. You can remove varnish in different ways - mechanical, thermal and chemical. Experts prefer to use a hair dryer for thermal removal of varnish. The procedure is as follows:
put on a protective suit and gloves, not forgetting about glasses; run a hairdryer over a small area of the surface, warming it up well (instead of a hairdryer, some use a blowtorch, but this method requires extreme caution so as not to damage the wood); take a spatula or knife and scrape off the varnish coating.
The mechanical method is more labor-intensive. You should proceed like this:
- remove drawers from furniture, remove all fittings;
- Wash fasteners, handles and other accessories well with soapy water, use soda if necessary;
- wipe the furniture with soap and powder to degrease it and remove dirt;
- rub off the varnish using a scraper, coarse sandpaper, or a metal brush;
- sand the surface with fine-grain sandpaper or a sander.
You can also get rid of the coating using a chemical method; for this purpose you will need a solvent that does not harm the wood. The remover is applied to the surface of the object with a brush and left under the film for 3 hours. Afterwards, using a spatula, carefully remove the old varnish.
Putty damage
To accurately assess the condition of the furniture, it is recommended to disassemble it into as many elements as possible. This way it will be possible to treat even the most inaccessible places and replace all the old, broken, ugly fittings. After sanding is completed, get rid of dust (wipe the furniture with a dry cloth or vacuum it). Next, an antiseptic is applied so that the product is not damaged by fungus in the future.
All large and medium-sized defects must be thoroughly puttied. It is better to buy transparent putties - they are suitable for any type of wood and do not change its structure. The putty should be applied in a thin layer and leveled well so that the surface remains smooth. After allowing the layer to dry completely, apply it again if necessary. At the end of the work, the treated area is sanded again.
Degreasing
Carrying out this procedure increases the service life of repaired furniture. Also, degreasing significantly improves the adhesion of paint to the surface and makes the coating layer uniform. To do this, use any detergents. They are diluted in water, wiped over the surface of the product, and washed off.
Wipe dry and dry until moisture completely disappears. If puttying has been done beforehand, it is better to use alcohol or vodka rather than an aqueous solution for degreasing. Stubborn stains of grease and dirt can be removed with table vinegar.
Painting process
Immediately before painting, priming should be carried out, for which only transparent primers are used. The product must be applied not only to the putty areas, but to the entire surface - the primer reduces paint absorption and improves adhesion.
Painting is done as follows:
- All elements that will not be painted must be removed or sealed with paper tape. This way you won’t have to wash them after the restoration is complete.
- Apply paint to each element separately. It is better to use a roller, so the paintwork will lie flat. Particular care must be taken to paint drawers and shelves, dry them separately, and only then fasten them in place. You need to make sure there are no paint drips.
- After drying, apply another layer of material to the furniture. This way the result will be fixed.
- Assemble furniture. You can install it in place.
Proper drying
Acrylic, latex and other water-based paints take a long time to dry. To prevent furniture from getting in the way, it is better to prepare a place for working and drying in advance. Each layer takes 12-24 hours to dry, and many enamels are harmful due to their fumes. You cannot live in the room where the furniture is, and children and animals cannot be there, even temporarily. The best temperature for drying is 20-23 degrees, so the coating will dry within the time specified in the instructions. If the temperature is lower, drying will take longer.