Significant differences between panel houses
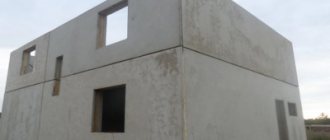
Buildings of this type are assembled from large reinforced concrete blocks - panels. At the production stage, channels are cast into them for hidden wiring.
There are several varieties of such buildings, 2 of them are most widespread. The main difference is the design scheme.
Series 1-464
The structural design of the facility is cross-wall. This means that almost all interior walls are load-bearing. Partitions separate only the bathroom (2 pcs.).
This series is recognized by the windows on the interfloor landing in the entrance, repeating the two-leaf apartment windows.
Series 1-335
The structural design is semi-frame and frame (later modifications). Loads are carried by columns and longitudinal walls. All transverse ones are partitions.
The hallmarks of this series are elongated windows on the landing and end walls without balconies.
What are the load-bearing walls of a panel house made of?
The panel is a reinforced concrete structure. There are several layers in it.
Outer layer
Protects the reinforcement frame from corrosion. The thickness depends on the location of the panel:
- internal - 15 mm;
- external (enclosing structure) - from 20 to 70 mm depending on climatic conditions.
In the second case, finishing is applied to this layer - tiles, gravel screenings, etc.
Rebar frame
The structure is assembled from longitudinal and transverse rods with a diameter of 12-14 mm, fastened with knitting wire. The frame absorbs tensile forces that concrete is not designed to withstand. The rods are located where such loads are most intense - near the surface of the wall or ceiling immediately behind the outer protective layer.
Destruction of reinforcing bars is unacceptable.
Inner finishing layer
Available on some panels. The thickness is 15 mm, the material is a solution of the same strength grade as in concrete. This layer allows you to do without plastering the panel.
Protective layer of concrete
In the absence of a finishing layer, the frame is followed by concrete 1.5 cm thick. Its function is to protect the reinforcement from corrosion.
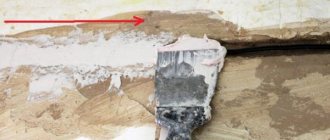
How to distinguish between finishing and protective layers
Due to the use of the same solution in both cases, it is impossible to recognize the outer layer.
Therefore, they assume the worst case scenario: the reinforcement is located 1.5-2 cm from the wall surface.
Compliance with safety regulations
When working with tools, wear rubber gloves and safety glasses.
When using electromechanical tools, you must comply with a number of safety regulations:
- When working with power tools in rooms with high humidity, be sure to wear rubber gloves and shoes with rubber soles.
- To protect your eyes you need to wear special glasses.
- To prevent cement dust from entering the worker’s lungs, wear a gauze bandage or a respirator.
- When performing this type of work, the room must be well ventilated.
- Do not overheat the tool. From time to time you need to give your power tool a rest.
- During breaks in work, all cement dust is removed with a vacuum cleaner. If powerful dust formation occurs, then the nozzle of the turned on vacuum cleaner is kept next to the channel during gating.
Is it possible to ditch walls and ceilings?
Federal and regional regulations prohibit striking fines in load-bearing structures. The weakening of the section leads to a loss of strength, as a result of which the building or part of it may collapse. To lay the cable along the ceiling, you need to look for another way. There is no point in slotting the crossbars: they are covered with decorative overlays, behind which it is convenient to place the wires.
SNiP 3.05.06-85 contains a clause that allows furrows to be made in load-bearing structures if agreed with the author of the project. In reality, this is almost impossible to do.
Creating grooves in partitions is permitted.
What is the conversation about and its importance
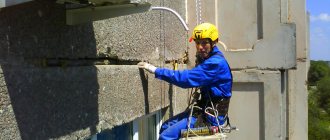
Grilling is a type of construction work that is performed when it is necessary to install electrical wiring and other communications. It involves making special recesses (grooves) in the walls using special equipment.
Grilling is a complex, labor-intensive process that requires the involvement of highly qualified specialists. Poor quality performance of this work can lead to deformation of load-bearing structures, damage to communications and the creation of an emergency situation, including the collapse of the house.
So we are talking about laying communications in the walls, this is basically laying electrical wiring. And sometimes pipes are walled up, for example, a hidden water supply to a bathtub or washbasin. Now everyone is skilled. A person buys a powerful hammer drill and immediately sees in front of him a huge scope for imagination. I consider this topic important because the guys are undermining the load-bearing structures of the house. As a result of their activities, all residents of the apartment building may suffer.
The legislative framework
According to Art. 7.21 of the Code of Administrative Offenses of the Russian Federation, gating of load-bearing structures is classified as illegal redevelopment. The housing inspection will force the violator to do the following:
- Pay a fine of 2.5 thousand rubles.
- Restore the strength of damaged structures (clause 3 of article 29 of the RF Housing Code).
To fulfill the second requirement, it is not enough to fill the fine with mortar. This will not restore the load-bearing capacity of the structure. Special measures will need to be taken in accordance with the strengthening design. Only the author of this building has the right to develop it - this is written in the law. For such a service they can ask for up to 800 thousand rubles.
In case of failure to comply with the instructions of the housing inspection, the apartment, by court decision, may be put up for auction (Clause 5, Article 29 of the Housing Code of the Russian Federation).
Norms and restrictions
For horizontal grooves in partitions, SNiP 3.05.06-85 establishes the following maximum permissible parameters (mm):
- Depth - 25.
- Width - 20.
- Length - 3000 (total).
Vertical furrows are made without restrictions.
Minimum distances from grooves to structural elements (cm):
- Floor slabs (for horizontal channels) - 15.
- Edges of the opening (for vertical) - 10.
- Gas pipelines (for any) - 40.
The device of fines diagonally is prohibited. They are made parallel to the corners of the building.
The groove for the wire in the area from the distribution box to the electrical point can have only 1 turn.
Work order
Wall chipping takes place in several stages - the preparatory process and the actual creation of the recess.
Let's look at the stages in more detail:
- Clear the room of extraneous things. Remove household appliances and furniture, sweep and wash floors.
- Cover the opening with a damp cloth to prevent dust from entering the living space.
- Remove wallpaper if there is any on the walls.
- Check areas where old wiring was lying. If you find one, remove it or retreat at least 100 mm.
- Make indentations using the selected tool (taking into account the characteristics of the walls).
- Clean the furrows and prime them.
- Wait until completely dry and lay the wires.
- Moisten the recess with water (a small amount).
- Fill the hole with plaster (plaster) or putty. For greater reliability, you can use reinforcement mesh.
Remember that grooves differ in purpose of use. Not only wires are laid in them, but also junction boxes, boxes for sockets, pipes and switches are installed.
Boxes for combining wires are located directly under the ceiling, and recesses for sockets are made at a height of about 300 mm from the bottom of the room.
To work, you will need two funnels per drill - one 65 and the other 85 mm. They are installed on the drill and help in making special holes. Sometimes there are situations when it is necessary to move the socket and make a groove.
How to make channels in wall panels
The correct way, which does not contradict technical standards, is as follows:
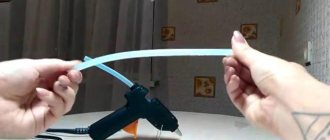
- A corrugation with a cable inside is laid along the surface of the structure.
- Build up the wall using plaster or drywall.
As a result, the corrugation will be inside the false wall. The disadvantage of this method is the loss of usable area due to an increase in the wall thickness by at least 2.5 cm.
Summary
Not so simple. Now you’ve done everything as expected, however... What else? Yes, that's half the battle. There will be a continuation. And I will return to this topic. By the way, here’s another question. Now I’m typing the text, and above me, apparently, my friend saw the hammer drill for the first time.
Well, he exploits it very actively. I don't know what he's doing there. Maybe it's undermining our walls? Can we control his work? Probably not. We can only call the management company and express our doubts.
True, if you are on good terms with the working neighbor next to you or above, then it is quite possible to go and have tea with him in a friendly manner. At the same time, inquire and talk about the rules for gating walls. Probably so. What do you think?
Read more ➤
Wall gating technology in a panel house
The boundaries of the future channel are drawn with a pencil or marker. The optimal width is 2 cm. It is convenient to lay vertical sections along a plumb line.
It is necessary to ensure that the fine does not cross existing electrical lines. If the location of the cables is unknown, they are found using a wiring detector.
Further actions depend on what tool is available.
Hammer
The so-called is fixed in the cartridge. spatula Next, turn on the shock mode and use the hammer drill as a jackhammer, knocking out the solution.
With this method it is difficult to control the depth of the furrow. Therefore, you should proceed with extreme caution and use a limiter. In the absence of such, tape is wrapped around the blade 1 cm from the edge.
Drill and chisel
The work is carried out in the following order:
- A concrete drill is installed in the drill chuck and switched to impact drilling mode.
- A series of holes 1 cm deep are made along the future furrow. You must first install a limiter on the drill.
- Use a chisel or chisel to knock out the solution between the holes.
Hammer and chisel
The most labor-intensive method. The chisel is placed against the wall and, striking the opposite end with a hammer, knocks out the concrete.
Manual work takes a lot of time, but is distinguished by delicacy: the master easily controls the depth of the channel.
Wall chaser
This is the name of a special tool for chiselling walls. It is equipped with 2 discs, the distance between which is adjusted according to the width of the furrow. The immersion depth is also adjustable.
After making the cuts, the remaining material is knocked out using a hammer and chisel. In order to reduce the amount of work, you can move the disks and once again walk the tool along the channel.
The wall chaser allows you to quickly create neat, even furrows. But it is a specialized device that is not advisable to purchase just for once. It is recommended to look for a company or workshop that rents out the device.
Bulgarian
A common alternative to a wall chaser. This device has a wide range of applications, so it can be found in almost any household.
The method of application is the same: with a diamond disc “on stone”, cuts are made at the boundaries of the groove and inside. The remaining concrete is knocked out with a chisel and hammer.
The disadvantage of this method is a large amount of dust.
Diamond blades
A very important thing when cutting grooves and sawing out niches is the quality of the diamond blades. You should never save money here and only buy well-known brands.
Even if your wall cutter or wall cutter is not Hilti or DeWalt but some other little-known brand, buy only expensive consumables. On cheaper diamond blades, the first thing that can wear off is not the diamond coating itself, but simply tearing out the seat under the fastening nut.
If buying a wall saw is an unaffordable luxury for you, but in the meantime you already have a hammer drill and don’t need to buy anything else, then work the old fashioned way.
For all the secrets of drilling out socket boxes, and ways to avoid breaking crowns when passing through reinforcement, read the link above.
Grilling in partitions
The maximum depth of the horizontal groove in the septum is limited to 2.5 cm, width - 20 mm, length - 3 m. Vertical grooves are cut without restrictions.
In order to save money and time, it is recommended to make a through hole and install 2 electrical points facing different sides of the partition. This will allow both supply lines to be laid in one hole.
Additional recommendations
In panel houses, it is necessary, whenever possible, to use standard channels made in the panels specifically for laying wires. They tend to place new sites in the following way:
- In the seams between wall panels and floor slabs.
- In electric baseboards.
- Behind a suspended ceiling and plasterboard paneling on the walls. The profiles for gypsum boards have special holes for wires.
Behind the suspended ceiling and wall cladding made of gypsum plasterboard, the cable is laid in a corrugation attached to the permanent structures with dowel clamps. Here it is allowed to place lines diagonally.
Do-it-yourself wiring replacement
The sequence of actions does not depend on whether the electrical wiring in the apartment is being replaced without grooves or with a groove device. First you need to mark the walls. Using the previously prepared diagram, transfer the locations of boxes, sockets, and switches. If the line changes position, it is also shown on the wall. Having finished the preparations, begin the actual installation:
- electrical products (box, plinth) are fixed on the walls;
- lay the cable;
- close the channel, inspect the quality of execution;
- check the integrity of the insulation by measuring its resistance;
- supply voltage.
To calculate the approximate cost of replacing electrical wiring in a one-room apartment, it is necessary to take into account the costs of purchasing wire and cable products, consumables, fasteners, and electrical products intended directly for installation. Experience shows that installation without gating is often slightly more expensive than without it. The bulk of the costs are spent on electrical installation products. You can only save on labor costs if you install the circuit yourself. Knowing the specifics of reconstructing the electrical network of a particular premises will help determine the exact cost.
The least hassle when repairing electrical wiring in an apartment building will occur when using old channels. The method is suitable for short sections; all you need is a new cable. Procedure:
- find the ends of the wire in the junction box and socket;
- a new one is tied to the old core;
- pulling out one cable, pulling out another;
- connect the terminals.
When laying, we must not forget the basic rule: the position of the lines is only vertical or horizontal. It is forbidden to pull the net at an angle or make indentations. By adhering to the rules, accidents from getting hit by a drill or nail on the wiring are excluded. Recesses for distribution boxes and socket boxes are made using a hammer drill with a special crown. You can get by with a chisel, but then you will have to work hard.
The wiring without gating the walls is ready. Now it is checked for integrity by a tester. Then voltage is applied. After making sure that the electrical network elements are working properly, the channels are sealed and the boxes are finally closed.
Wiring without wall grooves - replacement. Panel house