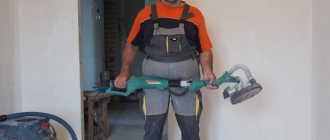
If you decide to level the walls in a wooden house, then by and large you don’t have much choice. You can use either different frame decors that will help you level the walls, or try to plaster the walls, but for this you need to follow a special technology, otherwise the plaster will not stick to the walls.
In order to decide on the leveling method, you must decide on the finishing decor. If you use wallpaper, paint, tiles or decorative plaster as decoration, then you need to plaster the walls, creating a good base for the decor. You can plaster the walls either initially on wooden walls, or using plasterboard.
If you decide to cover the walls with clapboard, plasterboard, OSB panels, etc., then you need to place a frame along the walls, which should have a good vertical level.
Practitioners advise: rules for leveling walls in a wooden house
Before you start leveling the walls, you should know that wood is a “living material” that can “breathe”. Wood can expand and contract depending on temperature and moisture fluctuations. Therefore, in order to let your walls live their lives without spoiling your decor, you need to level the walls using technology. If it is plaster, then using reinforcement and waterproofing; if the frame is, then preferably metal. In both cases, it is advisable to treat the wood with an antiseptic before sewing it up in order to preserve its original appearance, preventing parasites, fungus and mold from spoiling the surface.
Preparation
Before leveling the walls in a wooden house, you need to create a plan and calculate the required amount of materials. Places for mounting lamps and installing wiring are also outlined. All tools are prepared in advance:
- Drill.
- Level.
- Saw.
- Screwdriver.
- Roulette.
On paper you should make a sketch or drawing of the room and mark the places where the frame profiles pass. The number of screws and dowels is immediately determined. But it’s better to take them with a reserve. They are cheap, and no one ruled out the possibility of buying a defective one. It is also recommended to take extra sheets.
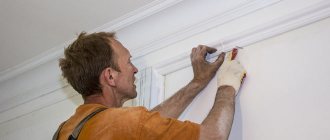
How to level the walls in a wooden house yourself using plaster
- First of all, you need to use any antiseptic in order to protect your wooden walls from rotting. Since wooden walls can absorb moisture, this is a very important point; do not neglect the use of antiseptic!
- Afterwards you need to glue the roofing felt to the wooden wall. It will protect the tree from destruction. During the drying process, the cement mortar releases moisture, therefore, if you do not protect the wall with roofing felt, it will absorb all the moisture, thereby causing the formation of fungus or mold.
- Next, at a short distance from the wall, you need to mount a metal mesh, which will serve as a reinforcing material and will prevent your wall from crumbling. To install the mesh at a distance from the wall, it is advisable to use slats. This way you will give the wood the opportunity to breathe without destroying your structure.
- Afterwards, you need to roll the entire wall into cement mortar. Be sure to use cement mortar and not gypsum, otherwise you may have problems with the wall in the future. After applying the solution, it must be allowed to completely harden. Moreover, it is advisable to periodically wet the wall with water for three days so that the cement becomes as strong as possible.
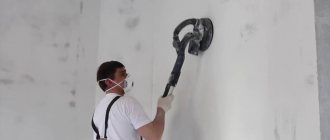
- The last step in preparing the walls will be the use of primer material to create a good base for decoration.
Why is it worth leveling with drywall?
If you are thinking about how to level a wooden wall inside a house, you should give preference to plasterboard sheets. This material allows for additional insulation of the house. Also, after installation, you get a perfectly flat surface, ready for finishing. And you can do the installation of sheets yourself. With proper installation, you can avoid cracks that can occur due to shrinkage of the house. That is why cement mixtures and plaster are increasingly being abandoned in favor of drywall. It's simple, cheap and practical.
How to level the walls in a wooden house yourself using a frame
If you decide not to plaster the wooden walls, but to expose the frame, then you need to follow these steps.
You can mount a wooden frame, however we recommend a metal one as it is more stable and does not lend itself to expansion
The frame is aligned using a bubble level. Be sure to check the verticality of each exposed part. The vertical must be looked at using a long rule.
Once you have placed the frame along all the necessary walls, you can move on to the sheathing material. This can be lining, plastic panels, OSB panels, drywall with subsequent application of plaster on it, etc.
Briefly about the main thing
There is no clear answer to the question of how to properly level timber walls. This can be done by pulling them to vertical studs on one or both sides of the wall. Or you can simply line it with clapboard, plasterboard or other wall panels over a flat frame. The choice of method primarily depends on the criticality of the deformations for the stability and visual appeal of the house. If it is large, and your own experience is not enough, it is better to turn to specialists.
Ratings 0
How to level walls with plywood
Plywood itself is an inexpensive material, so it is often used to decorate the walls of country houses. It is also necessary to level the walls with plywood using a frame. Of course, to completely save money, you can screw the plywood directly to the wooden walls of your house, however, if the walls are filled up, you won’t be able to align them vertically. However, it's up to you to decide.
When choosing plywood for walls, it is advisable to buy thicker material so that your walls do not sag when you lean on them. If the walls sag, then there can be no talk of any ceiling plinth, because it will simply peel off from the walls and fall off.
Alignment methods
The degree of deformation of the timber can be very serious. And this is not just an aesthetic defect, but also a risk of distortion and destruction of walls, especially load-bearing ones. In this case, it is necessary to decide how to level the timber wall and return it to its design position.
If the curvature does not threaten the stability and strength of the structure, it can be easier to hide it under a layer of finishing. But many owners of wooden houses prefer to do without it, leaving the walls in their natural form. And if you can still put up with their discrepancy with the ideal plane, then it is very difficult to carefully insert a door or window into an asymmetrical deformed opening.
If the walls are curved, the edge of the openings will protrude beyond their plane or sink in. Source of the edge24.rf
See also: Catalog of companies that specialize in completing unfinished houses
Mechanical method
The walls can be curved both in a new house and in one that has been in use for a long time. This does not mean that they require dismantling and reassembling, but straightening them and fixing them in a given position may be necessary so that the problem does not arise again. To do this, use the method of stretching the walls using a flat and strong wooden beam or a thick steel angle installed vertically and perpendicular to the beams.
To carry out this task, in addition to the required number of racks, you need to prepare threaded rods with a diameter of at least 12 mm and a length that will allow you to pass through the wall and two racks and screw nuts and washers onto it on both sides.
Studs with metric thread Source shop.doenges-rs.de
Here is an algorithm for how to straighten a wall in a log house.
- A beam or corner is cut to size from floor to ceiling.
Note! If the bend of the wall is very large, then you first need to use a jack and a vertical beam to lift the ceiling above it.
- Make markings for the holes in the timber, which should be located at the top, bottom and at the most convex points of the wall.
- Having drilled the racks, mark points on the wall through the holes and drill through them.
- Place the studs on both sides of the wall, aligning all the holes, and pull the studs through them.
- Place washers on the studs and screw on the nuts, having first positioned the posts vertically.
- Tighten the nuts, pulling the curved sections of the walls towards the studs.
Reasons for wall deformation
Before leveling the walls, you need to familiarize yourself with the reasons that may cause defects. At the time of installation of a house, a person stocks up building materials for future use. It is not possible to check all received timber for defects. Lumber must be made so that the core of the log is strictly in the center of the product. If this rule is not followed, drying will occur unevenly and deformation of the timber during construction or shrinkage of the building is inevitable.
Important! The best solution is to alternate multidirectional elements so that the elements compensate for each other's curvature.
Another reason for deformation of enclosing structures is considered to be incorrect calculation of loads. When compressed, any element of the building structure will bend. It is necessary to seek help from specialists who will help make important calculations and identify excess pressure in the structure. To redistribute the forces on the wall, you will need several additional racks.
The last reason for the deformation of enclosing structures is considered to be improper installation of inter-crown insulation, which can squeeze out the timber. There is no need to dismantle the wall; you need to remove the thermal insulation material and caulk the resulting gaps.
When is it required for the walls of a log house?
Restoration is more of a cosmetic repair that affects the appearance of lumber.
Work involves:
- sanding logs from blackening, blue staining, removing the top layer;
- eliminating small cracks in logs;
- bleaching blue with chlorine;
- painting and bioprotection.
The repair affects the deep layers of the log structure. Sometimes you have to dismantle the insulation, replace the siding, or lift the entire house to replace a rotten crown. Repair work includes :
- replacement of individual sectors or entire logs;
- elimination of through gaps, including inter-crown ones;
- replacement of the foundation.
Restoration and repairs are carried out as a complex. After all, you cannot leave sanded logs unpainted, or varnish the facade along with rotten logs.
Sheathing nuances
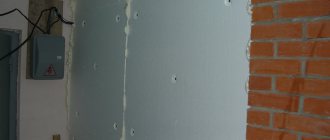
Next, we cover the walls with plasterboard in a wooden house. This can be done using self-tapping screws. You need to start from the bottom. If the length of the plasterboard sheet is not sufficient to cover the height of the wall, no problem. In such a situation, we cut off part of the piece from the new sheet and install it in place. Please note that the fastening of adjacent plasterboard sheets must be done in a staggered manner, offset.
The sheet is attached to self-tapping screws, but the latter are screwed in no closer than 10 centimeters from the edge. The step for fastening is 30 centimeters. It is important to carefully screw the screws into the plasterboard sheet. You need to stop screwing when the head of the screw has been recessed one millimeter into the sheet. This will be enough to securely fix the structure to the wall. Please note that if you tighten the screw too tightly, it can damage the plasterboard itself. In this case, the fixation will be unreliable. How to level walls in a wooden house? Then you can start decorating.
But first, experts advise to putty all the screw caps and all visible joints. Wallpaper can serve as a decorative finish. But usually in such houses the walls are simply prepared for painting.
Pros and cons of methods
Each technology has its own advantages and disadvantages. It is up to the owners to decide which method to choose.
Plaster
“Wet” plaster is one of the most common methods of leveling any surface. Many years of practice have revealed all the strengths and weaknesses of the method.
Pros:
- strength. But this only applies to cement mortars. You cannot screw a self-tapping screw into clay, lime, or plaster;
- durability - all types of plaster have a minimum service life of 30 years;
- fire resistance - prevents the fire from spreading to the walls if there is a fire inside;
- the heat and sound insulation of the house is improved;
- hardness - the surface is difficult to damage even in clay with light impacts, not to mention the CPR;
- environmental friendliness - can be used in the bedroom or nursery;
- the ability to restore damaged areas.
Minuses:
- high cost of work;
- high labor intensity of filling shingles;
- the technological process is extended in time due to the drying of each layer - up to 30-45 days;
- the need to install communications only on top of the finishing - grooves for wires and cables cannot be cut;
- complex technology - difficult for a beginner to understand.
Panels
The panels have their own advantages :
- no finishing is needed - they give room for imagination when decorating the interior;
- simple installation;
- work is completed in a short time;
- affordable for people with below-average income;
- have a long service life;
- make it possible to carry out additional thermal insulation with basalt wool or expanded polystyrene;
- easy to clean;
- You can hide wires and cables.
Several disadvantages greatly limit the scope of application:
- steal the volume of the room. If it is unimportant for the living room or bedroom, then it is critical in the bathroom;
- Heavy objects cannot be secured (hanging cabinets, quartz and ceramic heaters, etc.). Therefore, it is not recommended to use it in the kitchen.
Sheet material
The advantages and disadvantages of sheet material largely overlap with the strengths of panels. Let us briefly recall:
- there is no dirt, as with “wet plaster”;
- for performers of work there are minimum requirements for experience and qualifications;
- high sheathing speed;
- the ability to hide communications;
- surface leveling is combined with heat and sound insulation.
The disadvantages include :
- complexity of material delivery;
- the need for finishing;
- problems with fastening cabinets and various shelves - you need to provide for the installation of load-bearing panels or buy special butterfly dowels (each dowel is supported on one sheet of plasterboard 12.5 mm thick up to 25 kg, on a double sheet - up to 40 kg);
- useful area is consumed;
- low moisture resistance of most materials.
Lining
The list of advantages of leveling walls with clapboard:
- easy installation - easily cut to size, assembly is carried out using the tongue-and-groove system;
- possibility of additional finishing in some places;
- good design;
- long service life - 40-50 years;
- acceptable price;
- excellent sound and heat insulation properties.
In addition to the listed strengths, there are several specific advantages :
- conifers release substances beneficial to the human body into the air;
- the smell of forest has been in the house for several years, which calms the nervous system after a difficult day;
- Due to the hygroscopicity of the material, a comfortable microclimate is maintained.
Disadvantages of the material:
- risk of deformation during operation if drying technology is violated;
- sensitivity to high humidity;
- does not like sudden changes in temperature.
Fiberboard
You can also level the walls with fiberboard. The technology has many advantages :
- no frame is needed, therefore the reduction in the volume of rooms is minimal;
- work is completed quickly;
- simple technology allows a beginner to perform the work;
- applying gypsum plaster on top makes it possible to take advantage of all the benefits of plaster (see above);
- allows you to use wallpaper, painting, or liquid wallpaper as a finishing touch;
- financial costs are the lowest compared to the above methods of wall leveling.
There are three drawbacks , but one significant one: after a few years of use, waves will appear on the wall - there is not enough rigidity, no matter how often you hit nails or screw in self-tapping screws. Besides:
- cables and wiring will have to be secured to the finish;
- There are some difficulties when attaching shelves and cabinets.
The cost of the master's work
For each individual job, construction companies set their own price, for example:
The price for replacing the lower crowns costs approximately 1,500 rubles. for 1 linear meter excluding the cost of material.- Grinding of rounded logs costs 250 rubles per 1 m2, chopped logs – 340 rubles, ends – 340 rubles. separately.
- Painting walls for rounded and chopped logs costs the same - from 1300 rub./m2 with an oil composition, from 1780 rub./m2 with a glossy agent and from 1400 rub./m2 for covering paint. Indoor painting is estimated from 600 rubles/m2 for the most simple, watery paint and up to 2500 rubles/m2 for expensive, glossy paint.
- Applying an antiseptic is the most inexpensive service, excluding the cost of materials; you can carry out bioprotection starting from 50 rubles/m2 for processing grooves during assembly and treating walls for an amount starting from 120 rubles/m2.
Let's start installing the frame
We continue to study the question: “How to level the walls in a wooden house?” So, everything is ready. All that remains is to make the frame and sheathe it. The plasterboard sheets are fastened directly to the frame using self-tapping screws. But to secure the frame to the beam, special fasteners will be required. Since wooden structures can not only shrink, but also swell, absorbing moisture, the eraser will definitely move. Therefore, the height of the drywall sheets should be 10 centimeters less than the height of the room. This gap is subsequently closed using skirting boards.
To make the frame, we need:
- Metallic profile.
- "Crab" (first level connector).
- Closed sliding rafter support.
So, first you need to cut the eye in the sliding support. We don't need it anymore. Next, holes are made in the “crab”. Through them the support will then be fastened to the surface. Only the horizontal strip is fixed directly to the wall, and then the “crab” to it (and nothing else). This system allows you to avoid future deformations.
We attach the steel profile to the “crab”. If the work was carried out according to the instructions, then the profile should easily move vertically due to the sliding support. What's next? After this, jumpers are installed.
When to use gypsum plasterboard
This material is used in the following cases:
- Applying plaster is clearly impractical due to the large slope of the walls and the increased consumption of materials.
- The apartment must be thermally and/or sound insulated.
- There are too many communications in the rooms that need to be hidden: heating pipes, plumbing communications, air conditioning or ventilation.
In addition to eliminating irregularities, gypsum boards are used to solve other problems that arise during repairs:
- using plasterboard walls you can form right angles;
- there is no need to cut channels for wiring and hollow out places for sockets - they are easily mounted in gypsum plasterboards;
- it is necessary to create niches for furniture, household appliances, recesses for lamps, shelves or room decoration;
- you need to divide a large room with gypsum plasterboard partitions into functional zones.
Preparatory work
In order to correctly diagnose and outline a plan for reconstruction work, the owner of the house can invite a specialist or inspect problem areas on his own, if qualifications allow.
Reconstruction and repairs affect not only the wooden walls themselves, it is necessary to inspect the entire house, including :
- underground;
- foundation;
- rafter system;
- communications;
- insulation materials.
All these elements of the building affect the condition of the wooden building as a whole. There is no point in painting a house if in 5 years the roof will collapse or the house will go 10 cm underground due to a sagging foundation.
Repair work must be carried out in dry, warm weather, so that as little precipitation and moisture as possible gets into the grooves and crevices of the building.
Foundation inspection
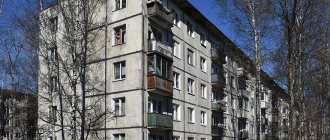
As a rule, when building houses 50 years ago, they did not pay much attention to the quality of the foundation or did not build it at all, but laid logs on the ground.
If you look under the house, you can find a strip or columnar foundation that has long since grown into the ground, and the doors are already scratching the ground. In this case, the foundation is replaced partially or completely , while raising the frame of the house.
Roof and rafter system
It often turns out that the roof was never insulated, and since waterproofing was not used before, the rafters could be partially covered with fungus or begin to rot. In this case, the damaged boards are replaced, insulation is laid, and the external finish of the roof is updated by laying slate, tiles or corrugated sheets.
Underground
If the house does not have a basement, but the floor joists need to be inspected, remove the top boards. Rotten logs are replaced, and the floor is insulated and waterproofed . After such work, the house becomes noticeably warmer. If there is a fireplace or stove in the room, it will not be possible to remove the boards.
Checking the communication system
At this stage, you need to check the serviceability of the electrical wiring and the condition of the water pipes for rust and leaks. Rotten pipes often leak under the floor, creating an excellent microclimate for fungus, mold and slugs.
Insulation materials
Previously, when building houses, glass wool and other materials that were not durable were used as insulation. Over time, they could crumble into dust.
Therefore, if the house has been insulated,
the insulation needs to be replaced if :
- respirator;
- gloves;
- work clothes.
If the insulation of the house did not take place in the last century, then it also needs to be checked.
Condensation may accumulate between the walls and the insulation itself, and the wall may already be rotting in full swing in a place that is simply impossible to reach.
Full information about thermal protection can be found here.