Many owners of houses or apartments are faced with leveling walls. The work is carried out both independently and with the involvement of professionals. Geometrically correct, perfectly straight walls immediately catch the eye and leave a pleasant impression on guests. Old buildings in most cases have curved surfaces, which does not allow for accurate installation of wallpaper or other finishing materials.
Determining the degree of curvature
It is easy to find out the degree of defectiveness if you use a laser level or a regular building level. Plumb lines are also often used, especially when the listed tools are not available. Any man can make the device. You need to take a strong thread and tie a small nut at the end. The load must reach the floor. Next, hammer a steel dowel into the upper corner of the base with a hammer, leaving the rod sticking out 2-3 cm.
A thread is tied to the product located at the top, and the nut is lowered down. When it reaches the floor, another dowel should be driven in at the bottom with the necessary condition that the cap is flush with the weight. This work will have to be done on the opposite wall. Next, the dowels are connected with twine and schematically form a visual surface. Application of the method will provide an opportunity to understand the degree of unevenness of the base.
What to choose: manual or mechanical application method?
The choice of manual or mechanized plastering method depends on many factors. But if we are talking about large areas in an extremely short time and with a limited number of workers, then only mechanical plastering makes sense. Mixtures for it provide lower consumption during operation, and you do not have to hire a large team of builders. At the same time, the time required to complete the work is much shorter: up to 250 m2 can be plastered in 1 working day.
Plastering small areas using a mechanized method is also beneficial. Just the fact that you don’t need to putty the surfaces before gluing wallpaper and ceramic tiles already provides additional cost savings. But it is also very fast.
Application of various materials
To properly level the walls, you can use one of 3 methods:
- Mixtures. Plaster and putty are used;
- Construction of sheathings. Either metal or wooden structures are assembled, and then drywall is attached;
- GKL . When plasterboard sheets are glued to the wall.
The method is selected depending on the condition of the surfaces. For very uneven substrates, it is advisable to use battens.
When the presence of uneven bases is proven, the restoration option should be decided.
- Up to 1 cm. Rubbed over with putty.
- Up to 5 cm. You can use plaster solutions.
- Over 5 cm. It is advisable to use sheathing with plasterboard.
When choosing materials, you need to pay attention to the factor of use (for external, internal work). The degree of environmental safety also plays an important role, especially when the mixtures will be used to level surfaces in the apartment.
DIY wall leveling technologies
For some time, gypsum plasterboard sheets began to be replaced with gypsum fiber boards (GVL). They consisted of a mixture of gypsum and plant fibers, but they turned out to have poor impact resistance and broke even with minor impacts. Therefore, GVL leveling of walls using them is now rare (sometimes they are placed on the floor).
In Soviet times, the walls were lined with plywood. But this is definitely the last century. It is far from the best replacement for gypsum plasterboard, which in 100% of cases gives cracks at the joints, and even swells from humidity. So it turns out that there is nothing to use instead of drywall. So the choice is really not very wide.
Smooth walls are a modern requirement
Actually, there is still one way - putty. But it is used only on relatively flat walls with a difference of no more than 5 mm. Therefore, they usually putty on already leveled walls, bringing the plane to the ideal.
If we talk about how easier it is to level the walls with your own hands, then many agree that it is easier to work with drywall. But it’s also not difficult to cope with plaster on beacons. The main thing is to know the technology and not deviate from it.
Choosing mortars
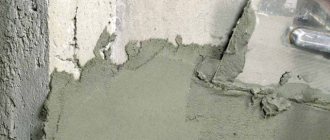
It is easy to level the surfaces with cement or gypsum plaster. Cement-based compositions are excellent for outdoor use. With the help of solutions, almost every man can achieve smooth foundations. Gypsum mixtures cannot be used in kitchens, bathrooms, where there is high humidity, and when leveling building facades. The material will gradually swell, and when it dries, it will begin to crack.
In addition to these mixtures, the owner of an apartment or country house can inexpensively buy cement-lime plaster. Modern material is positioned as highly versatile and is successfully used for indoor and outdoor work. The solutions are distinguished by their strength, plasticity, bactericidal properties, and vapor permeability. A wide range allows you to choose compositions with various fillers and use them when leveling walls.
How can I level a wall?
Although technologies in construction are developing rapidly, leveling walls is still done in two ways: plaster and plasterboard. Another thing is that there are different compositions of plaster - based on gypsum and cement, and you can install gypsum boards in two ways: on a frame and with glue. But that's all.
Smooth walls are a modern requirement
Benefits of mortars
So the main advantages of mortars:
- packaged in bags of 10, 25, 30 kg;
- are relatively inexpensive;
- have a high degree of adhesion;
- endowed with sound insulation properties;
- mix without much difficulty;
- dry quickly.
Compositions made by branded manufacturers do not contain substances hazardous to health. The disadvantages of plasters are the need for correct selection and an error-free application process.
Working with mortars will relieve the apartment owner from the need to purchase material for sheathing and then assemble the structure and apply it to uneven bases. Another nuance is proper assembly. A frame reinforced with irregularities in geometry will not solve the problem of crooked walls. Wall panels installed later will look unsightly. Also, improper installation will significantly shorten the service life of the sheathing.
Primer
A mandatory operation is carried out to improve the adhesion of the mortar to the wall. It is recommended to use a deep penetration primer with antiseptic properties: it will not only strengthen the base and improve adhesion, but also prevent the appearance of mold or mildew.
Secret from the pros. The “Concrete Contact” primer with quartz sand has proven itself to be excellent. However, you need to remember that it is only used under gypsum plaster. It is not suitable for subsequent application of cement mortar, since due to the properties of this material it only worsens adhesion.
The composition is applied in a continuous layer using a roller. It’s better to coat the corner with a brush, it’s more convenient.
The primer is applied in two layers. Between their application, you must take a pause to allow the composition to dry. Its expiration date is indicated by the manufacturer on the packaging.
Advantages of using a frame and decorative materials
Drywall sheets are installed mainly on a structure prepared in advance. It is assembled from woodworking products, metal profiles and is mounted to the wall using fasteners. A simple, unpretentious method will allow the apartment owner to get rid of quite tedious tasks - mixing mortar, plastering the surface.
The main advantages of installation and use of the frame:
- For many apartment owners, creating sheathing is free, because most have: dachas, barns, houses in villages where there is a lot of unused lumber;
- Proven environmental safety and provision of sound insulation, thermal insulation;
- There is no need to cover up all the cracks, potholes, chips, cracks;
- The use of profiles will provide the opportunity to elegantly hide electrical wiring;
- A structure assembled correctly can last for several decades;
- Almost every man can make a simple frame, with minimal experience.
From the list of shortcomings, one can highlight a slight reduction in living space, as well as certain difficulties in the work.
Preparation process
First you should carefully inspect the walls. If there are voids and defects, the folded seams are cleaned. Check reliability by tapping the surface.
If traces of mold appear, it is recommended to treat with fungicidal and antiseptic compounds. It is recommended to cover all cracks and remove smudges.
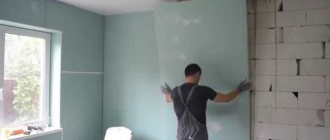
Preparing walls for the use of mortars
Work related to leveling foundations using mortars should be started when everything necessary is at hand.
To be purchased:
- cement-sand dry mixture;
- Master OK;
- spatula (large, small);
- rule;
- level;
- mixer with attachment;
- electric drill;
- special liquids;
- beacons.
You will need containers for mixing the compounds and a set of different rags.
Before applying the solution, the surface should be thoroughly treated.
1. The previous wall covering (if any) is removed. During the process of dismantling tiles and wall panels, they use construction power tools. Wallpaper and plaster are cleaned by hand, with damp rags, special liquids, and sharp tools.
2. Potholes, cracks, and chips are repaired with acrylic putty. Use a thin spatula to smooth out the resulting seams.
3. Next, a wall primer to ensure better adhesion.
Some plasters are applied in a thick layer - up to 2 cm. In this case, it is necessary to install a mesh to increase the strength of the decor. But many manufacturers use polymer additives in the manufacture of finishing materials. They significantly increase the strength properties, that is, reinforcing mesh is not required.
What wallpaper lines the walls
Rice.
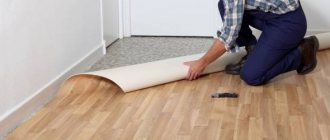
6. Dark wallpaper with a large pattern and liquid wallpaper for leveling walls If the walls are not even, but there is no bulging or subsidence of individual sections, then you should give preference not to plaster, putty or drywall, but to textured dark wallpaper, wallpaper with a large or abstract, chaotic arranged pattern. For surfaces with small cracks, coatings with a vinyl layer can be used. They have an increased density of 200-400 g/m2.
On a large wall area with many small defects, liquid wallpaper can be used. This mixture will fill all the cavities, even help to slightly level out small bulges.
Installing beacons and mixing the solution
Next, you should install beacons. They will be needed to create a flat surface. Long slats can be used as auxiliary elements. Perforated material is often sold in markets and building materials stores. Using a level or plumb line, it is necessary to mark the base. The distance when installing beacons depends on the width of the building code. Usually the step is 1.5-2 meters. A distance of 20-30 cm from the corners is maintained. The slats are mounted using plaster.
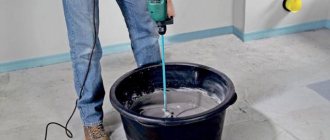
After purchasing the cement mixture, the bulk material should be properly mixed. In order not to violate the technology, it is recommended to read the instructions on the packaging. But such a solution can be prepared independently, provided you have sufficient experience in performing such work. At the first stage, it is necessary to mix cement and sand in a ratio of 1:2, 1:3 or 1:6. Proportions influence the achievement of the required plasticity. Then add water and stir until a thick mass forms. The composition must be used within 2 hours.
Plastering different types of walls
Plastering different types of surfaces has its own nuances.
Wooden walls
For plastering wooden walls, only cement, gypsum and sand-cement mixtures can be used. Work is carried out only at a humidity of no more than 60% and a temperature within 10-20°C. If the deviation is more than 5 cm, plastering will not be the right solution.
Concrete and brick walls
Plastering walls made of monolithic bases or brick is a mandatory stage of rough finishing, which gives the base additional strength and sound insulation. You can use gypsum, cement compositions, mixtures based on various mineral and polymer components.
Read more about this in the article “Plastering concrete walls” and “Plastering brick walls”.
Walls made of aerated block, foam block
Rice.
4. For leveling gas blocks and foam blocks, the best option is gypsum plaster. Porous walls made of foam blocks and gas blocks and similar building materials require the use of gypsum or cement plaster. But here it is important to maintain the correct ratio of the thickness of the outer and inner plaster layers (dew point). It should not be less than 2:1. This will ensure the proper microclimate in the room.
We described in detail about plastering such surfaces in the articles “Plastering of aerated concrete and gas silicate” and “Plastering of foam block”.
Internal and external walls
Almost any type of mixture is suitable for solving problems inside buildings, while only acrylic, mineral, and silicate plasters can be used for cladding external walls. However, for thin walls you should choose warm plaster, which will contain perlite, polystyrene foam, foam glass or sawdust.
Base leveling work
Using the trowel is convenient and simple. Using a construction tool, it is good to take the prepared solution from a bucket and then proceed according to the steps.
- First, a cement-sand composition is poured onto the base.
- Then it is leveled by a broad rule.
When leveling, you must adhere to the level of the beacons. After completion of the work, they are easily removed, and untreated areas are sealed. The end result should be a smooth, slightly rough surface. Roughness can be eliminated with fine-grained sandpaper.
Using cement mortar is not the only correct solution when it is necessary to level surfaces in the living room, bedroom, or office. A considerable percentage of finishers; experienced and beginners successfully use putty mixtures. They are excellent for finishing leveling on bases where there are minor vertical and horizontal deviations and where there are subtle defects.
Alignment methods
We'll tell you how to level your walls with wallpaper yourself. But it is better if the work, especially if there are large irregularities, is carried out by a specialist. This is a guarantee that later it will be easier to join the edges of the wallpaper, adjust the pattern, and there will be no waste of materials.
Putty
This option is used for surfaces made of aerated block or foam block, concrete or even plastered surfaces that have slight curvature and irregularities - ≤ 2-3 mm. Before gluing, the putty surfaces must be treated with a primer. This will allow the surface to evenly absorb glue from the panel, which entails complete gluing and perfect joining of seams. You can paste any type of wallpaper onto the putty: paper, non-woven, textile, vinyl, or paintable. Even thin materials are suitable.
Tools
You will need the following tools:
- spatula with a width of 400 mm;
- a small spatula to spread the mixture onto the main one;
- container for solution, preferably square or rectangular;
- brush for finishing leveling.
Rice. 2. Putty tools
Types of putty
Before work, choose materials. The putty mixture for leveling walls under wallpaper is divided into 2 groups (starting, finishing). The first is in demand for smoothing out identified irregularities and cracks. The second is for their final finishing.
Based on the type of putty base, there are:
- Gypsum
is the optimal solution. The downside is that it cannot be used in rooms with high humidity. - Polymers
are a universal solution, including preparing surfaces for wallpapering. It is allowed to apply such a mixture in a thin layer, since it does not shrink. The price is higher than gypsum. - Cement
- can be used under wallpaper. However, they take a long time to dry and are prone to cracking. To eliminate this, it is necessary to apply the composition in several layers, which increases the cost of materials and work. They have significant shrinkage. But they are used even in damp rooms. - Limestone
– not used for work under wallpaper.
Putty is sold in bags (dry mixtures mixed with water before use) or in a ready-made state (in buckets).
| Putty recommended for preparing walls for wallpapering | |||
| Brand | Manufacturer | Type | Price |
| ST 95 | Ceresit | Ready-made finishing polymer mixture. | 400 rub. |
| Fugen | Knauf | Dry mixture. Universal plaster. | 428 rub. |
| VH | WEBER-VETONIT | Dry mixture. Moisture-resistant gypsum. | 500 rub. |
| Finish cement | Bergauf | Dry cement finish. | 442 rub. |
Work execution algorithm
The work is performed in the following sequence:
- the walls are cleaned and primed (the brand of primer should be selected to match the brand of putty);
- the mixture is prepared according to the manufacturer’s recommendations (using a mixer and electric drill);
- the solution is applied with a construction spatula and spatula;
- After the composition dries, the surface is cleaned and primed.
After applying the putty, doors and windows are closed, preferably for 3-5 days. During this time the putty will dry. You can do the work yourself, but you will need to buy a minimum set of tools and it will take a lot of time.
Plaster
Plaster is a leveling method that will help smooth out significant unevenness or differences (from 2 mm), and remove small holes, blockages, and level out undulations on brick, concrete, wooden walls, aerated concrete/foam block surfaces (up to 2 mm). After finishing the work, you can glue paper, vinyl, textile, or any other wallpaper. When applying mechanized plaster, the finishing layer is glossed. This makes the surface almost perfectly smooth. Even thin non-woven wallpaper can be glued to such a base. But don't give up on primer. It will improve the adhesion of the base.
Materials and tools
All existing plasters are divided into two groups based on their base:
- Cement ones
are cheaper, last longer, and are able to counteract the negative influences of atmospheric factors. Most often used for external finishing done by hand. When the thickness of the applied layer exceeds 25 mm, it should be used only with reinforcing mesh. They take a very long time to dry. When applied by machine, such compositions significantly shorten the service life of equipment and reduce its productivity. Therefore, they are practically not used. - Gypsum
- when plastering an equal area (compared to cement) they are characterized by lower consumption. Such plasters “breathe” due to their ability to accumulate and release atmospheric moisture. This provides the premises with an optimal microclimate for humans. Dries quickly. Used for interior decoration.
It is strictly forbidden to glue wallpaper onto cement plaster. Although this drawback can be corrected - the wall is covered with a gypsum mixture before wallpapering. Any gypsum plaster must be primed before wallpapering. If you skip this step and apply glue right away, it will quickly be absorbed and the wallpaper won’t even have time to stick.
| Plaster for manual application | ||||
| Brand | Manufacturer | Type | Application | Price |
| LR pasta | WEBER-VETONIT | Polymer | Finished, ready for use | 742 rus. |
| Rotband | Knauf | Plaster | Starter (dry mixture) | 415 rub. |
| LAYER | VOLMA | Plaster | Universal (dry mix) | 307 rub. |
| CT-29 | Ceresit | Cement | Starter (dry mixture) | 539 rub. |
| Plaster for machine application | |||
| Brand | Manufacturer | Type | Price |
| MP-75 | Knauf | Gypsum mixture for machine application | 305 rub. |
| Gypsum-Active EXTRA | Volma | Plaster | 361 rub. |
| 501MH | Kreisel | Cement-lime | 300 rub. |
When you have chosen the materials for leveling the walls for wallpaper (in our case, plaster), you need to buy tools. For plastering by hand you need:
- a set of construction beacons;
- level;
- metal grater;
- ironer;
- rule with level.
For mechanical plastering you will need a plastering station, usually a trowel.
Rice. 3. Plastering tools
Manual application
The work algorithm looks like this:
- Spray (apply 1 layer).
Its thickness is determined by the wall material and the application technology used. Example: a 5 mm layer is placed on a brick (concrete) surface. When using plaster mesh – 9 mm. The layer levels out the main irregularities. Consistency mixture/water (%) – 40/60. - Soil - the next layer (consistency 65/35 - dough-like state).
Apply in several stages until the surface is completely leveled. The thickness of the simultaneously applied layer is ≤10 mm. - Covering (finish coating).
The solution is mixed until creamy. The thickness does not exceed 4 mm. Move on to the primer and wallpaper sticker after waiting until this layer has completely dried. Professionals bring the plastered surface to the required smoothness using finishing putty (layer up to 2 mm).
Not an easy job, but you can do it yourself. The main thing is to install the beacons correctly and perfectly evenly, and follow the above-described technology for applying the mixture.
Machine application
This modern technology has a number of clearly visible advantages compared to manual plastering:
- Significantly superior to it in the speed of work completion.
- dry plaster compositions used for machine application, cheaper than those intended for manual work. Their consumption is 1 m2 lower (13 kg versus 16). And taking into account two- and three-layer application, the savings are almost 9 kg/m2. The total price of purchased materials is lower.
- By performing the mixing in automatic mode (with the ability to pre-set the required characteristics of the mixture), the solution is more homogeneous.
- The adhesion rate increases.
- After completing the work, you can immediately proceed to finishing.
- Due to the smaller number of personnel, the cost of work is reduced.
The plastering station is delivered to the work site, connected to a water supply source (plumbing or a special container) and electricity supply. Depending on the model, a 220/240 V or 380 V network is required. A special bunker is filled with dry mixture. The ratio of components is programmed. During operation, the unit carries out dosed preparation of a solution of the same consistency for any batch.
Rice. 4. Mechanized plaster: applying the solution and grouting it
Work begins after preliminary preparation has been completed: beacons, internal and external corner profiles are installed. If necessary, a reinforcing mesh is attached. Permitted operating temperature range +(5-30) °C. The prepared plaster mixture is fed under pressure through a special hose with a nozzle (replaceable). Using a nozzle speeds up the process and allows you to optimize the thickness of the applied plaster layer. The maximum length of hoses is 50 m.
Work starts from the corners. Next, the entire surface is plastered. To do this, it is passed in stripes from left to right, in the opposite direction from the overlaps of the applied and previous applied strips. After application is completed, the surface is leveled. Use a rule (with a spatula) to remove excess solution. The permissible difference in thickness is up to 2 mm per 2 linear meters.
Half an hour after completion of application, the wall is wetted and grouted.
Mechanized application of plaster, despite the apparent simplicity of the technology, does not tolerate deviations from the technology and failure to meet deadlines. In addition, for this you will need to rent a plastering station, a grinding machine, and learn how to use them. This is not cost effective. It is much more profitable to hire a team of workers who will complete the work in just a couple of days.
Drywall
For walls that are significantly curved in planes (more than 10 cm), with depressions or convexities, the optimal leveling technology is the use of plasterboard sheets. This option will be ideal for wooden walls. To apply wallpaper to drywall, be sure to seal the joints and ensure the material is moisture resistant. This can be done using gypsum putty, reinforcement tape in the form of strips of fiberglass mesh or deep penetration primer.
Vinyl, paper and non-woven types of wallpaper and trellises for painting can be glued onto drywall. But it is recommended to putty the entire surface, especially if the wallpaper is slightly transparent. In this case, the walls are primed before and after applying putty.
Tools
To work you will need the following tool:
- construction knife;
- perforator;
- electric drill with mixer;
- ceiling profiles and guides;
- pendants;
- metal screws;
- gypsum board sheets;
- level.
It is advisable to use a gypsum board sheet with a thickness of 10-12 mm. When leveling walls in rooms with high humidity (bathroom, kitchen, toilet), you should use gypsum board (moisture resistant, with a dark green back color).
This material can be used using one of two technologies:
- glued directly to the wall (if the size of the defects is up to 3 mm);
- assembled onto the frame.
Rice. 5. Materials and tools for leveling walls with plasterboard
Gluing gypsum boards
The work algorithm is as follows:
- the sheets are cut out, places for installing switches and sockets are marked;
- the sheet is fixed with glue (plaster mortar), which is applied in increments of no more than 300 mm. Preferably in a checkerboard pattern.
The height of the adhesive material applied in a slide is about 300 mm. The sheet is pressed tightly against the wall and ironed. Leveled using a level (in two planes). To improve the reliability of fixation, it is additionally secured with self-tapping screws. The gypsum board is primed and then puttied using finishing putty.
Installation of sheets on the frame
A more complex technological process, including the following work:
- the installation locations of vertical guide profiles (PP) are marked in increments of 600 mm (taking into account that the standard sheet width is 1200 mm);
- profiles are leveled using special hangers;
- a transverse connection of the profile is made to give the structure the necessary rigidity.
If necessary, life support engineering systems can be removed behind the gypsum board. GKL sheets are sewn onto the assembled frame using metal screws. All joints are glued with serpyanka and putty. After drying, they are cleaned with sandpaper. The surface of the assembled structure is primed and puttied with finishing putty (layer up to 2 mm).
You can do the leveling with drywall yourself, but keep in mind that you definitely won’t be able to do it alone. In addition, the process is time-consuming, which is not suitable for everyone.
Read more about all types of plaster in this article.
Application of starting putty
Work on applying this solution begins with cleaning the surface. As before using a cement composition, the previous decor is first removed, and the walls are treated with an antifungal agent. Next, the bases are primed to ensure a high degree of adhesion to the applied material. Buying putty is not difficult. It is sold in bulk form, packaged in bags and sold in buckets, prepared for use.
Putty sold in bags must be prepared. How to mix the solution is indicated in the instructions on the package. It is also recommended to use a mixer with an attachment. When using a paste mixture sold in buckets, the container must be opened and then applied to the surface. Before performing work, it is advisable to prepare a large and small spatula. A small tool is convenient to handle hard-to-reach areas near window and door openings.
Plastering the wall surface
Leveling walls with plaster is suitable if small defects are noticed on the surface.
Automatic plastering process Source zakazat-pol.ru
The process looks like this:
- the master removes the old finish, if any;
- the degree of surface roughness is assessed;
- using a large hammer, the master knocks off all the large protrusions;
- if there is old plaster on the surface, lightly tap it: when the sound is empty, it is dismantled;
- each large depression is corrected separately: the master seals it with cement mortar;
- Next, beacons are installed along which the walls will be plastered; guide rails are also used;
- the pouring of mortar begins from the bottom of the wall;
- when all the defects have been processed, the master applies the composition to the entire wall and levels it using the rule;
- When the first layer has dried, apply the second.
At the final stage, specialists use a primer mixture. It helps to avoid the appearance of fungus and prepares the wall for further finishing. If in the future it is planned to lay tiles or glue other materials on smooth walls, notches are made on them using an ax. This is necessary to increase adhesion.
Carrying out work on applying putty
During use, it is best to level the putty mixture using building rules with a built-in level. Using a universal tool will allow you to “kill two birds with one stone”:
- Carry out the necessary work;
- Precisely level the surface.
If you plan to apply the material twice, it is advisable to wait until the first layer has hardened and then apply the primer. As an additional measure to ensure reliability, reinforcing mesh should be installed. In this case, it is advisable to follow the advice - to form layers that will be located perpendicular to each other.
At the last stage, the walls are sanded with sandpaper or a power tool with a special attachment installed. But many finishers use another layer – the finishing layer – in order to achieve impeccable quality when leveling surfaces. Before applying the material, the base must be moistened with water to create conditions for the best adhesion. When the work is completed, you can begin to remove roughness.
How to make straight corners
When using gypsum board sheets, the corners are perfectly even. When applying plaster or putty, it may be necessary to level the corners in order to give the corners (internal, external) an angle of 90°. How to align the corners of the walls for wallpaper is decided taking into account the base material and the location of the corner (external, internal).
Aligning the outer corner
For these purposes, a metal corner with perforation is used. Further:
- putty (starting) is applied to both walls making up the corner;
- the corner is pressed into it;
- Excess material is removed, the surface of the corner is cleaned.
The angle is leveled and strengthened at the same time.
Aligning an inside corner
Starting putty is also used for leveling. Work algorithm:
- the angle is formed by the rule by which first one wall is leveled, then the second;
- the applied layer is sanded.
Then the finishing putty is applied. This allows you to eliminate the smallest defects.
Using steel lathing
Assembly of the frame when leveling the bases will be required if, during measurement, the height differences reach too large values. On the assembled structure, it is then easy to install plasterboard, plywood sheets, panels and achieve excellent decorativeness. In the above example, installation of lathing and gypsum boards is a simple, economical way to solve the problem and is often used in apartments, country houses, and dachas.
Before starting work, you need to purchase materials and tools:
- plasterboard sheets 12.5 mm thick;
- hacksaw for metal, wood;
- wooden beams or metal profiles;
- building level or plumb line;
- hardware;
- electric drill;
- drill;
- hammer.
If necessary, you should buy products to provide sound insulation and thermal insulation.
Finishing gypsum plasterboard
Before final finishing, for example, wallpapering, the final preparation of the plasterboard surface is carried out:
- The seams are glued with reinforcing mesh and sealed with putty.
- After it dries, grouting is carried out using fine sandpaper.
- At the final stage, the surface is primed in two layers, applying the second after the first has completely dried.
- Then the entire surface is puttied. This must be done before painting; it is highly desirable for wallpaper; however, putty is not required before gluing tiles or decorative stones.
Carrying out preparatory work
Before ordering the main material, you need to know the percentage of humidity in the room. If the indicator exceeds the permissible limits, you should purchase moisture-resistant plasterboard sheets. You will need to buy and bring wooden beams or metal profiles ahead of time. If you plan to use lumber, they must be treated with special impregnations to prevent rotting processes and exposure to insects.
The general principle of creating lathing is based on the condition of reliable fastening of plasterboard sheets. Therefore, the frame must be mounted not only around the perimeter. Intermediate slats should be installed that will provide the ability to strengthen the facing materials in the central part. The guide profiles are attached to the base using hardware, in increments of 40-60 cm. A plumb line will be required to avoid vertical distortion.
Displaying beacons
It is recommended to plaster walls using beacons. Their role is most often played by a metal profile with a T-shaped section. You can also use wooden slats. This is the simplest method that does not cause any particular difficulties even for beginners.
The beacons are mounted on the wall by pressing them into scattered “cakes” made of cement or gypsum mortar. Until it sets, level the profiles using a level so that they are in the same plane.
It is important to choose the right distance between the beacons: the rule should move freely in the vertical direction, resting its edges on two adjacent profiles.
For the convenience of leveling the mixture, the outer beacons are not attached to the corners of the room, but retreat from them at least 30 cm.
Important nuances and installation of gypsum boards
When installing the sheathing, it is necessary to consider the issue of wiring utility lines. Then it will be extremely difficult to do. You will have to dismantle plasterboard sheets and slatted structures. If you need to fill the free space of the frame with sound insulation, say mineral wool, the distance between the beams must be sufficient, taking into account the parameters of this material, but less by 1-2 cm. Such a step will ensure the possibility of dense laying of soft slabs.
Installation of plasterboard sheets begins from the top corner. The process uses power tools, drills, and hardware. The caps of fasteners are recessed into the material up to 1 mm in order to ensure a smooth surface. After completing the installation of gypsum boards, unsightly places are sealed with putty mortar. It is better to decorate plasterboard boards with wallpaper and paint coatings. It is not recommended to install all kinds of panels or apply plaster in a thick layer, due to the heavy weight of the finishes.
Plastering corners, slopes, openings or ceilings
During construction and installation work, plastering of window slopes, doorways and corners is carried out after completion of the main steps to level the walls.
For an ideal result, it is recommended to use specialized profiles - husks and husks. These are internal and external perforated corners installed at the junction of two walls, walls and ceiling. Apply portions of plaster over the corner and level it with a spatula.
The ceiling is plastered in the same way as the walls. But it is better to apply the solution in two layers as thin as possible. Then the ceiling is always sanded using a hand float or sanding machine.
Gluing plasterboard sheets directly to the base
Another way to level walls with a large number of obvious defects, with horizontal and vertical differences of up to 5 cm on brick and reinforced concrete bases. Mixing, applying mortars and creating lathing is not required. The method is considered the simplest and is optimal for beginners in the field of repairs.
You will need to buy:
- plasterboard sheets;
- mounting knife;
- gypsum glue;
- roulette;
- mallet;
- paint brush, roller;
- building level;
- primer solution.
First, a layer of primer is applied to the wall and, using a paint brush or roller, evenly distributed over the base area. Using a tape measure will allow you to mark where to cut the material.
Working with drywall
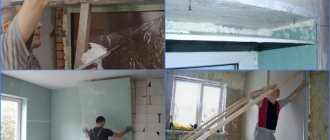
In many apartments in the kitchen there are various niches, windows and other things that are not needed in modern housing, a legacy of the old design. Usually, these defects of the former architecture are repaired with plasterboard. For example, in the photo you see how part of the doorway was sealed with plasterboard, reducing the entrance to the kitchen. Another example of why drywall is needed in the kitchen is to seal the windows from the kitchen to the bathroom.
All work on drywall must be completed before painting begins. Drywall also needs to be primed.
Carrying out basic work
Once the primer has hardened, you should prepare the drywall. If necessary, gypsum boards are trimmed with a mounting knife so that the installation process does not cause difficulties. Holes for sockets and switches are pre-cut in the material, and gypsum glue is applied to the back surface in increments of 30-35 cm. The prepared sheet is lifted and pressed against the wall. Next, a building level is taken and, based on the readings, the plasterboards are leveled using a mallet.
During the work, it is necessary to monitor so that the material fits tightly and evenly along the edges. Some finishers achieve increased reliability of fastening plasterboard sheets using additional fasteners. In this case, holes are drilled, plastic dowels are inserted and screws are screwed in. The heads of the hardware are then puttied. At the final stage, surfaces are decorated.
Leveling with putty for finishing
If the walls were relatively smooth, then there is no need to use plaster or drywall. To do this, it is enough to putty the surface. For the master's work I use starting, finishing or universal compositions. Starter putties allow you to fill voids up to 30 mm deep and are therefore excellent for leveling. Finishing mixtures are relevant if the differences are small - up to 10 mm. Such compositions are used before the final interior decoration of the room.
Modern compositions are easy to apply and level Source serveiestacio.com
Before leveling the walls, the master decides what type of mixture to choose:
- plaster;
- polymer;
- cement;
- limestone
The first three options are great for finishing the wall and leveling it. The lime mixture is comparable to plaster, so it is used for work on the outside of the house. If lime paint is used for finishing, it is better to level the surface with cement or lime putty.
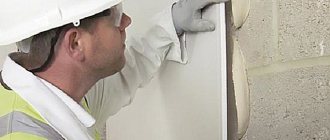
A worker checks the evenness of the wall using a rule Source dizainexpert.ru
The master dilutes the composition or uses a ready-made mixture. Using a wide spatula, large surfaces are processed, and medium and small irregularities are treated with a small spatula. At the final stage, the surface is treated with emery cloth - then the wall is completely ready for finishing.