Nowadays, many people can afford to have a swimming pool in the courtyard of a private house or cottage. But it should be noted that building a pond in your yard is one thing, but caring for it is quite another. You need to install filters, constantly clean and remove debris that accumulates on the surface of the water and at the bottom. To simplify the task for the owner, you can make a canopy over the pool, which will protect it from pollution. You can buy them ready-made, or you can make them yourself, saving a decent amount. So, this article will look at what types of awnings there are, what they do, and how to make them. Let's look at all these questions in detail.
What is the canopy over the pool used for?
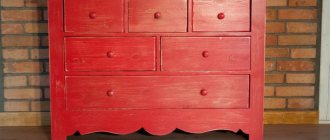
Pavilion
Protection from debris is not the only purpose served by such a structure. It is multifunctional and allows you to solve many problems.
By building a canopy or pavilion for a pool, you can get the following “bonuses”:
- Water will evaporate less, which will reduce water supply costs.
- The ability to significantly reduce heat loss, and, accordingly, the funds that will be needed to heat water. Moreover, the duration of the swimming season will increase significantly.
- It will not contain precipitation, debris, dust and leaves that the wind can cause. This will allow the owner to save on water filtration and its purification with chemicals (only if the canopy is of a pavilion type).
- The ultraviolet, which will affect both the pool and the people swimming in it, will arrive in refracted form, as it will collide with an obstacle. Thanks to this, its effect on the bottom and walls will no longer be so destructive, which will help preserve your tank and the materials from which it is made. And what is important, people will also be saved from its harmful influence.
- It can be used even when it is raining or strong wind is blowing.
- In winter, the air temperature in the pavilion is slightly higher than outside, so the pool will not be subjected to very low temperatures. This helps ensure that the entire system and materials do not deteriorate too quickly.
As you can see, by spending a little money on such a simple shelter, you can significantly save money, preserve the health of yourself and your loved ones, and extend its service life.
Maintenance during use
It is recommended to periodically clean domed and arched pavilions from dust and dirt. Use a hose. A stream of water washes away deposits.
As needed:
- clean the sash guides if the structure is lifting or sliding;
- lubricate hinges and locking devices;
- check the reliability of the polycarbonate fastening and, if necessary, eliminate gaps;
- Restore paintwork in a timely manner.
The time spent on building a pavilion quickly pays off due to the infrequent maintenance of the pool. Building a structure with your own hands allows you to create unique design structures, while saving significant financial resources.
What should the roof be like?
A simple canopy
So that the canopy over the pool is not built in vain and fully fulfills all its tasks for which it was erected, it is necessary to comply with some requirements when constructing such a building. First you need to determine for what purposes it will be intended. After all, both the choice of the material itself, as well as the strategy and technology of the work depend on this. One thing is for sure - the future roof has a design that is familiar to us and will practically not differ from other similar ones.
How to do it yourself?
The high cost of purchased models pushes craftsmen to look for alternatives.
The option made of plastic pipes, when assembled correctly, looks neat and fits into the country landscape. This design is suitable for frame pools, because... The plastic base of the tent is attached to metal pipes.
Tools and materials
The budget for a homemade dome is approximately 3,500 rubles. The manufacturing kit includes:
- PVC pipes with a diameter of 2.5 mm, a length of 4 m - from 12 to 15 pcs. (the quantity depends on the number of pool posts);
- double film 12 m long, 1.5 m wide;
- pipe clips;
- plastic clamps;
- star structure of 12-15 metal pipes with a diameter of 15-20 mm.
If you don’t have a welding machine, you can make a “snowflake” out of pipes like this: cut the hollow tubes into pieces, flatten them in the middle, drill them and connect them with a bolt.
(function (w) { function start() { w.removeEventListener("YaMarketAffiliateLoad", start); w.YaMarketAffiliate.createWidget({type:"models", containerId:"marketWidget", fallback:false, params:{clid: 2378357, vid:"902″, searchText:"dome for frame pool", themeId:1 } }); } w.YaMarketAffiliate ? start() : w.addEventListener("YaMarketAffiliateLoad", start); })(window);
Process of creation
Operating procedure:
- Pass the plastic pipe from the inside into the technological hole, which is provided for assembling the metal base of the pool.
- Secure each pipe to a metal support using clamps at the top and bottom.
- Place a ladder in the center of the pool bowl and place the pipes one by one on the rays of the metal “snowflake”. To avoid damaging the bottom, you need to use the ladder that comes with the pool.
- Cut the film in half and lengthwise. The result will be 2 cuts 6 m long and 3 m wide.
- Connect 2 pieces of film along the long side using a stapler or solder with an iron.
- Attach the film with clips to the pipes. The resulting folds need to be placed in the fastening points with clips, then the structure will look neat.
- Make an entrance hole. The distance between the 2 vertical cuts should be greater than the width of the stairs. Select the height individually.
To prevent insects from getting inside the shelter, you can make an overlapping “door” from an additional piece of film.
Canopy base
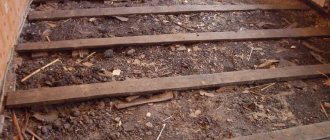
Concreted frame post
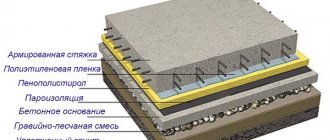
Despite the fact that polycarbonate is a fairly light material, the entire structure will have a decent weight. Therefore, it is better to install such a canopy on a solid concrete foundation, the depth of which is 50 cm and the thickness is 20 cm. A frame will be installed on such a blind area. Then you can tile the edges to make everything more attractive and protect the base from moisture.
You will need a shovel, tape measure, level, rope and pegs. First, mark the area using pegs and rope. Stick to exact measurements. Along the perimeter, focusing on the markings, you need to dig a trench 60 cm deep. Make sure that the bottom of the trench and the walls are even. After this, pour sand into the bottom with a layer of 5–10 cm, tamp it down and again pour a layer of crushed stone and sand 5–10 cm deep. Make formwork, the height of which is a multiple of one or two ceramic tiles (depending on their size), which will cover the blind area. Now mix the concrete mortar and pour the foundation. All that remains is to wait until the concrete gains strength, namely 1 month.
Another option for the foundation is when the support pillars are simply dug into the ground, then there is no need to make a foundation. This type is suitable in cases where the soil is quite dense. The pillars need to be deepened by at least 60 cm.
Selection of types, shapes and sizes
Swimming pools come in different types, each with its own set of characteristics. Installation methods also differ.
Types of pools
A different roof can be installed for each type of pool.
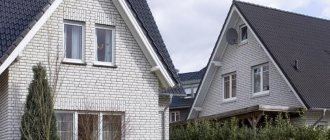
- Stationary pools are large tanks that are not designed to be moved. They are permanently installed and have a solid foundation, which is installed in the ground. Their dimensions can be very large, so the appropriate roof must be used. In dachas, such tanks are rarely found due to their high cost.
Fixed pool under a large retractable roof
- Mobile pools are the second group, which is divided into frame and inflatable. Frames can also be three-dimensional, and some models reach the size of stationary ones. Only they don’t go deep into the ground, and they stand on a flat area. The roof over such a pool can also be made permanent, but awning tents are more popular.
Large frame pool covered with a film tent
- The second category of mobile products is inflatable. In size they can be comparable to small frame pools with a diameter of no more than a meter. There is no point in building a separate roof for such pools at all - you can install them under a canopy, and for children, buy a model with an inflatable roof, as shown in the photo below.
Children's inflatable pool with roof
Large inflatable pool under a folding roof
Types of roofing
Depending on the type of roof, the specifics of installation and roof materials are determined.
| Roof type, photo: | Description: |
Stationary swimming pool for a summer residence - extension to a house | If the pool is located near the house, made as a stationary one, the roof above it can be tied to the main building. The photo shows that the owners equipped a separate room, which was lined with ceramic tiles. The design of the fence turned out to be semi-open - some of the walls were raised from blocks. The roof and front part are made of frames. For this, a metal profile and glass were used. The entrance inside is made in the form of simple swing doors. |
Arched telescopic model | For stationary models of any size, a lightweight telescopic roof in the form of an arch will be a good addition. It is made of polycarbonate and a lightweight aluminum frame. Parts of the canopy move along rails running along the bowl. This may not please everyone, as you will constantly have to step over them. The photo shows that the pool has a double roof - the first encloses the room, and the second only the tank. |
Dome roof | For pools that do not have the shape of an elongated rectangle, domed roof models are suitable. Functionally, they resemble the previous version in many ways, but they cannot be opened completely - this is done only in segments. The sections also move on rails, rotating around an axis in which a complex mechanism is installed. Such a pavilion will cost much more. She looks beautiful, but is more difficult to care for. It is also worth providing for the possibility of access to the central axis of the roof for its maintenance. |
Awning tent | A frame awning over a small pool is the most realistic option for a summer cottage in the Russian Federation, since a small number of people can boast of a stationary one. The price of such an awning ranges from 3 to 10 thousand rubles, depending on its size and quality. |
Mobile folding systems | This photo shows the version on wheels, which can also be folded and moved. This roof is made of transparent and opaque film. It has a lightweight aluminum frame. This solution is convenient and functional. |
Ball-shaped folding structures | In fact, we have before us a variation of the previous roofing option, only with limited mobility. This roof is good for small frames. Before bathing, it folds up and then returns back. Its disadvantage is that it is inconvenient to swim under, and oxygen access is limited. |
Swing mechanisms | Many stationary frame buildings are also used. They do not fold like the previously discussed models. The presented photo shows that all sections are sliding - the polycarbonate rises up along the guides, like blinds. You can use ordinary doors - it all depends on the shape of the project and its size. |
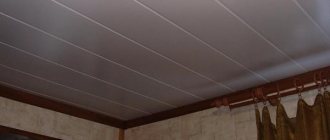
Polycarbonate canopies for pools in the country | The simplest roof is a canopy. It can have any convenient shape and size. The canopy can be attached to the house or stand alone. |
There are a lot of roofing options for a swimming pool. There are also complex combined solutions that combine different mechanisms.
Complex multi-component roof on a wooden profile
So, for any country pool, light awnings and a polycarbonate frame roof are good options in terms of price and quality.
Materials for making a pool roof
When choosing a material for a future roof, it is worth considering its capabilities and features.
- Aluminum is used for the manufacture of profiled frames of varying complexity and sizes. The material is strong enough to withstand loads, including snow. It is lightweight, easy to care for, and does not corrode.
Aluminum frame
- Steel is a fairly heavy metal, but has greater rigidity. For work, pipes and profiles of different shapes and sizes are taken. Steel corrodes from moisture, so it must be painted. The painting is periodically renewed, otherwise the product will become unusable after some time. It is used for simple, fixed frames.
Attention! Steel parts can be galvanized - the coating protects them from rust.
Small canopy - frame construction
- A wooden frame is the most expensive, since the material must be bent correctly and processed efficiently to protect it from moisture. But the exterior of such a roof will be amazing. Both fixed and moving systems are made from wood.
Glued laminated wood is used for the powerful frame.
Mostly transparent materials are used to fill the frame:
- Glass is suitable for large stationary canopies that do not use curved elements. For the roof, it is worth choosing an impact-resistant option in case of hail. This solution is expensive, but it has no equal in beauty.
All transparent roof parts made of glass
- Polycarbonate is a polymer, impact-resistant material. It can be solid or cellular. The first one is similar to glass, it is durable and costs more. The second is cheaper - strength is achieved due to the honeycomb structure.
- Polycarbonate comes in different colors. Tinted brown is very popular. It transmits light, but is not completely transparent, as can be seen in the next photo. Thanks to this, it provides good protection from the scorching sun.
Polycarbonate roof
- PVC and other films. Summer residents love this material, as it allows them to make a large and reliable roof with a modest investment. Disadvantages: low strength in contact with sharp objects. Heavy hail can also penetrate the material.
Film roof over frame pool
- Awning fabric is a fairly durable material that matches the characteristics of films. However, the awning is stronger and does not allow light to pass through.
The awning roof provides good protection from the sun
Frame making
Truss frame
After this, it's time to make the frame, which will eventually be covered with polycarbonate. It will be made from a profile pipe, which must be treated with an anti-corrosion agent before use. The roof can be made flat or arched. In this case, the profile should be cut in three places, bent and welded with a welding machine. If you are not confident in your abilities, it is better to entrust such work to a professional.
- First you need to install support pillars in increments of about 1 m. They either go deep into the ground or are attached to the foundation with anchor bolts. The top is tied.
- Now you need to weld or bolt cross-sections, flat or arched, to the frame and install stiffeners between them.
Another frame option
What design you will have depends on your choice. Its size and design are selected personally by you. It is important to adhere to exact dimensions and check the evenness of your structure.
Caring for your polycarbonate pool cover
The main enemy of an indoor polycarbonate pool in a country house is snow and dirt. In the first case, large snow accumulations in winter can cause the roof to collapse. After each snowfall, it is cleaned with a soft scraper, broom or other device.
Dust settles in dry weather in summer. Polycarbonate loses its transparency. It becomes dark under the canopy, and the roof looks ugly. Remove dirt with plain water. You can add a little detergent without abrasive particles. During washing, polycarbonate is wiped with a brush or rag attached to a device with a long handle.
Sheathing the frame with polycarbonate
The last, final stage of canopy construction is its cladding. To complete it, you must:
- Mark the polycarbonate sheets, making notes where it will connect to the frame itself. In those places you need to drill holes for screws. Do not remove the film from the material yet, so as not to damage it. The hole for the screw should be slightly larger than the screw itself. This is done because polycarbonate can expand when exposed to heat; if you make a hole the same diameter as the screw, the material can crack when it expands in the sun.
- Now you need to sheathe the frame (roof) with sheets, butt-to-edge. Using a screwdriver, connect the sheets using self-tapping screws. Be sure to place galvanized washers under their caps to close the holes.
- Treat the sheet joints and fastening points with silicone sealant.
Polycarbonate fastening
Now your pool and you are protected from the effects of rain and sun. But what if you need to completely cover your tank so that it is protected from debris, wind and is protected from all sides? We need to make a pavilion. The manufacturing principle is similar. The only difference is that more material is needed, since the frame must be completely sheathed. It can be of any height and shape, depending on your desire.
Cutting polycarbonate
Anyone can build such a canopy, the main thing is to show imagination, make a detailed drawing, purchase material and follow the recommendations for construction. To summarize, all work can be divided into the following stages:
- Selection of design and preparation of plan.
- Procurement of materials and tools.
- Preparing the base.
- Frame construction.
- Covering the frame with the material of your choice.
Pros and cons of a pool under polycarbonate
To figure out whether a roof is needed over the pool, you need to carefully analyze the positive and negative aspects of the structure.
Pros:
- An open canopy partially prevents water pollution from leaves, droppings of flying birds and other large debris. If the polycarbonate roof smoothly merges with the walls, forming a closed structure, then the pool is maximally protected even from wind blowing dust.
- The canopy allows you to use the pool in inclement weather. Enclosed structures provide favorable conditions for relaxation at the dacha even in the autumn.
- A polycarbonate roof allows light to pass through, diffuses it, and blocks UV rays. You can sunbathe safely for a long time under a canopy at your dacha.
- The closed type of canopy reduces the cooling rate of the water in the pool. The owner of a dacha reduces the cost of heating it.
- The roof reduces the rate of water evaporation. The pool will have to be refilled less often.
- A canopy, even if it is open, protects the pool from precipitation at the dacha in winter and autumn.
Minuses:
- Covering your pool with polycarbonate will require additional investment.
- The roof requires additional care. If the snow is not cleared off in winter, the polycarbonate will fail under heavy weight. The procedure is often impossible, since no one lives at the dacha in winter. It is necessary to come specially after each snowfall.
Despite two serious disadvantages, the canopy has more advantages. Because of the disadvantages, you should not refuse to build a useful structure at your dacha.
Important! The roof reduces the likelihood of the harmful effects of snow and rain on the bowl, communications and pool equipment.
Why polycarbonate
Although the polymer compounds that are used today in the production of polycarbonate were discovered by accident, their effectiveness has been tested over the years. Due to its characteristics, in some cases it is replaced by glass. With equal thickness, polycarbonate is several times smaller. This can be decisive in choosing polycarbonate as a covering. Polycarbonate is often used to organize awnings over canopies. It is also suitable for covering retail areas. In most cases, it is easy to give it the required shape. There are polycarbonate options with air cells inside. At the same time, the weight can be reduced several times more. When better light transmittance is required, as well as greater strength, then monolithic polycarbonate is used. Polycarbonate perfectly withstands various weather conditions. It practically does not change its properties when exposed to sunlight. It is quite easy to install.
When choosing just such a building material, do not forget about its disadvantages.
The sheets have a protective film that partially protects against mechanical damage. It must remain intact not only during installation, but also during operation. This means that the installation of polycarbonate requires precise calculations; the sheets do not have to be customized locally, but can be ordered for a specific project. Another disadvantage of a polycarbonate canopy is its transparency. Although this can be considered a plus for the pool.
How to build a swimming pool on the roof of a house: a step-by-step guide
Regardless of the type of pool you intend to build, it must be installed on a prepared site. The minimum recommended size is 6x6 meters.
Let's consider the stages of construction of such a site.
Concreting the base:
- we prepare the platform frame from metal using T-shaped profiles and welding;
- We choose a place on the roof for the pool. Since the structure will be heavy, it should be located above the load-bearing walls, and not between them. If there is no design for a house with a rooftop pool, the location of the load-bearing walls can be studied inside the building;
- We install formwork from edged boards and fill the site with concrete. When it hardens (and this is at least 2 weeks), we dismantle the formwork and put our metal edging on the site;
- before laying the edging, we place a metal mesh on top of the concrete;
- the frame is laid on a small layer of mortar. There is no need to cement the side edge, only the top one;
- We weld metal rods with a diameter of 10 mm and a length of 25 cm to the frame, directed inside the platform - they will fix the frame, preventing it from moving or sliding under pressure;
- fill the reinforcement with another layer of concrete.
After the concrete has hardened, it is advisable to treat the surface of the site with a primer; it will improve adhesion and create an additional layer of waterproofing.
Now you can begin installing rolled roofing materials:
- lay the first, lining layer. Fiberglass has the best characteristics. You should avoid using rolled nonwoven materials - they are not far from cardboard in terms of strength;
- On top of the fiberglass we place stone chips on the glue, which will serve as the finishing layer.
Now you can install the pool itself, frame or inflatable.
Step-by-step instructions - how to do it yourself
You can make a pavilion for a frame pool yourself. This will require knowledge and experience in the construction industry, since even a minor mistake will have unpleasant consequences. A self-made pavilion will cost less than one ordered from specialists.
Tools and materials
To make a gazebo with your own hands you will need:
- polycarbonate (sheets);
- profile pipes (square, rectangular section);
- bolts, screws;
- spacers;
- mounting plates (steel);
- cement.
Construction process
All work is divided into 4 stages:
Design. What will be the shape, design, dimensions and type of construction
The drawing indicates the door or the location of the sliding section (important if the structure is closed). The best option is when the shape of the pavilion (asymmetrical or, for example, domed) corresponds to the shape of the reservoir bowl
Size may vary.
Foundation. The pavilion is installed exclusively on a solid foundation. Ordinary soil will sag under the weight of polycarbonate, even though the sheets seem light. There is no need to pour a foundation unless there are strong tiles around the pool that can withstand a significant load. The optimal depth of the foundation is 50 cm, the location is along the perimeter of the bowl (the distance from its walls should be 8-10 cm). After pouring, the base is reinforced with square cells 20x20 cm. Frame. Made from wide profile support pipes. The width should be sufficient to attach sheets to the pipe on both sides. To correctly calculate the length of the supports, you need to add up the width of the artificial reservoir and the height of the future pavilion. Arches are made from the pipes (with a grinder, 3 cuts are made at the place where the support is bent, after which the pipe slowly bends and begins to resemble an arch, the cut points are welded and polished). The arches are attached to the foundation with bolts (preferably double). The pitch between the frame arcs is approximately 100 cm. Horizontal struts are used as stiffening ribs. Maximum stability of the frame is provided by fastening it to the base with steel plates.
Sheathing. Marking and drilling holes on polycarbonate sheets for fastening to the frame. The diameter of the holes should exceed the diameter of the screws by 2-3 mm, because polycarbonate becomes wider when heated, and this difference in size serves as protection against deformation of the sheets. After finishing the sheathing, the fastening points and joints must be sealed.
About children
It is very important to provide a swimming place for little people; here an inflatable children's pool with a canopy will come to the rescue, which can be placed next to a large body of water, the child will be under supervision. These are environmentally friendly and safe models, they are easy to care for and can be moved to any convenient place.
Children's inflatable pool under a canopy, convenient for placement near the main bath or in the country house
What to choose: double-glazed windows or polycarbonate
If you are planning a permanent building intended for year-round use, you can purchase double-glazed windows. They can withstand significant frosts and do not let the cold in.
But there is also a significant drawback. To obtain a presentable appearance, double-glazed windows must be ordered from a specialized company. And this is a very large expense. You won’t be able to bend glass yourself or cut it into triangles, rhombuses or squares of ideal shape. In addition, such structures are characterized by significant weight. What is required is not a shallow strip foundation, but a solid monolithic foundation.
Polycarbonate sheets will be a good alternative to glass. They can be cut and bent. It transmits sunlight well. The design is quite light and affordable. You can install a pavilion for a polycarbonate frame pool with your own hands. The most difficult thing in such a situation is assembling the base and arranging the foundation.
A familiar situation: in the catalog of individual house projects you come across nothing less than a masterpiece of modern architecture. Multi-level, floor-to-ceiling windows, on the roof of the garage there is a terrace with a barbecue, and near the house itself there is a lawn or even a swimming pool... The pulse quickened, the eyes sparkled, but the thought flashed through my head: “Eh-eh-eh! If I lived in Europe/Mediterranean/California, I would take it without a doubt! But in our Moscow region/Tyumen/Vladivostok there is snow for six months, what terraces, what lawns...” And the shaking finger quickly turns the page in the booklet to the nearest mansion with a gable roof.
Flat roof: right and wrong
Flat roofing in Russia has a worse reputation. According to ordinary people, it must leak, because rain moisture and snow have nowhere to go compared to a pitched rafter roof. Water must certainly accumulate and test the strength of the waterproofing layer every second. And this means constant repairs, waste, effort, nerves...
Where does the stereotype come from? From the very recent past.
In the USSR, flat roofs were used in the construction of multi-story administrative and utility buildings, as well as residential buildings from three to twelve floors. Until now, in advertisements for searching for an apartment they write the sacramental: “Not the last floor,” because it is firmly entrenched in the mind that the roof will leak, the ceiling will get wet and turn black. Proven by practice. In those days, the issue of energy efficiency of buildings was not on the agenda, and therefore no one was particularly concerned about how to get rid of the disadvantages and turn them into advantages. Year after year they patched up roofing felt, whitewashed the ceilings, scolded the material, the hands and those who came up with the idea of building flat roofs, and that was all.
Meanwhile, already in those years it was possible to build truly aesthetic and practical roofs, including in the private sector. Moreover, such a roof has a number of advantages over pitched roofs:
- the final area is significantly smaller, which means the consumption of materials is also reduced;
- there is no need to erect complex rafter structures, and there is no need to ventilate the attic;
- it is easier to work on construction: all manipulations are carried out on a plane, and not at a serious slope;
- more convenient to use: you can walk on it, you can mount solar collectors, antennas, external air conditioning units on it, and also organize an additional recreational area - solarium, barbecue, even a swimming pool;
- there is no risk of snow melting, and there is no need to clear the roof of it: with the correct construction technology, the snow cover will become an additional heat-insulating layer, and in the spring it will melt and neatly flow in rivulets into, again, a properly organized drain;
- gives more options for architectural solutions.
Strictly speaking, a flat roof is not flat at all, it has a slight slope of 2 to 4% to drain water. The slope can be centripetal, then moisture flows from the edges to the center, like in a kitchen sink, and enters the internal drain pipe. Or there may be a reverse slope, when the edge of the roof is 2-4% below the central point, the ridge. Then rain or melt water goes into gutters and drainpipes located on the facade. Therefore, a properly constructed roof should not leak.
Creating a canopy and installing it
Thanks to professional installation and the use of high-quality materials, your structure will be incredibly durable for many years. That is why all stages, from design to the last stage of installation, should be treated responsibly.
Model of a polycarbonate sliding cover
The best option would be to invite professionals. But, if you want to build a canopy for a polycarbonate pool with your own hands, you need to familiarize yourself with all the nuances of this process:
The main and irreplaceable stage in the construction of a canopy is the project. This will not only help to avoid problems during installation, but also during operation of the structure. By calculating the required amount of material, you can find out how much money should be spent and where you can save. At this stage, the strength is calculated according to snow and wind loads. Such calculations should be made by a professional engineer if you do not want the structure to collapse like a house of cards during the first winter precipitation.
Example of a pool canopy project
When the project has already been created, you can begin construction work. The required number of sheets has been calculated, materials have been purchased
It is important to prepare the site itself; it is leveled and smoothed. Now it's time to build the foundation
Since the structure is quite light, the optimal foundation depth is 50-60 cm. After small pits have been dug, it is necessary to fill them with concrete.
Types of pool canopy shapes
The next step is to install the support posts. The already selected pipes must be secured in the foundation. Now it's time to construct the frame. This is the most important part, because the durability of the future canopy depends on it. Having bent the arches and secured them to the racks, it is necessary to install stiffening ribs. They are carefully welded to the arches or secured with screws. When the frame is finally constructed, it is time to fasten the polycarbonate sheets
It is very important to be extremely vigilant at this stage, because if the fastening screws are not tightened correctly, this can lead to cracking. By scratching the protective layer of the sheet, you can cause the high performance properties of the material to deteriorate in the future.
Therefore, carefully bend the profile and slowly make holes in it.
Sheets of cellular polycarbonate in a canopy over the pool
You need to know that the protective film is removed only after final installation. The main materials for creating such a design are:
- concrete mixture;
- bolts;
- polycarbonate sheets;
- profile pipe;
- perforator;
- welding machine;
- sealant;
- level.
It is important to install polycarbonate only with the protective side facing the sun, which will help prevent fading. It is necessary to use a sealant to isolate the joints from the penetration of rainwater and other external factors
Polycarbonate in light shades (white, milky, cream) is suitable for areas with warm climates: it protects from the sun and does not fade
Requirements for a homemade pool roof
Any roof must be reliable and functional. A pool roof is no exception. Therefore, when choosing a project and when solving a problem - a roof for a round pool, how to make it yourself - you must take into account that the roof should be:
- With a rigid frame - reliable in all weather conditions.
- Reliability in operation - moisture protection. The frame should not be made of corroding metals or wood.
- Tightness, waterproof. Fabrics or polyethylene will be short-lived and unusable. It is better to use polycarbonate or corrugated sheet.