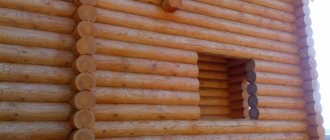
Rice. 8. Reconstructed veneer
One of the advantages of reconstructed veneer is that it has its own face with a clearly defined structure, pattern and color, most suitable for modern trends and fashion in the production of doors, furniture, and so on.
Fine-line and multi-veneer veneer
Fine-line is a type of reconstructed veneer made from natural wood that imitates certain species.
| Rice. 9. Fine-line veneer |
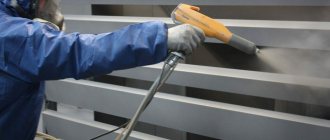
Features of fine-line veneer sanding
sand fine-line veneer in 2 passes. In the 1st pass, use skins with a grain size of 90-120 (surface leveling), and in the 2nd pass, a grain size of 150-180.
Keep in mind that fine-line veneer is thinner and softer than traditional veneer.
Multi-veneer is a reconstructed veneer made of natural wood, creating the effect of a harmonious combination of given color shades in a simple or complex pattern.
What are the benefits of reconstituted veneer?
The main advantage of reconstructed veneer is its uniformity over a large area (sheets of reconstructed veneer can have dimensions of about 3 m by 1 m), which allows you to bypass the stage of “stitching shirts” from strips, repeatability of decorative and geometric features.
This allows the use of veneer with virtually no waste and significantly reduces the duration of veneering technological stages.
What are the features of painting reconstructed veneer?
Compared to traditional natural veneer, reconstructed veneer is an even more porous and less hard material. The pores in the reconstructed veneer may not be straight, but tortuous, and contain glue, which may require a special technology for filling them.
To increase the uniformity of paint and varnish application on reconstructed veneer, it is sometimes necessary to apply special adhesive primers.
How to distinguish reconstructed veneer from natural one?
The main differences between natural and artificial veneer:
- The artificial veneer pattern has small structural notches (depicting wood pores), equally located on its surface at an angle of 20 degrees, as they are applied using rollers installed on a rolling machine.
Despite the name of artificial veneer, be it rosewood, oak or others, the pattern upon careful examination will be the same everywhere, regardless of color.
- The pattern of natural veneer is not so repeatable and has pronounced growth rings, depending on the type of wood.
The pattern of natural veneer will always be more clearly “alive” than that of artificial veneer, which can be more blurred “dead”.
What are the features of painting veneered products?
Products veneered with veneer have some finishing features. For example, thin veneer of species with large pores (oak) can release bubbles into the paintwork coming from under the veneer.
Veneer that is poorly glued to the base at some points can absorb water and swell when coated with water-based paints and varnishes.
Veneer sanding
sand veneer in 2 passes. 1st pass - using sandpaper with a grain of 90-120 to level out the waviness of the surface and remove possible traces of glue, 2nd pass - with a grain of 150-220.
Solvents contained in varnish can dissolve some types of adhesives. This can manifest itself in the form of swelling of the joints between the veneer plates, and with heavy sanding, directly under the veneer (if the solvent passes through the pores).
Nuances of veneer painting technology
Veneer, as a material that is more friable than solid wood, may require the application of thicker layers of paintwork or even more layers, especially for reconstructed veneer.
Some types of reconstructed veneer in the depths of the pores are not wetted with ordinary soils, and after finishing, so-called gray pores are obtained. In such cases, the first layer is applied with an adhesive primer.
Light-colored finishes look best (especially over time) when using non-yellowing acrylic paints instead of PU.
Is varnish necessary?
Varnish is used not only to give furniture a spectacular look. It creates a more durable surface. The varnish will help protect interior items from dirt, moisture and pests. Varnish can be:
- alcohol - used for restoration of antique interior items;
- acrylic is the most convenient type of varnish. It appeared not so long ago, but has already become popular. Does not have a pungent odor, suitable for exterior and interior use. Acrylic varnish is diluted with water. Its properties are similar to alkyd varnish, but acrylic varnish is much more economical;
- alkyd - it is diluted with a solvent. The surface coated with alkyd varnish has a film that is resistant to abrasion;
- nitrocellulose;
- oil is the most economical option. Oil varnishes are used to paint the floor. They used to be very popular. The varnish is diluted with drying oil, it takes a long time to dry;
- polyurethane - this type of varnish is used to treat ship parts, which indicates its increased wear resistance. A protective, quick-drying film appears on wood treated with polyurethane varnish, so the furniture will be painted in the shortest possible time.
All about painting veneer
- Peculiarities
- Paint selection
- Painting
Over the years, furniture, doors and other structures made of veneer begin to lose their attractiveness. The least labor-intensive and easiest way to restore the presentable appearance of veneered products involves painting them in a different color. Is it possible to paint veneer products? What paint can be used to perform this procedure? How is veneered surfaces painted?
How to prepare the surface?
First, the surface is prepared for applying paint. The instructions involve the following steps:
- We remove all the contents of old furniture, eliminate doors and drawers, as well as all fittings.
- We clean the fastening parts with a soap solution, after which we should degrease the entire surface of the structure and wait until it dries completely.
- We remove the old polish and varnish layer using a wire brush, scraper or solvent (it is recommended to carry out this procedure at least three times to achieve the best effect).
- In industrial conditions, at this stage the surface of the painted piece of furniture is sanded and minor defects are removed. At home, you can use sandpaper and apply an antiseptic.
- Next, we proceed to the primer; when it is completely dry, the surface should be sanded again until rough.
This is the main thing you need to know about the preparatory stage of painting lacquered furniture. Next we will talk about the process of painting this kind of surfaces.
Peculiarities
Veneer is an inexpensive, environmentally friendly material, consisting of wooden sheets up to 1 centimeter thick. In the manufacture of furniture, doors and other structures, veneer sheets are glued to a strong and dense wooden base, which is usually used as chipboard and fiberboard (MDF). Veneer has the texture, visual appeal and properties of natural wood.
Its use makes it possible to produce inexpensive and lightweight structures (furniture, interior doors, flooring), which are visually almost indistinguishable from products made from solid wood.
At the same time, the thinness and fragility of the veneer plates cause its fragility and vulnerability to moisture and mechanical damage. Taking these features into account, primary and re-painting, as well as surface treatment of veneered products, is carried out with the utmost care. Careless and inaccurate actions when working with veneer can cause damage to the material, the appearance of cracks, deep scratches and chips on its surface.
Looseness is another characteristic feature of veneer that distinguishes it from solid wood. This feature causes increased consumption of paints and varnishes when working with veneered surfaces. This nuance should also be taken into account when planning to paint veneered structures at home.
Painting veneered products requires preliminary preparatory work. The features and stages of their implementation depend on the initial state of the structure, the type and thickness of the old paintwork, the nature and depth of existing damage.
Decorative veneer furniture covering
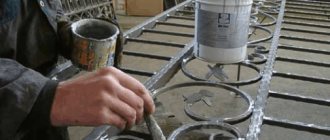
Our company is engaged in processing veneered products, applying stain, varnish, enamels, and tinting. When performing work, we use only high-quality materials, modern tools, without violating the technology of the preparatory and painting process.
Examples of completed work are presented below:
Before carrying out the procedure of applying varnish to the surface, it is necessary to carry out some preparatory measures. The varnish application process is as follows:
Paint selection
At the stage of preparation for painting veneer, special attention should be paid to the selection of a suitable paint and varnish material. Most often, quick-drying water-based acrylic paints are used to change the color of veneer surfaces. Experts include environmental friendliness, simplicity and ease of use among the advantages of paints of this type. The paints do not have a sharp or unpleasant odor, which allows them to be used indoors.
You can easily repaint old veneered furniture, interior doors, shelves and other interior items made of wood.
When painting entrance doors with veneer trim, experts recommend giving preference to alkyd enamel. It will provide a durable and strong coating that is resistant to moisture and ultraviolet radiation. If you intend to use enamel to paint veneered entrance doors, you should take into account that it will completely hide the unique texture and natural roughness of the wood.
It is also possible to paint veneer with polyurethane paints. A coating made with such paints will protect the wood from moisture, mechanical damage, and exposure to ultraviolet radiation.
It is strictly not recommended to use moisture-vulnerable nitro paints for painting veneer structures. After drying, paints of this type can form unsightly matte spots on veneered surfaces.
In addition, nitro paints contain toxic components that can cause allergies. For this reason, they should not be used for painting furniture, doors and other interior items.
How fine-line veneer is produced
The manufacturing process of this material consists of several stages:
- Peeling.
First, the wood is cut so that it produces a strip of special thickness. The blade rotates in a circle, cutting off layer by layer. When the diameter of the material decreases, the rotation speed of the knife also decreases. After this, veneer sheets are cut from the finished strip.
- Drying.
The veneer is thoroughly dried, reducing its moisture content to the required parameters. It is applied to special heated equipment, which promotes the evaporation of water. Circulating warm air and gas acting on the material helps achieve maximum results.
- Coloring.
Before this, the veneer is deresined so that the paint adheres well and is firmly attached to the surface. Also, to enhance the color saturation, the sheets are bleached. The cold coloring solution is poured into a wide container, where the veneer is placed on a metal mesh. The reason for keeping the paint temperature low is because it helps maintain the brightness of the colors. Sometimes the water is additionally boiled - this speeds up the coloring, but after the sheets cool, they may change their shade and become duller.
- Gluing.
Sheets are selected whose wood fibers are arranged in the same way. They are packaged in packs into which an adhesive solution is poured for impregnation, reliably fastening the sheets together. The packs are then heated.
- Pressing.
After gluing, the stacks of sheets are placed under a press, where they are joined into a single block. High pressure gives the resulting material strength and reliability. The sheets will definitely not come apart and will withstand both wet conditions and sudden temperature changes.
- Planing.
To get that “ideal line”, the blocks are planed with a special knife. It removes glue residues, removes roughness and unevenness. The block becomes smooth and pleasant to the touch.
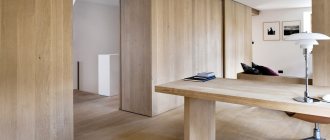
Fine-line veneered facades
Fine-line veneer includes:
- Natural wood – about 92%.
- Adhesive composition – about 7-8%.
- Paint – 0-2% (some sheets do not use paint at all, which makes them even more environmentally friendly and natural).
On average, the material weighs about 450 kg/m3, the thickness varies from 0.35 to 5 mm depending on the purpose of the veneer.
As is clear from the composition, the doors are absolutely safe for health. In their production, no components are used that would release substances harmful to the body into the air.
Painting
Before you start painting veneer products with your own hands, you need to prepare the following list of available tools and materials:
- coarse and fine-grained sandpaper;
- primer;
- spray, roller or brush;
- stain (if necessary);
- paint and varnish material (paint, enamel, varnish);
- solvent;
- a brush or scraper to remove old paintwork.
Next, they begin to directly prepare the veneer structure itself. At this stage, the existing fittings, decor and removable parts (handles, fasteners, hinges) are dismantled. If these elements cannot be dismantled for some reason, they should be wrapped in several layers of plastic cling film.
Then the surface of the structure must be thoroughly cleaned of dirt and degreased. For degreasing, universal solvents are most often used. After applying the degreaser, wait until the treated surface is completely dry.
Repainting a veneer product in a different color requires careful removal of the old coating. At this stage it is recommended to use fine-grained sandpaper.
If the coating is applied in several layers, it is better to use coarse sandpaper.
It is advisable to remove the old coating with a metal scraper or a rough brush in extreme cases. Such manipulations must be carried out with the utmost care so as not to damage the fragile veneer surface. Minor damage and chips discovered during work should be treated with a primer and smoothed using wood putty. After the putty has dried, sand the damaged area with sandpaper.
In order to change the color of the veneer (if necessary), it is recommended to use stain. Before use, it is thoroughly mixed and applied to the surface of the veneer in two layers. Do not use stain before treating veneer with enamel or water-based paints.
To apply paint to a veneered surface, it is recommended to use a spray gun (paint sprayer). The layers of paint applied with this tool are thin and even. In addition, using a spray gun allows you to avoid the appearance of drips and the formation of air bubbles. After applying the first coat of paint, you should wait for it to dry completely. Applying a second coat of paint to a surface that is not dry may cause air bubbles and drips.
If you don’t have a spray gun, you can use foam rollers and brushes with strong bristles. When painting a veneer surface with these tools, you should not rush, making chaotic movements in a random order.
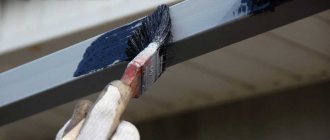
Using a roller or brush, the paint must be applied in even and neat strokes going in one direction.
After painting, the veneer structure is left for 48 hours in a dry and well-ventilated area. During the specified time, the painted product must be reliably protected from moisture, dust and dirt. Otherwise, the fresh paintwork may be seriously damaged. After the paint layer has completely dried, the veneer structure can be coated with a layer of varnish, which will give the product an attractive glossy shine.
To learn how to paint veneer, see the following video.
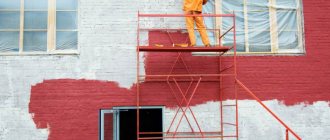
Painting wooden furniture
The photo shows an example of transforming old furniture
Like any painting process, painting furniture parts is divided into several stages.
Tools and materials
First, you need to collect everything that may be required for your work, so that in the future you will not be distracted by searching for the necessary tool or purchasing any material.
The list of everything that may be useful to you is as follows:
- Screwdriver;
- Fine to medium grit sandpaper;
- Rollers and brushes of various sizes and (or) a spray gun for painting furniture;
- Masking tape;
- Paint tray;
- Primer;
- Wood putty;
- Putty knife;
- Paint for painting furniture;
- Varnish.
Advice. When buying a primer, you should choose compositions based on the type of material being painted.
Preparatory work
Before you start working directly with acrylic paint or any other paint and varnish material, the following preparatory measures must be taken:
- Furniture is disassembled into parts;
- Each element is processed with coarse sandpaper to remove the old coating from the surface;
- Use a brush to sweep away all the dust;
- Cleaning is done with fine-grain sandpaper;
- Sweep away dust with a brush;
- Furniture elements are wiped with a damp cloth, after which they are allowed to dry;
- If necessary, wood putty can be applied to the parts using a spatula;
- Cleaned, puttied, dried furniture for painting is subjected to a priming process. (See also the article Primer on wood for painting: features.)
Painting instructions in pictures:
Note! Work must be carried out in a clean room. In order to avoid dust getting on the surface during the painting process, before starting work with paints, you should wet clean the room.
We paint old furniture
There are a huge number of dyeing technologies, including decoupage, two-color or multi-color dyeing, antique dyeing, etc. Only you can decide which specific method will be used to paint your furniture.
Antique painting technique
Painting furniture in a single color, for example, white, does not present any difficulties.
The main thing in the process of work is to follow the following set of rules:
- The paint is applied in one direction of brush movement;
- You should not apply a second coat of paint until the first one has completely dried;
- If the furniture is made of veneer, then the paint is distributed in the direction of the wood grain;
- The room in which work is carried out must be dry and clean.
- During long breaks during painting work, brushes should be immersed in a container of clean water so that the tool does not dry out, otherwise they will become unsuitable for further use;
- If you ultimately want to get a result similar in quality to factory coloring, then you should apply the coloring composition in several layers;
- Finally, once you have achieved the desired color, after the paint has dried, apply a final coat of varnish using a sponge;
- After finishing the work, assemble all the furniture parts into a single whole.
The photo shows the paint application process.
All about painting old furniture with your own hands
From time to time the interior needs to be changed. Moreover, global changes are not necessary: you can re-stick the wallpaper, change the textile decor, move the sofa. It's simple and not very expensive. Sometimes this seems not enough and you want to change a comfortable but boring table or cabinet. However, there is a better way: they can be restored. Let's figure out how to paint furniture made from different materials.
Where to begin
Breathing new life into an old shelf, bedside table or chest of drawers is not difficult if you choose the right restoration technique. The choice of decorative material and the technique of its application depend on the creative concept. First you need to determine what the furniture is made of. Any material can be repainted: metal, wood, plastic, etc. It is clear that the composition must correspond to the base.
You don't have to limit yourself to just paint. There are additional design techniques. This includes painting, manually or using stencils, decoupage with drawings or photographs, craquelure application, patination and aging, and much more. The decor is chosen in accordance with the interior style. If you wish, you can find very interesting solutions.
Composition and concentration
Many people are interested in whether it is possible to paint a veneer door? It is worth knowing that such material is demanding and capricious. The first thing to think about is the color scheme. You can radically change the color of the door leaf or slightly update it. Minor defects, scratches or chips can be removed using varnish, wax pencil, and, ultimately, polish. This is necessary so that the resulting canvas looks like new. It’s up to you to choose how to paint a veneered door, but you shouldn’t use nitro paints. They do not tolerate moisture and give the effect of matte spots on the product over time. Experts recommend using the following substances:
- polyurethane paints;
- water-based compositions;
- specialized materials for veneer;
- glypthal.
Painting stages. The work necessarily contains several gradual stages. The first is preparing the veneer door for renewal. It is imperative to remove the fittings, clean the surface from dirt, and remove the protective film, if any. If the doors are new, without damage or unevenness, then this preparatory work is not necessary. Repainting them will be easy, and the base coat will only strengthen the coating.
To remove old varnish, use fine-grained sandpaper and special mixtures. Do not use a grinding turbine under any circumstances. Turning at high speed will damage the surface, forming scratches, dents or even chipping.
The second stage should begin only after the completion of the previous one. If you are dealing with natural veneer, then work should be carried out carefully through the small thickness of the plates. A wood primer will eliminate unevenness and help give the door leaf a fresh look. The shade should be several tones lighter than the final one so as not to affect the result. Let the surface dry thoroughly. For work, you should choose dry rooms that are well ventilated. This will help speed up the drying process of the product at all stages and will not harm the work. For the final stage of working with water-based acrylic paints, it is better to use a brush or a small roller with short bristles. Alkyd products are also good because they have water-repellent properties. It is necessary to paint the door with a light color in two layers, and with a dark color in four to achieve the desired effect. Total drying time up to 48 hours.
There are several useful tips for those planning to repaint a veneer door:
- Thick paints will hide the unique ornament of natural canvas. It is worth using options with lower concentrations.
- Stains will help make the color more rich and fresh. Varnishes will preserve the natural appearance of the canvas.
- At all stages of work, carry out only with the door in a horizontal position.
- An interesting design solution would be to use different shades of each side.
- To apply stain to the surface, it is better to use a spray bottle or sponge.
How to paint a veneered door if it is not natural. Artificial canvas requires special attention, because they use film coatings to create a three-dimensional perception. The problem is that the paint flows faster over the surface and thereby forms streaks and waves. In this case, you should choose quick-drying materials with high density and use a spray bottle.
Choosing what paint to paint furniture
Let’s say right away that the work may require more than just a coloring composition. Therefore, we offer a brief overview of paint and varnish materials that may be useful to the master.
Primers
They are applied at the initial stage of processing to improve the properties of the base. Improves adhesion or adhesion of decorative material to the surface. They close the pores of the base, which reduces the consumption of paints and varnishes. Craftsmen recommend choosing a primer of the same color as the finish or, if this is not possible, the closest possible tone. This way it will not show through from under the main decor, which will reduce its consumption.
Stains, varnishes, waxes
Used for painting wooden furniture. With their help, they restore the appearance of wood and emphasize its structure. Colored stains tint the base and highlight its texture. Solutions are produced that imitate valuable wood species. So from ordinary pine you can get wenge or mahogany. True, the result does not always meet expectations. If you wish, you can try to make your own stain. To do this, take a decoction of nut shells, roots or bark.
Varnishes form a dense protective film that prevents the destruction of the decorative coating. There are transparent and colored preparations. The latter perform two functions at once: decoration and protection. The color of the varnish can be any; there are products on sale that imitate valuable types of wood. In addition, transparent and colored waxes, shellac, and drying oil are used to process wood.
Paints
They are used when you need to completely cover the structure of the base and change its color. The composition is selected based on the material on which it will be applied. So, there are preparations for metal, wood, plastic, etc. In addition, coverage, ease of application, and abrasion resistance are taken into account. The color range of the preparations is very diverse, as is the type of surface that is obtained as a result. It can be gloss, satin, matte plane or texture.
It is advisable to choose environmentally friendly paints for the room, especially if they will be used to paint children’s furniture. For example, milk-based formulations are completely safe and at the same time durable. They give a special “faded” shade that is well suited for interiors in Provence or country style. To create a micro-relief surface, special texture products are used. Fillers are dissolved in them, giving the plane a certain structure.
Cleaning and priming
Furniture must be cleaned of old layers of varnish and paint. To remove old layers at home, you will need coarse-grain sandpaper. It is used to sand the surface of interior items. The process is quite difficult; a grinding machine can make it easier. If you don’t have one, you can wrap sandpaper around the block and then run it over the entire surface of the product.
In addition, you can remove old paint using other tools, including:
- construction hair dryer - the tool heats up old paint. When exposed to hot air, it is quickly cleaned with a spatula;
- wash - you can buy products in automobile stores. The remover is applied to the surface. After a while the paint will begin to bubble. Now it can be easily removed with a spatula. When working with this product, you must use protective equipment;
- grinder with a metal brush. With such a tool you need to carefully pass through all elements without touching the wood.
After cleaning the products with any tool, it is necessary to sand the parts. Particular attention should be paid to the end parts and decorative elements. Then less harsh processing will be needed, so fine-grained sandpaper is used over all parts. When the work is finished, remove the dust with a vacuum cleaner. This way, dust won't fly all over the room.
Priming the furniture is an important step in the preparation process. A special solution is applied to the surface, which ensures uniform distribution of paint, as well as better adhesion to the surface.
- furniture is coated with an acrylic-based primer;
- leave for some time until dry;
- After this, the surface is degreased with vodka or alcohol.
It is better to select a primer that is similar in color to the future paint. Thus, the layer will be more even, and it will also be possible to save on dyes.
You can cover up and paint over scratches on furniture using putty. A small amount of product is distributed over the surface of the product with a rubberized spatula. If the defects are still visible, you can go over the putty again.
Stages of painting old furniture with your own hands
We will analyze in detail the general technique for painting furnishings made of any material at home. It is suitable for old and new products if, for example, you want to change the design of a standard chest of drawers or cabinet from IKEA.
Preparing for painting
All recommendations on how to paint lacquered or any other furniture begin with a description of the preparatory work. They are necessary to ensure that the painted surface is smooth, uniform and lasts a long time. It is important that the paint is chosen correctly, otherwise you will not be able to get a good result. Be sure to study the painting instructions, which indicate how to prepare the product for work and other important points.
Preparation stages
- We completely disassemble the product. Carefully unscrew the fasteners, remove the doors, and take out the shelves. We remove the accessories. Anything that cannot be removed, such as stained glass or glass inserts, is completely sealed with masking tape.
- Pour warm water into a container and dissolve a little detergent in it. We wash all the parts and remove dirty and greasy stains from them. If they are made of laminated or veneered boards, wash them very carefully so that the plates do not swell. Dry the elements thoroughly.
- Clean the surface with fine sandpaper. Sanding is necessary to improve the adhesion of the coating. Especially if the base is varnished or polished. Sometimes a grinder is used. You need to work with it very carefully so as not to damage the base.
- We remove dust from the parts with a vacuum cleaner or sweep it away with a dry brush. Prime the base with a suitable primer. We follow all manufacturer's recommendations. Apply one or two layers of soil so that there are no untreated areas.
- We carefully examine each fragment. If we find cracks, chips or other defects, we fill them with putty. To get a good result, use a soft rubber spatula. After drying, we sand again and prime the restored surface.
- After the primer has completely dried, sand the almost ready-to-use base again. Carefully remove all dust from the most inaccessible places. We do this only with a dry rag or brush. A damp cloth will “drive” dust particles into the cracks.
This preparation is carried out on each element removed from the product. After this you can paint the parts.
Dyeing and drying
Before you paint polished furniture or any other furniture, you need to prepare your work area. If the selected coloring agent has a strong odor, good ventilation and protection for the upper respiratory tract must be provided. In any case, the windows and doors of the room should be opened. In the summer, it is advisable to curtain them with netting to prevent insects from getting inside and landing on the wet paint. It will ruin the job.
Painting instructions
- We are preparing the composition for work. Shake the aerosol can. Mix or dilute the liquid mixture according to the instructions. We place the part on a flat base, cover nearby surfaces with plastic so as not to stain it.
- If we apply a coloring solution, pour it into a tray. Take a roller, dip it in liquid, roll it over the tray, removing excess mixture. We paint the part with a roller. We paint all hard-to-reach areas with a brush. Leave the first layer to dry. To obtain a pure color, which is most often the case with white, add one or two more layers.
- For spray painting, which is better for MDF or chipboard, we use a different technology. We bring the aerosol to the base at a distance of about 30 cm. Apply the paint tightly, with smooth movements. We try to avoid any drips. It will be difficult to remove them. If necessary, apply a second layer.
Now all that remains is to dry the painted parts thoroughly. Drying time depends on the type of solution, but it’s unlikely to happen quickly. You need to let the mixture harden completely. An important point: each subsequent layer is applied only after the previous one has dried. If the part needs to be decorated, for example, decoupage or patination, this should be done after the paint layer has dried.
You can apply a clear varnish to the dried paint, which will strengthen the design and give it a deeper tone. After the varnish has dried, carefully remove the masking tape and begin assembling the furniture. It is done in reverse order. If old fittings or fasteners are worn out, they need to be replaced.
Restoring polishing
Restoring a layer of varnish is a complicated matter. Any furniture restoration begins with cleaning and degreasing, and repairing the varnish coating too. We use dishwashing detergent diluted in water: safe and reliable. After drying, we proceed to refinishing the polish.
- On dark furniture, a scratch can be painted over with iodine, achieving the desired color in a number of layers or diluting it with water. If you have furniture markers, you can use them.
- Deep scratches that have turned white cannot be painted over like this. There are other methods:
- Make mastic from 4 parts melted wax and 3 parts turpentine. This paste is applied to the polish and rubbed with a soft cloth.
If you have shoe polish of a suitable color, you can cover it with it and then polish everything with a cloth.
Scratches are painted over, then the coating is restored
You can simply refresh the faded polish on furniture using mixtures you prepare yourself:
- Two parts each of linseed oil and turpentine and one part vinegar. Mix everything, apply with a swab, wait until it is absorbed and polish.
- Mix oil and beer in equal parts and wipe the furniture with this mixture. After it has been absorbed, rub.
- The surface will be more shiny if you boil beer with a piece of wax, cool it and apply it slightly warm to the furniture. When the composition is absorbed, the surface is rubbed until shiny.
A few more recipes in the video.
How to remove polish from furniture
Quite often you have to remove the polishing: it is not the most fashionable finish. Modern furniture is most often painted with opaque or tinted paints, and the surface is matte. In any case, the polish must be removed. There are several ways. Since varnishes come in different compositions, you have to select them experimentally. But one of the methods should work.
- You can remove old polish from furniture mechanically. If you have a sander, the process will go faster; if not, take coarse-grain sandpaper and remove the varnish layer until wood appears. Then take a fine grit and sand it to a smooth surface. Mechanical removal does not always work. Sometimes even a grinder does not give results: the polish does not come off, but begins to melt and stink. Then they change tactics.
- You will need a piece of old glass. Put on gloves and break it into several fragments. Use the sharp edges that have formed to scrape the coating down to the wood. If there are chamfers and recesses, it is convenient to scrape them out with sharp edges. After the main layer of polishing is removed, everything is brought to a smooth state using fine-grain sandpaper.
Often, restoring furniture with your own hands requires tough measures: some types of polishing can only be scraped off with glass
How to paint polished furniture
If old furniture was prepared for painting, it must be cleaned of dust, wiped with a damp cloth and allowed to dry. Then level everything with putty, smooth out all the unevenness, wait until it dries. Take sandpaper and sand again, first with medium, then with fine grain. Next, apply a layer of primer and wait for it to dry.
Applying varnish with a brush when restoring furniture polish
You buy a primer for the paint you are going to use, or you can dilute the paint with a compatible solvent and coat it instead of primer. After drying, you can paint.
You can paint with a roller or brush. Usually several layers are needed: do not try to apply a lot of paint at once, as drips may appear. It is better to apply several thin layers. This way the surface will be smooth and uniform. Another trick: for uniform coloring, layers are applied in different directions - along, then across. This also applies to applying varnish.
Some types of varnish are easier to work with when they are warm. They are heated a little and then applied with a spray gun or brush. When heating, you need to be careful: vapors may flare up.
In order of painting: first paint the internal surfaces, edges and joints, then move on to the external ones. With this sequence, there is less chance of getting dirty or touching an already painted surface, ruining it.
If the varnish coating is smooth, without defects, and it needs to be painted over, you can do without removing this layer. There are special primers for complex surfaces. Apply them to the surface and paint after drying. They have components that penetrate even the varnish layer. Therefore, the paint will apply well and last a long time. But such soils have a disadvantage: they are expensive. But they save significant time.
Some secrets of painting wood (including brushing and painting in two colors) are in the article “How to paint lining.” Watch the video for a few secrets to applying acrylic paint evenly.
If the restoration does not bring the expected result, maybe you need to change the appearance? How to remake furniture in a new way is described here.
Features of painting different surfaces
We have analyzed the painting process in general terms; it remains to find out the details characteristic of different materials.
Chipboards
It is difficult to answer unequivocally how to paint chipboard furniture, since the boards are different. In any case, the basis is compressed wood waste, but the finishing is different. So, the slab can be laminated, that is, covered with a decorative film, veneered, or a thin layer of veneer glued on top of it. In addition, the slabs are varnished and laminated. In the latter case, strips of paper are glued to the base. Before painting, the laminated chipboard is completely stripped of the paper finish and traces of glue are removed. Laminated chipboard and veneered boards are only sanded to improve adhesion. Priming is required. It is important to choose the right paint to paint chipboard furniture. Acrylic or alkyd are best, but oil can be used.
Wood
Wood is easy to paint provided it is carefully prepared. The only caveat: possible “lint raising”. It manifests itself when applying any wet compositions: varnish, stain, enamels, etc. It is easy to prevent such a “rise.” After the first priming, the coating is sanded with the finest sandpaper.
Varnished wood
Preparing for painting involves removing the varnish. This can be done in different ways. Soften the varnish layer with a hairdryer or a special remover, carefully remove it, or you can remove it with a grinder. Then proceed according to the described painting technology. The procedure for removing polish is very labor-intensive, so many people are interested in how to paint lacquered furniture without removing the varnish. This is possible, but only if the varnish coating is firmly held on the base. It is sanded, primed and painted with a suitable composition.
Painting laminated doors
The paint adheres perfectly to a smooth laminated surface, but it will not last long. Therefore, the first step is to remove the top layer of impregnated varnish using a sanding machine and, if necessary, zero sandpaper.
We should not forget that directly under the protective layer there is a particle board, which will easily begin to crumble if the treatment is carried out at a sufficiently deep distance. The prepared surface is thoroughly wiped with a solvent and a layer of primer-antiseptic mixture is applied. Wait some time for the protective layer to dry and apply paint.
Impregnation of the door surface.
You can purchase any paint, since particle board is unpretentious in terms of coatings applied to it.
The paint is distributed over the surface using a spray gun or a roller with velor pile. After the 1st layer has dried, apply the second. A day later, the painted door is varnished with a transparent composition, which will act as protection during operation.
How to paint veneer furniture with acrylic paint
Repainting is a great way to update old furniture and bring some change to your interior.
Restoring and painting wooden furniture with your own hands is not only possible for professionals. Even a beginner can easily cope with this task.
This operation can be carried out at home, you just need to stock up on the necessary tools, paint and patience. You can paint not only furniture made of wood, but also chipboard and veneer.
Restoration of wooden surfaces
No matter how carefully you handle the furniture, abrasions, scratches, and stains still appear. They are easy to eliminate. The main thing is to know how and with what.
- If the wooden surface has simply lost its shine, find a wood care product that contains orange oil. Take a clean sponge, dampen it slightly and microwave for 20-30 seconds. Spray the product from a spray bottle, then wipe with a hot sponge (hands should be wearing rubber gloves with a coating on the inside).
A hot sponge and orange oil will restore the shine of wooden furniture
Such transformations are possible using a marker, alcohol and wax.
What tools to use for restoration
To paint old wooden furniture you will need:
- synthetic brushes (one wide and one narrow);
- velor roller;
- cuvette or paint tray;
- metal spatula;
- primer similar in composition to the base paint;
- paint , stain or stain;
- wood putty;
- sandpaper;
- paint stripper or sander.
When preparing furniture for restoration, you should update the canopies or tighten the old ones, tighten the missing screws/screws, and strengthen the loose connections.
The very first
So, let's get down to the most important thing - preparing the furniture for painting. It is necessary to stock up on materials and tools for work.
- As a means of removing old paint, we recommend using paint remover from wood. You can buy it at a car store. It perfectly removes old coating in just a few minutes. The wash has a gel-like consistency, adheres well and does not spread over the surface. When working with the remover, it is recommended to use a respirator. Another way to remove the old coating is to traditionally sand the surface using an emery sponge or a sander. The smooth texture of veneer is initially even and smooth, and as a result of processing, the surface may lose its glossy shine, so when painting veneer, you should clearly consider what kind of surface you need: matte or glossy. To give a glossy shine, the veneer should be finished with a finishing layer of varnish.
- Prepare a small spatula and a medium-hard metal brush. A spatula will be needed to remove the old coating from a wide surface, and a small metal brush will be needed to remove paint from the sides and corners.
- Velor roller, synthetic brush. You can easily find these tools at any hardware store. When applying acrylic paint, craftsmen advise using a synthetic brush, which is sold in an art store. Unlike a traditional construction brush, it “fits” better and leaves no marks.
- You will need aids such as an emery sponge, gloves, and sanding equipment if available.
- Now you need to remove all the fittings, remove the locks, handles, if it is a chest of drawers or a sideboard, remove the drawers, shelves, remove the doors from the hinges (find out more information on how to paint a chest of drawers).
Where to start painting old furniture
When you complete the first stage of preparation, sanding the furniture, you can move on to the second - getting rid of deep scratches, chips and other damage.
To do this you will need wood putty. It is applied with a spatula, allowed to dry, and then the excess layer is removed with fine sandpaper.
Now you can move on to the third stage - applying the primer layer.
This point in the restoration of old furniture is not necessary, but experts recommend priming the product to save paint and even out the surface and its color. The primer also allows you to hide minor flaws and scratches on the base of the coating.
Further care
It is worth using interior doors carefully, keeping them clean, and avoiding mechanical damage. There is a list of products that do not need to be applied to this door leaf:
- hard abrasives;
- liquid cleaners containing active chemical components;
- iron scrapers.
With proper care, the door leaf will look beautiful for a long time.
What paint is better to use
Today the market is replete with a choice of paints of different compositions, colors and purposes. Which one should you choose for painting furniture?
For such work at home, it is better to use water-based acrylic enamel. Among other paints, it has the advantage of quick drying and the absence of a pungent odor.
Water-based enamel is wear-resistant and easy to apply, and subsequently, painted furniture is easy to care for. What paint to paint furniture made from pallets? If necessary, the enamel can be diluted with water.
Paints based on nitro, glyphthalic, pentaphthalic varnishes cannot be used for painting furniture yourself. These types of paints are more suitable for outdoor use.
Paints based on thixotropic varnishes tend not to leave smudges when applied to a vertical surface, apply easily and give the furniture a plastic effect.
If you want the wood structure to be visible on painted furniture, it is better to use a stain or stain. The choice of stain is quite rich in colors, conveying the natural color of the wood.
This product impregnates a small layer of wood, but does an excellent job of highlighting the pattern on it.
Mordant has a more natural effect and a higher level of adhesion to the substrate than stain.
If you want to give the updated piece of furniture a glossy shine, then after the paint has dried, apply a couple of layers of varnish.
Restoring old furniture with your own hands will not only save money on buying new ones, but will also delight you with a fresh look and give you a sense of pride as a craftsman.
The next step is priming the surface. It is best to use an acrylic primer, which is characterized by high adhesiveness and good water-repellent properties. The primer must be applied in a thin layer using a paint brush or roller.
When the primer is completely dry, you can begin applying paint.
It is recommended to paint the heating system in two layers. The average consumption is 1 liter per 10-18 square meters of area. A standard can of paint is 0.9 liters in size - it should be enough for you to paint batteries, for example, in a room and kitchen.
The price of such a can, depending on the manufacturer, ranges from 350 to 430 rubles, but there are also cans of larger capacity.
Sometimes passive fire protection of furniture is required, in which case its surfaces are coated with fire-retardant paints. Moreover, it is necessary to treat not only wooden parts with a fire retardant composition, but also metal parts, for which fire-retardant paints for metal Polistil or their analogues can be used.
To paint furniture yourself, it is recommended to do it in a separate room. The process may take several days, so it is better to have the furniture in another room. Is it possible to paint furniture with latex paint? In this way, it will be possible to protect your home from dust.
It is also recommended to wear safety glasses, gloves and a gown while working.
- Varnishes are used mainly to give furniture an antique , but well-groomed, noble and rich look. In this case, the surface is painted several times after each layer has completely dried.
- Varnishes are also necessary to fix the color and protect the surface from scratches and minor damage.
- You will need varnish even if you decide to paint the chest of drawers in an antique or Provence style.
The most important and most time-consuming thing at the stage of preparing surfaces for painting is removing old paint. To do this, it is best to use sandpaper and a wire brush with not very stiff bristles. It is better to refrain from using special solutions and, especially, a blowtorch.
Despite the high efficiency of these “tools,” they can cause serious damage to wooden surfaces.
Advice! When it comes to painting metal garden furniture, the most important requirement for paint is protection against corrosion. In this case, a proven product is electrically conductive paint Zinga, which provides two-level protection - barrier (passive) and cathodic (active), as with cold galvanizing.
Article rating:
Is it possible to paint furniture made of veneer Link to the main publication Articles mentioning the words:
Big Important Decor You Can’t Simple Do It Yourself
Related publications
- How to make furniture from scrap materials
DIY painting steps
Painting the door should be carried out according to an algorithm that includes several stages:
- Removing a layer of old varnish or previous coating by treating the door with a soap solution and a solvent used for paint. If necessary, you can use sandpaper (you can do without removing the base layer if the coated canvas is not damaged).
- Puttying with a special solution, which you can make yourself by mixing sawdust in PVA glue. After drying, you need to sand the surface with sandpaper.
- Painting begins with the panel, making even brush strokes along the fibers, after which the recesses and ends are treated.
- After the first painting of an interior door in an apartment, the coating will seem to be applied unevenly, so a second application of paint is used after sanding the first layer.
- Before painting the door frame, apply masking tape to the wallpaper adjacent to it to protect its surface.
It is better to carry out self-painting work with the canvas removed from the hinges. Before starting, you need to inspect it for any irregularities, which are repaired with a special primer.
In most cases, veneered doors have a certain pattern, so painting with a spray gun is quite complicated and should be done by professionals. The choice of paint is determined by the old coating and available financial resources. The best option is to use acrylic enamel, which gives a matte finish to the surfaces. But she's expensive. When using it, it should be taken into account that it must be secured with a reinforcing coating.
When painting doors made of artificial materials, it is better to turn to professionals, because due to paint running off the canvas, poor-quality painting may occur.
Actions in case of minor errors in operation
You can fix minor scratches or chips yourself. Select a transparent furniture varnish or wax furniture polish. If the area of damage is small, only this surface is painted over. If an area with chips or scratches is visible at a distance of 1 m, then you need to paint the entire canvas to eliminate shine.