MesterulManole
8839 0 0
MesterulManole July 5, 2017Specialization: many years of experience in finishing works of residential and office premises, dachas, country cottages, etc. Hobby: cycling in all its forms
Installing skirting boards over wallpaper has its advantages and disadvantages: find out more about them
Have you decided to glue a baguette onto the wallpaper, but don’t know how to do it correctly? I will tell you how to do the installation yourself and what you will need for this. In addition, you will learn about the pros and cons of gluing baguette over wallpaper.
Properties and features of baguettes
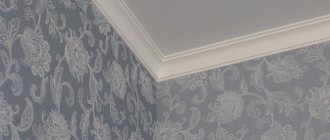
First of all, baguettes are needed to add elegance to the edges of the ceiling. If there are any imperfections on the surface of the walls or ceiling, for example, relief or cracks, then you can hide them with the help of baguettes.
During installation, there is no great inconvenience or error, even for beginners in the field of repair, since the installation process itself is quite easy. There are no problems even when combining baguettes with different types of ceiling materials.
To have an idea of how advisable it is to use baguettes for finishing ceilings, their main advantages are given below:
- Manufacturers offer a huge number of different options in shade and material, which gives a lot of scope for choice.
- Hide the appearance of bumps or depressions.
- The installation process is not at all difficult and even a beginner can easily cope with it.
- Any ceiling renovation will become much more beautiful if you add baguettes.
- Even though baguettes are used in expensive designs, their availability remains at a high level.
- It is easy to calculate the required number of baguettes, which results in large savings due to the lack of remaining materials.
- Carrying baguettes will not cause much difficulty, since they are very light.
As can be seen from the above advantages, using baguettes is very beneficial both from an aesthetic and economic point of view.
1.7. Level transition device
A level transition is a connection along a straight or curved section of several surfaces (both flat and higher orders) formed by suspended ceilings. This technique is usually used to bypass beams and crossbars. Level transitions are primarily divided into convex and concave (see Fig).
Sorry, this text is only available to dealers. You must be logged in as a dealer to see the hidden text.
A concave transition requires much more labor. It is available in two versions: with “separated by canvas” or “with a gusset”.
Sorry, this text is only available to dealers. You must be logged in as a dealer to see the hidden text.
After the installation of the form-building structure is completed, when the ceiling is stretched, the fabric will cover it and the required level transition will be obtained.
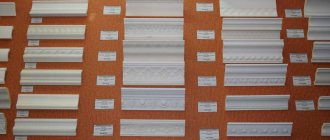
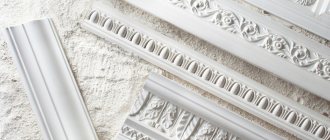
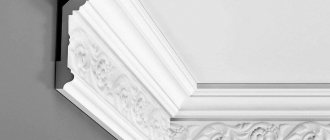
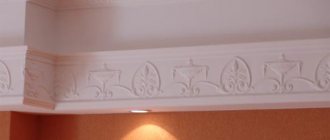
Types of baguettes
| Types of skirting boards for ceilings | What is it attached to? | Is it possible to paint | Mechanical stability | Moisture resistance |
| Foam | Glue, PVA, putty | Yes | No | Yes |
| Wooden | Glue, self-tapping screws, screws | Yes | Yes | No |
| Plaster | Glue, self-tapping screws, screws | Yes | No | No |
| Plastic | Glue, screws | No | No | Yes |
Baguettes can be made from different materials. All of them are presented below:
- The most affordable and lightweight to carry. A beginner will not have any inconvenience in how to glue a baguette from this material. However, this material also has some inconveniences, which are that it cannot be used in the bathroom or kitchen due to intolerance to moisture. But at the same time, for installation, for example, in the living room, there are no disadvantages.
- The best option to choose if you have a large budget is polyurethane baguettes. In addition to high reliability, they are suitable for use in places with large accumulations of moisture. But you have to pay a high price for quality and convenience.
- If you want to give the most beautiful and expensive look to a room, such as in a cafe or hall, then you can take a closer look at the plaster option. Like the first option, there is no reason, and there is no point in using it in the bathroom or kitchen. At the same time, baguettes made from this material will look beautiful only on high ceilings, so there is no point in installing them in an apartment.
- Baguettes made of wood are no less beautiful than those made of plaster, but it is advisable to use them in an apartment, but not in rooms with accumulation of moisture. Cracks do not form very often. Regular glue may not cope with fastening, in which case it is worth resorting to joining with nails.
- A good option is plastic baguettes. They are inexpensive and can be used in rooms with high moisture content.
Preparation
Since we do the installation ourselves, we need to find a company that produces suspended ceilings and go there with a detailed drawing of the room and all measurements. They do not have to be extremely accurate, up to 0.5 mm (the ceiling is usually cut 8% smaller than the perimeter of the room). Such companies work with individuals without any problems, since most of the installers are also very small enterprises. It is better to order a suspended ceiling with special harpoons. This is a kind of edging for the edge of the material, which makes it much more convenient to work with.
Video of ASTA M channel Stretch ceilings https://www.youtube.com/watch?v=-K9p8-k-frQ
From the same company we buy baguettes (the main elements for fastening the ceiling). There are plastic and metal models of such products. It is better to give preference to the second option. You also need to purchase mortgages for lamps and the lighting elements themselves.
Additionally, you need to prepare the following:
- Assistant. It is very difficult to stretch a ceiling alone, since while one worker is stretching the material, the second must heat it.
- Electric heater. Ideally, it is better to rent a gas heat gun, but if this is not possible, then a heater of 2 kilowatts or more will do. It is even better to use two such heaters, but you need to take into account the life of the electrical wiring. If a 32-amp circuit breaker is assigned to the outlet, then 3 heaters can be used.
Video channel Repair Workshop https://www.youtube.com/watch?v=dINaRUR98AA
- Putty knife. With his help we will put the material into baguettes. Instead of a spatula, a cake spatula is perfect, since it is rounded and therefore cannot damage the material of the stretch ceiling.
- Nylon cord.
- Hammer drill, 6-bit drills (as well as corresponding screws and dowels), screwdriver.
- Baguettes.
- Mortgages and cables for lamps. You need to calculate the cable based on the fact that 45 lamps will require approximately 3.5 m.
- Axle builder. It is needed to create the correct markup. You can also rent it or use simpler methods, for example, make markings using a painter's cord.
- Clamps, frame dowels, cable lugs.
Choosing glue for baguette
How to glue baguettes to the ceiling? It should be noted that it is much more important to first decide what material and shape of the plinth will be used for finishing, since based on this you can rely on the choice of glue.
How well the baguette will stick depends on the quality of the glue, so buying a cheap option can have negative consequences. But even expensive glue will not protect a heavy structure from falling. Then you should use fastening with nails, etc.
Glue putty for baseboards
A universal and at the same time economical option. This glue is often used for many types of work, not just for gluing baguettes. It is especially beneficial if there are leftover glue left after the repair, in which case they will be used for the right purpose.
The advantages of using are presented below:
- Big savings on buying new glue.
- Strong adhesion, which ensures reliable fastening of the baguette to the ceiling.
- Can be used without personal protective equipment, due to the lack of toxicity to the human body.
The disadvantages include difficulty in use and in removing remaining pieces of glue from the baguette.
Special purpose adhesives moment titanium
The most popular types of adhesives for working with baguettes. Firstly, they are in a tube, which makes them much easier to apply than putty. They have excellent gluing properties and will hold the baguettes for a long time.
If repairs need to be carried out quickly, then this glue is also best suited, since it hardens in the near future. Based on these advantages, professionals choose Moment or Titan glue for attaching baguettes.
But there are also disadvantages, which are discussed below:
- The need for personal protective equipment, such as gloves, a respirator and a mask to protect the body from harmful vapors, since the glue is toxic. It wouldn't hurt to open the window in the room in which the work is being done.
- The glue is not suitable for all types of baguettes. And it can enter into a chemical reaction with them.
1.4. Installation of external lamps (chandeliers)
By externally mounted lamps we mean ordinary chandeliers suspended on a hook embedded in the ceiling, etc. “ceiling chandeliers”, shaped like an inverted plate attached to the ceiling.
If it is not intended to change the location of the chandelier, then its installation is carried out after installing the ceiling canvas without additional work, but if the Customer asks to move the chandelier to another location, then before stretching the ceiling canvas, the following steps should be performed:
Operation 0: preparatory (carried out before installing the ceiling panel)
0.1. Remove the old chandelier hook to avoid damaging the fabric.
0.2. Install a new hook for a regular chandelier in the required place or place a stand under the ceiling chandelier that matches the diameter of the metal base of the chandelier. After installing a new hook or stand, be sure to check its ability to support the weight of the planned chandelier.
0.3. Connect the wiring to the new hook, carefully observing electrical safety requirements and making sure that the additional wiring does not subsequently fall onto the ceiling (you may have to specially secure it to the base ceiling. The method is at your discretion).
Operation 1: making a hole in the ceiling sheet
1.1. Feel through the ceiling canvas to find the hook of the chandelier or the central hole of the stand and make a mark on the canvas with a felt-tip pen.
1.2. Glue a reinforcing ring made of thin (2-3 mm) easy-to-process but durable plastic onto the front surface of the ceiling sheet. so that the mark made on the canvas is in its center. For a regular chandelier, the outer diameter of the ring is determined by the inner diameter of the chandelier cup, and the inner diameter is determined by the size of the hook - it must fit freely into the ring. At the same time, it is undesirable for the width of the ring to be less than 1 cm. For a ceiling chandelier there are no these restrictions - the ring is placed as conveniently as possible.
Attention: it is necessary to ensure that the ring is glued around the entire circle without breaks, to prevent the fabric from tearing during subsequent stretching of the fabric.
1.3. Wait 1-2 minutes after gluing the reinforcing ring for the glue to dry, cut the fabric inside the ring with a sharp knife with a narrow blade.
If all operations were performed correctly, it is easy to remove the wiring through the resulting hole and connect it to the chandelier and hang the chandelier on the hook in the most usual way. The hook may need to be extended - you will have to be smart to do this.
To attach the ceiling chandelier to the stand, you will have to make 2-3 additional holes with reinforcing rings (the inner diameter is for a self-tapping screw, the outer diameter is 1 cm larger) so that they coincide with the standard holes for attaching the chandelier to the ceiling in its metal base and they hit the strut ring. After this, the chandelier is connected to the wiring, its metal base is attached to the stand with self-tapping screws, and then the glass shade is attached to the base.
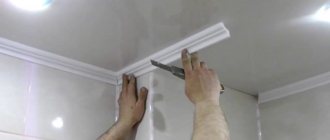
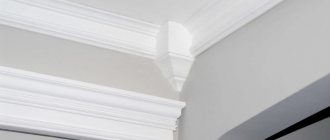
How to attach baguettes to the ceiling
How to glue baguettes to the ceiling is not difficult? Before you start gluing baguettes, you should prepare a respirator, gloves and other personal protective equipment. Since baguettes are mostly light in color, they can easily get dirty if work is carried out without taking care of the cleanliness of the room and hands.
It should also be noted that how to glue baguettes can be done in different ways and depending on this, the work process will vary. You can choose to mount directly to a bare wall or to pre-installed wallpaper.
Surface preparation
As usual, one cannot do without careful preparation of the space on which gluing will be done. Some of the baguettes have sufficient elasticity so that the existing relief on the wall is not noticeable, but it is always better to play it safe and make the surface as smooth and even as possible.
You should not ignore the ceiling of the room, because there will immediately be shortcomings if the surface is insufficiently smoothed. Putty is perfect for this job, as it can easily hide imperfections. If the wallpaper is already installed, then working with putty will not be necessary; in this case, a primer should be used.
Preparing the baguette
At this stage, everything depends on the experience of the person who is doing the fastening. Baguettes can be separated by using measuring tools in advance, but for beginners it is better to do this work during the gluing process.
If possible, it is better to separate the baguettes as little as possible, so the likelihood of making a mistake will be less.
Materials and tools
To work, you will need to prepare the appropriate tools, including: a cloth for surface treatment, a tool for applying adhesive and a sharp knife.
How to glue polyurethane baguette
For gluing, you need to immediately prepare a baguette, an adhesive composition and a cloth to remove any remaining glue. To get started, you need to apply glue to the baguette and then wait the time specified by the manufacturer on the packaging.
Next, attach the structure to the wallpaper on the wall and wait a while until the baguette sets firmly. Looking at the surface as you complete the work, you need to cut the baguette into appropriate pieces.
Recommendations from designers
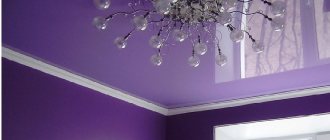
The interior baguette must be chosen taking into account the dimensions of the room. Here there is a correspondence in size: a large room with a large relief, a small one with a miniature one. Vertical lines add rigor and formality, and horizontal dynamics. For lovers of consistency and stability, it is better to choose samples from valuable wood species. If you like to change the design, bright accents, then the solution would be polystyrene foam or polyurethane for painting.
Baguettes in the living room interior Source yandex.net
The process of gluing ceiling plinths
When working, there are aspects that you need to know to avoid mistakes.
Pasting the baseboard over the wallpaper
Many beginners may wonder: is it possible to glue baguette onto wallpaper? Wallpaper may already be installed, but attaching baguettes can hide existing imperfections.
To do this, you need to measure the baguettes and cut off its sides, then apply glue and, as mentioned above, apply it to the wall for several minutes until the surfaces are completely set.
Securing the baseboard before wallpapering
You can slightly change the procedure, in which case all processing will be done after attaching the baguettes. After which all shortcomings are corrected.
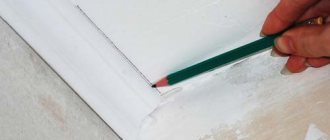
Installation of skirting boards in corner joints
How to glue baguettes to a ceiling with corners? Baguettes in corners can cause a lot of inconvenience if you don’t know how to do them.
To do this, you need to cut the edges of the baguette exactly halfway from the right angle. Most likely, beginners will not be able to carry out this work perfectly right away, so it is better to practice in advance.
Loose walls
Unfortunately, in our profession, cases of loose walls are not uncommon. What to do if the self-tapping screw screwed into the wall does not hold the profile well? There are two ways out: use spacers (jibs) or screw additional screws into one mounting hole. The second method in most cases saves the situation. One or two additional screws can securely fix the baguette. Well, if they didn’t help, then you should resort to using spacers. Take a 15 centimeter piece of baguette and drill a hole in one of the ends. Open the jib into the molding and the ceiling and place a mark through the hole in the ceiling. Drill under the dowel and drive it there. Take the jib and, tightening it with a self-tapping screw, open the baguette. The spacer should be rigid, and the profile should not move up and down and be pulled away from the wall.
Baguette installation technology
At this stage there are also some points that should be taken into account.
Lightweight foam models
The simplest models are made from foam plastic, even a beginner can easily handle them. At the same time, they hide the existing terrain.
To install them, you need to mark on the wall with a ruler and pencil the place where the baguette will be installed. The whole process is similar to the previous ones. That is, stick the baguette to the wall and, if necessary, cut a corner.
Heavy polymer products
If the baguettes are quite heavy, you need to mark the space for work and then cut them into appropriate pieces. Then remove all remaining glue and debris.
Wooden structures
Such structures are the heaviest and must be carefully sanded before installation.
Which profile is better to choose?
The choice of aluminum baguettes for stretch ceilings is based on the following conditions:
- the walls and ceiling are smooth and form an angle of 90°;
- installation is carried out to the floor slab;
- a niche for curtains is planned;
- installation of multi-level structures;
- a safety margin is required for a large room area;
- financial possibilities allow.
A plastic baguette is suitable in the following cases:
- the need for simple and inexpensive finishing;
- there is curvature of the walls;
- there are oblique angles;
- small room area.