Types of ceiling plinths with photo samples: is there a large selection of baguettes?
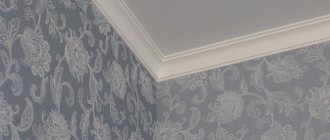
Ceiling plinth is called baguette, frieze, fillet and is used in decorating ceilings. These products go well with any wallpaper, ceiling coverings, plaster, painted walls and ceilings.
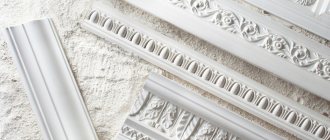
You can buy skirting boards of any shape and in different decorative designs PHOTO: borisov-praktik.by
Skirting boards are used in almost all styles, but where they are definitely superfluous is in high-tech.
We will discuss below how to properly glue a foam ceiling plinth, but now we will look at what fillet options are available and clarify what their meaning is.
You need a baguette if:
- there are defects that stand out at the junction of the walls and ceiling;
- wallpaper cut unevenly;
- I want more decorativeness;
- the interior requires a clear perimeter outline;
- I want the finish to have a finished look.
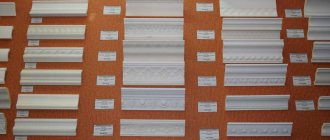
Now let's discuss the range of fillets.
Skirting boards differ from each other in shape, size, material of manufacture PHOTO: nikovera.ru
Material for baguette:
- polystyrene foam : the most affordable option with light weight and easy installation. The products have many advantages. They look good, and humidity is not a problem for them, and they do not rot, and can be easily cut with a utility knife. But they also break easily from mechanical damage;
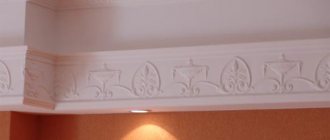
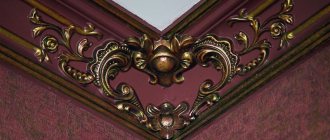
- gypsum : very decorative products, but they are used only on perfectly flat surfaces, because gypsum is not at all famous for its flexibility. Baguettes will weigh a lot and absorb moisture, but with them the room will take on a royal look;
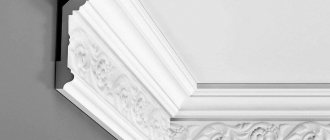
- extruded polystyrene : the structure of this material is denser and smoother than that of foam plastic. The joints are smoother and more invisible, but the cost of the models is higher than that of foam plastic ones;
- wood : wooden models are durable and beautiful, but are not suitable for every interior. The cost of such skirting boards is high, and their service life is limited by the influence of humidity in the room.
Foam plastic is the cheapest PHOTO: percpektiva.prom.ua
Expanded polystyrene is a more profitable option for polystyrene foam PHOTO: potolokjournal.ru
The tree looks rich and chic PHOTO: sdelaipotolok.com
Gypsum offers many beautiful options PHOTO: sdelaipotolok.com
Selecting the appropriate baseboard and glue
Ceiling plinth or fillet is made from different materials.
It can be wood, foam, plaster or polyurethane. Therefore, first of all, you should choose a skirting board that is suitable for your case. The most commonly purchased products are foam and polyurethane products. They have many common characteristics. Such fillets are made of polymer compounds, are low cost and quite lightweight.
The cheapest option is polystyrene foam. But such a plinth has disadvantages. Polystyrene doesn't bend well. If you need to go around large irregularities or paste over corners, then such a plinth will simply burst.
Polystyrene foam does not like moisture, so it is not recommended to glue it in the bathroom.
Polyurethane
Polyurethane is more flexible and is not afraid of moisture. It does not cost much more than foam products, but the quality is significantly different.
Polyurethane can be bent to large radii quite easily. It does not crumble or break.
Gypsum
Gypsum or wood fillets are quite expensive. In addition, they cannot be bent.
Such skirting boards are glued only in rooms with absolutely correct geometric dimensions and smooth surfaces. And, of course, the interior itself should be suitable.
Wooden plinth
How to properly glue ceiling plinths: glue or putty
Before considering the question of how to glue fillets, let’s find out what exactly they are glued with. There are several ways, let's look at the two main ones.
How to glue ceiling plinth to putty
An excellent adhesive composition is finishing putty, which was previously used to treat the walls. This method is used on plastered and plasterboard walls.
Important nuance! You can glue the baseboard with putty before wallpapering the room and painting the walls and ceiling.
The fact is that if you carry out installation on finished walls, then white marks from the putty mixture will remain on the wallpaper.
In general, the method is good where the walls cannot surprise with their evenness and perfection PHOTO: couo.ru
Preparatory work and installation
The putty is prepared as prescribed in the instructions, but reducing the volume of water by 6-10%, which will give it the desired consistency.
Installation can be started from any corner. One layer of putty should be applied to the inner sides of the baguette and the element should be installed in its designated place. Fixation is done by hand for 1-2 minutes.
Excess composition will most likely protrude from under the fillet and should be removed. If the resulting uneven joint occurs, it is corrected with a solution.
Choosing what to glue the molding on PHOTO: stoiportal.ru
Installation with glue for ceiling plinth
How to properly glue a foam plastic ceiling plinth? Here it is better to use special glue.
Selecting adhesive for ceiling plinth made of foam plastic, polyurethane, PVC profile
For this purpose, polymer glue “Dragon” or the more common “Titan” is purchased. Application is carried out on the inner sides by drop method. The step between the drops is approximately 3-5 cm. They are applied in a checkerboard pattern on each side.
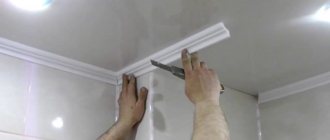
Now you need to press the baseboard into place and immediately remove it PHOTO: alloya.ru
This way some of the glue will transfer to the wall and ceiling. Remove the glue threads and wait 2 minutes: during this time the glue will wear off and you can press the baseboard again, but you need to hold it for about a minute.
Advice! If the walls are uneven, do not be zealous when pressing the baseboard: the cracks are then sealed using acrylic sealant.
You can buy an adhesive called liquid nails. It is also applied in a checkerboard pattern on the internal edges, but the baseboard is glued immediately after application.
White “liquid nails” are used to seal the gaps between the baseboard and the surface PHOTO: blog-potolok.ru
We bring to your attention a video on how to glue foam ceiling tiles
Installation methods
There are two main ways to install ceiling plinths:
- after wallpapering and finishing the ceiling;
- after processing the walls.
The first method is the simplest and fastest. It consists of gluing the baseboard with glue on top of the wallpaper and ceiling trim. For this purpose, so-called “liquid nails” are used (for example, “Moment installation”). They are applied along the edges of the baseboard, apply the finish to the wall at an angle of 45 degrees and hold for 1 - 2 minutes. The advantage of this method is that the decor covers defects in the ceiling finishing and wallpaper at the junction of the wall and ceiling. However, if the walls are not level enough, problems may arise - gaps will appear.
The second method involves placing decorative elements before wallpapering. They are secured using polymer putty. This method is ideal if there are uneven surfaces. After all, putty can hide them and fill gaps that may form between the finish and the wall. True, the technique also has a drawback - it requires very careful wallpapering. After all, then it will no longer be possible to hide the defects with a plinth.
For perfection in detail: how to form corner and intermediate joints
How to glue a foam plastic ceiling plinth if there are corners in the room and molding joints form? But there will be joints, because the length of the moldings will still not be enough. In fact, there is nothing complicated, let’s study this process more carefully.
How to properly cut corners of ceiling plinths
How to correctly cut a corner on a ceiling plinth? This is best done with a miter box, which was created for such purposes. It allows you to cut the strip at a precise angle.
The miter box is convenient where the corners are perfectly even PHOTO: youtube.com
For such cutting, you need to prepare the moldings themselves and a number of tools: a hacksaw or a stationery knife, a miter box with a protractor, a ruler and a pencil. If the angles are non-standard, then you will need to work with a construction knife with replaceable blades.
Ceiling molding: how to glue it securely and correctly?
You don’t always know which ceiling plinth to choose in the store. However, installation raises even more questions among apartment and house owners. Using our own example and guided by personal experience, we will tell you how to glue a ceiling plinth and how to attach it securely.
Basic provisions
Before gluing the ceiling plinth, you need to decide for yourself what kind of material will be used. Products made of polystyrene, plastic and polyurethane differ in their structure, so the gluing will be different. When choosing what to glue the ceiling plinth with, the type of surface is also taken into account, since the ceiling and walls are often finished with completely different materials.
The ceiling fillet can be attached in two main ways. The first is when the plinth for the ceiling is fixed after the final finishing of the surface. For example, you managed to glue the wallpaper and started installing decorative plaster. This DIY installation of ceiling plinth is considered the easiest. However, in this case, when replacing one wallpaper with another, the fillets will have to be dismantled and glued again.
The second method is the answer to the question of how to properly glue the ceiling plinth before finishing the wall. On the one hand, it is easier to attach the ceiling plinth, but on the other hand, you will have to adjust the plaster and wallpaper to avoid joints. The good thing about installing the ceiling plinth this way is that you won’t need to remove it when re-finishing it. If expensive ceiling skirting boards are used, this is best suited.
Popular gluing technologies
At first glance, how to glue baguettes to the ceiling should not cause any difficulties. But as practice shows, this is not so. Much depends on what kind of glue you use to glue the ceiling plinth, what kind of DIY ceiling plinth you use (plastic, polyurethane or foam).
How to properly glue ceiling plinth in a house where all the walls are crooked and the ceilings are also uneven? What should you glue ceiling skirting boards to when the coating begins to crumble with one touch? This is exactly what most modern apartments look like, and it’s not your fault. What to do in such a situation and how to glue baguettes to the ceiling?
Below you will find detailed instructions on how to glue a ceiling plinth made of polystyrene or foam plastic:
- We begin attaching the ceiling plinth with careful surface treatment. If there is a layer left on the wall that was glued 10 years ago or smudges, before making the ceiling plinth, these smudges are removed with a spatula. As an additional tool, you can use sandpaper or a mesh designed specifically for grouting. If you see a glued or putty joint between the ceiling and the wall, it is too early to glue the skirting boards to the ceiling. First, this joint needs to be primed.
- If you are also interested in how to properly glue baguettes to the ceiling, start by attaching each corner. Only after this will it be possible to adjust the remaining parts. The corners to install the ceiling elements are trimmed using a miter box. Installing foam ceiling skirting boards involves using a mold that forms 45 and 90 degrees. You need to know in detail how to attach the ceiling plinth and how smooth the walls in the apartment are. If this is not the case, working with a miter box will be problematic. You will have to make your own template that will help you cut the ceiling molding and join the corners.
- When the corners are cut, you can think about what to glue the ceiling plinth to. It is very convenient to glue the ceiling plinth with Moment Installation glue. To properly glue ceiling plinths, apply the liquid pointwise and in a small volume. Otherwise, the adhesive may leak out and get on the stucco. The pasted layer will be extremely difficult to remove, because household chemicals cannot be used. Therefore, when we glue the ceiling plinth, the substance is applied to the middle of the product. When the ceiling plinth is successfully fixed, the resulting technological gap is sealed with sealant. There is one simple rule on how to choose a ceiling plinth and sealant for it. They must have the same color.
- You already have general information on how to properly install ceiling plinths. It remains to find out in more detail how to properly glue the fillets to the wall. Before installing the ceiling plinth, it is tried on and carefully cut in the right place. The ceiling baguette with the applied composition is applied to the surface and pressed very carefully. Keep in mind that the name “foam” fully corresponds to the properties of this plastic material. Just one careless movement can result in a crack or serious dent. How to glue a plinth to the ceiling if a defect appears on it is still a problem. A baguette for the ceiling will look unpresentable. You may need to select another element, and this will be an additional cost.
- How to glue baguettes to the ceiling with an alternative adhesive? Indeed, you can cook it yourself. Immediately before gluing the plinth to the ceiling, PVA glue, finishing putty and water are mixed in one container. Do you know the name of a ceiling plinth that was glued in this way? That's right, "dead"! Because it holds very firmly and reliably. For ceilings, this mixture should have the consistency of porridge.
We've dealt with polystyrene foam - plastic is next. If we discuss this material and what to glue the ceiling plinth to, you will have two options - polyurethane and PVC. How to choose a ceiling plinth, taking into account the pros and cons of each of them? This is what we will talk about now.
The ceiling plinth made of polyvinyl chloride (aka PVC) attracts attention because it has its own special box for laying wires during the fastening process. How to glue this type correctly?
It turns out that installation also starts from the corners. They are cut correctly thanks to the miter box, although you can just go to the store and buy new ones. By choosing the “buy now” option, you will make your life much easier. But this must be done before attaching aluminum slats or plastic panels. The plastic is installed on a mounting strip - it is fixed with self-tapping screws.
How to glue a fillet, albeit in a less reliable, but simple way? Liquid nails or sealant will help you with this. The acrylic composition is always applied quickly. Before doing this, it is advisable to wet your hands with water.
The most difficult material to work with is polyurethane. It has a decent weight. It glues in exactly the same way as foam plastic, but choosing the adhesive composition is more difficult. Most homeowners opt for liquid nails. They can be called “Moment” or something else - it doesn’t matter. But with their help it is quite possible to glue a polyurethane fillet to absolutely any surface.
What to glue first: wallpaper or ceiling plinth
This question is serious and worries many. In both options, you need to perform the same preparatory work:
- remove everything unnecessary from the room;
- dismantle unnecessary coverings;
- if necessary, change the electrical wiring;
- make slopes;
- level the walls.
As for the rest, you need to weigh the pros and cons.
If you glue skirting boards to finished wallpaper, you will not be able to hide the cracks under gypsum putty or sealant.
In addition, when decorating the molding, it is easy to stain wallpapered walls PHOTO: pilorama-chita.ru
But if you are not a master of precise trimming of wallpaper, it makes sense to hide it under the baseboard by gluing it on top.
Method, guess
A simple “collective farm” option is to cut “by eye” at 45°. To do this, take a joining part, which is adjusted to the previous angle in fact.
You can try on the design by weight; this is a rather long and painstaking task. Maximum precision required!
When adjusting, constantly try on the resulting pairing in place. Only after several fittings can you achieve a good result, and then glue the plinth to the base. In short, you can’t do without experience :)
A way to fit a baseboard without using a miter box
Tips on how to glue skirting boards to different types of ceilings
Let's look at the nuances of gluing ceiling moldings to suspended, plasterboard and plastered ceilings.
How to properly glue skirting boards to a suspended ceiling
First of all, we will tell you how to glue ceiling plinth to a suspended ceiling; today this is the most popular coating.
The glue should be transparent or white, not darkening over time: “Moment Installation”, “Moment Super-resistant” and “Titanium” PHOTO: vseprokley.com
If the corners are not used, you will need a miter box, in addition, a standard set of tools. Don't forget about the stepladder.
Pasting is done from any angle: it is better to mark the lower border of the plinth with a pencil. The glue is applied to the surface of the molding adjacent to the wall, the time specified by the manufacturer is waited, and it can be applied to the designated area. No glue is applied to the edge adjacent to the ceiling.
If the wall is not completely flat, the plinth can be pressed additionally with masking tape PHOTO: youtube.com
Then the tape can be removed without any problems. Gradually cover the entire perimeter. For accuracy, you will need to measure the distance to the corner in order to know what length you will need.
It happens that there is only 4-7 cm left to the corner, in this case it is better to cut the plinth to length, increasing the corner element PHOTO: givewhereyoulivehamptons.org
Advice! Corners are cut with a small margin, this will help if there were errors in the measurement.
When gluing moldings, glue is applied to the end of one of them. Excess glue is immediately removed with a dry cloth.
On drywall
What glue should I use to glue foam ceiling skirting boards if they need to be placed on drywall? The steps are generally the same as when gluing a baguette in the case of a stretch ceiling.
The molding is glued onto the plasterboard before the wallpaper, and so that the molding becomes one piece with the surfaces, all joints are coated with putty and painted to match
On a plastered surface
A few words about how to glue baguettes to a plastered surface. It is better to use finishing putty rather than glue, applying it in a thin layer to the inner edges of the molding. But this can only be done where decorative finishing of surfaces with wallpaper is yet to be done, because practically indelible stains will certainly remain on the walls.
Installation of ceiling plinth under tension fabric
When installing a frieze under an already stretched ceiling, it is recommended to avoid gluing it to wallpaper. This will reduce the risk of damage to the film or canvas and will significantly simplify the process when subsequently changing the wallpaper.
Rules for installing skirting boards:
- Installation starts from the corner. The baguette is located as close as possible to the stretch ceiling, but should not touch it.
- Decorative elements are attached only to the wall and to each other. Care must be taken to ensure that the adhesive protruding along the edges does not touch the top coating.
- If putty is used for installation, then the gaps that form at the joints of fragments of the ceiling plinth are also rubbed with it. If glue is used, a sealant can be used for these purposes.
Advice! For additional protection of the ceiling during work, a special film is stretched over it; the edges can be covered with masking tape.
How to finish a ceiling plinth
Baguettes under the ceiling can be painted if desired. This helps to achieve greater decorativeness and disguise the putty in the cracks.
Additionally, this serves to increase the strength of the skirting boards PHOTO: nashaotdelka.ru
The work is carried out like this:
- the baseboard needs to be primed;
- apply the first layer of paint, wait for it to dry;
- If necessary, everything is painted again.
What a beauty PHOTO: gidpokraske.ru
Watch a video that will show how ceiling plinths are glued.
Fillet cut into the inner corner:
- To do this, you need to take a baguette and place it in a miter box. The hacksaw is inserted into the grooves and a cut is made on the workpiece. The left groove should be closer;
- The second baguette is cut according to the same pattern. Only the right groove is closer, the left one is further.
The fillet is pressed tightly against the far wall of the miter box and held with the inactive hand. The handle of the hacksaw or saw should be as close as possible to the hand that holds the workpiece. The saw should not be pressed too hard.
How to cut a plinth for a ceiling
To cut foam skirting boards for the ceiling, you must adhere to and follow the advice of experts.
Namely:
- The most necessary tool that allows you to cut the required angle is a miter box; a baguette is fixed in it and a specialist cuts off the required angle with a hacksaw;
- Before work, it is better to practice in advance in order to get neat edges; you need to cut the material carefully so as not to get hurt;
- If uneven edges are obtained, with small errors, they are eliminated using fine sandpaper;
- If the work goes poorly, it is better to purchase ready-made corners, which greatly facilitate the work.
Baguette is a very fragile material, so precision and accuracy are required.
Choosing a tool for cutting fillets depending on its material
Before choosing a tool for cutting ceiling plinths, you need to find out what materials they are made from.
The most common materials for baguettes:
- PVC skirting boards, which have the lowest price. They are quite light, and at the same time fragile. Even during installation, it is possible to damage the surface of the baseboard, leaving dents on it. Therefore, if you nevertheless purchased such strips, then exercise maximum care when working. Their main advantage is that they are easy to cut; an ordinary stationery knife or hacksaw will be sufficient.
- Expanded polystyrene is also inexpensive and very fragile. It breaks easily, so you need to cut off the corners with a sharp knife or a hacksaw, without applying too much pressure.
- Extruded polystyrene is a little more expensive and has a denser structure. They don’t crumble as much, but they are also more difficult to cut. You can use a knife or hacksaw for cutting.
- Polyurethane skirting boards are durable and moisture resistant. Their price is much higher than previous types. You can easily cut with a construction knife. The disadvantage is that they are afraid of temperature changes, so it is not recommended to use them in the kitchen.
- Wooden ceiling fillets can be cut using a hacksaw, which has small, frequent teeth, or a hacksaw for metal.
How to properly glue skirting boards to the ceiling
The work includes several stages.
Basic steps:
- The edges of the joints must be sanded, then they will fit better together and dock;
- Experts advise it is better to buy ready-made glue for baguettes; it should be uniform, without delamination or lumps;
- Before pasting, you must wash your hands thoroughly so as not to stain the product;
- It is better to glue the plinth from the corner, this will speed up the work and make the process easier;
- The sticker occurs in this way - glue is applied both to the part and to the surface itself, this will allow the product to better adhere to the wall;
- After applying glue to the part, you need to set it aside for about five minutes, then stick it on the ceiling;
- It is better to connect the corner parts and then attach them to the area on the wall;
- Excess glue must be removed with a wet cloth or napkin;
- Gradually it is necessary to move from one strip to another, doing the work carefully, without haste.
How to glue baguettes on uneven walls yourself
The curvature of walls can be decorative - half-columns, bay windows. But more often - forced. Curved surfaces are the fate of many apartments located in old houses or renovated by handless craftsmen. But you can complete the renovation and beautifully design the joints of walls and ceilings in any apartment.
Today we will tell you how you can glue baguettes to uneven walls so that the result pleases, and does not emphasize the features of your surfaces.
Choosing ceiling plinth and glue
When choosing a plinth for uneven walls, you should be guided by two principles.
Width
It must correspond to the height of the ceilings, the dimensions of the room and the degree of curvature of the surfaces.
A wide baguette is suitable if the ceilings are higher than 2.5 meters and the room area is more than 15 m2. An important condition for purchasing such a plinth is minor unevenness of the walls - on very curved ones it can highlight problem areas.
A narrow plinth is suitable for compact rooms with low ceilings, as well as for rooms where the wall geometry is very poor.
Material
The most popular baguettes are made from foam plastic, since their cost is minimal and the range is wide. Manufacturers allowed them to be strict, with minimal decorative elements, and luxurious, imitating ornate plaster stucco.
Foam molding can be recommended for rooms without decorative roundings, because it can only be rounded at large radii. If your interior is decorated with bay windows or half-columns, you need a polyurethane baseboard. It has a much smaller bend radius and higher strength.
A little advice. If you have not had to adjust a figured baguette yourself, it is better not to choose it. Or practice fitting in advance on scraps or excess baseboard, since here you need to follow your own rules.
How to glue a baguette on a wall before finishing
The easiest way to hide uneven walls is to glue the baseboards before wallpapering. And during the painting process you won’t have to worry about their cleanliness.
What is the best way to attach foam to an uneven wall?
We wrote about how to choose glue for baguette in this article. Our assortment always includes a good selection of glue from well-known manufacturers. They provide reliable fixation with a minimum of effort on the part of the master. But you can use liquid nails or glue only if, when applying the baseboard, a sufficient number of areas of contact with the wall appear.
Some craftsmen recommend gluing foam plastic to an uneven wall using putty. It fills the voids that are formed when a plinth is placed on a curved surface and prevents it from sagging. This creates the impression of a monolithic baguette, which “grows together” with the putty after painting.
How to glue molding to a wall
It is better to start the process from the corners. This will make it easier to insert and join the last piece.
- Cut the baseboard, attach it to the wall and trace it with a pencil so you don’t get confused with the fit later.
- Apply putty or glue to the molding and wall. Place the plinth against the wall in the space provided for it and press down slightly. Excess adhesive mixture will come out - remove it immediately. Let the baguette set a little and continue working on the other side of the corner.
- After the corners, you can glue the baguette onto straight sections. The plinth is also pre-cut to the required dimensions and marked “on the ground”.
- With putty that will come out, you can immediately seal the joints between the baseboards, and after that remove the excess mixture and wipe the baguette with a rag.
- When the putty is completely dry, the molding needs to be primed and then painted.
Soon it will be possible to start working on wallpaper.
Advice from professionals
Do not try to completely press the baseboard into the curves of curved walls. It may crack. If it survives, it will be in a very unkempt state. And it will definitely focus on the geometry of the surface.
You cannot fix a baguette to a suspended ceiling, since it may not withstand the composition of the glue - you only need to glue the baguette to the wall.
If, when joining the plinth, there is insufficient adherence of the elements or because of the curve of the wall one protrudes above the other, pin them together with safety pins or a construction stapler. After drying, the “clips” are easy to remove.
When wallpapering, slightly overlap the top cut of the wallpaper onto the baguette. When the glue dries, the excess can be easily cut off with a segmental knife under a metal ruler. And the top will have a perfect, neat look.
That's all the secrets on how to glue baguettes onto uneven walls and make this defect invisible. And remember that the result is influenced not only by the quality of the work, but also by the quality of the plinth. Visit our catalog and choose a baguette that will adequately decorate your walls.
Uneven ceiling: how to glue the baseboard
The market offers skirting boards made from different materials.
Namely:
- Polyurethane is the highest quality and most durable, because its base is rubber, which adds flexibility and allows you to create interesting transitions and curves.
- Polystyrene is a solid analogue of foam plastic, has a smooth, matte surface, and is used in most cases for borders. A big plus is its non-flammability, so to a certain extent it is safe.
- Wood is the most expensive exclusive type of room decoration.
- Gypsum - this material is used in those rooms where the design requires stucco. With the help of special forms, you can achieve any intricate patterns or shapes. The downside is its fragility and high price category.
- PVC - polyvinyl chloride has a wide variety of colors and decors; it can be matched to both wood and stone. Also, this material is presented in a wide range of colors, and proper installation will make it almost invisible on the wall.
The length of these materials ranges from 1.3 to 2 meters, and for the convenience of customers, ready-made corners are also offered so that there is no need to trim and level the product. Often, rooms do not always have perfectly smooth walls and ceilings, so skirting boards can come off if not done carefully. To avoid this, it is necessary to use plaster tape, which allows you to tightly attach the plinth to the ceiling. After you have managed to install the ceiling plinth, you need to treat the cracks with transparent sealant and cut off the excess areas. A skeleton pistol, which is sold in almost any building materials store, will help make the task easier.
The sealant must be applied to the crack, and then rubbed along it with a wet finger, pressing slightly.
Types and features of baguettes
Ceiling plinths (frieze, fillets, baguette) are used for interior decoration of houses and apartments. At the same time, it goes well with various types of wallpaper, ceiling tiles and regular painting.
Tip: When decorating a room in a high-tech style, you should not use a frieze.
When purchasing a baguette, you need to take into account the height of the ceiling and the size of the room. The larger they are, the larger the baseboard should be.
By installing a baguette you can:
- Hide defects that occur when puttingty or wallpapering between the ceiling and the wall;
- Hide uneven wallpaper trim;
- Decorate the room;
- Emphasize its outline;
- Give the finish a finished look.
A fairly diverse assortment of these products, when the homeowner decides to use them in decoration, allows him to choose the best option for the interior. The fillets differ in size, shape and material of manufacture.
Baguettes can be made from different materials, but we will only touch on the most popular options:
- Foam, decorative . Such skirting boards for ceilings are used most often, which is explained by:
- low cost;
- beautiful appearance;
- low weight;
- ease of installation of elements;
- they do not absorb moisture;
- do not rot;
- easy to cut with a regular sharp knife;
Disadvantages include:
- low fire resistance;
- great fragility;
- inaccurate joints due to the graininess of the material.
- Plaster . Such fillets can only be used with smooth walls and ceilings, since the material is not flexible. They allow you to turn a modest room into a real palace. The products are fireproof, but, like all gypsum products, they are quite hygroscopic.
- heavy weight;
- complexity of installation.
- Made from extruded polystyrene foam . It has all the advantages of foam plastic and neater joints, which is associated with the increased density of the material. But its price is slightly higher.
- Made from natural wood . These products are used for rooms designed in a classic style. Due to their rich appearance, as can be seen in the photo below, and high cost, they belong to elite baguettes. They are made from expensive hardwood:
- oak;
- ash;
- mahogany.
The disadvantage of the material is that it absorbs moisture, which can cause deformation and even mold to appear over time.
The most popular are baguettes made of polystyrene foam and modern polystyrene foam.
How to connect a plinth on a ceiling
The methods for joining skirting boards made from different materials are not the same.
Here are the main ones:
- Plastic ones are connected to the ceiling using special strips attached to the ceiling with self-tapping screws. Instead of self-tapping screws, you can use either liquid nails or sealant. Experts advise applying acrylic sealant quickly and with wet hands.
- Before work, it is necessary to treat the surface with a special primer, then the product will adhere well.
- When connecting parts, you should not put too much pressure on them, because the plinth is fragile and can break.
- Other types of skirting boards are joined using putty or special construction adhesive, which can be purchased at the store.
We prepare a preliminary estimate
There are no small details in repairs, so it is necessary to calculate the required amount of ceiling plinth at the planning stage. If the wallpapering is done independently, then the necessary values and measurements will already be on hand, since the perimeter of the room is the required total length of the required material.
When planning, you should take into account the material with a standard length of 2 m, and choose it in the store - in this case, you can avoid a large number of joints, and it will be easier to glue the corners. To be on the safe side, you can buy one additional two-meter piece. It can also be useful if you get an uneven cut or if you have to practice first.
Numbering of skirting boards
How to glue skirting boards to the ceiling
Before gluing the plinth to the ceiling, you need to choose it correctly in the store.
Selection tips:
- It is better to purchase the required amount of material from one batch, since there is often a difference of even half a tone, which can affect the final result of the repair work.
- Before purchasing, you need to measure the perimeter of the room, and if there are niches in it, then they also need to be measured additionally and added to the total amount.
- If you plan to purchase plastic skirting boards, then you must inspect each element, because if you come across a product with a defect or an uneven edge, then even the most experienced specialist will not be able to glue it correctly.
- Designers advise purchasing baguettes pressed from granules, rather than granular ones. They are of higher quality, will last longer, and will also be easier to install.
Gluing and installing plinths on the ceiling can be done using various materials.
Namely:
- Finishing Putty – This can also be used as an adhesive. Experts advise diluting it in a separate container and applying a thin layer both to the baguette and to the wall itself, then press the baguette tightly against the wall for several minutes. This is not difficult to do, you just need to practice a little.
- An even easier and simpler way is to secure the baguette using sealant. The product with the applied product is fixed on the wall for about 30 seconds, then released. Remains of glue must be carefully removed with a rag, and if cracks appear somewhere, they are also treated with sealant. The final stage is painting it. To make it easier to work with glue, it is better to use a special gun, which greatly facilitates the process of applying the product.
- Finishing the ceiling with PVC panels complicates the work a little, because in such a case the installation of plastic skirting boards is required. Before starting work, it is necessary to correctly mark the entire room, and then the specialist installs the mounting strip on which the panels will be held. The tilt angle should be 90 degrees. The plastic plinth also needs to be cut at the desired angle, and then snapped onto the bar. After such procedures, a recess is formed between the baguette and the fasteners; it is convenient to install plastic panels into it. The next step is to attach the baseboard on the remaining sides.
Gluing the baseboard
Repairs in any room require completion and at the final stage, the gluing of ceiling plinth is applied, which matches the style of the room.
Advice: Before use, it is necessary to leave the material in the room being repaired for a day.
Step by step work:
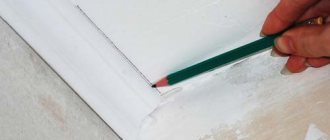
- The baguette is marked. The plinth strips laid out along the wall are marked in places of shortening along the length measured with a tape measure.
- Using a pencil, make a mark on the baseboard attached to the corner of the wall. The outlined angle of the baguette should be 45º.
- Using a mounting knife, the excess part of the material is cut off.
Recommendation: Marking the trim of the plinth is done from the top and bottom to avoid distortion in the cut. If you are unsure of what to do, you can use a miter saw.
- Installation is carried out from the corner of the room. Glue is applied to the back side of the plinth, with grooves.
- A baguette with glue is pressed tightly onto the landing site and held for twenty minutes.
Trick: To free yourself from wasting time, the baseboard is secured with masking tape, and polyurethane corners are supplied with baguettes. When cutting, the specified angle is first performed, and only then the required length.
Methods for attaching skirting boards
Before gluing the ceiling plinth, you need to decide on the method:
- Installation over wallpaper. The advantage is the ability to select molding when you can already see the complete picture of the room, without fear of making a mistake with the design.
- Installation on walls only prepared for wallpapering. The advantage is that there is no chance of spoiling the final finish during the process of attaching the curbs.
Main functions
The main task of the plinth is to hide the gaps between the floor and the wall along the entire perimeter of the room. The presence of such cracks allows you to get rid of the negative effects of swelling and shrinkage of the building material (boards, wooden panels) from which the floor is made. As a result, no bulges form at all on the floor surface, even with a significant change in humidity. When purchasing skirting board products, it is important to consider that the thickness of the strip should be sufficient to cover expansion joints.
Additionally, the plinth performs the following functions:
- Protects walls from dirt, mechanical damage during cleaning and mopping the floor.
- Allows for the distribution of cables in the house due to the presence of a hidden recess on the reverse side.
- Helps to aesthetically decorate a room: it gives the interior an appropriate character and ensures the creation of harmony.
Today it is difficult to imagine any renovated room without a plinth. In order to properly select such an element for the interior, you should find out in more detail what types of planks exist.
Installation of special skirting boards allows for discreet distribution of cables in the house Source td-neko.ru
Preparation for installation work
You can glue the ceiling plinth only after it has been left unpacked for a day. Therefore, after purchasing a baguette, you have at least a day to fully prepare for the installation process.
First of all, you need to purchase all the materials and tools that you may need:
- Glue or putty, depending on the chosen installation method.
- A miter box, a fine-tooth saw and a construction knife will help you carefully make a cut at the junction of two baguettes with the desired outer or inner corner.
- Spatula, rags and sponges to remove excess glue and putty.
- Paint and brushes for painting the border.
If you have little or no experience in gluing ceiling plinths, you need to practice filing corners. Therefore, it is better to purchase an additional baguette and use it to make all kinds of corners that are available in the room.
Ceiling plinths should always be glued to a dry and clean surface, so the place of attachment should be wiped with a cloth to remove dust. If the baguette is attached to a plastic surface, it must be degreased and wiped dry.
How to press?
They begin gluing from the corner in the most visible place of the room . They work like this:
- Immediately after applying the glue, the plinth is applied to the ceiling in the desired position. The main thing is to prevent displacement.
- Press firmly to the surface and hold for about two minutes . Only press down the edges of the baseboard. Applying the mixture and pressing the baseboard
- A little adhesive will come out. It is immediately removed with a spatula.
- The next element is attached in the same way.
Warning ATTENTION! Do not press on the middle of the skirting boards; they may become deformed and will not stick smoothly.
Choosing glue for attaching the baguette
If you are going to glue the ceiling plinth before finishing, it is better to use finishing putty or drywall gluing solution.
If installation will be done on top of wallpaper, special glue is required. Here the choice becomes between 2 types: acrylic and polymer. Water-based adhesive (acrylic) is used in children's rooms, bedrooms, living rooms and other rooms where safety and the absence of a pronounced odor are important. Polymer adhesives, such as Moment and Titan, are recommended for use in rooms with high humidity.
How to glue a plinth to a radius or bend?
If the interior of the room is decorated with half-columns, convex or concave plasterboard structures or a bay window, the process of gluing the ceiling plinth is somewhat more complicated.
You can get out of this situation by using special polyurethane skirting boards, which contain rubber, which ensures their high flexibility.
If this is not possible, then you can bend the plinth in one of the following ways:
- The simplest is to make frequent cuts on the back side of the fillet, and then, without using force, try to bend the element into an arc with the required radius. If the bend is insufficient, you can reduce the distance between the cuts. Accordingly, the larger the radius, the greater the distance between the cuts and vice versa;
- In the case when the radius is very small and the plinth no longer bends, it is cut into small pieces. The desired arc is formed from them, gluing them one by one and cutting them in the form of a wedge. Keep in mind that such an adjustment requires meticulousness and can be complicated by the presence of embossing and patterns on the surface of the baguette. Therefore, if there are such problem areas in your room, choose a simpler fillet design in advance
- If the bending radius is small, you can try to bend the baseboard by heating it with hair dryer . If you don’t have a hairdryer, you can dip the plinth in hot water for a few minutes, bend it, and then cool it sharply in cold water to fix the shape;
- On the back side of the fillet there are stiffening ribs, by cutting which you can easily bend it into an arc. To add strength, a strip of tape can be glued to the back side where there are no ribs.
Installation of skirting boards before finishing
- The process of installing the molding must begin by sawing down the edges at the desired angle. To avoid confusion, prepared baguettes can be laid out near the perimeter walls in those places where they will be attached to the ceiling. The joints of the plinth on a straight wall are adjusted in place so that there are no large gaps. Therefore, there is no need to immediately cut them to size.
- To make the corners perfect, it is better to adjust them without adhesive. We take two baguettes, sawed at the desired degree and join them in the corner. If the gap is large, we adjust the joint by cutting off the excess with a knife. If the quality of the joint is satisfactory, take a pencil and outline where the molding fits against the wall and ceiling.
- After all corner joints are prepared, it is necessary to dilute the mixture. There are 2 possible ways to prepare it:
- Mix the finishing putty with water until a homogeneous soft mass is formed, the excess of which will be squeezed out from under the baseboard. It is important that the mixture is like thick sour cream, but does not flow;
- Add putty and PVA glue to the water (proportion 1:1:1) and mix until a homogeneous mass is formed and leave for 2-3 minutes. The adhesive mixture is ready, you can start working.
- We glue the ceiling plinth starting from the corners. To do this, apply the putty evenly on both working surfaces and install the baguette along the previously drawn lines, pressing it along its entire length. Remove excess putty with a spatula, immediately rubbing the joints and wiping them with a damp cloth. The only case when it is necessary to apply glue or finishing putty to one surface is a suspended ceiling (nothing can be glued to it).
- In the same way, we will glue the baguette on the other side of the corner and putty the junctions with the walls and other molding.
- When all the corners are ready, we proceed to the straight sections. We measure the required size by placing the plinth between two already glued ones, cut it off and fasten it in a well-known way.
- After the putty has dried, prime the molding and paint it.
How to make a corner without using a miter box
How to join the ceiling plinth in the corners? It is possible to ensure an accurate fit using a device for cutting plinth strips at an angle of 45° only if the wall junction is strictly rectangular.
Otherwise, you will have to abandon the use of the miter box and make markings using a simple pencil and ruler. In this case, the marking procedure for internal and external corners is different.
Internal corner
Here, in the case of adjusting ceiling slats in places with a large deviation from 90°, the operations of marking and cutting the slats are performed in the following sequence:
- attach the uncut left fillet to the wall;
- draw a line with a pencil along the edge of the plank on the ceiling to the adjacent wall and set it aside;
- install the right bar in the same way, also draw a line, and at the point where the left one joins, put a mark with a pencil;
- Attach the left plinth again and put the corresponding mark on it;
- Place a ruler along the line connecting the marks you made to the bottom corner of the baseboard. This will be the conditional cutting line.
After this, check the accuracy of the markings and, if necessary, make small adjustments using sandpaper.
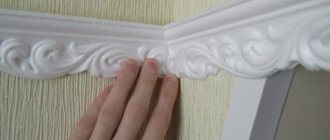
Installation of skirting boards on wallpaper
The algorithm for attaching a baguette to wallpaper is the same as in the previous case. But there are some nuances:
- Glue is also applied to both surfaces of the baguette, but not evenly, but pointwise in increments of 3–4 cm or in a narrow strip. The amount of glue should be such that it holds the glued product well, but does not protrude when pressure is applied to the molding. If it does appear on the wallpaper, you need to immediately wipe it off with a dry sponge or cloth.
- After applying the glue to the baseboard, you need to wait a little time (so that it sets) and then stick it on the walls. If this is not done, you will have to stand for a long time, pressing the molding against the wall and ceiling, which is very inconvenient.
- It is more convenient to paint the baseboard before installing it, this eliminates the risk of paint getting on the wallpaper.
Solution 3. Thick wallpaper
WALLPAPER MIRABELLA ANACAPRI 1 37301
Wallpapers differ in the density of the material from which they are made, which means they have different masking abilities. Single-layer paper wallpaper is the thinnest option, so it is not the best way to eliminate wall defects. For such cases, duplex, consisting of two layers of thick paper, is more suitable. These coatings are inexpensive and easy to use.
The properties of vinyl and non-woven wallpaper are much better. Coatings with a vinyl layer, especially foam and hot stamping, have increased density
- 200-250 g/m2, and for some manufacturers it can reach up to 400 g/m2. They are easy to clean, resistant to damage, but most importantly, they hide uneven walls.
Non-woven wallpaper is heavy and has a significant thickness. This means that they will not only last for many years, but will also save time on preparing walls and sealing small cracks.
How to make a cornice cut by hand using a template
Draw a straight line on a piece of paper. Use a pencil to mark a dot on the workpiece. Mark the 90 and 45 degree angles using a protractor. Draw straight lines through the marks so that they are clearly visible when working with the saw.
The baguette is pressed against one of the parallels at the desired angle and cut with a hacksaw
There is another simple option to trim the cornice “by eye”. You should take part of the product and attach it to the desired corner. During application, carefully observe and mark the location with a pencil.
Trimming the baseboard using the pencil notching method
Let's sum it up
Gluing ceiling plinths is not as simple as it seems at first glance. However, if you properly prepare the surface, apply putty or glue, cut corners and make joints, the decor will look great and stick firmly.
Sources
- https://zen.yandex.ru/media/teremok/kak-pravilno-delat-ugol-na-potolochnom-plintuse-5c38a511ef136b00a923b756
- https://ZnatokPotolka.ru/plintus-i-karniz/kak-kleit-v-uglah.html
- https://m-stone.ru/stroitelstvo/potolok/kak-sdelat-ugol-potolochnogo-plintusa-vneshniy-vnutrenniy/
- https://sdelalremont.ru/kak-kleit-potolochnyj-plintus-rezat-ugly-galtelya-pravilno.html
- https://relend.ru/kak-kleit-potolochnyj-plintus-sdelat-ugol-baget.html
- https://remstroiblog.ru/karina_vajlo/2019/11/01/8-sovetov-po-poklejke-potolochnogo-plintusa-ili-galteli/
- https://potolokjournal.ru/plintus/kak-skleit-i-sostykovat-v-uglah.html
- https://comfort-da.ru/kak-kleit-potolochnyi-plintus/
[collapse]
Similar posts:
- How to properly glue ceiling plinths: types and…
- How to work with an angle grinder correctly: step-by-step instructions
- How to cut a plastic window sill evenly
- How to cut PVC panels?
- Greenhouse made of polypropylene pipes: drawings and diagrams,…
- How to stick photo wallpaper on a wall with wallpaper: materials,…