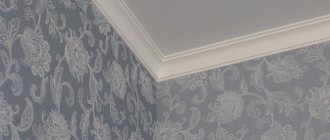
After installing a stretch ceiling, a gap cannot be avoided between it and the wall. Technically there is nothing wrong with this, and it does not in any way affect the operation of finishing products. The catch here is rather in aesthetics. It is easy to disguise this defect using plinths for suspended ceilings. Below we will look at how to properly glue the ceiling plinth.
The baguette for suspended ceilings is attached only to the wall adjacent to the ceiling.
This is due to the fact that:
- The tension material consists of an elastic, dense membrane. It sags under the weight of decorative fittings.
- The adhesive may deform or melt this film.
- The fabric that makes up a suspended ceiling is not static; it can bend and change shape.
Dimensions
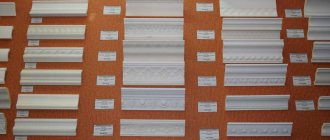
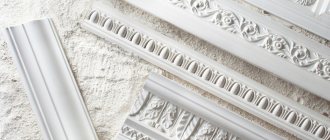
Skirting boards come in different sizes and differ in length, width and surface type.
Usually they are selected to match the overall style and interior of the room. Sometimes the choice of plinth depends on the size of the joint that has formed between the ceiling and the wall. Also, the choice of ceiling fillets depends on their purpose. If they should play an exclusively decorative role in the room, the walls are smooth, like the joint line, there is no need to hide any defects, then the plinth can be replaced with molding. Otherwise, use elements whose side attached to the wall is wide enough. This way you can hide small repair errors and joints.
In terms of length, it is better to choose options that, during installation, will create as few joints as possible and a minimum of scraps. Therefore, in order not to make a mistake with its length, before purchasing skirting boards you need to know the exact dimensions of all walls. If the installation of such elements is carried out independently and for the first time, then it is better to buy a plinth with a reserve, this will avoid the need to run to the store for additional material.
Some people have difficulty cutting corners during the installation process. Therefore, to simplify the work, manufacturers offer to use ready-made corners, which only need to be glued between the straight lines of the baseboards.
Advantages and disadvantages of masking tape
The main advantage of such inserts is that they are removable and can be easily dismantled when performing indoor renovations and replacing wallpaper. And after the work is completed, they are put in place. You can install such a plug yourself. They are sold in rolls by the meter. Therefore, having measured the desired size, you can easily install it. In this case, you do not have to use sealants and putties. It is convenient to work with such tapes at curved junctions and uneven walls. As shown in the video, they are easy to bend due to the softness and elasticity of the material. These products give the room a finished look.
How to install a ceiling plinth on a suspended ceiling
It is worth noting that gluing skirting boards to the ceiling is not easy, but it is possible, both with your own hands and without the help of a specialist.
The sticker of the baseboard must be carried out strictly according to the technology in order to exclude:
- Formation of material distortions;
- Uneven edges and joints;
- Presence of flaws after installation.
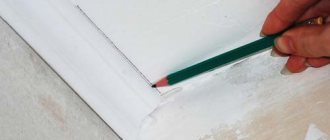
After replacing the ceiling covering, it is necessary to make markings along which the material will be applied. To do this, use a pencil or cord. If you first fix the wallpaper on the wall, and the baseboard is not light in weight, then when marking the position of the product, you need to make small cuts. To be more precise, the wallpaper will be removed above the cut.
There is a special insert in the internal and external corners. To independently make such a design, use a miter box, a special device with different levels of inclination. The plinth must be secured by spreading glue only along the end part, which will be applied to the wall surface. The opening between the ceiling and the product being installed should be as minimal as possible. If necessary, you can increase the opening to 2 cm, provided that lighting or other lighting devices will subsequently be installed there.
Installation must be carried out extremely carefully, since it is theoretically possible to insert and remove the baseboard, but this can cause glue drips to form on the wall, which will spoil the appearance of not only the canvases, but the entire room. The products are installed sequentially around the room.
If the walls have unevenness, then in addition to pressing, you need to apply pressure, but so as not to push through the baseboard, and also wait time for the two coatings to bond together. It is not uncommon to place masking tape on top of the baseboard in order to secure it to the wall as tightly as possible. It must be removed immediately after complete drying. Masking tape is unique in that it does not leave marks, even the smallest ones, which means the work will not be ruined.
How to calculate the required quantity
What quantity of plinth is best to purchase for suspended ceilings so that it is enough for all the finishing work? There is a simple formula for how to calculate correctly: to do this, you need to measure the perimeter of the room, and to these dimensions add the length of one large baseboard strip. For what? This is necessary to adjust the joints, and you may also need an additional insert in the corner of the room.
If the walls in the room are smooth and have right angles, then you can buy corner inserts - many manufacturers offer this type of finishing.
A pre-glued plinth corner will help save time spent on finishing work.
How to install before finishing is complete
The algorithm for installing the plinth before finishing is completed differs significantly from the usual one, and among the key points are:
- preparing glue and putty;
- moisturizing the working surface;
- preparing a working solution based on putty;
- fillet sticker.
Preparing glue and putty
The choice of gluing before finishing involves two implementation methods:
- using glue;
- using putty.
The use of glue is implemented in the same way as the previous option, but you will need to tinker with the putty. It is necessary to achieve a solution that is slightly thicker than when treating walls.
Surface moistening
After the baseboard is adjusted and ready for gluing, the surface of the wall is wetted for better adhesion of the putty. In addition to the wall, do not forget to wet the inside surface of the baseboard itself.
Preparation of a working solution based on putty
Algorithm of actions necessary to prepare a working solution for working with ceiling plinths:
- Take a mixing container.
- Fill it with water.
- We gradually add the dry mixture to it until the solution reaches the consistency necessary for the work.
- Mix the mixture with a construction mixer for 2-3 minutes.
If the solution is made manually, first pour in the mixture, then pour in water.
How to glue fillets
When gluing the baseboard, you need to press it firmly against the wall so that part of the applied solution is squeezed out through the bottom, thereby filling the unevenness in the wall. Excess solution is subsequently removed using a regular spatula and a clean rag.
Choosing decorative masking tape
The manufacturer of the tension fabric provides a complete list of components intended for installation. It remains to decide on some key points.
Each type of baguette is combined only with certain masking tapes. There are products that are used for harpoon baguettes or other, for example, bead or wedge fastening systems for webs. When choosing a ribbon, make sure that it is the same width as the baguette.
Features of choosing the section of masking tape:
- T- and F-shaped tapes are used on well-prepared surfaces or in curved structures.
- S-shaped - used for uneven surfaces, or if the wall has a finish with a large relief: decorative plaster or wallpaper with an embossed pattern or design.
- The L-shaped wall corner forms a cap similar to the ceiling plinth.
Types of plugs for stretch ceilings in different colors
When ordering a certain type of masking tape, the manufacturer provides a wide range of material colors. Pay attention to how the profile is painted. The best option is a product painted in the mass. It will serve you for a long time. Please take into account the fact that white and black colors are presented in several versions, differing in the perception of shade.
Features of fastening plinths to suspended ceilings
Installing a plinth on a suspended ceiling always begins with preliminary measurements and preparation of fillets (pieces of plinth). Remember that it is best to use fillets of medium length so that they are easy to attach and so that there is no need to glue small pieces.
If, when installing a plinth on a regular ceiling, it is painted at the finishing stage, then in the case of a stretch ceiling it is better to do this in advance. The condition is optional, but this way you definitely won’t stain the new ceiling.
The main feature of installing the plinth in our case is the method of fastening. The fillets are only glued to the wall. It is impossible to glue fillets to a suspended ceiling for a number of reasons:
- it is not tough enough;
- during operation, the ceiling may stretch;
- If you need to dismantle the plinth, you will damage the covering of the stretch ceiling.
We also note that it is not advisable to glue the baseboard to the wallpaper; they may simply not withstand it. That is, the baseboard is attached to the suspended ceiling before you glue the wallpaper.
Also, before starting installation, it is recommended to make markings using a tapping cord for a more even installation of the plinth.
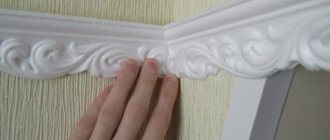
Otherwise, the installation technology is standard. Install the plinth starting from the corner. Let us remind you that special corner elements can be used for the corners of rooms. If you couldn’t find the baseboards that match the design, then you can cut the fillets at an angle of 45 degrees and simply join them.
You can install the plinth using either glue or putty. To protect the stretch ceiling, you can cover it with polyethylene, which is then very easy to remove. Glue or putty is applied only to that part of the fillet that will be pressed against the wall. Parts of the plinth should be brought as close as possible to the ceiling so that the gap is small, but not pressed tightly. The joints between the fillets also need to be coated with glue or putty for better fastening of the entire structure.
If the installation of the plinth was carried out using putty, all joints and gaps are immediately rubbed with it. If glue was used, the gaps can be eliminated using sealant or finishing putty. After complete drying, the baseboard needs to be touched up in places that were puttied.
When the plinth is completely ready, it is necessary to remove the polyethylene from the stretch ceiling.
Expert advice
- To calculate how many finishing strips you will need, add 40–60 cm to the length of the perimeter of the room. Divide the resulting value by the length of the fillet.
- If wallpaper is already pasted around the perimeter of the installation of decorative parts, you should remove it. Otherwise, under the weight of finishing materials, they may become deformed and cannot withstand the weight of the slats.
- If there is a gap between the wall and the decorative strips, fill it with sealant and a spatula.
- Installation of finishing fittings is best done last, after other work is completed.
- To evenly press the baseboard against the wall, it is better to do it together.
- When joining two parts of the cornice, do not forget to coat their end with the mounting mixture.
Preparation of tools and calculation of materials
To work you will need the following tools:
- A stepladder or a strong, stable table.
- Tape measure and pencil.
- Chop cord.
- A stationery knife and a miter box for trimming baseboards in corners.
- A dosing gun or a small metal spatula, depending on the glue used.
- A thin plastic or rubber spatula for puttying joints and removing excess mixture.
- Medium hard brush for painting.
Materials you will need:
- Adhesive for foam plastic.
- Finishing putty or sealant for filling cracks and eliminating joints before painting.
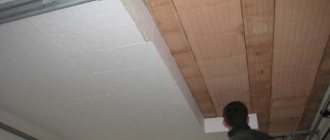
- Plastic film so as not to stain the stretch ceiling.
- A napkin for removing excess glue.
To correctly calculate the required number of baguettes, you need to measure the length and width of the room and calculate the perimeter using the formula: P=2*(a+b). Then for each corner add 15-20 cm, find the sum of the values and divide by the standard length of the plinth (2 m). The result should be rounded up and one or two details added in case of possible damage. If the layout of the room has a complex configuration, the area is divided into separate segments and then summed up.
An example of calculating the required number of baguettes for a rectangular room measuring 6x3 meters with four corners:
- Perimeter: 2*(6+3)=18 m.
- For corners: 4*0.2=0.8 m.
- Total length: 18+0.8=18.8 m.
- Number of stripes: 18.8:2=9.4 pcs. The resulting result is rounded to 10.
Thus, you should purchase 11-12 skirting boards, of which 1-2 are for unforeseen circumstances.
Types of skirting boards used
All commercially available and homemade ceiling plinths for suspended ceilings can be classified according to:
- type of material;
- structure and cross-section;
- fastening technologies.
Accordingly, the choice of plinth for finishing a stretch ceiling will be based on these three indicators. We will separately note the pros and cons of the materials, and we will touch on other indicators in one way or another as we present the material.
Ceiling plinth material
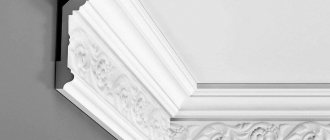
In building materials stores you can see ceiling moldings made from materials such as:
- gypsum and building mixtures based on it (a wide variety of exquisite forms, durable, but heavy and expensive);
- polyvinyl chloride (inexpensive, moisture-resistant, can be glued to wallpaper, but turns yellow over time and accumulates dust);
- wood (durable, but expensive and heavy);
- polystyrene (cheap, elastic, but easily damaged and dissolved by some types of glue);
- polystyrene foam (light, cheap, can be painted, but not elastic and melts with solvents);
- polyurethane (durable, flexible, but expensive and heavy).
As a homemade alternative to store-bought options, consider homemade braided cord and baseboard made from rubber tape, which is often used as a sealant or gasket.
Cord.
Stub.
Preparatory stage
- Make accurate measurements, buy the required number of fillets of standard length (it is better to buy not long products - no more than 1.3÷1.5 m.).
- Before installation work, you need to prepare the wall surface for attaching the plinth. For reliable, durable fastening, the surface must be clean, degreased, without traces of paint or putty.
- Make markings with a tapping cord or draw the bottom line with a pencil. This stage is needed to attach the decoration element evenly, without displacement.
- Prepare elements for installation, paint them in the desired color (preferably before installation, but possible after installation).
Tools that will be useful during installation
You need to prepare in advance:
- Simple pencil;
- Yardstick;
- Cord for marking the required length;
- Knife, hacksaw;
- Putty knife;
- Angle ruler or miter box;
- Suitable adhesive composition (putty);
- A small amount of sealant;
- Table with a flat surface;
- Ladder.
To avoid such troubles as, for example, dissolution of products, penetration of glue onto the outer surface of the skirting boards, leaving yellow marks on it, etc., the skirting boards must be glued with adhesive (putty) suitable for such work.
Tools required for work Procedure for using a miter box Trimming, preparing parts for installation
Decoration of corners
Self-finishing of corner joints of skirting boards is carried out as follows:
- You need to take two skirting boards adjacent in texture and mark with a pencil the area where the joint will be located.
- Using a miter box, the edge of one of the plinths is cut at 45 degrees at a short distance from the intended point.
- Then all the other skirting boards are cut in pairs. When cutting, you must remember that the corners of the parts must ultimately align.
Problems may arise with skirting boards that have a complex pattern, so you need to buy them with a small margin for trimming. If the installation of the plinth is planned not near the wall, but at a strictly defined height, then each individual part must be cut individually, taking into account the characteristics of the place of its installation.
Gluing plastic skirting boards
To secure plastic products, it is convenient to use putty or liquid nails. The surface is pre-cleaned. To attach a plinth to a suspended ceiling, you need to perform the following steps:
- Mark around the perimeter of the room where the bottom edge of the baseboard will be located.
- Cover the canvas with polyethylene to prevent dust and dirt from getting in.
- Starting from the corner, glue the first part.
- Take the second plinth and lubricate it with adhesive. The side of the glued part is also coated.
- If the distance to the corner is less than 7 cm, the part is trimmed.
The final stage is lighting installation. This is a responsible job for which it is better to invite a master. Creating decorative lighting comes down to placing LED elements behind the baseboard. In combination with the glossy surface of the ceiling, such lighting looks amazing.
These are the main nuances of working with ceiling skirting boards
It is important to remember that when choosing, you should take into account the appearance, quality and weight of the fillets. The adhesive must match the selected material
During operation, it is necessary to protect the tension fabric from contamination. To avoid cutting corners, you can buy ready-made elements. Proper execution of the work is a guarantee that the products will be fixed beautifully and reliably, and in the future, if necessary, they can be easily removed to attach new ones.
The choice of glue depending on the material for making baguettes
Before choosing which glue to use to glue the ceiling plinth, you need to decide on the material of the fillets themselves. Based on this, a suitable composition is purchased.
The adhesive for ceiling skirting boards must meet the requirements imposed by the material from which the baguettes are made:
- high practicality at an affordable price determines the choice for decorating the ceilings of domestic premises with fillets made of foam plastic or polystyrene. It should be noted that with proper care, such skirting boards are not much different from gypsum products. Professionals recommend gluing foam moldings with acrylic putty. This mixture guarantees the safety of the material. Liquid nails, along with assembly adhesives, due to the presence of solvents of varying aggressiveness in their composition, can cause harm to fragile products. Baguettes can melt under the influence of chemicals, ruining the appearance of the ceiling. The exception is special products, the packaging of which indicates the permissibility of use for foam and polystyrene products;
- The plastic baguette glued with acrylic putty adheres impeccably. A polyurethane baseboard in a room with pre-prepared wallpaper requires fixation with special compounds. Construction stores provide consumers with a wide selection of similar products intended for plastic. When choosing adhesive for skirting boards, carefully read the recommendations on the packaging, which indicate the possibility of use for a particular material;
- gypsum ceiling molding is fixed to the surface with a special composition, represented by a mixture of PVA glue and alabaster. For particularly massive fillets, additional fixation with self-tapping screws may be required. Long bolts are screwed into the product for reliable installation, and after the adhesive mixture has completely hardened, they are removed. The holes are masked with alabaster;
- For wooden skirting boards, it is recommended to use liquid nails, if necessary, supplemented with fixing the product with self-tapping screws.
Installation of baseboards with acrylic putty
Separately, it should be noted that there are no strict rules for choosing means of securing baguettes. When determining what to glue the ceiling plinth to, they are guided only by general recommendations, supported by many years of experience of professional builders.
How to install a ceiling plinth on a suspended ceiling with your own hands
In order for the ceiling decoration to be completely finished, it is necessary not only to choose a ceiling plinth that suits the design, but also to know the main points of its installation.
Tools for installing ceiling plinths on a suspended ceiling
To glue fillets you will need a certain set of tools and auxiliary materials:
- a miter box designed for adjusting corners;
- construction knife, hacksaw;
- roulette;
- ruler;
- a square with a right angle and an angle of 45 degrees, a protractor;
- for marking, a simple pencil;
- several types of spatulas (rubber, narrow metal);
- a construction gun for applying glue to fillets;
- container for preparing a working solution based on putty;
- finishing putty;
- white acrylic sealant;
- assembly adhesive composition;
- water-based paint.
When all this is ready, you can begin the process.
How to glue skirting boards to a suspended ceiling: instructions
Ceiling plinth can be installed on glued walls, plastered or painted surfaces. If the wall has unevenness, then it should be prepared as much as possible: cleaned, treated with a primer, leveled with plaster and primed again. Installation work should be carried out only after the soil on the wall has completely dried.
Instructions for installing plinths on a suspended ceiling:
- Using a construction gun, apply adhesive to the back side of the ceiling plinth.
- For better adhesion of the fillet to the wall, you need to let it lie for a few minutes, and only then apply it and press it to the intended surface. To avoid marks, it is recommended to press the element against the wall using a clean cloth.
- Excess adhesive should be removed immediately. Once they dry out, you won't be able to remove them.
- At the very end, all gaps must be treated with acrylic sealant or putty. For smoothness, the sealant can be smoothed with a finger dipped in water. For such work it is recommended to use rubber gloves.
- To fill gaps at joints, putty and a narrow spatula are used.
A video on how to insert a plinth into a suspended ceiling is presented here.
The adhesive composition should be purchased in strict accordance with the specific type of ceiling plinth. For decorating small spaces, the best solution in terms of choosing fillets would be narrow and simple models. But for finishing a stretch ceiling in spacious rooms, a wide plinth with a complex pattern will look more impressive.
If you want to highlight the suspended ceiling, then you can play with contrast, where the fillets will have a completely different color in contrast to the canvas. When installing, you should know that you need to leave a gap of 3-5 mm from the stretch ceiling. To avoid spoiling the appearance with excess glue, it should be wiped off immediately with a clean cloth. Anyone can install a ceiling plinth on a suspended ceiling, the main thing is not to neglect the rules for its installation.
Questions and answers
Is it possible to use Moment glue or similar ones?
Theoretically it is possible, but this will create a number of problems. First, quick-drying compounds contain a solvent. It can literally “eat a hole” in a foam or polystyrene baseboard. And secondly, after such installation it is impossible to remove the baguette, keeping it safe and sound. And in general it’s difficult to film; Often in the process, wallpaper and even suspended ceilings suffer.
It was said above that the plinth is not glued directly to the ceiling. What to do if a gap forms between the ceiling and the molding?
To ensure that there are no gaps left, you need to ensure that when gluing the skirting boards, placing the baguettes close to the ceiling. Once the work has already been done, it is very difficult to correct such flaws; in most cases you have to remove the baguettes and re-glue them.
Why can't you paint the baseboards first and then fix them to the wall?
If at the time of installation you know the color of the paint with which the walls will be painted, or the shade of the wallpaper, you can paint the baguettes before starting work. But it often happens that the skirting boards are glued at the very beginning of the renovation, when the apartment owners are looking for the best options and, accordingly, cannot decide on the color of the moldings.
Which glue to choose so as not to make a mistake?
Acrylic putty or acrylic mounting adhesive. Both compositions do not emit harmful substances into the air, are easy to apply, harden quickly, and can be easily removed from surfaces using a clean and damp rag or sponge. However, they are only suitable for rooms with normal humidity. For kitchens and bathrooms it is worth using neopropylene “liquid nails”.
If you carefully read the information given above, you will probably be able to attach the skirting boards under the suspended ceiling with your own hands. Well, if you still doubt your abilities, first practice on a frame made of plywood or boards - it will act as walls and ceiling.
Installation methods
There are two main options for installing fillets. The first assumes that the walls are first covered, then the suspended ceiling is installed, and then the plinth is attached. This is a convenient and least time-consuming method.
The second approach is based on the fact that you should first stretch the ceiling, then glue the baseboard. Lastly, the walls are finished. The method is not without its drawbacks. Firstly, while working with the wall, you can damage the canvas. Secondly, when installing the ceiling, all the shortcomings of the wall will appear, since its finishing cladding has not yet been completed. It is up to the homeowners to decide which sticker method to choose. Sometimes it is not possible to finish the wall cladding before installing the ceilings, so you have to adhere to a non-standard sequence.
Peculiarities
To be more precise, the plinth is glued not to the ceiling itself, but to the adjacent wall.
This is done for a number of reasons:
- The ceiling itself is a thin synthetic film and there is a possibility of mechanical and chemical damage.
- The stretch ceiling is not fixed so rigidly that the entire structure is securely fixed.
- When the glue dries, it decreases in volume, which will lead to the film web shrinking and causing distortions.
In addition, the contactless method of installing a ceiling plinth to a stretch ceiling is quite practical. You can re-paste the wallpaper as many times as you like, change the baseboard, the ceiling will remain the same for a long time. That is, if the plinth is glued directly to the suspended ceiling, then it cannot be peeled back, but at the same time it can be peeled off from the wall many times.
It is worth noting that peeling off the baseboard from the wallpaper is a rather complicated procedure. Therefore, it is recommended to first glue the baseboard, and then the wallpaper. It is also recommended that before starting work, markings using a beating rope. This will ensure a smooth installation.
How to glue foam ceiling skirting boards
To glue foam baguettes to a suspended ceiling, you can use the following means:
- Liquid nails - from this line, universal glue Moment or specialized for polystyrene foam - INSTALLATION express decor - is suitable. This is a waterproof, white composition, intended for decorative friezes, safe for humans and will not damage the foam. To work you will need a dosing gun.
- Polymer glue - Eco-naset, Titan, Master, Elitance. A special product for gluing expanded polystyrene products. It is a transparent, water-based composition. It is cheaper, but the setting time is longer; you have to press the baguettes against the wall for 5-10 seconds. The work process is lengthened.
- PVA glue is safe and can be easily removed with a damp cloth. The disadvantages include high consumption and long setting time - about 3 minutes.
- Acrylic putty - Uniprof, MasterTeks HM. Waterproof, solvent-free adhesive based on acrylic dispersion. Suitable for any decorative items made of polystyrene and polyurethane. It has a high drying speed.
You can make the composition for gluing baguettes yourself. To do this, you need to mix finishing putty and PVA glue in a ratio of 4 to 1, gradually adding water until you get the consistency of sour cream. When the solution becomes homogeneous, let stand for 10 minutes, stir again and start working.
This is interesting: Drywall dowels - features of choice
Decorative cord
Thick ropes are woven from strong threads. They come in plain, close or contrasting colors. Sometimes metallic elements are added - gold, silver, etc.
This filling option looks good with satin, suede or matte fabrics.
Cords are available in different diameters, so you can choose the one that suits you, taking into account the size of the gap. This insert is flexible and is used on straight and rounded areas.
Prices for decorative cord
But the cord also has disadvantages. It collects dust and needs regular cleaning. Installation requires gluing the cord to the wall in the gap area, which makes the finishing procedure more complicated. And if the walls are uneven, it will be noticeable due to incomplete fit.
Methods for installing plinths under a suspended ceiling
How to glue a ceiling plinth to a stretch ceiling? The method of fastening depends on the moment at which it was decided to install it. There are two main options:
- The product is glued directly after all work. The fact is that many people initially line the walls with wallpaper and stretch the ceiling fabric. Accordingly, the baseboards are fixed last. This state of affairs occurs most often.
- Fastening is carried out after the ceiling is installed. This precedes work on the walls. There is one small minus here. It must be taken into account that it becomes very difficult to carry out preparatory work on the walls. Firstly, the canvas can be easily damaged. Secondly, the suspended ceiling follows the configuration of the walls, which means that all irregularities will become even more visible.
Most often, the installation of ceiling plinths is carried out after finishing work on the walls and ceiling, although this is not always justified
Therefore, depending on the situation, the necessary technology is selected.
Finishing installation
Installation of plinths on glued or painted walls occurs according to the following principle:
A reliable adhesive composition is selected for the job. The best option is a transparent or white material
It is important to consider that the substance should not change its color after drying or over time. The setting time is also taken into account; the longer it is, the longer the part will have to be held. The necessary tools are being prepared
For this event you will need: a simple plastic miter box, a good utility knife, a saw, a meter, and rags. It should be taken into account that the work will be performed at height, so it is necessary to provide a reliable stand or stepladder. The plinth begins to be glued from the selected corner. It's the same as gluing baguettes.
To trim the baseboard you need to use a special tool - a miter box.
- Before gluing the product, it is first pressed to the surface to check the correct location. But it is better to make adjustments while working. This will help avoid mistakes.
- To prevent displacement of fragments, preliminary marking is performed. A mark is made on the wallpaper, just above the edge of the baseboard.
- The glue is applied exclusively to the part that will be pressed against the wall. The procedure is as follows: A small amount of the composition is distributed on the wrong side.
- The composition should not be applied to the very edge; you should back off a little to prevent excess from appearing.
- Before starting to glue, wait a while.
- Next, press the part to the selected location.
After applying the adhesive, the baseboard must be pressed tightly to the desired area
If the walls are not perfectly even, this will lead to gaps forming between the baseboard and the wall. To remove them, use masking tape. It is glued to the part and to the wall. That is, the existing defect is eliminated. After complete drying, the tape is removed.
The use of sealant or putty allows you to create a monolithic decorative coating
Thus, the entire area is covered. It should be understood that when removing wallpaper, in this case, damage to decorative elements is possible.
Installation to finishing
How to glue a plinth to a suspended ceiling if the walls are not yet covered with wallpaper? This option allows you to update the decorative finish without changing the installed products.
Mounting is done as follows:
- The parts are being prepared for work. Installation will be carried out using putty.
- The process begins with lightly wetting the surface. This will increase adhesion.
- The required amount of composition is mixed.
- The putty is applied with a spatula to the wrong side, the solution is distributed evenly.
- The part is placed in the specified place. It is pressed and leveled. This allows you to squeeze out excess mixture, which is immediately removed.
- All fragments are mounted. After complete drying, the surface is ready for further finishing.
The video will help you thoroughly understand the intricacies of the process:
Still, when deciding how to properly glue the ceiling plinth to a suspended ceiling, it is better to use a more universal option that allows you to avoid various defects. It consists in the fact that the walls are initially leveled and the ceiling fabric is stretched. Next, the baseboard is glued and the final finishing is performed.
Insert as a decorative element
Having looked at numerous photos of plugs intended for tension structures, it’s simply a sin not to think that these products can be used not only to mask cracks and grooves, but also to introduce a fresh air into the interior of the room.
Thus, an edging for elastic ceilings, running along the perimeter of the room, will create a clear boundary between the wall and the stretched film, emphasizing the beauty and sophistication of each surface.
On a note. A color insert for tensile structures that harmonizes with the canvas will visually expand their area, and the glossy surface will create the illusion of high walls.
A plug that matches the color of the wallpaper will add height to the walls even with a matte surface of the canvas. Small paintings hung on the walls will only enhance the feeling of spaciousness.
The commercially available range of insertion products can satisfy any fancy. Their affordable price will allow you to periodically change the tape, refreshing the interior of the rooms.
How to stick after finishing finishing
Many people competent in the construction industry are still arguing about how best to glue the baseboard - before or after finishing. We will consider both options, and it’s up to you to decide which one to choose.
Note! Unless you are an experienced builder with the proper skills and equipment, try to stick the ceiling plinth on after the finishing is completed. This way you will reduce the risk of incorrectly calculating the location of the fillet fixation, and you will not have to redo the whole job again
Selection of adhesive composition
When choosing an adhesive, it is necessary to take into account the material of the baseboard and the characteristics of the room being repaired.
For those who don’t want to bother buying glue, we advise you to pay attention to the following products:
- Moment;
- liquid Nails;
- Adefix;
Moment
An adhesive that is in great demand among customers due to its versatility and practicality. Advantages:
- Suitable for most building materials used in renovation.
- Reliably fixes the part.
- Dries quickly.
Liquid Nails
The best choice for heavy fillet models that require increased reliability of the adhesive during fixation. The adhesive does not deteriorate when exposed to water, which allows it to be used in rooms with high humidity levels.
Adefix
Acrylic-based adhesive, suitable for working with skirting boards made of:
- polyurethane;
- polystyrene foam;
- extruded polystyrene.
After hardening, the glue does not lose its elasticity, which significantly expands the scope of its application.
Preparing tools
Correct, advance preparation of tools speeds up and simplifies any repair work. To glue the ceiling plinth after finishing, you will need:
- ladder;
- stationery knife;
- ruler or tape measure;
- hand saw;
- tray for cutting profile lumber;
- clean rag;
- pencil.
Performing markup
Marking is carried out using a pencil and tape measure, while noting:
- the lower edge of the ceiling plinth;
- joint places.
Applying glue
The glue is applied to the back side of the fillet, after which it is necessary to give it a few seconds for the substance to begin to set.
Trimming is done using a saw and a tray for cutting profile material. It has standard slots made at different angles, which greatly facilitates the process of marking and cutting.
Polyurethane fillets
Polyurethane is stronger and more flexible than foam. It is not afraid of exposure to various chemicals, so you can choose any glue. Due to its flexibility, polyurethane skirting boards fit perfectly onto curves.
The disadvantage of this material is its significant weight. Such fillets are not recommended for use on wallpaper, which simply cannot support its weight. They are fixed to a regular wall before its final processing. However, after some time, the baseboard can bend under its own weight, causing cracks to form.
Another disadvantage is the high price of polyurethane fillets. It is more than twice the price of foam plastic ones.
Instructions for gluing skirting boards on a suspended ceiling
In order to competently carry out the work, learn how to glue the ceiling plinth to the suspended ceiling with your own hands, while preserving the PVC film, you need to know the features and nuances of this process. It becomes important to choose the correct adhesive base and carry out the sizing itself.
Not all types of skirting boards are suitable for suspended ceilings
We prepare materials and tools
To install the molding, prepare the following:
- step ladder (can be replaced with a stable, reliable table);
- pencil and tape measure;
- tapping (painting) cord for drawing straight marking lines;
- stationery sharp knife;
- miter box - this tool will help you accurately trim the baseboard for corners;
- spatula or gun depending on the type of glue used;
- a spatula (rubberized or made of soft plastic), which is used to remove the remaining mixture and putty the joints;
- brush if additional painting of the baseboards is planned;
- adhesive mass;
- putty or sealant for final decorative work (masking cracks/joints before painting);
- film for protecting PVC sheets.
In order to prevent excess purchased material, it is worth learning the rules for calculating the consumption of skirting boards. To do this, calculate the perimeter of the room using the formula P = 2x(a + b), where “a” is the length of the room, and “b” is its width. Add 15–20 cm to the resulting number (for each corner). We divide the resulting amount by the length of the plinth (in the classic form it is 2 m). We’ll add 2-3 more baguettes to the final result (for emergencies).
Choosing glue
To properly glue baguettes onto a suspended ceiling, craftsmen recommend using various adhesive modifications. The most common and proven ones include:
To work, you need to choose high-quality glue
You can also prepare adhesive mixture for skirting boards yourself. To do this, mix PVA glue and putty at the rate of 4 parts putty to 1 part glue. Water is carefully added to the mixture with constant stirring. As soon as the substance acquires the consistency of sour cream, leave it for 10–15 minutes, and then begin to work.
Surface preparation
To ensure reliable adhesion and long-term fixation of the working surface, it should be prepared. Preliminary work consists of cleaning the surface and priming. For priming, it is better to use a primer or an aqueous solution of latex at a rate of 1x5, where 5 parts are latex. All subsequent gluing work is carried out only after the primed surface has completely dried. When working, it is worth considering the following nuances:
- It is better to glue the wallpaper after installing the moldings to improve their adhesion to the walls and ease of subsequent dismantling of the wallpaper itself;
- if you already have wallpaper, then use lightweight foam baguettes to mask the gaps between the walls and PVC film;
- work especially delicately, try not to stain the suspended ceiling with the adhesive base;
- excess adhesive mass is removed immediately with a soft cloth or paper napkins;
- if painting the baguette is planned, then the initial layer of paint is applied before installing the structure.
Marking and working with glue
The prepared material is applied in such a way that the surface edge of the element is flush against the ceiling. Fix the bottom edge of the baguettes in the corners of the room with a basting. To mark, you can use a small piece of plinth 20–25 cm in size. After that, all the indicated marks are connected with taping tape and marks are marked along the perimeter of the entire room.
The sticker process itself begins from the corners of the rooms. The adhesive mass is applied to the baguette in an even layer and distributed evenly over the entire back side. Then the baseboard is pressed firmly against the wall along its length. The adhesive residues are removed. The rest of the elements are glued in the same way.
How to join moldings at corners
Corner joints are made at an angle of 45⁰. For precise and even cutting of baguettes, a miter box is used. And the baguettes themselves are quickly cut with a knife. It is better not to use a hacksaw - the foam will crumble and form crooked burrs. When corner joining a baguette, the adhesive mass is also applied to the area of the fastening joints.
Which skirting board is suitable
Various skirting boards are used to decorate joints. When considering the question of how to glue fillets onto a suspended ceiling, you should carefully select the glue. And find out about all the suitable varieties. And also study the inherent features of each type.
| Type of border | Peculiarities | pros | Minuses |
| made of foam | the most popular type of skirting boards with various textures | ease and simplicity of installation, a large selection helps to decorate a room of any style, attaches well and lasts a long time, affordable, not afraid of moisture | susceptible to solvents and require a special choice of glue, too brittle, difficult to bend, afraid of sunlight (turn yellow), low heat resistance |
| polyurethane | can be smooth or have a voluminous, embossed surface | look beautiful and aesthetically pleasing, easy to care for and paste, easy to paint with acrylic dyes, durable and reliable, flexible and resistant to high temperatures | heavy and quite expensive, it requires the use of specialized glue; during installation, additional reinforcement with screws is required due to the weight of the fillets |
| made of plastic | the design has a groove-lock and is used for “harpoon” installation | easy and quick installation, no finishing required, high moisture resistance, easy maintenance, durability and reliability | poor choice - manufacturers only offer white fillets; preliminary leveling of the walls is required before installation - plastic skirting does not mask wall irregularities well |
The construction world also offers other baguettes made of gypsum, wooden inserts, and MDF. But the heaviness of such options does not allow their use in the presence of a suspended ceiling. The ideal method is to use foam skirting boards. These are the ones that should be glued to reliably mask the gaps.
Production of “standards”
Whatever type of plinth is chosen, you need to buy 1 - 2 strips of foam fillets. This is not burdensome for the wallet, since the cost of 1 m of the cheapest is somewhere around 100 rubles. Moreover, the width of the samples does not play a role in this case. Our task is to prepare 2 pairs of plinth pieces that, when joined, will fit perfectly with their corner cuts. This is where you should practice using purchased foam plastic products. It’s clear why you need exactly 2 pairs. One is as a sample for internal corners, the other is for external corners.
By definition, all of them in the room are equal to 900 (although in practice this is not entirely true). This is what you need to focus on. You don’t have to be a great expert in geometry to understand that each piece of plinth needs to have its edge cut off at an angle of 450, and then they are placed next to each other at the installation site.
Naturally, in some places (and not only in the corners) after fixing the skirting boards, there may be, albeit small, gaps between them. This is due to the fact that there are no absolutely even walls. Therefore, focusing on the same reference pair will not result in a perfect fit. But it's not scary. The joints are perfectly “masked” with white sealant (or acrylic putty). Considering that the baseboards are located at a height, under the ceiling, it will be almost invisible.
Recommendations for implementation
Here are some recommendations to help install products without flaws:
- To prevent gaps in corners and joints from being visible, they are filled with acrylic putty (sealant);
- Markings can be made on the wallpaper, but when working with heavy baseboards, the wallpaper must be cut out so that in the future you don’t have to redo everything;
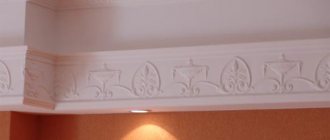
- For additional lighting, leave a gap near the baseboard, into which LED strips of different colors are placed;
Application of LED strip
- For decoration, a facing cord is used, which gives originality to the design and highlights the upper surface of the room;
Decorating with cord
- You should handle the glue carefully so that it does not get on the walls, suspended ceilings, etc.
- If there is no measuring rectangular corner (miter box), it can be made from wooden blocks or by connecting two ordinary rulers;
- The contrasting colors of the stretch ceiling and fillets look the most beautiful and aesthetically pleasing.
Appearance and dimensions of fillets
Fillers are mainly made of polystyrene foam and polyurethane, as well as plastic.
You can find fillets made of fairly heavy materials, such as wood and plaster. But due to the fact that ceiling plinths are not recommended to be glued to the ceiling, it is necessary to use a lighter material. Ceiling skirting boards have different lengths and widths; the surface can be smooth or textured. The appearance must match the style of the finished room.
The length of the fillets is selected such that there will be fewer joints and fewer scraps. Therefore, before purchasing, measure the length of all walls.
It is necessary to buy fillets with a significant margin, because they cannot always be immediately adjusted to the corners. For such cases, many manufacturers offer special corners that can be glued between skirting boards that meet at right angles. This makes the job much easier.