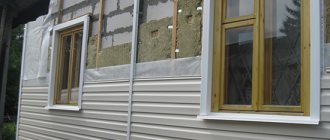
In winter, heating costs make up a significant part of utility bills. And even small investments in thermal insulation can save significant money. If it is impossible to insulate the walls from the outside for one reason or another, then all that remains is to organize thermal insulation from the inside. And it is most convenient to do this simultaneously with covering the walls with plasterboard.
The industry offers various materials for wall insulation. One of the most popular materials for interior decoration is mineral wool. Its advantages:
high thermal insulation characteristics;- low weight;
- moderate cost;
- environmental friendliness;
- durability;
- Fire safety.
Insulating walls with mineral wool from the inside plus plasterboard does not worsen the microclimate of the room, since the material allows air to pass through well. And yet, this insulation has several features that are very important to consider when installing under drywall.
Benefits of penoplex
For internal insulation under gypsum plasterboards, foam plastic, mineral wool or penoplex can be used. Polystyrene foam does not have the best thermal conductivity, and mineral wool is hygroscopic, so penoplex is more preferable for this method of thermal insulation. This is facilitated by its characteristics:
- Light weight of slabs.
- Easy to process and give the desired shape, which greatly facilitates installation. For example, if there is a window or radiator on the wall, then it is not difficult to cut out a piece of foam plastic of the required size to go around them.
- Good moisture and vapor barrier performance.
- Good noise-absorbing properties.
- Strength, durability, safety.
There are few disadvantages:
- The material does not withstand prolonged exposure to the sun. Therefore, you must follow the rules for its storage.
- During operation, it may be damaged by rodents.
- Quite expensive compared to other materials.
Work technology
The entire thermal insulation process can be divided into several stages, each of which is described below..
Preparing the wall and treating it with an antiseptic, antifungal solution (if there is already mold on the surface of the wall, it needs to be washed with special solutions and then dried with a hair dryer).
Creating a frame. The frame can be either metal (galvanized metal profile) or made of wooden beams. It is better to attach drywall to a metal profile. The main thing is that the thickness of the metal profile is identical to the thickness of the insulation. In addition, the distance between the horizontal and vertical slats should be equal to the size of the slab or roll of mineral wool.
Laying mineral wool in the space between the profile slats (it is best to choose slab wool in advance; if you take roll wool, you will have to first cut it into pieces of a suitable size, with a small margin in case of further shrinkage).
Which is better: heated floors or radiators?
Warm floorBatteries
A layer of vapor barrier is laid on top of the mineral wool.
Installation of vapor barrier film
Drywall is attached, after which all joints between the sheets are carefully sealed.
Plasterboard finishing
Thus, insulating a house with mineral wool and plasterboard is a very simple procedure that can be completed simply by following the instructions above.
Mineral wool in combination with plasterboard significantly reduces the noise level, which will significantly make life easier in houses located in close proximity to entertainment spots: bars, restaurants, metro lines.
In addition, the top layer of plasterboard is an ideal base for almost any finishing.
Thermal insulation properties of plasterboard
The use of plasterboard slabs allows you to create high thermal and sound insulation not only due to the pores that form inside it, but also due to the air layer that is located behind the slab. Therefore, for a relatively warm climate, you may not need to use additional insulation. As for the gypsum board itself, the level of thermal insulation is determined by the thermal conductivity coefficient. For example, drywall has a thermal conductivity coefficient of only 0.15, which is significantly lower than reinforced concrete. This allows you to not only create warmth in the winter, but also coolness in the summer.
It is worth noting that the method of installing drywall affects the level of thermal insulation. To achieve greater effect, it is recommended to use a frame version rather than glue
The resulting layer under the frame creates additional insulation of the walls. But, one way or another, to create a warm atmosphere you will need insulation.
Options for insulating brick and wooden houses
Insulation of a house can be done in different ways:
- by filling the air gap of a brick wall with foam chips or polyurethane foam;
- by external cladding of the facade with expanded polystyrene and mineral wool;
- through internal thermal insulation.
Both in stone and wooden private houses, there must be not only internal thermal insulation, but also external, because only together they can ensure reliable and high-quality insulation of the house. Nevertheless, there are cases when it is not possible to provide external thermal insulation, in which case the only option may be internal insulation of the walls with mineral wool covered with plasterboard .
The reasons why developers resort to thermal insulation from the inside of the building may be as follows:
- insufficient distance between individual buildings;
- a ban on changing the external appearance of the facade (if, for example, the house has historical or any other value);
- irreparable defects of the facade;
- the adjoining of the façade walls to non-residential premises of a technical nature (elevators, staircases).
Insulation of an unheated room
Many novice builders are interested in the issue of installing gypsum board in an unheated room. We warn you right away: most professionals are against such installation. The fact is that even moisture-resistant material cannot withstand strong changes in temperature and humidity. If you decide to install plasterboard structures in such a room, but do not want to install additional thermal insulation, it is enough to attach the sheets to a frame made of metal profiles. The air between the structure and the main wall will provide some thermal insulation.
It is possible to insulate an unheated room, such as a loggia or balcony, only under certain conditions. Firstly, it must be glazed. We are not talking about simple wooden frames, but at least double-glazed windows. They provide reliable protection from moisture and cold. In addition to the walls, you will need to insulate the floor and ceiling, which are covered with high-quality moisture-resistant plasterboard.
GCR can be used in loggias that are connected to a living room with a normal microclimate. Think carefully before you start installing drywall in such rooms, because the structure “eats up” at least 6-7 cm of space. Thermal insulation in the loggia is carried out in the same way as in ordinary rooms, but with some features. First, the wall is covered with waterproofing material.
Conclusion
Now you know how to insulate walls from the inside under drywall, and you can handle the work yourself. Additionally, watch the video in this article. If you have any questions, write comments and I will be happy to answer you.
Did you like the article? Subscribe to our Yandex.Zen channel
March 13, 2022
Plasterboard systems, Decorative wall finishing, Walls, Wall insulation
If you want to express gratitude, add a clarification or objection, or ask the author something, add a comment or say thank you!
About mineral wool
Internal wall insulation is less effective than external insulation, but if the latter is impossible due to some circumstances, it is a good alternative.
Insulating walls from the inside with mineral wool plus plasterboard has its advantages and disadvantages, which must be known and taken into account when performing this type of work.
Advantages of mineral wool insulation:
- Material price
- Resistance to temperature changes and various temperature conditions
- High fire safety
- Ease of installation
- Good sound insulation
- Resistance to mechanical and chemical stress
- The material has low thermal conductivity
Insulation with mineral wool can be done with your own hands, at any time of the year, regardless of the weather outside the windows.
The disadvantages of this method of insulation are:
- Mineral wool absorbs moisture, which over time destroys it and leads to rotting
- Along with insulation, it is necessary to carry out a vapor barrier to avoid condensation and the appearance of fungus and mold.
- After some time, mineral wool shrinks
Important: If every centimeter of space in the house is valuable to you, then it is better to insulate the facade, since internal insulation can take up to a whole square meter from the area of the room. Mineral wool has been used in construction for a long time; it is made from natural fibers, is an environmentally friendly material and perfectly retains heat in buildings.
Mineral wool has been used in construction for a long time; it is made from natural fibers, is an environmentally friendly material and perfectly retains heat in buildings.
There are three types of mineral wool depending on the purpose of its use:
Easy
It is used for insulation of frame buildings, has a density of 10-90 kg per cubic meter.
It is used to insulate building facades; its density is 90 kg per cubic meter.
They mainly insulate technical buildings and industrial equipment where the air temperature is high or low.
If you classify mineral wool by composition, it is as follows:
Very common and economically priced. It is made by melting sand or broken glass into a thin fiber, to which binders are added, turning the material yellow.
Glass wool
It is based on the raw materials that are used to make glass; even cullet and glass production waste are used. Dimensions of insulation fibers: length – 14-50 mm, thickness – 4-15 microns. Thermal conductivity – 0.028-0.052 W/m K. Operating temperature from -60 °C to +500 °C.
Slag
The raw material is blast furnace slag. Fiber sizes: length – 15-16 mm, thickness – 4-13 microns. Thermal conductivity – 0.45-0.48 W/m K. Maximum heating temperature up to +300 °C. This species is very hygroscopic.
Experts warn that slag wool should not be used on metal surfaces. The thing is that residual acidity is always present in slags. When interacting with moisture, the acid begins to corrode the metal.
Stone wool
This is the most common type in this category. And when it comes to mineral wool, it means stone wool. Therefore, in what follows we will not distinguish between these two concepts.
So, let's start with the fact that mineral wool is made from different types of stone. Therefore, it has different characteristics in terms of density and thermal conductivity. If the insulation is made of limestone, dolomite, and so on, that is, non-solid rocks, then the thermal conductivity can vary from 0.077 to 0.12 W/m K. If the insulation is made of basalt (diabase or gabbro), then the thermal conductivity of such a material is 0.03 -0.05 W/m K.
At the same time, soft rocks contain many impurities in their structure, which means that the fibers are weakly connected to each other. Therefore, more formaldehyde is added to them during the production process. Such materials can withstand temperatures up to +600 °C. Basalt mineral wool up to +1000 °C. Stone wool today is sold in mats (blocks), in rolls and in loose form.
What you need to know about mineral wool?
Mineral wool for wall insulation can be of three types, it all depends on what source material was used to make the wool.
Based on glass fiber (glass wool)
The raw material for the manufacture of glass wool is glass, but not more than eighty percent. The composition also includes sand, borax, soda and limestone. Fiber thickness is from 5 to 15 microns, length is 15 – 50 mm. Withstands temperature loads from – 60 to +450° C.
Advantages and disadvantages:
- Has increased elasticity. The material can be folded in several layers without it deteriorating;
- Vibration resistance;
- Excellent moisture resistance. This material is practically waterproof;
- The purity of the material and the absence of toxic components, hence minimal harm to the human body;
- Fire resistance. The material is absolutely non-flammable;
- Not susceptible to mold or mildew. Mineral water does not rot;
- Absolutely inedible for rodents (rats, mice);
- Enhanced safety precautions are required when handling the material;
- Some types contain formaldehyde.
Based on slag (slag wool)
The raw material for the production of slag wool is metallurgical slag, which is processed into glassy fibers. It has a fiber thickness from 4 to 12 microns, and a length of 16 mm. Among all types of mineral wool, this type can withstand the lowest temperature - 300° C.
Advantages and disadvantages:
- Has high chemical resistance;
- Simplicity and ease of handling during installation. Cotton wool is produced in rolls;
- Environmentally friendly. The material contains a minimum amount of components harmful to the human body;
- Not resistant to high temperatures. At temperatures above 300° C, the fibers begin to melt and the material loses its performance qualities;
- Hygroscopicity and residual acidity;
- Fiber fragility. The fibers crack and dust from them appears in the air.
Based on stone fiber (stone wool)
The raw material from which this material is produced is rock, namely: gabbro-basalt, metamorphic rocks, marls. The thickness of the fibers almost corresponds to the size of the slag wool fibers.
Stone wool products can withstand very high temperatures, provided the material is not deformed. Wool fibers can withstand temperatures up to 1000° C. Unlike glass and slag wool, stone wool's fibers are not sharp, which makes it easier to handle.
Advantages and disadvantages:
- Has low thermal conductivity. Keeps the house warm;
- Has a very long service life. Shelf life up to forty years;
- The material is not afraid of exposure to mold;
- Has high noise insulation properties;
- Resistant to vibrations;
- Eco-friendly material;
- Has high fire safety;
- Convenient for installation;
- High price;
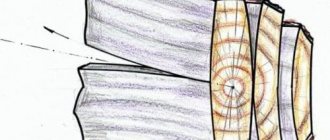
- There may be heat leakage through the seams. To avoid this, it is necessary to connect the wool slabs together as tightly as possible;
- Does not withstand heavy mechanical loads.
Required tools and material
Before starting work, you need to prepare tools and materials so as not to be distracted during the process.
So, you will need:
- polystyrene foam (its thickness will depend on the degree of insulation you need);
- adhesive composition (if you work using the frameless method);
- spatula-comb;
- primer emulsion;
- level;
- rule;
- drill;
- a nozzle called a “mixer”;
- dowels for attaching foam plastic (if insulation is done by screwing);
- self-tapping dowels;
- vapor-proof film;
- plaster mesh;
- hanging plates;
- metal profiles to strengthen the frame or insulate the walls if mineral wool is used.
Costs of raw materials and services
Material costs are determined by the insulation area and depend on the size and cost of the slabs. With a total insulation area of 109.9 m2, a thickness of the slab layer of 0.1 m, the volume of the heat insulator will be 11 m3.
Since most insulation is sold in m3, knowing its cost, you can determine the total cost of purchasing slabs:
- Basalt wool, 1500 rub/m3, total 16500 rub.
- Mineral wool, 1070 rubles/m3, total 11770 rubles.
- TechnoNIKOL basalt wool, 2270 rub./m3, total 24970 rub.
- Glass wool Isover Warm House, 1250 RUR/m3, total 13740 RUR.
- Stone wool Mat Teploroll, 1280 RUR/m3, total 14080 RUR.
- Slag wool, 860 rub./m3, total 9640 rub.
- Ursa GEO Facade, 975 rub./m3, total 10,725 rub.
Average prices by region of Russia for thermal insulation of brick walls:
- thermal insulation with mineral wool on glue, 360 RUR/m2;
- fiberglass reinforcement and glue treatment, 410 RUR/m2;
- primer work, 60 rub./m2;
- performing decorative plaster, 380 RUR/m2;
- thermal insulation with mineral wool on a wooden frame, 870 rub./m2.
If you are interested in how and with what you can insulate brick walls from the inside and outside, take a look at this section.
Wall insulation
In frame houses, expanded clay is used to insulate walls, mainly due to its low price and durability. Additional advantages are its environmental friendliness, non-flammability and fairly low thermal conductivity.
The disadvantages of expanded clay used as insulation for the walls of a frame house include its high density - up to 500 kg/m, that is, it is a rather heavy material, compared, for example, with mineral wool. Another drawback, which, however, can be easily tolerated, is the extension of construction time.
If you choose expanded clay as insulation, keep in mind that although this material is considered a good thermal insulator, its thermal conductivity coefficient is significantly lower than that of mineral wool or polystyrene foam. Accordingly, the expanded clay layer should be thicker.
A thick layer of expanded clay has significant weight, which must be taken into account when choosing the wall material (they must be quite strong) and when calculating the foundation. The thickness of the expanded clay will be approximately 200-300 mm. In this case, the meaning of a frame structure is lost, the main advantage of which is the ease of wall construction. Therefore, in frame houses it is still preferable to use mineral wool or polystyrene foam as insulation. But the choice is always yours.
When insulating walls with expanded clay, it is necessary to use steam and waterproofing to protect the insulation from getting wet. Although expanded clay does not absorb moisture well, it can nevertheless become wet over time, which is not at all desirable.
When insulating the walls of a frame house with expanded clay, the insulation is poured between the outer and inner wall panels, which are attached to the frame. This is a simple process that can be done independently without special tools and equipment. Steam and waterproofing are laid between the wall panels and the insulation.
- Start building the wall by erecting the inner wall panel.
- Attach a vapor barrier to it. Tape the joints of the film with tape.
- The construction of the outer wall panel and the filling of expanded clay occur simultaneously. Having mounted a small section of the wall (about 50 cm), attach waterproofing inside the formed well from the side of the outer panel with a large margin equal to the height of the wall. Also seal the waterproofing joints with tape.
- Pour expanded clay into this well and compact it thoroughly. Fig.0
- The next step is to re-mount a small part of the outer wall panel, attach the waterproofing and fill it with expanded clay, and so on until you have mounted the entire wall.
The wall pie consists of the following layers:
- inner wall panel;
- vapor barrier;
- expanded clay;
- waterproofing;
- outer wall panel.
To insulate walls, choose fractions of 5-10 or 10-20 mm.
Still, think carefully before insulating the frame walls with loose expanded clay. It's not rational. We recommend choosing mineral wool or polystyrene foam. You can also use expanded clay concrete blocks.
Stages of thermal insulation of a wall
In order for the work process to proceed quickly and properly, you should prepare the necessary tools. This will significantly speed up the work on protecting the walls with insulation.
The following materials will be required:
- plasterboard sheets;
- self-adhesive tape;
- insulation;
- membrane to ensure maximum vapor barrier;
- screws, nails;
- hammer, screwdriver, hacksaw;
- yardstick;
- metal profiles or wooden slats for constructing the frame;
- fastening materials.
For 1 sheet you need approximately 30 pieces of self-tapping screws. It is best to buy screws 20 mm long.
As for the manufacture of the frame, the profile must be taken of 2 types: marked CD and UD. The length is selected based on the size of the room.
Frame design
It consists of drawing the perimeter and thinking through how the frame will be positioned on the wall. A simple pencil and a building level are enough.
Preparation:
- surface cleaning;
- smooth out all the unevenness and fill up the cracks and depressions;
- drying with a heater or blow dryer;
- getting rid of mold and mildew.
Sometimes it is necessary to treat the walls with a special waterproofing putty to prevent the occurrence of dampness. First, the layer is applied vertically, then horizontally.
Frame construction
Installation of a frame from profiles for plasterboard You need to mount the frame according to pre-made marks. To avoid contact of the metal structure with the wall, a tape prepared in advance is glued to the base of the profile. The frame parts are fastened to the wall using self-tapping screws and dowels.
Before laying the insulator, the surface is prepared in advance. Weak areas of plaster are removed or restored. To eliminate the possibility of the formation of fungus and mold, it is necessary to treat with a primer and an antiseptic.
Sheets of plasterboard are installed on a frame made of metal or wood. A metal frame will last significantly longer than one made of timber.
In the area where batteries are located, where installing thermal insulation is difficult, penofol can be used.
You can make a frame from bars under drywall
Assembling the frame begins with the installation of guides created from the UD profile. The slats are mounted on the ceiling and floor with a distance of 50-60 mm from the walls. A section of the rack profile is inserted into the guides. The ends are fixed using small self-tapping screws (“fleas”). The edges of the hangers are folded from the sides and connected to the slats. The pitch between the profiles must be observed so that there are 3-4 slats per sheet.
To improve the rigidity of the structure, it is necessary to make transverse bridges from the CD profile. The profile is cut so that its length overlaps the adjacent slats by half. Use metal scissors to cut off the shelves. Then the blanks are fixed with fleas onto the frame.
Vapor barrier device
Penofol is often used as a vapor barrier. Before attaching it, you need to make sure that the side of the material with foil is facing inside the room.
As for the vapor barrier material, which has a rough surface, its uneven side should also be directed into the room.
Insulation
The insulation should be cut using a special knife. The insulation should be cut into pieces, the size of which should match the parameters of the frame cells.
If you use foam plastic as a thermal insulation material, then it should be attached with special glue prepared with the addition of water. Each piece should fit tightly to the surface. If gaps appear between the parts, they are filled with polyurethane foam. After the glue has dried, the foam is fixed with dowel umbrellas. Dowels should be placed in the corners of the sheet and one in the center.
After laying the internal thermal insulation, they begin to sheathe the frame with sheets of plasterboard.
When the screw is screwed in, its head should sink slightly, by 1-1.5 mm, but without tearing the cardboard. To make fixing easier, it is better to buy bits with a limiter.
After the walls are completely covered with plasterboard sheets, the surface is finished in any usual way. Insulated walls can also be covered with wallpaper or painted.
Thickness of mineral wool for attic insulation
Mineral wool is available on the market in several varieties:
Glass wool. The material is made on the basis of thin glass fibers, their thickness is 5-15 microns, length 15-50 mm
The insulation is sufficiently elastic and durable, but when working with it you need to be careful - use protective equipment. He is not afraid of temperatures from -60 to +500 ° Slag
The insulation is made from blast furnace slag, the fiber thickness is 4-12 microns, and the length is 16 mm. But due to its excessive hygroscopicity, it is not very effective to use it in thermal insulation measures when arranging the attic. Among the disadvantages of the material are: fragile structure, prickliness, aggressive effect on metal structures. Basalt (stone) wool. Made from gabbro-basalt with the addition of composite and binding components, wool is very similar in fiber thickness to slag wool. Having high performance characteristics, this insulation is better than others for thermal insulation of the attic from the inside. Heat resistance up to 600°
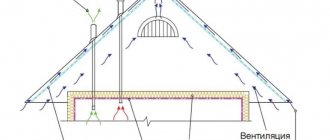
Regarding the thickness of the thermal insulation material for insulating the attic, the climatic conditions in a particular region should be taken into account. On average, this parameter is 15-30 cm. If the region is cold and has high humidity, then it is worth choosing mineral wool that is thicker.
To more accurately determine the required thickness of the insulator, you need to take into account the type of material
It is also necessary to take into account each air gap
It is necessary to calculate the thickness of mineral wool as accurately as possible, otherwise the result will not correspond to what was expected, the room will remain cool and damp.
Main types of mineral wool
There are three such types.
Glass wool
This product is produced by melting broken glass and quartz (sand). When a molten mass is obtained, glass fibers are pulled out of it, the length of which is 15-50 mm, thickness - 5-15 microns.
Considering what this mineral wool consists of, it can be argued that this material:
- chemically absolutely inert;
- cannot become a medium for the development of any forms of biological life (neither microflora, nor rodents, nor insects will grow in glass wool);
- not subject to rotting.
The disadvantage is the causticity and fragility of the elements that make up glass wool. When styling it, you need to work using special protective equipment, otherwise the skin will be completely irritated. Also, glass wool particles should not be allowed to get into the respiratory system or eyes.
So it is not advisable to use glass wool when arranging thermal insulation in residential premises. After all, microparticles will still be released from the laid mats and spread throughout the room. Residents will begin to inhale them along with dust particles and suffer from allergic reactions.
Slag
This mineral wool is also not suitable for thermal insulation of housing. There are many reasons that can be cited, including:
- causticity and fragility of particles;
- high hygroscopicity (ability to accumulate moisture);
- significant shrinkage (as a result, the insulating properties of the insulator layer are lost).
And the designated material cannot be classified as absolutely environmentally friendly. It is produced from blast furnace slag. Their composition is heterogeneous; they can even show increased background radiation. In addition, steam may be highly acidic, and moisture absorption contributes to the formation of an aggressive environment. Metal elements deteriorate first.
Basalt (stone) wool
This insulation is excellent for furnishing residential premises, that is, for internal insulation of houses. This material, when compared with all others, is considered the most elastic and durable. The fibers are less brittle and therefore do not cause irritation to the mucous membranes and skin. At the same time, reducing negative qualities does not in any way reduce the insulating properties. Basalt wool has a thermal conductivity coefficient almost the same as glass wool.
A negative property of stone wool can be considered its ability to absorb moisture. However, its hygroscopicity index remains the lowest when compared with other similar compositions. Complete polymerization of the binder occurs when such a mass is produced. So this mineral wool does not pose a significant danger to human health. You just need to purchase certified products supplied by reputable manufacturers. Laying basalt wool is easy. Such mats (cords):
- hold their shape well;
- easily cut;
- If necessary, they are fixed to the wall with glue.
Selection of materials
Do-it-yourself insulation of walls with plasterboard requires the correct selection of materials. Saving and choosing components that do not correspond to technology will make thermal insulation useless and money spent in vain.
To make high-quality insulation you will need:
- Wall plasterboard.
- Metal profiles or wooden slats.
- Insulation.
- Fastening materials.
Drywall and profile
Drywall can be used to insulate walls from the inside of the room; it can be either wall or moisture resistant. The latter type is used for rooms with high humidity levels: kitchens or bathrooms.
Wall types of plasterboard are suitable for living rooms where humidity does not exceed the threshold of 70%. Drywall sheets are marked in blue on a gray surface.
Main types of drywall
The moisture-resistant type of drywall contains special antiseptic additives (directly in the plaster) with silicone granules. The cardboard for the shell is impregnated, that is, it has an impregnation that makes it resistant to high humidity. An additional coating in the form of waterproof paints makes it almost completely protected from water.
Metal profiles or slats are required to construct the frame. A base for plasterboard sheets is a prerequisite for wall insulation. You need two types of profile, marked CD and UD. The length of the metal slats is selected depending on the parameters of the room.
Insulation
Insulating walls under plasterboard is impossible without thermal insulation materials. The most commonly used materials are mineral wool and polystyrene foam. It is also possible to use penoplex or isolon. These materials differ from each other in installation methods, price, and strength.
The most budget option would be foam insulation, the cost of which is in the range of 70-90 rubles. per square meter, mineral wool will cost a little more. 90-150 rubles. The price of the material depends on its thickness, density and manufacturer. When choosing between these two types of insulators, it is better to give preference to cotton wool; it does not burn and does not attract small rodents, unlike foam plastic. Also, such insulation is more convenient when laying in a frame under plasterboard on the wall.
Foam insulation
Penoplex is extruded foam plastic, but with high density and strength. Insulating walls with penoplex will cost more, the price per square meter is about 200 rubles.
Penoplex insulation
Another good insulation option is isolon, or polyethylene foam. Its price is 280-300 rubles. per square meter.
Thermal insulation performance when using one type of material or another will depend on compliance with installation rules and the thickness of the insulation.
Insulation with isolon
For fasteners, you will need to purchase butterfly dowels for fixing guide profiles, straight hangers, self-tapping screws for drywall and for connecting guide rails to each other (fleas).
Advantages and disadvantages
The main advantage of thermal insulation of the walls of a house using plasterboard is
- ease of installation;
- high efficiency of insulation;
- ideal surface for walls and ceilings for finishing.
The disadvantages include:
- the system of frame guides takes up space and volume, this is especially noticeable in compact rooms;
- low mechanical strength of the coating, does not withstand impacts;
- You cannot hang heavy objects without installing additional guides.
Insulating walls with plasterboard has a number of advantages and disadvantages.
Nevertheless, more and more rooms are being finished with gypsum board. Working with it does not require high qualifications or expensive specialized equipment.
Production of thermal insulation for a brick building
The process of insulating a brick house with mineral wool is similar to that described above. The creation of a ventilated facade begins with the manufacture of sheathing on the load-bearing wall. The insulation is fixed on it. A windproof membrane is laid on top and secured. You also need to install ventilation ducts measuring 4-6 mm. All this is covered from above with the selected finishing material.
Insulating walls with mineral wool in frame, wooden, and brick houses is a simple process. If you purchase the simplest tools and necessary building materials, then 2-3 people can properly insulate a medium-sized house in one day.
Features of mineral wool as insulation
Today, there are several types of mineral wool and therefore you need to correctly approach the issue of choosing a suitable material for insulating walls under drywall. Such thermal insulation can be made from rock or waste from the glass industry. These distinctive features affect the cost of the finished product. both in mats and in rolls, is considered optimal for internal wall insulation .
In this case, you can always choose the appropriate thickness of the material. Mineral-based insulation has a high degree of thermal and sound insulation and is very easy to use. Mineral wool is very flexible and does not contain harmful carcinogens, unlike glass wool, when working with which you need to protect the respiratory tract and exposed skin. To do this, you need to wear a respirator and rubber gloves, limiting direct contact with the material.
Types of insulation
It is better to insulate the surface under drywall using mineral wool or polystyrene foam. You can also use isolon or penoplex. These insulators differ in installation methods, cost, and strength.
According to research, polystyrene foam, like polystyrene, is harmful to health. It is rarely used in residential premises. Another disadvantage is that some types of foam are eaten by rodents. But it has a low cost and is also available in many densities and sizes.
Example of insulation with plasterboard and mineral wool
Article on the topic - which is better, polystyrene foam or mineral wool?
As for mineral wool, the advantages include low weight (especially important for insulating old buildings), as well as low thermal conductivity. There is only one significant disadvantage of mineral wool - hygroscopicity. Therefore, when thermally insulating partitions and walls, it is necessary to prevent the accumulation of condensation. For this purpose, vapor insulation should be used.
There are several types of mineral wool. They all differ in the production method, composition and technical indicators. Among the types of wool that are on the market, the most popular is fiberglass-based basalt wool. Like other types of insulation, they have both advantages and disadvantages.
The main negative aspects of glass wool:
- The thermal conductivity indicator is greater than that of stone, and therefore heat disappears faster.
- At elevated temperatures it forms a solid glass mass.
- Inconvenient to work with (glass wool fibers can cause itching; requires the use of protective glasses, gloves, a respirator, and wearing a thick suit).
When working with lukewarm fluid, you only need to wear a suit and a respirator.
Despite their external similarity, basalt and glass wool are significantly different. Glass wool is made from very thin glass fibers, and basalt wool is made from volcanic rock. They also differ in the indicator of thermal conductivity, which is lower in basalt, and, therefore, it retains heat better.
Cost of materials for insulation:
- The cheapest way would be to insulate the walls of the house with polystyrene foam, the price of which ranges from 70-90 rubles. for 1 sq. m.
- As for mineral wool, it costs a little more - 90-150 rubles. The price of the material depends on its density, thickness and manufacturer.
- Penoplex, which is extruded foam plastic, but with increased strength and density, costs 1 sq. meter approximately 200 rubles.
Isolon (foamed polyethylene) can also serve as an insulator. Its cost will be 280-300 rubles per 1 square meter.
How long will the insulation last?
The service life of insulation depends on its type.
Cheap materials are on average suitable for use for 20-30 years. Some expensive brands have a service life of up to 50 years in their technical specifications (but this is not always tested in practice). Over time, the substance ages, the structure of the material is destroyed, it dries out or cakes, and loses more than 1/3 of its thermal insulation properties. Most types of insulation are recommended to be replaced at least every 35 years.
To create a healthy, favorable microclimate in the house, you can independently carry out the work of insulating the internal walls. For this purpose, lightweight, easy-to-install materials are used. With their help, you can make high-quality wall repairs with your own hands, even without professional training, using tools available in everyday life.
Sources
- https://rusolymp.ru/raznoe/yteplenie-sten-iznytri-minvatoi-tehnologiia-i-poleznye-sovety
- https://expert-dacha.pro/stroitelstvo/steny/uteplenie-st/minvata-plyus-gipsokarton.html
- https://UznayoRemonte.ru/remont/stenyi/uteplenie-sten-iznutri-minvatoj-plyus-gipsokarton/
- https://iv-proect.ru/steny/uteplenie-sten-iznutri-minvatoj-plyus-gipsokarton.html
- https://ProUteplenie.com/steny/uteplenie-pod-gipsokartonom
- https://ProUteplenie.com/steny/iznutri-minvatoy
- https://stroitelstvo.guru/kak-uteplit-steny-iznutri-minvatoj-plyus-gipsokarton/
- https://obustroeno.com/stroitelstvo/elementy-konstrukcii/steny/90184-uteplenie-sten-iznutri-minvatoj-plyus-gipsokarton
- https://tutknow.ru/building/uteplenie/6563-uteplenie-sten-iznutri-minvatoy.html
- https://otdelkasten.com/gipsokarton/uteplenie-sten-vnutri-pod-gipsokartonom
How do you like the article?
Sergey Vladimirovich
Ask a Question
Lathing under mineral wool and drywall - features and installation
Traditionally, you can create a partition sheathing for attaching drywall from two materials:
- wooden slats;
- galvanized profile.
The wooden frame is distinguished by its massive, bulky design. Before installation, wooden slats are treated with an antiseptic to prevent the possibility of rotting.
When installing drywall, it is more advisable to use special galvanized profiles.
They are designed to be attached to each other, in addition, they are provided with mechanisms for attaching to walls - brackets, with which you can adjust the thickness of the partition.
A brief diagram of the installation of lathing for gypsum boards can be presented as follows:
- The thickness of the partition is determined depending on the selected thickness of the insulation;
- a guide profile is attached to the sides of the vertical adjacent walls, along the floor and ceiling;
- the edge from which the plasterboard sheets will be installed is determined;
- Considering the width of the sheets is 120 cm, markings are made every 40 (or 60) centimeters;
- U-shaped brackets are attached along the markings at intervals of 50 cm;
- the supporting posts are inserted into the guide profile in accordance with the markings;
- using a stretched string, level the supporting posts and secure them with brackets;
- Transverse posts are attached to the load-bearing posts to ensure structural rigidity;
Mineral wool lathing
Insulation is laid under the resulting plane.
Why do you need wall and ceiling cladding?
If necessary, insulation can be placed under the drywall.
Despite all the beauty and warmth of such a natural material as wood, many problems immediately arise when decorating the walls of a dacha or cottage. In order to quickly get rid of them and spend a minimum of financial resources on this process, they install gypsum boards in the house.
The use of plasterboard in the house allows you to almost perfectly level the ceiling and walls of the room, while creating the desired surface for subsequent finishing. This allows you to paint the walls or cover them with wallpaper at the lowest cost, and as a result get a beautiful view of the finished room. To improve the energy-saving performance of the house, insulation can be installed under the installed drywall, which will greatly reduce heating costs in the house in winter.
If communications (electrical wires, water pipes, etc.) are laid along the walls of the room being repaired, then they can be covered with wooden boxes or plinths, but this will lead to additional costs. The situation is much simpler when using drywall - its sheets will simply cover all these communications when covering the room. That is, the use of this material during installation makes it possible to remove several problems at once while decorating the entire room: install plasterboard arches in doorways, make shelves from this material, install modern lighting on the ceiling, etc.
Characteristics of drywall
Drywall is a sheet finishing material consisting of gypsum and paper. Designed for covering wall and ceiling surfaces on rigid wooden or metal frames.
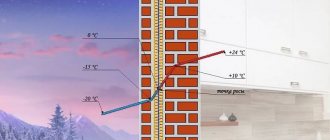
Depending on the type, the thickness of the panel varies from 6 to 12 mm. At the same time, the average thermal conductivity of the product is 0.35 W/m°C (for brickwork 0.64-0.81 W/m°C) which, of course, is not bad for finishing, but is too low for a heat insulator.
For example, the heat transfer resistance of a twelve-millimeter sheet is only 0.0042 m2 °C/W out of 3.28 m2 °C/W, which is recommended by SNiP for walls in the Moscow region. It turns out that plasterboard is useless as a wall insulation, it is even less suitable for thermal protection of the ceiling, and yet it invariably participates in the composition of the thermal insulation cake.
The fact is that although it won’t be possible to insulate a wall with plasterboard, you can easily use it as a container for mineral wool or expanded polystyrene, you just need to mount the frame at the required distance from the wall and fill the entire resulting space with insulation.
At first glance it’s not difficult, right? But this matter also has its own nuances. Read more about this further.
How to install drywall in a wooden house?
Many people are increasingly beginning to use plasterboard for finishing walls in a wooden house, for example in a country house or cottage.
Drywall is becoming increasingly popular among finishing materials. It levels the walls and allows you to hide all communications.
This allows you to save money and solve several problems at once:
- level the walls of the room;
- mask all communications;
- insulate.
Is it possible to install drywall in a wooden house yourself? What materials and tools will be needed for this? What is the technology for installing drywall in a wooden house?
Installation of gypsum boards
To attach drywall, you need to purchase self-tapping screws. Their number is calculated based on the fact that about 30 pieces are required per sheet. Self-tapping screws need to be chosen a little longer, approximately 20 mm. Of course, you can buy 16 mm screws, but when fixing, it is possible that when screwing in, the tip will bend the surface of the profile without drilling into it. Longer screws eliminate this possibility.
This is how drywall should be attached to the profile
You will also need a screwdriver and quality bits.
Installation of drywall sheets is carried out according to this algorithm. The material is laid on the frame and the lower corner is secured. Next, screw the screws in order to the opposite end of the sheet (not all corners at once!).
When the lower and upper sections are fixed, fasten them to the main frame slats. In this case, the pitch between the screws should not exceed 250-300 mm.
When a screw is screwed in, its head should be slightly recessed by 1-1.5 mm. Just don't tear through the cardboard! To simplify the fixing task, it is better to purchase bits with a limiter.
Upon completion of the cladding, the surfaces are prepared for final finishing.
What is needed to install drywall in a wooden house?
To carry out the work, you need to buy a metal profile for the frame, sheets of drywall, insulation, screws, putty, wallpaper and glue or paint at the construction market or in a specialized store. To work, you will need various tools: special construction knives with replaceable blades (they are used to cut drywall), a hacksaw, an electric drill, an angle grinder with discs, a screwdriver or screwdriver, spatulas, paint brushes, and some consumables.
The tool must be of high quality and reliable.
Useful tips and nuances of internal insulation
If possible, it is advisable to carry out insulation from the outside, as this is most effective. In addition, this allows you to neutralize the harmful effects of cold on the walls. Naturally, this does not apply to wooden buildings, where it is necessary to lay a thermal insulation layer both inside and outside the room.
Experts recommend that before installation work, a calculation of the thermal characteristics of the building is carried out, thanks to which it is possible to correctly select the thickness and characteristics of the insulation. Even when individual sections of the walls freeze, they provide thermal insulation around the perimeter of the entire room. If the building has high humidity, then foil insulation is used.
When doing all the work with your own hands in a brick or wooden building, it is important to ensure that the markings are applied correctly. The rolled insulation must be opened in advance so that the mineral wool takes on its original dimensions.
If glass wool is used as insulation, then all work on its installation is carried out only with the use of protective equipment. You cannot proceed to the main work until the fungus and mold, as well as other damage to the walls, have been eliminated in the room.
Many experts also recommend laying insulation under the metal profile or using polyurethane foam. Mineral wool must be properly leveled so that it acquires its natural position without dents, deflections or waves. In the case of multi-layer laying of thermal insulation, the seams should not be allowed to coincide.
Mistakes made when insulating
In order for the insulation of the walls of the house, from the inside, done with your own hands with mineral wool, which will be covered with plasterboard on top, to last as long as possible, it is important to avoid common mistakes:
- an attempt to save money when purchasing thermal insulation material from little-known manufacturers;
- non-compliance with the sequence of thermal insulation work;
- laying mineral wool with various types of defects;
- there are gaps between adjacent sheets of material;
- improperly equipped vapor barrier or its complete absence.
It often happens that while doing the work with his own hands, the homeowner forgets to install sockets or a switch in the drywall . If you carry out installation work on installing electrical products after fixing the drywall, you can significantly damage the insulation. Therefore, this procedure must be performed in advance.
As you can see, insulating mineral wool under drywall is not the most difficult process; the main thing is not to forget about high-quality vapor barrier and distribute the mineral wool in an even layer from the inside over the entire surface of the walls. This procedure will keep the house warm and prevent the formation of drafts and other troubles.
Common materials for internal insulation
Not all materials are suitable for internal insulation. Insulation for walls and partitions made of plasterboard should have a fairly dense texture, not crumble, or cake.
The most popular:
- Styrofoam . The cheapest and most successful option. Foam insulation is the most common type. Almost complete vapor tightness, rigidity, ease of processing and installation, excellent heat-saving properties of the material make it a leader among its peers.
- Extruded polystyrene foam (EPS), penoplex. This is the same foam, but made in a different way. The structure of these materials is a frozen foam. Complete vapor barrier and excellent heat conservation of the material would make it the best option, but the high price limits its use. Insulating walls from the inside with penoplex is very effective and allows the use of thin material.
- Minvata. It is mostly suitable for external insulation, but can also be used for internal insulation. The main problem with mineral wool is its soft structure, which requires the installation of sheathing. In addition, mineral wool is a hygroscopic material that requires high-quality vapor protection.
Stages of thermal insulation of a wall
In order for the work process to proceed quickly and properly, you should prepare the necessary tools. This will significantly speed up the work on protecting the walls with insulation.
The following materials will be required:
- plasterboard sheets;
- self-adhesive tape;
- insulation;
- membrane to ensure maximum vapor barrier;
- screws, nails;
- hammer, screwdriver, hacksaw;
- yardstick;
- metal profiles or wooden slats for constructing the frame;
- fastening materials.
For 1 sheet you need approximately 30 pieces of self-tapping screws. It is best to buy screws 20 mm long.
As for the manufacture of the frame, the profile must be taken of 2 types: marked CD and UD. The length is selected based on the size of the room.
Frame design
It consists of drawing the perimeter and thinking through how the frame will be positioned on the wall. A simple pencil and a building level are enough.
Preparation:
- surface cleaning;
- smooth out all the unevenness and fill up the cracks and depressions;
- drying with a heater or blow dryer;
- getting rid of mold and mildew.
Sometimes it is necessary to treat the walls with a special waterproofing putty to prevent the occurrence of dampness. First, the layer is applied vertically, then horizontally.
Frame construction
Installation of a frame from profiles for plasterboard You need to mount the frame according to pre-made marks.
To avoid contact of the metal structure with the wall, a tape prepared in advance is glued to the base of the profile. The frame parts are fastened to the wall using self-tapping screws and dowels. Before laying the insulator, the surface is prepared in advance. Weak areas of plaster are removed or restored. To eliminate the possibility of the formation of fungus and mold, it is necessary to treat with a primer and an antiseptic.
Sheets of plasterboard are installed on a frame made of metal or wood. A metal frame will last significantly longer than one made of timber.
In the area where batteries are located, where installing thermal insulation is difficult, penofol can be used.
You can make a frame from bars under drywall
Assembling the frame begins with the installation of guides created from the UD profile. The slats are mounted on the ceiling and floor with a distance of 50-60 mm from the walls. A section of the rack profile is inserted into the guides. The ends are fixed using small self-tapping screws (“fleas”). The edges of the hangers are folded from the sides and connected to the slats. The pitch between the profiles must be observed so that there are 3-4 slats per sheet.
To improve the rigidity of the structure, it is necessary to make transverse bridges from the CD profile. The profile is cut so that its length overlaps the adjacent slats by half. Use metal scissors to cut off the shelves. Then the blanks are fixed with fleas onto the frame.
Vapor barrier device
Penofol is often used as a vapor barrier. Before attaching it, you need to make sure that the side of the material with foil is facing inside the room.
As for the vapor barrier material, which has a rough surface, its uneven side should also be directed into the room.
Insulation
The insulation should be cut using a special knife. The insulation should be cut into pieces, the size of which should match the parameters of the frame cells.
If you use foam plastic as a thermal insulation material, then it should be attached with special glue prepared with the addition of water. Each piece should fit tightly to the surface. If gaps appear between the parts, they are filled with polyurethane foam. After the glue has dried, the foam is fixed with dowel umbrellas. Dowels should be placed in the corners of the sheet and one in the center.
After laying the internal thermal insulation, they begin to sheathe the frame with sheets of plasterboard.
When the screw is screwed in, its head should sink slightly, by 1-1.5 mm, but without tearing the cardboard. To make fixing easier, it is better to buy bits with a limiter.
After the walls are completely covered with plasterboard sheets, the surface is finished in any usual way. Insulated walls can also be covered with wallpaper or painted.
Choosing the optimal insulation
Mineral wool heat insulators are the most acceptable option for insulating a frame house. The materials are made from different raw materials, which determine the basic characteristics and scope of application. The general advantages of all types of mineral wool include: light weight, fire safety, resistance to pests and the necessary vapor permeability.
The main disadvantage of fiber insulators is hygroscopicity. To preserve the insulation properties, mineral wool needs high-quality vapor and waterproofing.
Basalt wool - environmentally friendly and fireproof
The main component of the insulation is rocks of volcanic origin: basalite, diarite and basalt. Stone wool is a completely non-flammable material that can withstand temperatures of 1000 °C. The heat insulator retains its physical properties for 40-50 years. The main advantages of basalt-based mineral wool:
- low thermal conductivity – 0.36-0.42 W/m*C;
- resistance to mechanical stress;
- good noise insulation characteristics;
- resistance to temperature fluctuations.
The insulation contains hydrophobic additives that ensure rapid removal of moisture. Basalt heat insulator is produced in slabs, the density of the material is 35-50 kg/cubic. m. The disadvantage of stone wool compared to fiberglass counterparts is less elasticity and susceptibility to rodents.
Glass wool – elasticity and moisture resistance
The basic components of the heat insulator are broken glass and sand. The addition of binding components makes it possible to form rolls from the finest glass fibers. Approximate dimensions of the mats: thickness – 100 mm, width – 1200 mm, length – 10 m.
It is equally important to calculate what density of insulation should be used. For thermal insulation of frame buildings, this glass wool parameter should be at least 15-20 kg/cube
m.
Features of glass wool:
- high elasticity – the material easily takes on and quickly restores its given shape, which is very convenient during installation;
- vibration resistance;
- not susceptible to mold and unattractive to rodents.
Like rock wool, fiberglass is fire resistant. However, in comparison with the previous insulation, glass wool loses on several points:
- Unsafe material - installation is carried out in a respirator and protective clothing. The fibers are very fragile and when cutting, a lot of “glass” dust is released.
- Shrinkage of the heat insulator - over time, the risk of the formation of cold bridges increases.
Ecowool – versatility of use
A new word in the segment of thermal insulation materials is ecowool. The material is 80% recycled paper. Additional components: boric acid and sodium tetraborate. Minor ingredients provide protection against microorganisms and reduce flammability.
Distinctive features of ecowool:
- Ecowool is a loose insulation material, and therefore the technology for its application is fundamentally different from working with sheet mineral wool. To create a thermal insulation layer, special equipment is required - a pneumatic inflatable device.
- If the walls of a frame house are insulated poorly, there is a risk of ecowool shrinkage, which can lead to the formation of uninsulated zones.
- The material is not recommended for use near open fire sources, fireplace pipes and chimneys. A protective layer of basalt foil-clad fireproof mats or fencing made of asbestos-cement slabs is required.
The main advantages of ecowool: environmental friendliness, the ability to insulate hard-to-reach places and high sound insulation qualities.
“Warm wood” - an alternative to mineral wool
This group includes mats and slabs made of wood fiber materials. The technical and operational characteristics of the insulation are at a fairly high level:
- good thermal insulation - thermal conductivity is comparable to that of mineral wool;
- preservation of the structure even when wet - the properties of the insulation do not change when absorbing moisture in a volume of 20% of its own weight;
- high strength and excellent sound insulation – protection from impact and “air” noise;
- sufficient density and elasticity - the insulation is attached between the frame posts without additional fasteners;
- environmental friendliness of the material and safety of installation work.
Wood fiber insulation “breathes” and helps maintain a comfortable microclimate in the house. The disadvantages of a heat insulator include: high cost and flammability.
Insulation under drywall inside the house
Basalt wool is often used in the thermal insulation of walls. In terms of its properties, it is most similar to glass wool, but differs in composition. Rocks are used in its production, which makes it fire-resistant and hypoallergenic.
But its disadvantage is the price; it is more expensive than glass wool and polystyrene foam. Roll insulation requires additional fixation, which is carried out using umbrella dowels or glue. An important step in insulating walls from the inside on your own is covering the frame with a vapor barrier membrane. It will not allow steam to pass through, which will penetrate from the room through the gypsum board, which means it will not allow the insulation to absorb moisture. Now - about the distance between the profiles.
You need to focus on the dimensions of the sheets of drywall and insulation, since cutting them is much more difficult and a waste of time. But since they are rectangular, they can be mounted in different ways - vertically, horizontally. The general principle for choosing the required “profile pitch” is clear. If you decide to insulate drywall yourself using penoplex, it is not necessary to install a vapor barrier material.
A feature of extruded polystyrene is its absolute resistance to moisture. Insulating walls with penoplex does not take much time and does not require the use of additional materials. Almost every owner can handle the insulation of walls covered with plasterboard.
If you decide that you can do without the help of specialists, you should start by studying wall insulation technologies and choosing a thermal insulation material. You can also insulate it over plaster, since you don’t mind the space. If the plaster is dry now, then most likely there will be no critical shift in the dew point after insulation; there is not enough information to say this 100%. Insulate with penofol, and the walls can be lined with plasterboard. Penofol is a porous insulation material, sold in rolls and has a thickness of three to ten millimeters.
Attached to the wall with a simple construction stapler. If you don’t want to line the walls with plasterboard, you can line them with OSB board, but then it will be difficult to glue wallpaper onto it. I finished the hallway with such a slab and first putty it with putty based on PVA glue. and then I glued the wallpaper. Everything turned out smoothly.
Wall insulation under plasterboard is often used both in large office premises and in ordinary apartments, especially corner ones, when external insulation is problematic or expensive. Insulation comes in rolls or slabs with a width of 50 and 100 mm. Slabs are undoubtedly more convenient to work with; they do not need to be cut and their width is 60 cm, which is often equal to the distance between the frame posts.
The advantages of rolled material include lower cost.
Installation methods
There are several options for attaching mineral wool to the insulated surface. There are three main ones:
- frame method;
- for direct hangers;
- on mushroom-shaped dowels.
On the frame
To do this, you need to assemble a frame of wooden blocks on the wall, floor or ceiling. Precisely from wood, because wood, in contact with the surface, will not create cold bridges, like a metal profile. Of course, the bars will have to be treated with an antiseptic.
If plasterboard is used for finishing, you will have to take into account the dimensions of this sheet material. Then between the bars it will be necessary to leave a space of 1200 mm (this is the width of the drywall) with the installation of one or two more intermediate elements.
Since the main manufacturers produce mineral wool with a width of 610 mm, the frame for plasterboard will be with the installation of one bar in the middle. And 10 mm will play the role of that very sealing layer that will press the insulation to the frame.
For direct hangers
This option for installing mineral wool is usually used when it is necessary to insulate a ceiling on which a suspended structure made of plasterboard, plastic panels, and so on is mounted. Consider the option with drywall.
To create a suspended structure on the ceiling, it is necessary to install direct suspensions on it, to which profiles will then be mounted. After the suspensions are installed, it is necessary to attach stone wool slabs to them along the entire ceiling. You can also use a roll version, but it is more difficult to work with it under the ceiling.
To do this, you need to make holes in the mineral wool slab through which the ends of the hangers will be squeezed. If a suspended ceiling were installed, then the suspension tendrils would simply need to be bent in different directions, thereby securing the insulation. This cannot be done for a suspended structure under plasterboard, because the frame profiles must be attached to the hangers.
To prevent the mineral wool slabs from falling below the required level, you can stretch a strong thread through the holes in the suspension antennae (and this is a perforated part), or insert a plastic or metal rod (for example, wire) into each element.
On dowels
This is the simplest option for attaching stone wool. Most often it is used to insulate facades. The thing is that often inexperienced craftsmen cannot create the required installation density in this way. Therefore, there may be gaps between the thermal insulation boards that need to be filled with foam.
The installation technology is quite simple. To do this, a heat insulating mat is applied to the wall and two holes are made through it in the insulated surface. Mushroom-shaped dowels made of plastic are then inserted into them. This is how the fastening occurs. In order for the fasteners to be as reliable as possible, these dowels are also installed in the gap between the plates, two on each side.
Technology of thermal insulation of walls with plasterboard from the inside
The technology of insulating the walls of a room with plasterboard from the inside does not require special training of workers or expensive equipment. General construction skills and a universal tool are enough.
Tools and materials
During the work you will need:
- guides (metal profiles or wooden bars);
- gypsum boards;
- insulation in slabs or rolls;
- double sided tape;
- vapor barrier membrane;
- screws, dowels and other fasteners;
- anti-mold agents;
- putty;
- drill;
- screwdriver;
- hand tool.
The floor in the room must be cleared of debris and foreign objects.
Design
At this stage, the type of insulation, gypsum board and guides is selected.
If you are insulating a kitchen or bathroom, you should choose moisture-resistant plasterboard. For the boiler room, it is recommended to use fire-resistant.
Wooden guides are cheaper, but they are at risk of drying out and deforming in the event of temperature changes. The metal profile does not have such disadvantages. The number of guides is calculated based on a standard step of 60 cm.
When calculating the volume of materials purchased, a 5% reserve should be made in case of damage to gypsum boards and for cutting complex elements of walls and ceilings.
Stages of work execution
At the first stage, it is necessary to perform a number of preparatory work:
- clean the walls from dirt and mortar drips;
- dismantle all protruding objects: fasteners, remnants of fittings, sockets, lamps, etc.;
- fill all cracks and irregularities;
- treat with a composition against fungus and mold;
- dry the surface.
Next, marking work begins. Use a plumb line or a laser rangefinder and a chop cord
special attention should be paid to:
- parallelism of the marking of the mounting points of the guides;
- marking in corners and junctions of building structures: arches, window and door openings, columns, bay windows, ceiling beams.
After marking, they proceed to the installation of frame guides.
- The starting profile is glued to the floor using double-sided tape; the adhesive tape will improve sound insulation and protect against drafts;
- vertical profiles are attached to the starting strip with metal screws, and to the wall with screws on dowels.
The process of insulating walls with plasterboard.
A very important stage is laying insulation into the guides. The quality of insulation will directly depend on the accuracy of the work:
- insulation sheets are placed in the guides from bottom to top;
- they should fit between the profiles without gaps, with some effort;
- the sheets are additionally attached to the wall with adhesive or disc-shaped dowels;
- All cracks and gaps must be tightly filled with scraps of material or sealed with foam.
Now it's time to install a vapor barrier:
- penofol is mounted with foil inside the room;
- The vapor barrier membrane is attached with the rough side inward; double-sided tape is used for installation.
And the final stage is the installation of drywall sheets. They are mounted horizontally, from bottom to top. Before screwing the sheet to the guides, you need to use markings and a level to make sure that it is positioned strictly horizontally. After the first layer is secured along all the guides, the next one is installed on top of it. Here you also need to ensure that the position is horizontal and that the gaps between the sheets are minimal.
As a rule, the size of the room does not allow installing only whole sheets of drywall. Pieces have to be mounted in corners and under the ceiling. Drywall should be cut on the floor, in a horizontal position, on a flat surface. It is enough to cut through the top layer of paper with a mounting knife. Now the cut piece can be broken off along the cut line.
Upon completion of installation, all joints between the sheets should be thoroughly puttied. After the composition has dried, it is leveled with fine sandpaper, achieving a completely flat surface of the wall or ceiling.
Now the surface of the insulated wall is ready for final finishing. Two main types are used:
- wallpaper;
- water-based paint.
When insulating rooms with high humidity with plasterboard, moisture-resistant types of plasterboard with special hydrophobic and antifungal impregnations are used. These panels are easy to distinguish: they are painted green. In wet rooms it is also necessary to arrange supply and exhaust ventilation to prevent air stagnation and mold formation.
Popular thermal insulators for interior work
Nowadays, internal insulation of brick walls can be carried out using different methods, which is why it is so important to correctly choose the most suitable material for these purposes, taking into account the characteristics of the given structure. The material is selected taking into account its fire resistance, thermal conductivity and density
These indicators affect the weight of the material and the thickness of the insulation. And the service life largely depends on the strength of the material.
The material is selected taking into account its fire resistance, thermal conductivity and density. These indicators affect the weight of the material and the thickness of the insulation. And the duration of operation largely depends on the strength of the material.
The most popular insulation materials include:
- Expanded clay. This insulation is added to the base, after which a monolithic frame is formed from it;
- Mineral wool. This insulation has good moisture absorption, so it allows you to insulate the house from the inside. Glass wool, which is also used as insulation, is one of the varieties of mineral wool;
- Warm plaster. This material is a universal insulation material because it can be used both inside the house and for facade work. The insulation retains heat well, but it is a heavy material, so it is used only in houses with a reinforced foundation;
- Cellulose wool. This material retains heat well, has excellent absorbency, but is subject to mechanical stress; experts recommend this insulation for interior work;
- Cork insulation. The positive characteristics of the material include its ability to retain heat well, however, it is flammable;
- Styrofoam. The reasonable price and the ability to use this material for both interior and facade work have made it popular. However, this insulation has disadvantages: it does not “breathe” and releases harmful compounds during the ignition process.
Less popular insulation materials are: extruded polystyrene foam, penofol, penoplex, polyurethane foam and penoizol.
Criteria for choosing material, requirements for insulation, which is better
When choosing insulation of walls inside a brick house, first of all, it is necessary to take into account the thermal insulation properties of the material. In addition, the most significant characteristic of the material is vapor permeability.
The following actions will help prevent contact of freezing brick wall surfaces with steam:
- Wall cladding with a polymer heat insulator such as extruded polystyrene foam, sprayed polyurethane foam, high-density foam or penofol.
- Use of mineral wool insulation material.
- Applying a thick layer of heat-insulating plaster.
When planning to insulate your home, you should also consider the method of installing the heat insulator.
When choosing insulation of walls inside a brick house, first of all, it is necessary to take into account the thermal insulation properties of the material.
Installation of insulation using fastening brackets
To insulate walls from the inside with mineral wool using this technology, follow the following sequence:
Install special brackets on the wall for attaching drywall profiles. Screw them vertically in increments of 50-60 cm from each other. Give the screwed brackets a U shape
Important! Such fastenings are quite reliable, both for installing the profile and for fastening mineral wool. Unpack the roll or bale of mineral wool slabs. Measure and cut the required length of cotton wool with a margin of at least 10 cm. Important! If you do not take a reserve length, then if the mineral wool is slightly deformed, it simply may not be enough to insulate the entire height of the wall.
Place the measured strip of cotton wool over the mounting brackets. Install the next strip lightly with an accordion
Important! Mineral wool is easily pierced by the bracket, so it will hang vertically without problems. The accordion is necessary so that the insulation covers the entire wall tightly and without breaks. Mount the drywall profile.
Secure the profile to the mounting brackets. Install the hydrobarrier film using several self-tapping screws screwed to the profile. Important! This action is necessary if cotton wool without foil was used for thermal insulation. The film prevents the harmful effects of mineral wool on the room. Install drywall onto the profile.
Putty the joints.
Let's go up to the roof
As usual, we will consider the work process using the example of a specific object, in the finishing of which the author of the article was directly involved. We had at our disposal a fairly spacious attic (46 m²), which the owner of the house, for reasons known only to him, decided to convert into a living space.
Visual assessment of upcoming work
Having gone upstairs, we saw the following picture: the floors were littered with plasterboard and boards, from which we had to assemble the frame for the plasterboard. Their end section was 25x100 mm, and their length was about six meters. All this greatly complicated our task, since constantly moving around a cluttered room takes a lot of effort, nerves and time.
Advice! Always, at the first opportunity, remove from the room all tools and things unnecessary during the work process in order to provide yourself with the most comfortable conditions.
But the main difficulty was different:
We got to work only after making sure that the customer was going to glue wallpaper (see Wall repair and wallpapering: we do it ourselves), and besides, he did not set any special requirements for the evenness of the walls.
Advice! If you want to create a high-quality finish indoors, then you should not skimp on the material for the frame, since by assembling it, you lay down the future strength and evenness of the entire structure.
In the second half of the room there was a chimney and a hatch with a ladder, which we will also have to decorate. A pipe, as an object in the middle of a room, does not cause any particular difficulties during the work process, but we will encounter it several times along the way, and we will tell you how to properly sheathe the space around it.
Preparing for insulation
In the photo above, the numbers indicate a group of vertical beams that will form the base for the future wall. They were installed by “roof guards” to strengthen the supporting frame of the roof. It is between them that we will lay the insulation.
Accordingly, moving a person behind walls with exposed insulation will cause certain inconvenience, so we decided to completely cover the back side of the beams with 10 mm OSB panels.
For ceiling planes, you won’t have to do anything like this, since the insulation will be held in place by its own weight and density, which prevents it from sagging much. Therefore, even before laying the first sheets of mineral wool, we begin to install a frame under the drywall, which will hold the insulation.
We did it as follows:
Attention! We will describe how to geometrically accurately assemble a wooden frame of such complexity in the next article, where we will directly touch on the installation of drywall, but for now we will consider the main issues related to insulation.
Installation Rules
As mentioned above, hygroscopic mineral wool quickly absorbs moisture. Therefore, when installing from inside the room or outside on the facade, it is necessary to observe measures to protect it. If insulation is carried out from the inside, then waterproofing is applied along the wall, plus a vapor barrier is applied on top of the insulation itself. Membranes are most often used for this.
If facade insulation is being carried out, then it is best to use stone wool under a ventilated facade with the obligatory installation of wind protection. It is better not to install it under plaster mortars. More dense and moisture-resistant materials are suitable for these purposes.
Source
We insulate wood with mineral wool: simply, quickly and inexpensively
- Mineral wool is considered the optimal budget functional insulation. She solves several problems at once. Saves money because it is characterized by a high price-quality ratio.
- Simplifies installation, which is accessible even to non-professionals.
- Acts as additional sound insulation.
- Compliance with the technology of insulating wooden walls from the inside with mineral wool requires the use of personal protective equipment (PPE). This will help avoid negative aspects associated with exposure to carcinogenic substances that are hazardous to health: on the skin, respiratory organs, mucous membranes of the eyes, etc.
Necessary tools
For work you will need:
- level (construction level);
- brush;
- roulette;
- marker;
- knife or saw (for cutting insulation);
- PPE: gloves, cap, respirator.
Installation of mineral wool: a wooden wall is taken as an example
- You need to start insulating with a thorough examination of the walls. Clean them from dirt and dust. Remove electrical wiring. Caulk the gaps between boards and logs using jute fiber and a thin chisel: the tool tightly fills the gaps, and in the case of large gaps, use tape tow formed into a roller. Elimination of cracks will be inevitable, because during operation the house dries out, shrinks, etc.
- Protect wood from damage by insects and organic formations.
- Next, insulating wooden walls from the inside with mineral wool involves creating a vapor barrier layer from film. This is necessary in order to protect the walls from moisture penetrating into the room. The rolled material is laid overlapping with the rough side facing the wall surface. The strips are fixed together with a stapler.
- The sheathing for the insulation is made either from wooden blocks or from a metal profile (if you plan to insulate the walls from the inside with mineral wool plus plasterboard).
- To ensure that the corners do not lose their shape when facing, corner posts are additionally designed that resemble the letter “G”. Two beams of the same length, equal to the height of the room, but with different sections (50×50 mm and 50×100 m) are formed using self-tapping screws into a given structure. To do this, a beam of smaller cross-section is joined to the edge of the second beam and secured. The resulting “G” racks are placed in each corner of the room. To avoid deviations from the vertical, constantly check the level.
- Wooden sheathing requires pre-treatment of its guides and posts with an antiseptic, protection from possible rotting and bug damage. Vertical elements with a cross section of 50x50mm are installed at intervals of 0.5 m.
- The installation of insulation can be either tiled or rolled, with preliminary cutting of pieces of the required length. It is equal to the height of the room with an increase of another 10-15 cm. The pieces or strips are located between the bars, close to the film and each other. Fastened with anchors with large diameter caps. The presence of voids between the wall and the wool leads to the deposition of steam on the enclosing surface and the formation of condensation in this place. The moisture from the wet wall then drips onto the floor and can seep into the room.
- The laid insulating material on top is again covered with a hydro- and vapor barrier film, which is then attached to the beam with a stapler or double-sided tape. The protective membrane prevents pieces of mineral wool from entering the air in the living area. In this case, ordinary rolled cellophane can play the role of protection.
You can do the job differently. Make a frame. One side of it will be sheathed with LGK. The opposite is to pack with sheets of mineral wool. They are all pushed one by one into the cavity under the gratings, without making any gaps. Any leakage in the joint is fraught with the formation of “cold bridges”. If the thickness of the insulation “does not fit” into the gap, it is peeled off, removing the excess thickness. The frame filled with insulation is covered with plasterboard sheets.
Flaws
Mineral wool has two disadvantages. First, it is a brittle material at the grain level. Therefore, dust particles from the insulation hover in the air all the time during its installation. Experts recommend using protective equipment while working: wear gloves on your hands, goggles on your eyes, and be sure to use a respirator.
Secondly, stone wool absorbs moisture, which reduces its technical characteristics. Therefore, during the thermal insulation process, the insulation must be covered with protective membranes.
We step by step analyze the thermal insulation process
Insulating walls from the inside with mineral wool is not a very complicated process. However, to achieve the desired result, you need to know certain basics. Next, the process will be discussed step by step.
Preparation
Preliminary preparation of walls is the most labor-intensive process. You will need to do the following:
Remove the finishing coating (if any). If the walls are finished with panels (of any type), they can be carefully removed and used in the future. Level the rough surface. If the walls are concrete or brick, it is advisable to put them in order. The most effective and affordable method is a small cement screed. Lagging areas are removed. It is also necessary to achieve level alignment. The walls must be level so that the guide bars can be installed correctly. Then the surface is cleaned from dust and debris. Otherwise, the adhesives will not adhere. Now all surfaces are covered with protective impregnations and antiseptics
This is especially important for wooden buildings, where fungus and mold appear very quickly. When the impregnations have completely dried, a membrane film (or similar moisture-proofing material) is glued to the entire area. The sheets are laid overlapping with an allowance of at least 10 cm
This is necessary in order to prevent the formation of condensation at the joints. For fixation, you can use “liquid nails” or “Moment Universal”. After preliminary setting, it is advisable to shoot all the sheets with staples using a construction stapler. In this case, maximum bonding with the original surface will be ensured.
Creating a frame and laying insulation
Now a frame is created from bars into which mineral wool will be laid. The dimensions of the logs should be equal (approximately) to the expected thickness of the thermal insulation layer. When forming a frame, you must adhere to the following principles:
- The distance between the vertical posts should be 58 cm (the width of the mineral wool roll minus 2 cm). A small allowance is needed so that the mineral wool fits as tightly as possible, without gaps.
- Horizontal racks must be positioned so that they accommodate the joining of gypsum board sheets. Therefore, you will have to write out all the dimensions in advance and draw up a small plan.
- At the edges of the walls (adjacent to the ceiling and floor), bars must be located, regardless of the chosen scheme. This is the right thing to do, because it provides increased structural strength.
- Mineral wool is placed in the created niches. Since the distance between the bars corresponds to the width of the roll, trimming will be minimal. The mineral insulation is attached using a construction stapler. If we are talking about concrete or brick walls, then you will need to use a special glue.
- The entire structure is covered with another moisture-proofing layer. This measure will completely protect the insulation from the effects of condensation (since it will be hidden inside). However, it is not necessary, especially for rooms where there is no high humidity.
How to choose stone wool?
Before purchasing stone wool, you need to find out the amount of material needed and calculate the load that will be placed on the insulation.
We have already said that the prices are high, but you can still save money. The cost will be influenced by the following factors:
- Density of wool;
- Manufacturer;
- Binder and rock category;
- The presence of another layer of coating;
- Quantity purchased.
When purchasing, be sure to look at the instructions; they usually indicate the scope of use of stone wool and its technical characteristics. The most proven ones are TechnoNIKOL and Rockwool. The last company is located in Denmark; insulation materials from this country are of the highest quality, since strict certification bodies operate there.
When choosing, check with the seller how the fibers are arranged: horizontally, vertically or in a chaotic order. The first two types prevent the material from deforming, and the latter provides good heat and sound insulation.
Depending on the density, stone wool is usually divided into categories. Stone wool: wall slabs:
- Brand P-75. Suitable for horizontal internal surfaces that are not exposed to load, for insulating pipelines.
- Insulation for walls is wool grade P-125. Suitable for both horizontal and vertical surfaces. It is ideal for insulating ceilings, floors and the inside of walls.
- PZh-175. Stone insulation for walls made of metal profiled sheets or reinforced concrete.
- Insulation wool PPZh-200. The hardest stone wool. This type is used in engineering buildings, protecting them from fire.
Which mineral wool is best for wall insulation?
Insulating a house with stone wool begins with choosing a manufacturer.
Rockwool “ROCKWOOL” is popular both in the domestic and foreign markets. It has the following distinctive characteristics:
- Good level of strength;
- Mineral wool for wall insulation lasts from 15 years;
- The fibers are arranged in a chaotic manner;
- Helps save electricity, as the manufacturer claims;
- An additional layer that increases moisture resistance.
Stone wool "TechnoNIKOL".
- Produced only on the basis of basalt rocks;
- Additional layer for noise reduction;
- Light weight, making work easier.
Insulation for walls stone wool "URSA":
- Special packaging will make it easy to transport and work with the material;
- Does not contain formaldehyde resins, therefore it is recommended for schools, hospitals, etc.
Tips for choosing
Buying a truly high-quality product can sometimes be difficult. Therefore, you need to know some important points.
Pay attention to where and how the cotton wool is stored. Most often, it is stored in its original packaging and wrapped in shrink film.
Make sure there are no holes or cuts on the packaging. The cotton wool should not be in the open air, but under a canopy. If stone wool is packaged in cardboard boxes (they usually contain expensive insulation materials), then its storage location must be protected from moisture. Even after getting a little wet it will be unusable. Purchase goods only from trusted sellers. Give preference to those stores that are located closer to you - this will reduce the cost of delivery.
Vapor barrier in different rooms
There are different levels of moisture evaporation in the bathroom, bedroom or kitchen. Therefore, you should consider how to install the vapor barrier material on the frame.
In the bathroom
Watch the video: waterproofing in the bathroom.
When working in the bathroom, the sequence of actions is as follows:
- First, the frame of the selected type is installed.
- Then a heat-insulating layer of material is mounted into the frame (if provided).
- After this comes the moment of fixing the vapor barrier layer into the frame structure.
- Depending on the selected material (vapor barrier film or membrane film), the sheets are secured either with a profile or immediately fixed with a sheet of plasterboard. When installing vapor barrier material on the surface, you should be extremely careful. It is necessary to check that there are no cracks or gaps between the sheets.
The installation of vapor barrier material in other rooms is carried out in the same way.
It is preferable to opt for waterproofing the bathroom using mastic.
In wooden houses
There are some differences in the process when installing a vapor barrier layer in a wooden house. Plasterboard coverings are popular in wooden houses. The main thing is to adhere to the process technology in order to do everything correctly.
The wooden facade of the house is prone to corrosion and fungi. Therefore, it is best to install a vapor barrier coating on both sides of the insulation so that moisture and dampness coming from the wood do not reach the surface of the plasterboard sheets. To do this, you can first fix the vapor barrier sheets on both sides before installing the insulation into the frame. This will remove excess moisture from the surface of the drywall and wood.
It is not difficult to install vapor barrier material under plasterboard floors. The main thing is to weigh the important nuances and decide what materials you need to buy and which installation option is most relevant.
Selecting raw materials to provide vapor barrier properties is a fairly simple task.
The main thing is to decide what goals are set, and you also need to pay attention to the cost of the material. The narrow selection of vapor barrier materials prevents you from getting lost in a multitude of ideas. Watch the video: attaching a vapor barrier in the attic under a metal profile and to aerated concrete walls
Watch the video: attaching a vapor barrier in the attic under a metal profile and to aerated concrete walls.
Requirements for insulation
The production of mineral wool comes from melts of basalt and other silicate rocks or waste from glass production .
The result is a porous fibrous material, woven from thin threads, which is subsequently rolled or cut to size. Foil mineral wool is considered the highest quality. To carry out insulation from the inside of a room, you need to select materials that meet the established environmental friendliness characteristics. It is unacceptable to select thermal insulation materials that may have a detrimental effect on human health. Therefore, it is better to give preference to well-known manufacturers of materials for room insulation.
Mineral wool laid from the inside must be covered with a finishing finish , which is most often used in sheets of plasterboard. But due to the fact that the material is in a confined space, it is impossible to control its condition and therefore it is important that it does not deform, which may affect the thermal insulation characteristics of the insulation.
The selected mineral-based insulation must have a minimum thermal conductivity coefficient. The smaller this parameter, the thinner the layer of material will have to be installed under the drywall, which is very important in small rooms. High-quality insulation can be achieved not so much due to the thickness of the material as to its basic characteristics.