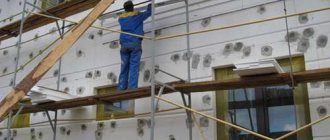
Heating or insulating?
When the temperature in the garage is below freezing, the condensation freezes. And when the engine heats up, it begins to melt. Freeze-thaw cycles do not benefit either the metal or the internal mechanisms.
But heating the room is not the optimal solution. By leaving a warm garage into the cold, we create a situation of sharp temperature changes. And when we return back to the heated space, we get the formation of condensation even on those parts where moisture does not enter when the car is moving.
Experts say that the best conditions for winter car storage are created when the thermometer shows +5°C. The danger of corrosion under such conditions is minimal, and the temperature difference between the street and the room does not have such a detrimental effect on the car.
Accordingly, when choosing between connecting to the heating system and insulating the garage with your own hands, it is wiser to choose the second option. Moreover, it will help you save on your monthly energy bills.
Restoring air circulation
Cheap air recuperator.
has both positive and negative consequences. The positive aspects are obvious - it becomes warm, the car is easy to start in the morning. The negative aspects include the lack of air circulation. Logically, heat preservation is required in the cold season, that is, in winter. In winter there is a lot of snow, which sticks to the car wherever possible.
When the vehicle warms up in the garage, the snow will also melt, increasing the humidity in the room. And, as you know, high humidity, heat and lack of air circulation cause fungus to appear. In addition, high humidity, caused by the thermal insulation of the garage from the inside, negatively affects the car body. It begins to rust, the effect is enhanced by the salt that is scattered all over the roads. How to make it so that:
- the room was warm;
- there was a constant flow of fresh air.
As an option, you need to insert an air recuperator into the air window, which has long been sealed and sealed. There are units for 3 thousand rubles, which are built into a hole in the wall. In this case, it’s simply an ideal option. The device is connected to the network and works constantly without turning off. It takes heat from the exhaust air and transfers it to the supply air. An article about air recuperators will help you study this issue in more detail. One of the options for how to insulate a garage from the inside is clearly shown in the video:
Basic requirements for garage insulation
When insulating a car storage area, it is worth remembering a number of key points.
- Ventilation holes must not be sealed - any thermally insulated structure needs ventilation just as much as a heated one.
- Thermal protection should affect not only walls, but also garage doors, floors, and roofs.
- If you want to do everything according to the rules, it would be useful to study the sixth section of SNiP 2.07.01–89. It regulates the requirements for premises where vehicles are stored. Of course, when it comes to a personal garage, it is not necessary to comply with them. However, standards can help address a number of issues.
- To insulate the gate, in most cases, internal thermal protection is installed.
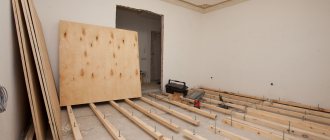
First stage: preparing the surface and creating the sheathing
Even before starting work, it is worth working on the garage ventilation system.
There must be supply and exhaust openings. If there is already a supply opening in the gate, it is important not to cover it with a layer of insulation.
Garage ventilation layout
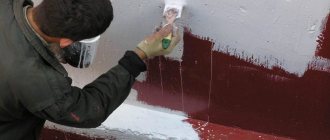
It is important to treat the surface of the gate by removing any corrosion with a brush or grinder. The insulation may be hampered by, for example, peeling paint.
After stripping and peeling off the paint, it is necessary to treat the metal with an anticorrosive agent. It will turn out better if you apply a layer of primer from a spray bottle.
Clean Corroded Metal Garage Doors
The next stage is the process of making the sheathing. It helps to attach the insulation, and the outer, front layer of the cladding will hold on to it. It is optimal to use 4*4 cm bars for lathing, approximately this size. The lathing is attached to the gate frame. The wood must be dry and of high quality. The bars are treated with an antiseptic to prevent rot and moisture; it is advisable to do this twice. To secure the beams in the frame, a hole is drilled for a self-tapping screw.
It is important to make recesses in the sheathing for the holes in the gates. The bars can also be fastened together if there is no rigid frame
Making lathing for insulating gates
Materials market review: choosing the best
The first thing you have to consider when choosing a heat insulator is the type of insulation you choose. For example, moisture-permeable materials, when wet, change their properties. Therefore, they are not a good option for external thermal protection. And for internal thermal insulation, insulation materials that emit harmful substances in the summer heat or during domestic heating are not suitable.
The modern market offers several types of materials for thermal insulation of garages. Let's consider the main properties and characteristics of the most popular of them.
Internal location of insulation
When figuring out how to insulate a flat roof from the outside, do not forget that insulation can also be done from the inside. This solution is especially relevant if there is an unused or technical attic space. In this option, all the necessary materials are attached to the ceiling from the inside. However, this does not relieve the need for external waterproofing.
This method of insulation is less effective than external insulation, but in some cases it may be the only possible one. Here, all the components of the structure and their arrangement will correspond to classic external insulation, with the only difference being that they will be located not from bottom to top, but from top to bottom, in the reverse order.
The only difference is the creation of a heat-insulating structure in residential premises, when the outer side of the assembled pie will act as a ceiling. In this case, the external component of the assembled “pie” will be a decorative coating. This can be either a suspended ceiling or any other solution that is more suitable in appearance or suits the taste of the owner of the house.
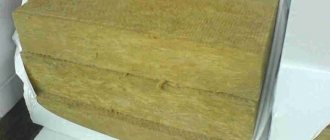
Mineral wool
Available in the form of slabs and rolls. It retains heat well and has sound insulation properties. But at the same time, it easily absorbs moisture - high humidity is the main enemy of cotton insulation. And when wet, it completely loses its ability to insulate heat. Therefore, its use requires high-quality hydro- and vapor barrier. It is almost impossible to dry this insulation; it becomes brittle and easily damaged. And when the glass wool gets wet during installation, it clumps and becomes unsuitable for further use (cavities appear inside it).
Considering that the external insulation pie can be damaged or depressurized, using this material is risky. In general, mineral wool is not the best choice for vertical installation. It has considerable weight and consists of fibers. Under their own weight, they can sag over the years, and voids will begin to form between them - the so-called cold bridges.
This heat insulator has two advantages: low price and equally low thermal conductivity. But that's all. Then only the shortcomings begin. Once in the lungs, glass particles are no longer excreted from the body. They leave itching and irritation on the skin. When installing them, a protective suit, a respirator and a mask are required, and after completion of work, a thorough cleaning of the room is required. Then you will have to wait a day or two until the glass dust, invisible to the eye, settles.
If during operation there is at least partial damage to the protective layer of films or foil material, you will again need to rent special clothing and resort to cleaning after completion of the repair.
And finally, the material shrinks and is not durable. Therefore, it does not matter what type of insulation you prefer: internal or external, it is better not to stop at this option.
Features of the work
When laying insulation on the roof of a garage, it is necessary to take into account the design features. There are two roofing options: single- and gable. The requirements for the type of material and the procedure for installing the heat-insulating layer are the same in both cases. However, due to the design features of the roof, some problems may arise during the work.
Shed roof
This type of roof has a simple design, which is why it is often used in the construction of a garage.
If the latter is adjacent to a house or other building, when laying insulation, it is important to eliminate the gaps between the material and the neighboring building. Otherwise, “bridges” of cold will form in this zone
If a garage with a pitched roof stands separately from other buildings, then the installation of thermal insulation is carried out according to the described algorithm
It is important to ensure that the materials on both sides of the roof are tightly covered with a canopy.
Gable
When installing a vapor barrier on single- and gable roofs, it is necessary to leave a ventilation gap. To do this, it is enough to place bars in several places between the material and the sheets with which the beams are sheathed.
When working on a gable roof, problems may arise when insulating the junction of the beams at the top point. This moment requires special attention
To avoid the formation of cold bridges, it is important to foam all the cracks on the ridge
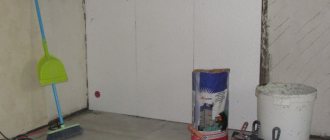
Styrofoam
This material is very popular due to its low cost and ease of installation. It retains heat well and lasts for decades. You can install it yourself, without having any special tools or special construction skills at hand. But it still cannot be called an ideal solution. Although not as significant as mineral wool, it absorbs moisture. Very easily damaged and crumbles. Its granules have low adhesive strength, so over the years they can fly out even with accidental pressure on the material.
But that’s not even the main thing. There is a huge amount of uncertified polystyrene foam in the market due to the high demand for it. Finding a high-quality and safe product for health is not an easy task. And the one that was produced in violation of technology, when the temperature rises and the sun’s rays hit it, it begins to release toxic substances. Considering that the garage is a closed space, this is fraught with serious health problems for the car owner.
Thermal insulation methods
It is recommended to select methods for laying a thermal insulation layer under the roof before installing the rafter structure. This will save time and select the appropriate insulation. There are two ways to install thermal insulation on a garage roof: from the outside and from the inside. Each of these approaches has advantages and disadvantages.
From the inside
Insulation from the inside is carried out in cases where the roof is made of beam structures or reinforced concrete slabs. This option involves laying three layers in the room: steam, heat and waterproofing. If the roof has a beam structure, before installing the specified materials, the roof is sheathed with sheets of insulation. In cases where the roof is made of reinforced concrete slabs, a frame for thermal insulation is first installed on the latter.
Outside
External insulation is carried out after installing the rafter structure, but before laying the roof. The installation process is not much different from the previous one. The only difference is that reinforced concrete slabs cannot be insulated from the outside.
PENOPLEX (extruded polystyrene foam)
Perhaps, for insulating a garage from the inside with your own hands, this is the best option. It is affordable and even easier to install than foam plastic - the joints do not need to be sealed with foam, because they have L-shaped grooves. It is easy to cut and can be glued directly to the wall.
But the most important thing, of course, is its thermal insulation ability - one of the best among modern materials. Moreover, it remains unchanged in any situation. PENOPLEX does not get wet (moisture absorption coefficient is less than 0.4% in 28 days), is not afraid of defrost-freeze cycles and lasts for more than 50 years.
It is resistant to compression, does not shrink, absorbs noise, does not rot, does not harbor insects, and to top it all off, it is a homogeneous mass of polymer without individual granules. This provides it with high strength even many years after the work has been carried out.
Summarizing all of the above, we conclude that this material is ideal for both external and internal insulation.
Advice from professionals
To avoid mistakes when carrying out thermal insulation work in the garage, you need to take into account the recommendations of specialists:
- If there is poor ventilation in the room, the level of humidity in it will be quite high, which will lead to damage to property.
- When insulating, lighting must be removed in advance, stretching it over the last layer of heat insulation.
- The arrangement of a lattice structure allows you to expand the possibilities in matters of final finishing: installation of plasterboard sheets, plastic panels, OSB boards, plywood.
How to insulate a garage from the outside - step-by-step instructions
For external work, it is most convenient to use rigid slabs. The cheapest option is polystyrene foam. PENOPLEX is more expensive, but much more effective in terms of moisture resistance, heat protection, service life and strength. Therefore, we will consider the installation procedure for this particular material. However, it is almost no different from the foam insulation technology.
We will need:
- glue (branded PENOPLEX is best, since its composition is specially adapted for this insulation and does not destroy it);
- a spatula for applying glue or a special gun;
- paint knife or jigsaw for cutting sheets;
- fastening disc elements (4 pieces for each plate).
Step 1.
We prepare the walls.
We clean them of old paint, dirt, dust, cobwebs and other things. You can use a primer to help the glue adhere better. But this is an optional point.
Step 2.
We fix the bottom bar.
It is typical for slabs to start installation from the ground. We attach the starting profile to the dowels and begin laying the material in a checkerboard pattern.
Step 3.
Insulation fasteners.
This is a simple matter: apply glue in strips to the slab and apply it to the wall. We connect the L-shaped grooves to each other, thereby ensuring a tight fit of the material without gaps. When the glue dries, for greater reliability we fix the sheet with disc-shaped dowels.
Step 4.
Final works.
To protect PENOPLEX from ultraviolet radiation and make the facade more aesthetically pleasing, we plaster the walls or cover them with siding, DSP, or other material.
Insulation from the outside
External insulation of the garage roof can be carried out during the construction of the building. Necessary steps in the procedure for how to insulate a garage roof from the outside:
- a vapor barrier layer is laid - it is important that capillary moisture does not enter the insulation, and that steam escapes outside. If steam accumulates and condenses on the ceiling and on the insulation, it will shorten the service life and damage the car with rust;
- a layer of thermal insulation materials is attached - sheets of expanded polystyrene, mineral wool;
- installation of waterproofing in the form of a film, the joints of which are sealed with construction tape;
- roofing materials are laid.
Installation using polymer materials
Installation of polystyrene foam is carried out using plastic dowels, and the edges are additionally glued. The remaining cracks are filled with polyurethane foam. To insulate a metal garage with polystyrene foam, you need slabs 20-100 mm thick. and density 25 kg/cm2. Penoplex comes in the form of sheets with a chamfer for laying on top of each other and is preferably with a density of 35-45 kg/cm2.
To insulate with polystyrene foam and penoplex, the layers are simply glued to the ceiling with glue, and on top they can not be covered with anything or can be puttied and plastered. Polymer materials can be in liquid form - for example, polyurethane foam, which is applied by spraying and does not require a vapor barrier.
Installation with wool or fiber
In the case of mineral wool or fiberglass, a mesh frame is constructed from wood or metal material for the flooring. Installation using fiberglass and mineral wool consists of the following steps:
- a vapor barrier film is laid on the rafters, secured with staples, and the joints are taped with construction tape;
- Fiber or cotton wool is laid between the rafters in a layer of 15 cm, and the edges should be in contact with the boards that are nailed between the rafters (the mesh mentioned above).
The entire insulation system is sheathed with chipboards or other decorative coatings. It is worth remembering that working with fiberglass requires more care than with mineral wool.
Natural materials are almost never used to insulate garage roofs - they work best on wooden surfaces. For garages, expanded clay is often used, made from clay in the form of pebbles with a diameter of 10-20 mm. It is laid on the inside of a pitched roof and requires ideal vapor barrier and protection from moisture - you will need film and foil.
Floor insulation
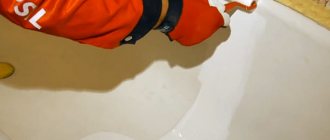
It can be done in different ways. One of the simplest and least labor-intensive options is PENOPLEX insulation under the screed. To do this, the floor will need to be raised a little. This will reduce the height of the room, but you won’t have to dig a pit - you can install the heat insulator on the existing floor. The procedure is simple.
1. Clean the surface, make a cement-sand screed (CSS) or level the coating using building mixtures. It is important that the differences do not exceed 5 mm.
2. At the next stage, we lay the PENOPLEX FOUNDATION® directly on the floor without using glue or dowels. You can put insulating material in one or several layers.
3. To distribute upcoming point loads, it is necessary to fill with concrete mortar or self-leveling mixture 40 mm thick. In this case, the insulation is insulated with film, and its seams are securely fastened with tape. Leave 1–2 cm of empty space between the wall and the screed to take into account thermal expansion and subsequently make noise insulation by filling it with polyethylene foam.
4. At the finish, the finishing floor is laid.
Insulation from the inside
When the garage has already been built, the question arises of how to insulate the garage roof from the inside. To prevent heat from penetrating outside, you will have to install 3 layers of insulating structure.
Installation of polystyrene foam
So, if the floor consists of a concrete slab, the insulation is attached to it. Installing polystyrene foam boards is very simple. The material is cut with a knife to the desired size. The slabs can be attached to the slab using glue or screwed with dowels. The edges between the plates should be additionally lubricated with glue, and the remaining voids should be filled with polystyrene foam or polyurethane foam.
Before attaching the insulation, you need to check the surface of the slab, clean it of plaster: the layer on which the insulation is attached must adhere well and not peel off, otherwise the insulating structure will not fit tightly.
Beam system
If beams protrude from the garage ceiling, the insulation work plan will have to be changed. At the first stage, the beams are covered with sheet material, and then fiber insulation is attached underneath.
To secure the mineral wool, a structure is constructed from wooden blocks, between which mats with fiber insulation are inserted. Next, the entire insulating structure is covered with film or foil to protect it from moisture.
Working with liquid materials
It is easier to carry out work using liquid foam insulation. Foam insulation is applied to all surfaces by spraying. Penoizol penetrates into cracks and hard-to-reach places, quickly hardens and forms an even layer. In addition, such material does not require protection from moisture and is designed for long-term use.
If polymer insulation was used, it is not necessary to install a vapor barrier; it is enough to cover the garage with a waterproofing film. Having finished insulating the garage roof, you should insulate the walls and gates: they are also easy to sheathe with your own hands. The technology remains the same, except that decorative cladding with wood, siding, clapboard is required - as desired.
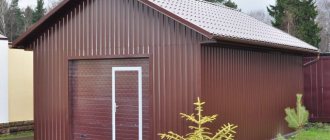
Gate protection
Many people are faced with the problem of seasonal “walking” of the pillars (the base of the gate), which is why they do not close. The best solution is to protect the base (posts) from freezing when installing the gate. If you have already installed ordinary iron gates, then they must also be thermally insulated from the inside. If it is possible to attach the sheets with dowels to the material from which the gate is made, it is worth doing so. If not, the usual glue method will do. The already glued insulation is covered first with a vapor barrier film, then with outer skin. To enhance thermal protection, you can use foiled polyethylene.
Thus, the correct choice of thermal insulation material makes insulating a garage a fairly simple process that anyone can do.
15.06.2018
Return to list
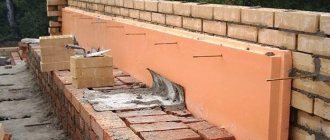
Walls
We start, similar to the ceiling, with waterproofing. At a distance of approximately 60 cm from the floor, frame beams are installed to attach the insulation, but you can use a simplified version by placing the insulation on glue or attaching it to the wall with self-tapping screws.
Insulation is laid between the beams if you still choose this type of fastening. The next stage is attaching the vapor barrier film with staples and covering the walls with any material desired.
An important point: before starting facing work, seal with sealant or foam all the cracks and inconsistencies left after attaching the insulation. The exception is ventilation.
Condensation is the cause of corrosion
Having carefully rolled the car into the garage, you snap the lock on the gate and happily head home through the snow crunching in the cold.
Meanwhile, you have just personally created all the conditions for the favorable development of corrosion on the car body.
The hot metal of the engine and the hot exhaust pipe will heat the icy air in the garage. But the opposition between heat and cold will be unequal. The engine will cool down quickly.
According to the inexorable laws of nature, drops of condensation will appear on the cooled surface. Corrosion takes over.
But condensation does not only form on the car. Treacherous drops will also appear on the ceiling and walls.
If the garage is metal , it is doomed to rust along with the car.
On brick walls, dampness will eventually cause destructive mold, and fungus .
Oddly enough, cars left in open parking lots in winter are not subject to external condensation. But the condensation process occurs in a closed cabin; these cars rust from the inside . That is why it is recommended to close the windows loosely, leaving slits for ventilation.
This is not safe on the street, but always do this the garage
Let's sum it up
In conclusion, we can say that covering a roof with insulation is not so difficult. The main thing is to understand the feasibility of such work: if the garage is built, then there is no point in dismantling the entire roof for the sake of insulation from the outside, because in this case it can be insulated from the inside. When insulating the roof, you need to understand the types of materials and, if possible, take into account the specifics of your garage, use non-flammable insulation if you are working with a welding machine or burners. We wish you good luck in all your endeavors!
More
Video description
In the video, a specialist talks about how to properly insulate a roof with polystyrene foam boards:
If the roof is a non-residential premises, then the rafter system is sheathed from the inside with used slab or sheet materials, or unedged boards. If the roof is part of the attic structure, then the cladding is carried out with plasterboard, clapboard, plywood, chipboard and OSB. Choose any one. It is clear that the skin is subsequently covered with a finishing finish.
And the second option is that the roof is in use. That is, it is covered with roofing material. From the inside of the attic, it looks like the same rafter legs. In principle, the insulation technology is the same, but there is one nuance. A vapor barrier membrane is laid over the rafters from the inside of the attic, as shown in the photo below. That is, the film wraps the rafters, and it is attached to them, but creates a cellular shape of the rafter system, leaving space for laying thermal insulation.
Vapor barrier film laid along the rafter system from inside the attic Source roomester.ru
Outdoor installation
With this approach, all layers of insulation and waterproofing are located on the outside of the ceiling. Accordingly, it is necessary to create a heat-saving “pie” that can withstand all temperature and climate changes. There are two main types of flat roofs, insulated differently:
A classic roof is insulated according to a standard scheme and the layers are laid in the following order, counting from bottom to top:
- Floor slab
- Vapor barrier film
- Insulation
- Waterproofing
This scheme has a significant drawback - external waterproofing requires periodic maintenance and repair. It is produced every two to three years and this entails additional costs, although such a roofing device is slightly cheaper than the other option - the inversion one.
This type of roofing is considered more expensive to install, but it withstands temperature changes better and does not require such frequent repairs. Its fundamental difference from the classic version will be a different scheme for laying layers and arrangement:
- The first will be, as in the previous case, the floor slab
- Then - screed
- Next comes waterproofing
- Next is insulation
- A special film is placed on top - a filter.
- Cover the pie with expanded clay or gravel, at least 50 millimeters thick
This solution allows you to protect the waterproofing gasket and significantly increase its service life.