How many skirting boards are needed?
To buy the right amount of material at once, you should measure the perimeter of the room. To make it easier to understand this issue, it is worth studying an example: the room has a size of 2 * 6, the area will be 12 square meters, and the perimeter will be 11. Usually the size of plastic skirting boards is 2 meters, which means you will need to purchase 6 pieces.
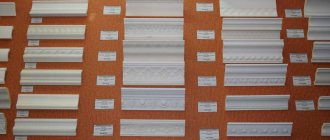
The choice of baguette width is made based on the ceiling height; in high rooms, wider options can be used.
To buy the right amount of material at once, you should measure the perimeter of the room.
How to remove?
Glued or nailed baseboards can be removed using the following construction tools:
- a screwdriver or chisel with a flattened end;
- flexible spatula or thin scraper;
- mallet;
- nail puller;
- wooden wedge;
- stationery or shoe knife;
- hammer.
What is glued first: wallpaper or baseboards
The procedure for gluing skirting boards to a foam plastic ceiling, before or after gluing wallpaper, is determined by the conditions of the repair. Usually the material is pasted before wallpapering. This helps to get a better degree of fixation. And it will be easier to level the wall surface with a putty solution.
It is convenient to glue baseboards over wallpaper because you can apply it at any time, even after a long time. You can then replace it with a new type.
Usually the material is pasted before wallpapering.
Conclusion
From the article you learned what is the best way to glue skirting boards. All the options I reviewed are reliable and durable, it’s just that some technologies are simpler and some are more complex. The video in this article will provide additional information and clearly show some important aspects of the workflow. If you have questions or clarifications on the topic, write them in the comments under this review, we will analyze them in the most detailed way.
Did you like the article? Subscribe to our Yandex.Zen channel
November 23, 2016
Operations with ceilings, Ceiling finishing, Ceilings, Ceiling structures
If you want to express gratitude, add a clarification or objection, or ask the author something, add a comment or say thank you!
Choosing adhesive for ceiling plinths
Before deciding how to glue the baseboard to the foam ceiling, you need to determine what material will be used for gluing and the level of preparation of the wall. The glue may have the function of leveling the surface; its cost also depends on its properties.
Before deciding how to glue the baseboard to the foam ceiling, you need to determine what material will be used for gluing.
Polymer adhesives
These adhesives have a strong odor and reliable fixation and can hold heavy materials. They have a high degree of adhesion to wallpaper and plaster.
These adhesives have a strong odor and reliable fixation and can hold heavy materials.
Titanium
Titanium is intended for gluing with many types of materials, including polystyrene foam baguettes and polystyrene foam. It can be used in any climatic conditions; high humidity is also not a problem. After drying, it does not emit harmful elements, therefore it is safe.
Suitable for indoor and outdoor use.
It can be used in any climatic conditions; high humidity is also not a problem.
Moment
The glue helps to obtain a high-quality seam by securely attaching the material to the base. When working, it is important to protect your skin from contact with the product and wear a respirator. It is advisable to wear special glasses.
The glue helps to obtain a high-quality seam by securely attaching the material to the base.
Eco-naset
Similar in properties to Titan. It has a transparent structure, a budget product that is harmless to human health.
It has a transparent structure, a budget product that is harmless to human health.
Polyvinyl acetate adhesives
These are harmless adhesives that can be used in children's rooms. However, the level of fixation is not high. Therefore, they apply it in a thick layer, which increases consumption.
These are harmless adhesives that can be used in children's rooms.
Liquid Nails
Liquid nails work well with gluing plastic skirting boards. They do not harm the material and create stable adhesion. There are neopropylene nails that have an unpleasant odor and are chosen for rooms with high humidity. And acrylic ones are odorless, create weak adhesion, and are suitable only for light parts.
Liquid nails do not harm the material and create a stable adhesion.
Putty
Putty is necessary if you have to simultaneously level the surface and remove defects. It is convenient to work with it in corners. Operation at low temperatures and high humidity is acceptable.
Putty is necessary if you have to simultaneously level the surface and remove defects.
Silicone sealants
They are chosen when faced with the presence of large joint areas that are sealed with sealants. The resulting seam is resistant to moisture and dirt.
They are chosen when faced with the presence of large joint areas that are sealed with sealants.
Homemade glue
To create your own glue, mix PVA glue, putty and water. The adhesive solution must be used within 120 minutes. Cheap option for gluing skirting boards.
The adhesive solution must be used within 120 minutes.
Description of 2 workflow options
Let's figure out how to glue foam and polyurethane baseboards, since these options are used in 90% of modern houses and apartments. The technology is based on your own experience, so you just need to repeat all the steps, especially since gluing is a simple process, it does not require construction skills, accuracy and precision are much more important.
The more meticulously you measure and mark out the elements, the better the quality of the plinth gluing will be.
Option 1 – fastening with putty compound
This option is suitable if you have not yet hung wallpaper; I consider it the most preferable, since the result is high-quality and reliable. Thus, it is possible to attach both foam and polyurethane, as well as gypsum elements.
First, let's figure out what materials are needed.
There are many options, which allows you to choose the optimal solution for any room.
| Material | Recommendations for selection |
| Skirting | You choose the specific option yourself; it is important to remember a simple rule: for low ceilings and small rooms it is better to take narrow planks, and for tall rooms wide elements are more suitable. Foam plastic products are most often used; they are distinguished by their low price, large range of possible options and minimal weight. |
| putty | Many people do not know what to glue the elements onto and buy special glue, while the remains of putty on hand disappear. There are no special requirements, the main thing is that the mixture is suitable for work and has a normal shelf life (you should not use fossils from bags that have been in the basement for several years) |
| Primer | To secure the elements to the base as firmly as possible, you need to prepare the surface. An acrylic-based primer is best suited for this. |
You can also use gypsum adhesive, but I do not recommend it for the simple reason that the mixture sets very quickly, and there is not much time to position all the elements perfectly.
Don't know what is the best way to glue the baseboard? The remains of any putty will come in handy
Now let’s figure out what tool is used to glue and prepare the plinth:
- Cutting is best done with a hacksaw with fine teeth; a metal tool is best suited. I recommend using a construction knife only for elements up to 20 mm wide, since it is impossible to cut wide planks efficiently and evenly in this way;
A hacksaw is great for foam elements
- To cut corners perfectly, you will need a special device, it is called a miter box;
A miter box will help you perfectly fit corner joints.
- The putty is applied with a spatula up to 100 mm wide;
- A brush is necessary for applying primer;
- If any roughness remains on the surface, the easiest way to remove it is with fine sandpaper.
Now let's figure out how to properly glue the ceiling plinth:
- First of all, it is necessary to check the junction of the ceiling and the wall; if there are unevenness on the surface, then they need to be eliminated;
- The place where the frame will be attached must be treated with a primer, just go over it with a brush to strengthen the surface. Before use, the soil must be mixed (if you have a ready-made composition) or diluted (if you have a concentrate);
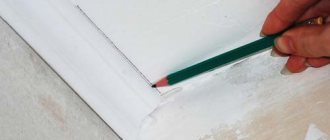
- It is best to pre-mark the line for placing the plinth; you can simply take the element and mark its position. This will allow you to see clear guidelines when working, you will control the process and will not fasten the product crookedly ;
The applied marks will allow you to avoid mistakes when carrying out work.
- Measuring the exact length of the elements is a very important process; if you are mistaken by even a couple of millimeters, you will get gaps at the joints that will have to be sealed. Therefore, do everything with maximum precision and measure dimensions down to the millimeter in order to fit all the components together as tightly as possible;
Measurement requires care
- Once the dimensions are determined, you need to mark the lines on the baseboard and cut. Here it is important to install the plinth in the miter box as it should be, in case you mix something up and ruin the product. The diagram below shows how to align the strips correctly when cutting the joints of internal and external corners, use the drawing as a hint when working ;
This is how internal corners are cut
External connections are located like this
- When the preparation of the elements is completed, you can prepare the glue for the ceiling plinth. To do this, we just need to dilute the putty with water in the same way as for finishing work, the mixture should be moderately thick and well mixed so that there are no lumps in it;
- Now you need to apply the composition to those sides of the baseboard that will be pressed against the base. The layer should be uniform, but not very thick, otherwise, after pressing, a lot of excess will come out from all sides, which you will have to remove . There is no need to apply the mixture to surfaces that are not in contact with the wall and ceiling, there is no point in this;
The composition is carefully distributed with a spatula
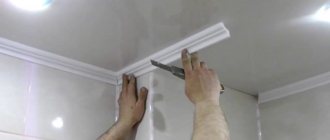
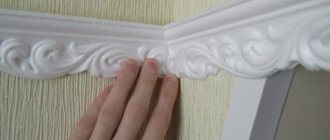
- How to properly glue ceiling plinth? It's simple: work starts from the corner in the most visible place, the element is placed against the surface and pressed tightly against it. Most likely, excess composition will come out from under the element; it should be carefully removed while the composition is fresh, and this can be done easily;
The panel must be pressed firmly and evenly
- When the excess is removed, at the same time the cracks at the joints, if any, are sealed. That is, you carefully align the joint, giving it an ideal look; this putty is better than glue. Even if there are unevenness on the wall, you immediately cover it up and thereby achieve an ideal result;
This is how all joints are brought to perfect condition
- The next element is attached in a similar way. But, before gluing the joining plinth, you need to apply putty to the end joint, so you can immediately seal the connection and fasten the planks in this place. The most important thing is to clearly combine the products so that the overall geometry is ideal; any displacement will be very noticeable;
Glue is applied to the end of the joined plinth
It is important to align the baseboard tightly, after which you can remove excess composition from the surface
- If after drying there are irregularities at the joints, then they should be carefully removed with sandpaper . After this, the surface is primed and painted in the desired color, everything is simple. The only thing worth mentioning is that if you need to protect the walls or ceiling from paint, then apply masking tape first so that the work goes quickly and efficiently.
Painting gives the surface a uniform appearance and hides all joints
When pressing a foam baseboard, you should not press on it with your fingers, since the material is soft and marks may remain on the surface that will have to be either puttied or left as is. The easiest way to press elements is with the back of your hand.
Option 2 - use of adhesive composition
This type of work can be used both on bare walls and on surfaces that are already covered with wallpaper. The only thing I want to draw your attention to is that the wallpaper must be glued securely; if it starts to fall off later, the baseboard will also come off.
First of all, let’s figure out which glue is best for gluing the baseboards:
- Universal mounting compounds are a transparent mass that hardens slowly and is used for different types of materials. The most popular option of these is “Titanium”, it is also often called polystyrene glue, although it is for this material, and not made from it. I rarely use this composition, since working with it is inconvenient: the surface is smeared, left for a while, then pressed and held;
This glue is suitable for the job, but not very convenient to use.
- An excellent solution is liquid nails; they are produced both in special cylinders for a gun and in tubes. There are special options for polystyrene foam products; these are the best to use;
What should I glue the frame onto? Liquid nails are great for these purposes.
- How to quickly glue the baseboard if there is no glue at hand? Acrylic sealant is perfect; it has the required viscosity and fixes the elements very reliably. Personally, I most often use this option, since it has another important advantage, which I will talk about when describing the work below.
You don’t have to figure out what is the best way to glue the baseboard, but just take acrylic sealant
There is no point in considering the list of necessary tools, since it is similar to the section described above with the only difference being that in this case a spatula is not needed and there is no need to prepare the composition. Therefore, I will immediately begin to explain how to properly glue the elements.
The do-it-yourself work plan consists of the following points:
If you break the work into small parts, it is much easier to understand it
- First of all, the surface needs to be checked for unevenness; if there are any, it is advisable to eliminate them so that the planks are pressed as tightly as possible;
- Then the length of the required elements is measured, you can also mark the wall to see the location of the plinth, these operations have already been described above;
- Cutting is done using a miter box;
If it turns out that this device does not exist, then you can make it on a sheet of paper or cardboard, the main thing is to put the corners correctly. It’s more difficult to work with such a device, but it’s perfect as a way out of the situation.
This improvised miter box will help you cut the baseboard at the right angle.
- We discussed above what kind of glue to use to glue the elements, and if you have the option in a can, then don’t forget to purchase a gun to simplify the application process. The composition is distributed in a line on those surfaces that will be glued. Sometimes the elements are attached only to the wall, in which case the glue is applied only to one side;
The glue is carefully applied with an indentation from the edge so that it does not come out at the joint
- The elements are carefully placed in the place of gluing and fastened as indicated in the instructions for using the composition . Some options need to be held, some pressed, then removed for a while for the glue to set, but it’s easier to use those that set quickly: pressed, held for a few seconds - and that’s it (sealant is just right for this);
The element needs to be pressed for a few seconds so that it sticks well.
- The plinth is left until the glue dries (the time is indicated on the packaging with the composition), after which you need to seal the cracks that may appear at the joints or in places of unevenness on the walls. For the work, acrylic sealant is used (that’s why I wrote above that it is most convenient to use), it is applied in the required places, after which its excess is removed with a rubber spatula or even with a finger so that the joint is neat and even;
There can be many problems, all of them need to be eliminated
The composition is carefully applied to the joint
Excess is removed immediately, this is the easiest way
- If necessary, the baseboard can be painted, but before that it is advisable to prime it. If you do everything carefully, the frame will look great anyway, because both the planks and the sealant are white, and if there are no unevenness on the surface, then the joints will be almost invisible against the general background.
I am often asked if there is a self-adhesive plinth for ceilings? But so far I have not seen such options; there are flexible elements for the floor and bathroom, so the ceiling structures will have to be fixed using traditional options.
Step-by-step instruction
Proper gluing involves performing several stages of work, which will be described below. If the surface is not well prepared, then the baguettes may be glued crookedly and unreliably. As a result, the effect will be negative.
If the surface is not well prepared, then the baguettes may be glued crookedly and unreliably.
Required Tools
Repair work begins with the preparation of tools and materials that will be needed during work. The following items should be purchased:
- Wide skirting boards are cut with a hacksaw, narrow ones (up to 2 cm) can be cut with a stationery knife;
- Miter box, for adjusting corners;
- Narrow spatula;
- Fine-grain sandpaper.
Repair work begins with the preparation of tools and materials that will be needed during work.
Surface preparation
The walls are leveled so that the fastening goes smoothly. The surface is sanded using sandpaper. Apply the primer mixture and wait until it dries completely. Markings are made, baguettes are applied to the surface, and the joints are marked with a pencil. Prepare the material according to the required dimensions.
The walls are leveled so that the fastening goes smoothly.
Gluing onto putty mixture
When working with putty, it is often necessary to dilute it; work according to the instructions, adding the amount of water specified by the manufacturer. Then proceed as follows:
- The mixture is applied in a thin layer to the baseboard.
- Excess from the front side can be removed using a rag or sponge.
- Place the molding against the wall according to the markings, check the evenness, and press it against the wall without force.
- The next baguette is additionally greased with the mixture from the end.
- Having glued all the parts, they are left for 24 hours, after which the surface is sanded.
When working with putty, it is often necessary to dilute it; work according to the instructions, adding the amount of water specified by the manufacturer.
Glue mounting
The principle of operation is similar to that described above; glue must be applied to the baseboard according to the instructions from the manufacturer. Press the material against the wall along the central and outer parts. Hold for the period of time indicated on the package. Excess adhesive solution is removed immediately. After drying, the joints are filled with sealant.
Press the material against the wall along the central and outer parts.
Cut skirting boards at an angle
For the joint, adjacent skirting boards must be cut at an angle of 45°. This can be done in different ways. The simplest one is in a special template called a miter box. You can do without additional devices and cut the fillets by trying them on next to each other.
How to trim a baguette in a miter box
Illustration: Artem Kozoriz / Lifehacker
Place the plinth in the miter box, press its edges against the walls of the template and cut at the desired angle in the required direction: one of the baguettes from right to left, the second from left to right. It is better to work with a stationery knife with a new blade or a hacksaw with a fine tooth in the case of hard cornices.
When trimming a ceiling molding, it is applied to the wall of the miter box closest to you. The far one is intended for floor skirting boards, and if you use it as a guide, the parts will not fit together.
Place the pieces together and check how accurate the joint is. If necessary, trim with a sharp knife or cut again.
How to trim a baguette without a miter box
Illustration: Artem Kozoriz / Lifehacker
Place the left plinth in the corner, then move the right one close to it. On the first element, use a pencil to mark the distance by which it overlaps with the second piece.
Illustration: Artyom Kozoriz / Lifehacker
Now swap them: place the right baguette in the corner and, moving the left one towards it, make a similar mark.
Illustration: Artyom Kozoriz / Lifehacker
Next, all that remains is to cut off both fillets from the mark to the opposite edge. As a result, the elements must fit together perfectly.
Illustration: Artyom Kozoriz / Lifehacker
The advantage of this method is that it is suitable for surfaces with any angles. Whereas a miter box allows you to trim skirting boards only for walls with perfectly right angles.
How to glue baguettes to different surfaces
The principle of operation depends not only on the type of product, but also on the type of base to which the baguettes will be glued. They need to be taken into account when working independently.
On a suspended ceiling
Narrow foam materials are selected, in which the upper part is the same as the lower one. Then you will be able to apply glue only to the area attached to the wall; you cannot touch the stretch ceiling. The adhesive solution must have a high level of adhesion.
You should work carefully so as not to leave glue stains on the ceiling covering, as they can ruin it.
Narrow foam materials are selected, in which the upper part is the same as the lower one.
For wallpaper
Skirting boards can be glued to wallpaper only if they are securely fixed. The adhesive mixture must have reliable fixation. To avoid glue getting on the canvas, masking tape is glued to the bottom of the marking border.
Skirting boards can be glued to wallpaper only if they are securely fixed.
On drywall
Joint areas are considered a difficult area to work with. Where the putty may be uneven, it is smoothed out using sandpaper. Plasterboard sheets reduce the space of the room, so for visual interest, panels are glued with the wide side to the ceiling covering.
For visual interest, panels are glued with the wide side to the ceiling covering.
For plaster
The plaster may be uneven, so it is advisable to treat it with a putty mixture. If necessary, resort to applying a primer and sanding the surface.
The plaster may be uneven, so it is advisable to treat it with a putty mixture.
How to choose?
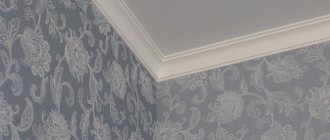
Thanks to ceiling plinths, you can improve the appearance of the room, and the ceiling is the final element in the renovation. With the help of skirting boards, errors, uneven walls and other nuances are hidden . But in order for the fillets to last as long as possible, you need to choose high-quality glue.
Fillets help hide uneven walls
Construction stores have a huge range of putties and mixtures for fixing ceiling plinths. But only a few meet the requirements and are designed for gluing fillets. When choosing an adhesive, you need to consider several characteristics :
- no pungent odor;
- instant setting;
- strength;
- Ease of use;
- compliance of glue and selected fillets.
Tips and tricks
Lessons from professionals will help you glue the cornice securely. Experts recommend choosing quick-drying products for large areas to reduce the time required to complete the work. But they require wearing a respirator and protective equipment.
For medium-sized rooms, harmless compounds can be used, which are more convenient to work with. When choosing polymer adhesives, it is necessary to remember the health hazards; in addition to protective equipment, good ventilation is ensured.
Experts recommend choosing quick-drying products for large areas to reduce the time required to complete the work.
Types of polymer compositions
Polymer adhesives are divided into two groups. The first includes compositions with instant action (for example, “Moment”). They set in just a few seconds. In this case, you need to adjust the edging to the level very quickly.
The second category of compositions is preferable for novice installers. In this case, there will be enough time to level the position of the baguette. Polymer compositions may contain toxic components. Thus, “Moment” includes ethyl cyanoacrylate. It may cause skin irritation. Therefore, work is carried out only in protective clothing, gloves and goggles. Even a small drop of this composition if it gets into the eye can lead to loss of vision.
Problems during operation
The main problems arise when the surface is poorly cleaned and prepared for work, or when the adhesive solution is incorrectly selected for the base and baguette. Also, drafts should not be created during the first 24 hours; this will lead to the material peeling off and the work will have to be done again. If you don't make these mistakes, the process will be easy.
You should not create drafts during the first 24 hours, as this will lead to the material peeling off.
The article described in detail how to glue a foam plastic ceiling plinth. It is important to pay attention to the choice of adhesive solution so that it fits the base and foam. The process is simple, you can do it yourself.
Fillet and suspended ceiling
Stretch ceilings without plinths have an unfinished appearance. That is why sticking the molding is considered a mandatory final step. For suspended structures, elements that meet the following conditions are used:
- maximum light weight, since fastening is carried out only in one plane - from the side of the walls;
- ensuring a tight fit to the surface to be glued for the above reason;
- ease of installation;
- the product is sufficiently wide to make it possible to hide the structural elements holding the ceiling sheet.
Foam fillets meet these conditions. It is especially interesting to use it when creating rectangular multi-level structures. With this type of ceiling, fillets of various widths are used and made into two tiers. The use of foam plastic in some interiors is limited only by the need to frame bent contours in the form of pillars, ellipses and other geometric shapes with a smooth transition - the material is fragile, it is impossible to give it the desired shape. To frame figured stretch ceilings, plinths made of polyurethane foam and plastic are used. Their properties allow you to create a frame along any contours of the base.
Skirting under a suspended ceiling
Recommendations for installation on this type of ceiling are presented as follows:
- The load-bearing side is the side adjacent to the wall. Glue is applied to it, it is responsible for the strength of the fastening.
- Docking of baguettes is carried out in the classic way, given below in the text. But you can purchase special connecting elements - this will simplify the work and reduce the total time for installation activities.
- The width of the molding should ensure complete concealment of fasteners or internal wiring when using LED ceiling lighting.
- The adhesive composition should ensure quick fastening of the elements. The use of putty-based mixtures is not recommended. The optimal solution is “Liquid nails” or even more active compounds.
- The requirements for preparing the base for attaching fillets are reduced to the standard ones - cleaning the surface from dust and priming.
- Painting of the perimeter elements, if necessary, is carried out before direct installation.
Important! Before starting work, measures are taken to prevent the adhesive from getting on the stretch ceiling fabric. If such operating consequences occur, they must be eliminated immediately. The opposite can lead to irreversible damage to the canvas.
A video tutorial on how to glue a plinth to a suspended ceiling is presented in the following video:
Advantages and disadvantages
In many interior design options, foam dumbbells are used. Such solutions are associated with the following advantages of the material and its derivatives:
- Inertness to inorganic materials - lime, cement, alcohol, alkaline and others.
- Low cost of products and minimal costs for consumables.
- Wide selection of products. Any retail outlet that sells building materials offers dozens of options for foam dumbbells. You can choose the pattern and width of the product for any interior.
- Presentable appearance. The texture lines are highlighted quite clearly. When dyed, they can complement a variety of designs.
- Possibility of coloring. Use water- or acrylic-based paints.
- Ecological and hygienic cleanliness. The use of elements made from this material does not create a favorable environment for the development of bacteria and fungal accumulations.
- Simple installation, accessible even for novice home craftsmen.
- Possibility of using plinths under a suspended ceiling.
- Low weight of elements.
- Absolute absence of hygroscopicity, eliminates the possibility of rotting.
- Possibility of gluing to putty mixtures without the possibility of breaking the fastening density during operation.
Ceiling plinth
Disadvantages include:
- the elements are fragile and require careful handling at all stages of work;
- they are subject to external mechanical damage;
- long-term use is associated with slight yellowing of unpainted surfaces;
- When exposed to heat from an open fire, they lose their consumer properties and release a significant amount of toxic substances.
Pay attention to the granularity of the foam composition, which causes difficulties when joining the ends of the parts. However, this feature is neutralized by simple putty. If there are minor defects in the joints or the formation of areas of loose fit to the planes, wait for the main adhesive composition with which the baguette was secured to dry out. Then the joints are puttied and cleaned with emery cloth.
Bottom line
Installation of ceiling plinths is one of those simple activities that you can implement on your own. Before gluing the ceiling plinth to the ceiling, it is recommended to pay special attention to the quality alignment of the walls and ceiling.
Sources
- https://comfort-da.ru/kak-kleit-potolochnyi-plintus/
- https://otdelkasam.ru/vnutrennyaya/potolok/kak-pravilno-prikleit-potolochnyj-plintus-iz-penoplasta.html
- https://pod-potol.com/prinadlezhnosti/plintusa-i-bagety/na-chto-kleit-potolochnyy-plintus-rekomendatsii.html
- https://stroyday.ru/remont-kvartiry/steny-i-potolok/kak-krepit-potolochnyj-plintus.html
- https://HomeMyHome.ru/kak-kleit-potolochnyjj-plintus.html
- https://pod-potol.com/prinadlezhnosti/plintusa-i-bagety/kak-pravilno-kleit-potolochnyy-plintus-na-raznye-vidy-potolka.html
- https://GidPoKraske.ru/rabota-s-kleem/kak-kleit-potolochnyh-plintus.html
- https://StroyGuru.com/remont-kvartiry/potolok/kak-kleit-potolochnyj-plintus-iz-penoplasta/
- https://KraskaGuru.ru/klej/dlya-stroitelstva/potolochnye-plintusa.html
- https://FB.ru/article/342996/na-chto-kleit-potolochnyiy-plintus-iz-penoplasta—osobennosti-vyibora-kleya-i-rekomendatsii
- https://HoroshijPotolok.ru/otdelka/klej-dlya-potolochnogo-plintusa.html
2 377
What characteristics should you pay attention to when choosing
When choosing and purchasing foam ceiling plinths, you should pay attention to the following distinctive features and technical characteristics of the products:
- Foam density - as a rule, sellers offer materials with a volumetric weight from 25 to 40 kg/m3. As the density increases, the price increases, but at the same time, the element has increased compressive and bending strength.
- Element profile shape - different manufacturers supply foam ceiling plinth to the market in 4 main types of profile shapes:
- Concave design is the classic type.
Concave part profile shape
- Convex shape - used mainly for modern interiors.
Convex part profile shape
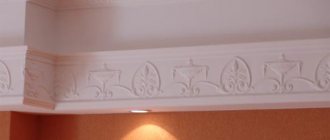
- Figured dressing of complex configuration.
Figured finishing of the part profile
- Design of bas-relief in antique, Indian and other styles. The range of products is very large, and each owner of the premises can choose the decor to suit his taste.
Image of artistic bas-relief on the surface of the part
- Cross-sectional dimensions and length of parts. Products are supplied to the market from 2.5 to 3.5 - 4 meters in length, with profile dimensions from 15 - 25 mm to 200 - 400 mm, depending on the style.
- The plinth can be of symmetrical or arbitrary (asymmetrical) section.
Symmetrical profile section
- Composition and flammability class. The material should not contain formaldehyde or other toxic compounds, and the base should be self-extinguishing, which also guarantees its fire safety.
- Surface type – products are offered in both technical and finishing versions.
An element that does not require finishing
When choosing, it is also worth studying the main suppliers and the presence of positive reviews on forums on the Internet about their products, indicating the pros and cons.