The technology of manufacturing walls, partitions and ceilings from metal frame structures covered with sheets of plasterboard has become extremely widespread in construction. The most used technology today is Knauf designs. But if you need to mount a wooden frame, in this article we have described the work process in detail. First, let's look at a small list of terms that will be used in this article.
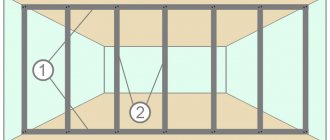
Mounted frame made of metal profile for fastening drywall.
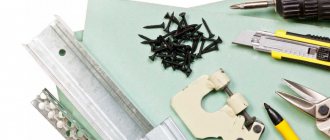
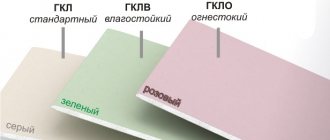
- Gypsum board sheets (GKL) are a building material consisting of sheets of gypsum framed with layers of cardboard measuring 2400 x 1200 x 12.5 mm. Sheets with a thickness of 9 mm are used for covering the ceiling.
- Metal profile – PS 50/75/100 mm x 50 mm x 3000 (rack profile), PN 50/75/100 mm x 40 mm x 3000 (guide profile), PP (ceiling profile) 60 mm x 27 mm x 3000 mm , PNP (ceiling guide profile) 28 mm x 27 mm x 3000 mm, UP (reinforced profile with a metal wall thickness of 2 mm) – 50 mm x 40 mm x 3000
- Soundproofing tape with an adhesive side made of latex foam rubber, 3 mm thick, 27 mm - 100 mm wide.
- Suspensions – straight and anchor for fastening profiles,
- Hardware – fastening screws and dowels. They are used to connect metal profiles to each other and to the surfaces of walls and ceilings.
Types of profiles
Using plasterboard structures, you can install soundproofing systems and conduct communications in walls and ceilings - electrical and water supply.
In our article we will look at the main structures that are made from metal profiles and gypsum plasterboard. It should be noted that such systems can be made from wooden beams instead of metal profiles. But this article will not discuss such technology. The article will describe in detail the installation of the following structures:
- Partition.
- Wall sheathing.
- Ceiling.
- Doorway.
Tips for choosing
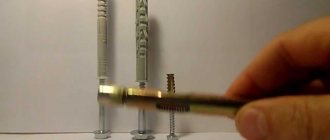
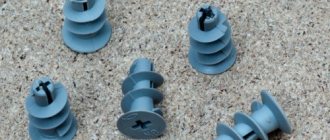
A dowel-nail consists of two elements: a dowel, which is inserted into a hole in the wall, and a nail, which is driven or screwed into the dowel if there is a thread on the rod. The cap has a slot, usually for a Phillips screwdriver. Dowels made of polypropylene are suitable for installation in heated rooms, while dowels made of nylon are able to withstand sub-zero temperatures, so they can be used even outdoors.
You can use a dowel-nail for concrete, brick and foam concrete, it all depends on the design of the dowel. Based on this principle, the following types are distinguished.
- Spacer - fixed due to the expansion of the sleeve in the hole, its relief surface limits the movement of the dowel.
- Universal - fastened in the hole due to the knot that is formed when twisted.
When buying dowel nails, pay attention to their size . The diameter can be from 5 to 8 mm - the larger it is, the heavier objects the fastener can support. The most common dowel nails for fastening plasterboard profile frames into concrete are size 6x40.
The length of the nail can be from 40 to 120 mm - the longer it is, the more securely it will hold the suspended structure. Also consider the amount of fasteners in the package and make your choice based on the amount of work to be done. If you need to display one shelf and several paintings, a package of 6 to 10 pieces is enough. When you need to fasten many items, it is better to take items with a reserve, for example, 100 - 150 pieces.
Choosing material
Wooden frame
Plasterboard on the ceiling can be mounted on two types of frame elements:
- wooden slats and bars. Their qualities are slightly inferior to metal profiles, since their service life, especially in certain conditions, will be somewhat shorter;
Note! A wooden frame can only be used in rooms where there is a dry microclimate. But still, wooden elements must be pre-treated with special means to prevent their destruction.
Metal carcass
- metal profiles. They are more preferable in terms of forming a frame for plasterboard sheets. They are more durable and will serve faithfully much longer. For the ceiling it is recommended to use only metal frame elements.
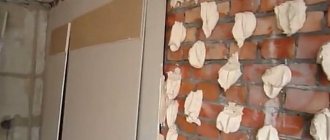
The choice of material for the sheathing is entirely up to you. But remember that in rooms such as a kitchen, a toilet with a bath, as well as a balcony and a loggia, it is better to use metal profiles.
Dowel-nail for gypsum boards
When using drywall, you should choose the right fasteners. Not only the strength of the structure being created depends on this factor, but also the appearance, service life of the structure, its technical characteristics - whether this structure can be weighted with various objects. For installation of gypsum plasterboard frame. The type and number of selected dowel-nails depends on the type of frame, the selected profiles; they differ in the thickness of the material from which they are made, the material of the walls and ceiling. (Foam concrete, shell rock, concrete, brick, etc.)
To install a metal frame, not only self-tapping screws are purchased, but also dowel-nails. These fasteners create the strength of the entire frame for drywall. To use these fasteners, you should familiarize yourself with their characteristics. Improper use may have a negative impact on the metal frame.
Varieties
Ceiling compositions of different complexity and number of tiers require the use of different fasteners. The two most common types are:
- Standard direct fastener in the form of a perforated strip that is bent at the edges, resulting in a U-shaped part with perforations on the long parts.
- Adjustable elements in the form of two rods connected by a metal adjustment bar. Another type of such fastener is equipped with only one rod and a bar that allows you to adjust the installation height of the frame.
For simple single-level solutions, as well as in cases where the base is sufficiently flat, direct fasteners are used. For complex compositions with several levels or for installing ceilings on floors with significant defects, adjustable fasteners are used.
Sometimes, instead of adjustable strips, a section of profile is used, fixed to the base surface using a perforated plate, and directly to the frame, such a two-part structure is attached with self-tapping screws. Such combinations of different elements make it possible to assemble the most complex composition at any distance from the ceiling.
[custom_ads_shortcode1]
Classification of dowel-nails
In order to purchase dowel nails, you should consider the following factors:
- Estimated load on the fastening element, on the surface itself.
- The base into which the dowel-nail will be attached is concrete, brick.
- Surface – ceiling, wall.
The fastening element is not uniform and is available in different sizes and structures.
Installation differences
Depending on the structural structure of the dowel, nails should be worked with different tools.
Manual fixation of the dowel-nail - in this case, 2 types of dowel-nails with different structures are used. Nails without threads are driven in with a regular hammer. Threaded - you will need a screwdriver or screwdriver.
Fixation with a construction gun. For this type of installation, dowel-nails with a metal sleeve are used. They are manufactured to carry more weight.
Dimensions of dowel-nails
The fastening element is produced in various sizes. Depending on the purpose, you should purchase a dowel-nail of the required size. Fasteners are marked with two numbers: the first indicates the diameter, the second indicates the length of the fastener.
| Size diameter/length | Dowel length | Nail length | Min depth for through installation | Max thickness of mounted material | Weight 1000 pcs. per kg. |
| 6/40 | 4 mm. | 42mm. | 50 mm. | 10 mm. | 3.3 |
| 6/60 | 4 mm. | 62mm. | 70 mm. | 30 mm. | 4.89 |
| 6/80 | 4 mm. | 82mm. | 90 mm. | 50 mm. | 7.28 |
| 8/60 | 5 mm. | 62mm. | 70 mm. | 20 mm. | 8.5 |
| 8/80 | 5 mm. | 82mm. | 90 mm. | 40 mm. | 11.02 |
| 8/100 | 5 mm. | 102mm | 110 mm. | 60 mm. | 13.78 |
| 8/120 | 5 mm. | 122mm | 130 mm. | 80 mm. | 16.53 |
| 8/140 | 5 mm. | 142mm | 115 mm. | 100 mm. | 19.3 |
| 10/100 | 7 mm. | 102mm | 150 mm. | 50 mm. | 15.32 |
Technical parameters of dowel-nail
According to GOST 28457-90, dowel-nails are produced. They undergo processing - hardness 53-56HRC. But they may have a deviation of 51/5HRC.
- The rod can be bent according to factory settings: with a length of 50mm. – 0.1mm curvature; length is more than 50mm. – 0.15mm.
- There should be no ripples or cracks on the nail. The nail must be sharp if the dullness is 0.8 mm. – it is considered unsuitable.
- The nail point can be multifaceted.
- There may be a washer on the nail. A force of 0.3 kN is required to shift it.
Dowel nails are made with an anti-corrosion zinc layer. It must be no less than 6 microns.
Ceilings made of corrugated sheets with permanent formwork
When constructing a monolithic reinforced concrete floor, corrugated sheets act as permanent formwork. A reinforcement frame made of metal rods is laid on top, and concrete of the required grade is poured. The entire structure rests on longitudinal metal beams made of I-beams or channels.
Thus, the monolithic floor transfers the load acting on it to the load-bearing columns and foundation. By preventing concrete from spreading, corrugated sheeting acts as additional external reinforcement. The frame structure becomes more rigid and stable.
During the work, it is recommended to pour concrete first in one span, then in the other, since it will not be possible to fill all the cells at the same time without the concrete drying out.
To save on labor-intensive and expensive ceiling finishing, it is recommended to choose sheets with double-sided polymer coating. In this case, the ceiling surface becomes resistant to any external influences.
The choice of grade of corrugated sheeting is of great importance. The sheet must withstand enormous loads from the weight of concrete. It is recommended to choose brands “N” or “NS”, with a high fin height, and a trapezoidal wave shape.
Suspended ceiling systems occupy a leading position as the choice of the most optimal solutions for renovation of premises. Any technology for installing a suspended ceiling involves installing a system frame to which the ceiling structure will be attached (it can be made of a wide variety of materials). Today we will talk about how to properly attach a profile to a ceiling surface.
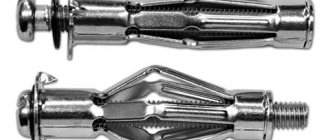
What is a metal wedge dowel?
This fastener is commonly called a metal wedge anchor. It is made from metal. The word "anchor" is translated as "anchor".
The metal dowel for drywall has a different installation technology. The moving part of the fastener is driven in with a hammer, due to which the dowel is wedged into the surface.
According to GOST, 2 types of metal dowels for drywall are produced: 6/40 and 6/60, where 6 is the diameter in mm, 40(60) is the length in mm. Wedge anchors are available for sale in packages of 100 and 200 pcs.
How to hammer a metal dowel wedge quickly with a hammer drill, watch the video.
Video:
Features of using a wedge anchor
The wedge anchor is made of galvanized steel or stainless steel. Carbon steel is used and coated with white or yellow zinc. On the head of the anchor there is a manufacturer's mark indicating the density of the metal used.
Basically, these metal wedge fasteners are produced for fastening profiles or hangers to the base and are the recommended fastening.
The wedge anchor is produced in the form of a metal rod. There is a locking cap at one end, and a wedge-shaped spacer end at the other. When mounting, an anchor is placed in the hole made and the moving part is driven in with a hammer. In this case, the wedges diverge in different directions, thereby fixing the fastening element in the ceiling. The wedge anchor is particularly reliable when attached to the base.
Factors affecting structural strength
In order for the wedge anchor to have a long shelf life and also maintain strength, there are some factors that influence these indicators:
- The wedge anchor is driven into the base, which has no voids. This ensures fastening strength.
- With high humidity, the concrete base will constantly absorb moisture, which can cause premature corrosion of the metal.
- If there is constant pressure (movement, vibration) on the base into which the wedge anchor is mounted, the wedge will soon break out.
- If there is a moving part left above the surface - the rod, this means that the anchor has not fully opened. However, the service life is limited.
- Chemical solutions should not be allowed to come into contact with the fasteners. They will destroy the fastener.
Comparative table with which you can determine the strength of the anchor wedge:
| Name | 6/40 | 6/60 |
| Diameter of wedge anchor, mm. | 6 | 6 |
| Wedge anchor length, mm. | 40 | 60 |
| Max thickness of fixed material, mm. | 5 | 8 |
| Drill diameter for hole, mm. | 6 | 6 |
| Min depth of hole for anchor, mm. | 45 | 65 |
| Pull-out force minKN from concrete B25 | 3.60 | 5 |
| Weight 1000 pcs, kg. | 10.70 | 16.05 |
Separately, it should be noted that for fire safety reasons, all suspended structures must be secured with metal wedge anchors.
Tools you may need
To install the frame, you will need to attach the profiles to each other and to the base. Dowels will help you cope with this task. All you need to do is select their size, which is selected taking into account the material used to make the walls. The lower the density of the base, the more important the strength of the fastening. The larger the dowels should be. Taking this into account, when working with bases from a silicate block, take 8x80 dowels. For stone bases, it is advisable to purchase 6x40 dowels.
You should also prepare for work:
- seal;
- screwdriver;
- measuring tool;
- laser level or spirit level 1.5–2 m;
- perforator;
- cord;
- cutting tool;
- pencil.
As for the material, to arrange the frame you will need 2 types of profiles - CD and UD. The first one is used to make a supporting structure. The second one performs the function of a guide element and has a smaller width. Anchor hangers are also being prepared.
Base for dowel nails and wedge anchor
In order for the fastener to have a long service life, you should know what the base should be:
- Reinforced concrete ceiling slabs in apartment buildings.
- Concrete – the floor in an apartment or poured concrete in a private house.
- Solid brick. There are several types of this material: ceramic, silicate, clinker bricks. Each material has its own density, which determines the service life of the fasteners. Such material can be encountered in private buildings.
- Foam concrete blocks. If there is no cavity in them, you need to know the density of the foam block.
Dowel-nails and wedge anchors are not mounted in a wooden base, as well as in walls made of foam blocks and other hollow materials. Since the spacer elements will not be fixed in the base, but mainly in the void, which will not provide the required strength.
How to properly attach a profile to the wall
Before attaching a metal profile to the wall, you should have a set of tools and materials:
Profile – guide profile is mainly galvanized. This gives reliability to the created structure. The calculation is made using an online calculator or on your own. Material must be taken in reserve.
Dowel and nails for fastening the profile - for a solid wall measuring 6/40. If the base is wood, then 25mm self-tapping screws are applicable.
Drill with 6mm drill bit. and a screwdriver. Before using electrical tools, it is necessary to calculate the load on the electrical wiring.
Scissors for cutting metal. When installing a guide profile, it is sometimes necessary to make an incision on a metal product or cut it off.
Installation of the guide profile
To install the guide profile, a prepared surface with ready-made markings is required. How to fix the profile to the wall? Installation is carried out in the following algorithm:
- First of all, the guide profile is applied to the marking (the line can pass both from the inside and from the outside - depending on the nuances that arise)
- Next on the profile you need to mark the places for future fasteners. Basically, you need to retreat up to 15 cm from the edge of the profile. Maximum, the second fastener is located at 25 cm. from the first and so on - every 25cm.
- If there are no holes in the profile, they are made independently. Even if there are these places marked by the factory, according to the craftsmen, one should be made exactly in the middle between the holes for the strength of the structure.
- The diameter of the drill should be 6 mm and its length 50 mm. if the drill is longer, you should mark a boundary on it; this can be easily done with electrical tape or tape.
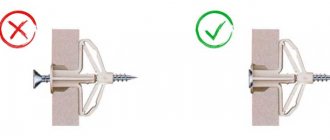
- A plastic dowel is inserted into the hole made both in the base and in the profile. It is hammered into place with a hammer. This should be done carefully, as deformation may occur during installation. Then the plastic part will become unusable.
- After installing the first plastic part of the dowel, a threaded nail is installed using a screwdriver. The deeper the nail enters the component, the more it opens, fixing all the fasteners with special tendrils.
- If the profile is longer than required, it is cut off with metal scissors.
- If you need to sharpen the profile, then you can use special extensions.
- You should retreat 15 cm from each end to the border of the profiles and fix the guide dowel with nails.
The screwdriver should not be set at high speed, so as not to drive the nail into the plane more than it should be, thereby bending the profile.
The guide profile is an integral part of the entire metal structure for plasterboard, so its fixation must be strong and of high quality.
Fastening a profile to the ceiling or fixing a wall frame under gypsum boards are similar in technology.
Video:
Marking and installation of the supporting frame
Marking for fastening the frame begins with determining the installation level of the guide profiles. To do this, on the walls, starting from any corner, using a water or laser level, marks are transferred to the remaining corners. Then, using a marking cord, mark a control line along the entire perimeter.
Carrying out calculations and drawings is one of the most important points when installing a gypsum board ceiling; making the slightest mistake can ruin the entire final result.
If it is not intended to install spotlights and it is necessary to reduce the height of the room to a minimum, then the supporting profiles can be mounted at a distance of about 30 mm from the lowest point of the ceiling. Most tips boil down to finding this lowest point and moving it to the nearest wall and then knocking the level off from there. But nowhere does it say how to do this.
A simple way to make inexpensive and high-quality repairs: installing a plasterboard ceiling yourself
It is much easier to mark a temporary horizontal line around the perimeter at a distance of 20 - 25 cm from the ceiling. By pulling the cord between any points on opposite walls, you can quickly find the lower level of the ceiling and move the temporary horizontal line to any value.
To attach the hangers, markings are also required. Here you need to proceed from the size of the slabs and the width of the walls. It may happen that you need to fasten a strip of sheet less than 20 - 25 cm wide. This is not advisable. It is better to cut plasterboard sheets symmetrically from opposite walls, ensuring that the minimum width of the attached strip is at least 25 cm.
The position of the profiles relative to the slabs may be different. It is most practical to lay the sheets so that the supporting profiles run across the gypsum board at a distance of 50 cm (for sheets 2.5 m long).
Manufacturers of plasterboard boards do not recommend attaching gypsum boards to the ceiling to guide profiles; therefore, for these purposes, load-bearing supports are laid next to the guide profiles at a distance of no more than 150 mm.
Between the laid profiles, jumpers are installed at a distance of half the width of the gypsum board. The connection of the jumpers is done using crabs.
Attaching hangers to the ceiling under plasterboard
How are hangers attached to plasterboard structures? Many will answer this question “dowels and nails are used.” This is wrong, because the suspension takes on the load of the entire plasterboard ceiling. When weighing heavily, over time the dowel and nail cannot withstand it and comes out of the surface. The result is sagging and deformation of the suspended ceiling. According to experts, the best fastener is a wedge anchor. How to attach profile hangers? To ensure the strength of the structure being built, a metal wedge anchor, size 6/40, is fixed in the side holes of the suspension. Installation is carried out as follows:
- According to the intended markings, a hole with a diameter of 6 mm is made on the ceiling, the depth of the hole is 40 mm.
- This hole is cleared of dust (you can blow it out yourself).
- A hanger is attached to the holes made.
- The wedge anchor is inserted into the suspension eye and hole until it stops.
- Afterwards, the protruding rod is driven in with a regular hammer. With each blow he goes deeper into the concrete surface. This indicates that the anchor elements are straightened in different directions, thereby fixing the entire fastening element.
Installation of one anchor takes 10 seconds. This fixation of hangers is the most durable compared to the use of dowel-nails.
At what distance should the profile hangers be attached? The strength of a plasterboard suspended ceiling directly depends on the hangers. The hangers are attached to a marked line intended for the ceiling profile. On this line, every 40-60 cm, suspensions are attached with anchor wedges. The distance depends on the material used to make the suspension. If the metal is thin, then the distance will be 40cm.
Distance of fastening of direct hangers along the cord
It is allowed to use dowels when creating a box on the ceiling. This design does not burden the dowel-nail due to the low weight of the plasterboard box.
Distance for attaching hangers to the wall
Video on how to properly attach the suspension
Video:
Video:
To assemble the metal structures of the suspended ceiling frame, you will need the following components:
Types of profiles for drywall.
- guides;
- suspension elements;
- elements for joining the profile and guides.
The main element of the metal frame structures for suspended ceilings made of plasterboard sheets are guides. Structurally, the guides are a U-shaped profile of various lengths and thicknesses made of galvanized steel.
Suspensions are used to attach the frame to the base surface and give it rigidity. Each manufacturer, as a rule, can offer several types of suspensions. Their main task is to withstand weight loads from the ceiling, regardless of design features.
[custom_ads_shortcode1]
Installation features
When installing a profile with dowels and nails to the walls, certain difficulties may arise. To avoid this, you should familiarize yourself with certain nuances:
- When installing into a brick wall, you should determine the location of the dowel-nail. If the fastener gets on the boundary (in the mortar) between the brick, then there is a high probability that it will pop out. Because the solution may crumble.
- Before drilling into the wall, you should know for sure that there are no electrical wires going through there. Otherwise, a short circuit will occur.
- If there is metal reinforcement running through the wall, this will also have a negative effect on making the hole.
- To properly install the dowel-nail, you need to make holes with the same diameter as the dowel (6mm).
- You need to drill the wall at low speed so that the material does not come out from the surface in one piece, which will create a large hole.
- When driving the dowel, the limiting collar will prevent the fastener from falling into the hole. Therefore, the dowel should be driven in carefully.