The combination of oriented strand board (OSB, also known as OSB or OSB sheets, slabs, panels, boards) and liquid wallpaper is becoming more and more common. This tandem allows you to radically change the appearance of walls and ceilings with minimal effort. If earlier, a similar method was used in suburban buildings, now it has migrated to ordinary houses, apartments and commercial premises.
It is recommended to apply liquid wallpaper to OSB sheets of at least second class. More details about existing OSB classes and their other varieties can be found in a separate article: what is OSB, types, classes, characteristics, use.
Alternative to tiles
Unfortunately, no matter how hard you try, on light wooden structures that are subject to constant deformation, tiles will a priori hold up worse than on stable mineral bases (concrete, plaster, gypsum plasterboard, gypsum fiber board, LSU on a steel frame).
We cannot unreservedly recommend large areas of walls of frame structures for cladding. Is there an alternative to heavy ceramic, porcelain or stone tiles? Partly yes. Unfortunately, there is nothing to replace polished stone and porcelain tiles with. But there are quite reliable imitations of natural slate, sandstone, and aged brick, specially designed for finishing problematic surfaces. This is a flexible facade tile (flexible stone). A layer of colored marble chips is applied to an elastic base using acrylic resins, which gives the tiles a resemblance to unpolished natural stone or unglazed ceramics.
The products of the Hungarian company Delap are well known in Russia and the CIS countries. With good quality and a wide range, the company offers attractive prices; m2 of finished surface, taking into account the cost of tiles, special glue and primer, costs an average of 1000 rubles, which is cheaper or comparable to the price of porcelain tiles or decorative plaster based on marble chips. While flexible tiles reliably protect the façade from precipitation, they are capable of transmitting water vapor.
Sealing joints
Particular attention should be paid to processing joints and sealing screw heads. These shortcomings will definitely appear after wallpapering.
OSB, like any other wood-based element, tends to change geometric parameters under the influence of temperature or moisture. Therefore, during installation, a gap of several millimeters is left between the plates. To seal it, it is recommended to use silicone sealant. Even if the house is constantly heated, the possibility of an accident cannot be ruled out. With a sharp change in temperature, the plasticity of the silicone solution will prevent cracks from forming between the fragments.
You can smooth the joints of the sheets using polyurethane foam or plastic wood putty with the obligatory use of sickle tape.
In the absence of silicone-based sealant, the heads of hardware are coated with oil paint. It will prevent rust from appearing.
Processing slabs without putty
OSB has such a feature as the presence of gaps necessary for the movement of OSB when it is necessary to expand or narrow the space.
It is also important to take into account the type of finishing material, since the surface is usually uneven and rough, as a result of which the trellises will not completely cover surface imperfections. It is recommended to sand the surface with a grinding machine before gluing.
It is recommended to sand the surface with a grinding machine before pasting.
Gluing the material directly to the surface promises a number of disadvantages from this method, namely:
- poor-quality gluing work and visual visibility of unevenness;
- the structure of the slab is visible in cases of light-colored wallpaper;
- as a result of an increase in temperature, impregnation, paraffin substances and resins will clearly appear through the wallpaper layer;
- the quality of wallpaper sizing will deteriorate as it dries, as peeling occurs from the surface;
- A slab of poor quality that is not environmentally friendly will not fulfill its protective properties.
For example, gluing vinyl, non-woven wallpaper, thick-layer wallpaper or large-embossed wallpaper. To isolate the coating, if the glued material is white, you must apply light-colored paint to it.
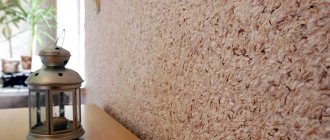
There are wallpapers, after application, the quality of the slab itself improves, even if before that it had various unevenness, roughness and other flaws. These are liquid wallpapers, they are usually applied directly to the object.
Liquid wallpaper
If the preliminary preparation was carried out correctly, you will get a beautiful decor, since the silk decorative plaster will strongly adhere to the OSB board after hardening, which will make it possible to eliminate the penetration of impregnation and have an elegant finish.
Regular wallpaper
When the wallpaper is light in color, it is recommended to apply insulating paint. But it is also possible to apply wallpaper to an untreated surface in the case of thick wallpaper or a relief structure.
How to apply the liquid mixture?
If you choose liquid wallpaper for finishing, then before using it you need to apply a primer to the panel and seal the borders with sealant. For this task, only E0 brand panels are used. With proper preparation and priming, the silk plaster, when thickened, will firmly adhere to the surface, which will eliminate the penetration of impregnation. The result is an excellent decorative coating.
You can learn more about what liquid wallpaper is, how to dilute and apply it correctly, here.
Consequences of pasting on an untreated surface
Pasting untreated OSB boards with wallpaper can lead to a lot of negative consequences. For example:
- Correct installation of OSB boards implies the presence of technological seams between the elements in order to compensate for the linear expansion of the material. In addition, the surface of the slab itself is uneven and heterogeneous. In this regard, after the wallpaper dries, all these places will be clearly visible. Exactly like the screw heads. All the decorativeness of such decoration will be reduced to nothing;
- Under the influence of temperatures, synthetic resins and paraffin will be released from the surface of the slabs. Accordingly, they will appear on the wallpaper in the form of spots;
- OSB boards are additionally impregnated with special solutions, which ensure their moisture resistance, but at the same time reduce the adhesion of the surface with any other composition. Wallpaper glue will simply roll off, just like primers;
- If you do manage to apply glue to the surface, it may cause it to swell. Therefore, it is simply necessary to create an intermediate protective barrier.
All OSB boards, depending on the formaldehyde content in them, can be classified into two categories - E1 or E0. All of the above is more true for class E1 slabs.
Puttying and re-priming
- Oriented strand board appears smooth only at first glance. After drying, all the unevenness and roughness of the surface will definitely appear on thin wallpaper. Interpanel seams will also appear, as well as places of fastening with self-tapping screws.
- Under the influence of temperature, stains from released synthetic resins and paraffin will appear on the wallpaper over time.
- Impregnation of the OSB board impairs adhesion, so the glue or primer will slide off its surface.
- Wallpaper glue can cause the material to swell, so it is necessary to create a barrier against its penetration into the panel.
What glue is used for decorative stone for interior decoration?
To glue decorative stone, you can use tile adhesive, cement-sand mortar or mastic.
- To prepare the solution, you need to take three parts sand and one part cement. This composition has its drawbacks: it hardens for a long time and is not plastic.
- Tile adhesive is diluted according to the instructions; for 25 kilograms of dry composition, take up to 10 liters of liquid. This material is flexible, easy to apply and adheres to any surface, and excess glue can be removed without any problems.
- The mastic has high adhesive properties, is thick, and is suitable for any type of material. But creating a thin layer during application is quite difficult.
If decorative stone is laid on a plastered surface, then cement-sand mortar is not used, since adhesion is poor, as a result, the adhesive composition begins to peel off and the material falls off. When laying decorative stone on a plaster wall, you can use PVA glue; it is elastic, applied in a thin layer, does not shrink significantly, and hardens quickly. To do this, glue is applied to the entire surface, fragments of material are pressed tightly, and held until they set.
If there is paint or varnish on the wall, then it must be cleaned, plastered, and then proceed to finishing with decorative stone. When laying decorative gypsum stone, you can use any type of adhesive composition, it depends on the material from which the surface is made, as well as the ease of application. To lay the material, you can use compounds such as PVA, bustylate, acrylic and tile adhesive, cement mixtures, “liquid nails”, mastic, putty or polymer sealant.
When laying cement-based decorative stone, the adhesive composition must be made of the same material. Accordingly, if the laying material has a gypsum base, then the adhesive should be gypsum-based.
Is it possible to do this without putty?
This is one of the ways to wallpaper OSB boards. The strip can be glued on without prior putty. This solution seems very simple. But such a building material is produced while maintaining the gaps that are necessary for the movement of the material during expansion or contraction.
This quality does not have very good consequences - if you do not close the seams, folds will form after some time. Without preliminary filling, it is necessary to apply a sealant containing silicone to the seams.
Preparing the OSB surface for wallpapering
In order for wallpaper on OSB to last for a long time, the surface of the boards is pre-prepared. Ideally, you not only need to seal all the seams and prime them, but also cover the surface with a layer of gypsum plaster or putty. Let's take a closer look at each stage of preparing the surface for subsequent decoration.
Seams on OSB boards
Special attention should be paid to joints, as well as to the sealing of the heads of fasteners. Do not forget that this material is made on the basis of wood, which means it can change its geometry depending on changes in the level of humidity in the room
Therefore, craftsmen advise leaving a seam of several millimeters between the slabs. To seal them, you can use silicone sealant, which, when the material is deformed, will not allow cracks to appear, just like polyurethane foam
Do not forget that this material is made on the basis of wood, which means it can change its geometry depending on changes in the level of humidity in the room. Therefore, craftsmen advise leaving a seam of several millimeters between the slabs. To seal them, you can use silicone sealant, which, when the material is deformed, will not allow cracks to appear, just like polyurethane foam.
The most labor-intensive option is to use wood putty, but to do this, all seams need to be sealed with sickle tape so that a large number of cracks do not appear on them later. The putty is applied in a small layer using a spatula. After the composition has dried, the seams must be thoroughly cleaned with a sanding mesh, first with coarse grains, then with fine ones.
Sanding OSB surface
This process helps not only to remove minor irregularities, but also to remove the top impregnation, which prevents the penetration of primer compounds.
To get the job done quickly and efficiently, it is better to use a sander with a fine-grained wheel. You can also sand it manually using sandpaper, but this will take quite a lot of time, since such a process is very labor-intensive.
OSB surface primer
Under no circumstances should this stage of surface treatment be ignored before wallpapering it, as it allows you to:
- create a protective layer that will prevent deformation of the slabs when moisture gets on them;
- eliminate small irregularities that will remain after grinding work;
- improve surface adhesion;
- eliminate the appearance of stains on the facing material during operation.
The primer is applied in two layers, and the composition must be latex or acrylic.
Useful tips
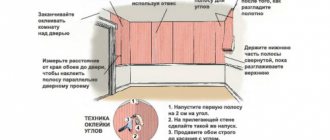
There are a couple of useful tips that will help you properly cover a room with OSB panels. Initially , it is necessary to ensure that the boundaries of the wallpaper strips do not overlap the boundaries of the OSB boards . Then you can calmly begin gluing the walls of the room.
If it happens that the boundaries of the wallpaper and panels converge, then special paper strips should be used to “hide” this defect. But it is better to avoid such situations and calculate in advance everything necessary for finishing, check how the sheets are laid.
Preparing for wallpapering fiberboard (hardboard)
With fiberboard, everything is more complicated due to the high hygroscopicity of the material. It cannot be treated with a deep penetration primer; without putty, seams will be visible through the finish.
There are 3 options for preparing hardboard for wallpapering.
Method No. 1:
- The surface is covered with white alkyd paint or primer on a similar base in 2 layers. This will create a moisture-proof barrier and increase adhesion.
- When gluing canvases, PVA is added to wallpaper glue at the rate of 50 ml per 1 liter.
This method is only suitable for thick textured wallpaper, through which seams will not show through.
Method number 2:
- The hardboard is primed with undiluted PVA glue.
- Fiberglass or fiberglass mesh is glued to the surface using PVA.
- The fiberboard is puttied with a gypsum compound. Layer thickness is about 1 mm.
- Putty slabs are sanded.
- A deep penetration primer is applied.
- Wallpaper is glued in the usual way.
The only drawback of the method is the one-sided protection of fiberboard from moisture. At high humidity, sheet material may become deformed.
Method No. 3 includes the following steps:
- Impregnation of hardboard with hot drying oil before installation, which will make the fiberboard moisture resistant.
- Treatment with a primer with quartz sand - “Concrete Contact” - making a smooth surface rough.
- Putty the slab with a thin layer. In this case, it is not necessary to use fiberglass mesh.
- Coating with acrylic primer.
- Wallpapering.
Method No. 1 - without putty
This method is often used to reduce finishing time and in case of lack of skills in working with building mixtures.
In this case, the surface of the plates is processed as follows:
- You must first seal all the joints between the slabs. It is best to use acrylic or silicone sealant in white or transparent color. If this step is neglected, over time, folds may form on the wallpaper at the junction of two plates. In no case should the sealant protrude beyond the plane of the slabs; its excess can be smoothed out with a rubber spatula, which is usually used to grout tile joints;
- When the sealant has cured, it is necessary to make the surface of the slabs smooth and increase their level of adhesion. If you are gluing smooth and not very dense wallpaper, the surface must be sanded. For thick vinyl or non-woven wallpaper, glass wallpaper or liquid wallpaper, the surface can be treated with coarse sandpaper. At this and the next stage, be sure to use eye and respiratory protection - there will be a lot of dust;
- Remove wood dust from the surface. This can be done with a brush;
- Now let's start priming. You can use purchased compounds (Ceresit ST17 deep penetration primer has proven itself well) or prepare the compound yourself. To do this, you need to mix PVA glue and clean water in a ratio of 1:3;
- It is necessary to prime with a purchased composition at least 2 times after each previous layer has completely dried. If a homemade solution was used - at least 3;
- Many experts, after the soil has dried, claim that the surface is ready for gluing. However, many users, from personal experience, still advise covering primed slabs with white interior paint. If possible, use two layers. After the paint has dried, you can begin gluing the wallpaper. The procedure will be standard.
I would like to note right away that if after a few years you have a desire to re-glue the wallpaper, it will be quite difficult to do so. The canvases will stick to the interior paint very firmly. And, secondly, if the walls are still shrinking, then sealant filling the seams alone will not be enough. Over time, these places will collapse and the wallpaper will tear. We can conclude that this method will be successful only for finishing utility rooms or a summer house. For finishing a residential building, it is better to use the second method.
Breeding liquid wallpaper
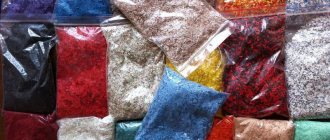
Liquid wallpaper can be found on sale in 3 packaging options:
- dry in one hermetically sealed transparent bag weighing from 1 kg;
- dry in 4 plastic bags, where the components are packaged separately;
- in a wet state.
How to dilute liquid wallpaper at home in each specific case? The breeding principle is general, the difference is only in the details. Instructions may differ in the amount of water used (from 5 to 8 liters) or the ripening time (from 8 to 12 hours). All this information can be found on the packaging. However, there are nuances that you need to know.
1. It is strictly forbidden to make one batch from several packages or divide the bag into 2-3 parts. The following rule applies here: the mixture is prepared for one wall. To do this, the packages (all contents at once) necessary for the work are mixed separately. After the required consistency of the solution has been achieved, all batches are transferred to a large container and thoroughly mixed by hand.
2. When packaging wallpaper into several bags, glitter is poured into the container first.
3. The shelf life of diluted wallpaper in a hermetically sealed bag is only 2-4 days, and not several weeks, as they write on most construction sites (after only a week there will be a lump in the bag that will have to be thrown away). For long-term storage of already mixed material, you can use the following technology:
- a thin layer of diluted wallpaper is applied to a clean polyethylene film;
- the mixture is dried at room temperature for 24 hours;
- dried trellises are rolled into a tube along with the film and crumpled with hands or any hard object;
- the recovered fibers are placed in a plastic bag from which the air is removed. The mixture can be stored indefinitely in a tightly sealed bag, despite the fact that manufacturers indicate an expiration date.
A step-by-step algorithm for diluting liquid wallpaper with your own hands can be represented as a chain of interconnected technological techniques:
the package with the dry mixture is shaken several times and crumpled by hand - this restores the fine structure;
Stirring liquid wallpaper.
- the contents of the package are poured into a container (with a capacity of about 12 liters) and stirred until a lush, equally colored mass is formed;
- the dry mixture is filled with heated water (25-35oC) in the amount (usually 5 l) indicated on the package;
- The mass is thoroughly mixed by hand until the desired consistency is obtained;
- The ready-to-use solution is transferred to a large container (for example, a basin);
Mix for the wall.
- make a batch of the next package and add it to the first. And so on until the required amount of liquid wallpaper is obtained for application to one wall;
- Danish plaster is mixed in a basin until one tone is obtained, after which it is laid out in bags, the air is removed and tied tightly;
- packaged Danish plaster is left to mature for 8-12 hours (the minimum required number of hours is indicated on the packaging);
- After ripening, the mass of each bag is placed in a container for further work. If necessary, the mixture can be diluted with clean water.
The mixture is ready. But how to glue liquid wallpaper on a wall? More on this below.
Plaster and putty
Depending on the curvature of the walls, both of these leveling methods or only the last one are used.
For application to OSB, compositions intended for wood that are highly elastic are selected: nitro putty, as well as acrylic-based or oil-adhesive solutions.
Leveling mixtures are applied until all surface imperfections are eliminated, and after hardening they are rubbed with fine sandpaper or a sanding mesh.
Applying plaster or putty is not necessary if liquid wallpaper, fiberglass or thick wallpaper with a textured pattern are used.
Is it possible to glue wallpaper without putty?
Wallpapering without putty Thanks to the experience of craftsmen accumulated over the years, you can find the answer to this question by looking at the list of negative consequences:
- After the surface is pasted over, irregularities, joints and fastenings become visible.
- After a short time, the slabs begin to release glue, and they become covered with stains, which looks very unsightly.
- Due to the peculiar coating, the surface is not able to hold the primer, which impairs the quality of bonding to paper products.
- If the processing is poor or absent, the wood shavings begin to absorb glue and swell. Subsequently, this can lead to delamination of the material.
Despite all the negative indicators when gluing wallpaper without putty, there are types that are mounted only on an untreated surface:
For example, liquid wallpaper is capable of smoothing out all defects in the surface of the slabs and making it perfectly smooth.
Liquid wallpaper
Textured trellises also do not require pre-treatment of strand boards. The material consists of a relief pattern that hides irregularities. Sticking is carried out on products marked EO.
How long will an OSB coating last without putty?
Wallpaper without putty on OSB can last for a certain time:
- in a dry place - 2-3 years, then they will simply fall away from the surface in stripes;
- in a damp room – 1-2 years maximum. After which the strips will come off and the slab will become deformed.
When the surface is treated with OSB with primer and putty - 5 years or more. Depending on humidity and temperature changes.
Plastered and puttied slabs last a long time because their surface is protected from external influences.
Preparatory work
First of all, before gluing wallpaper on plywood, it is necessary to carry out preliminary preparation in order to avoid possible shortcomings and ensure a long period of operation of both materials.
The main disadvantage of the base made from it is the slightly but varying thickness of the sheets. For this reason, when fixed to the walls at the joints, small ledges appear, which, after wallpapering without preliminary preparatory work, stand out noticeably against the general background.
As a result, before gluing wallpaper from plywood, it is necessary to remove it using a grinding machine. For this task, it is enough to even use a low-power eccentric or belt model with a set of P60-P120 sandpaper.
Before sanding the plywood base, you should make sure that the fasteners are fully screwed or driven in so that they end up slightly recessed into the sheets, since without this there is a possibility that the wallpaper will tear during gluing or damage to the power tool used will occur. If there are protruding nails or those with caps torn off, then you need to pull them out and re-hammer the intact ones.
It is also important to open the caps with drying oil or paint, and after drying with moisture-resistant putty, which will prevent rust from bleeding through the wallpaper several years after gluing the plywood with them.
When starting to process plywood, the first thing you should do is install sandpaper with a higher grit (P60-P80) on the sanding machine to remove deep irregularities from the surfaces. After finishing the wall, you need to go over the entire wall again with finer sandpaper (P100-P120).
Note! If liquid wallpaper is to be applied to the plywood in the future, it should only be sanded with coarse sandpaper (P60) to ensure greater adhesion.
At the end of this stage, you should begin moisture-proof treatment of the base, which must be carried out regardless of the material (plasterboard, wood, plaster and many others) acting as it
During the process, it is only important to ensure that the wood is fully protected from the negative effects of moisture. The ends of the sheets are most susceptible to its influence, which is why they must be opened with natural drying oil, which is best done before fixing the plywood to the walls, bringing the mixture to a temperature of 50-60°C during heating before use.
The very outer side of the material can also be opened with it, after which it should be treated with a continuous layer of a special acrylic primer for wood, which is available in a huge variety of hardware stores from various manufacturers. To apply the mixture, you can use a wide brush or paint roller.
Important! It is best to use a special primer that does not contain substances harmful to health, has no odor, and dries within a few hours after application.
The next step is to seal the joints between the plywood sheets. For this purpose, it is optimal to use acrylic finishing putty, which is also commercially available in ready-made form, supplied in plastic buckets. If there are large gaps between the slabs or significant differences in height, then in addition to it, serpyanka should be glued. After gluing, it must be re-treated with a layer of putty.
If there are chips, irregularities or deep depressions on the outside, they must also be opened with putty. After the mixture has dried, sand it with fine-grained sandpaper.
Finally, it is necessary to completely prime the plywood surfaces at least once, and preferably even twice. Before applying the second layer, be sure to wait until the previous one has completely dried.
Working with liquid wallpaper
This type of finishing material is suitable for installation on E0 class slabs that do not emit phenols and formaldehydes into the atmosphere. It is liquid wallpaper that can be used to decorate walls made of OSB boards with minimal effort. Recommendations for their use look like this.
- The surface of the panels is coated with a primer. The treatment is carried out twice; it is better to choose acrylic compounds with antifungal additives.
- The mixture for liquid wallpaper is diluted in a prepared container. If possible, you should purchase a ready-made mixture in a plastic bucket.
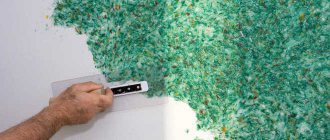
- Using a trowel, liquid wallpaper is applied to the surface and distributed. Finishing is carried out from the corner of the room along the entire wall; it is not recommended to interrupt the work, as this may affect the aesthetics of the coating - the seams at the junction will be clearly visible.
As soon as all the walls are covered with a decorative layer of liquid wallpaper, you need to leave them until completely dry. Typically, recommendations on its timing are given by the manufacturer.
How to hang wallpaper on OSB boards, see below.
Sticking
To paste the OSB canvas, it is necessary to carry out a number of preparatory work.
The appearance of the surface after finishing and drying of the wallpaper depends on the quality of materials and work. After preparing the base, you can glue light, striped, embossed, thin and thick trellises.
Surface preparation
Surface preparation consists of the following steps:
- Leveling the base. Here you need to level the surface and remove the top protective layer from the slab, which makes it difficult to apply the primer. The surface can be sanded either with a machine or sandpaper.
- First application of primer. The primer is applied 2 times. It will prevent wood chips from swelling from glue and moisture, and will also improve the adhesion of the material applied to the surface. Craftsmen recommend using a primer that contains acrylic or latex.
- Treatment of seams and fasteners. After installation, a gap of 2-3 mm remains between the plates. It definitely needs to be sealed. For this purpose, silicone sealant is used. You can also use polyurethane foam or plastic putty using serpyanka. All fasteners are coated with paint so that they do not rust later.
- Fixation of fiberglass reinforcement sheet. The reinforcing mesh will improve the adhesion of the putty to the surface. It is secured with a stapler. They start working from the slope and lead the grid to the adjacent wall. You can also use glue to fix the glass sheet.
- Puttying. Depending on how curved the walls are, plaster or putty is used. For work, choose wood materials that have elasticity (oil-glue). After applying the solution and drying it, it is necessary to grout it with sandpaper.
- Re-priming.
Each stage requires responsibility and accuracy.
Primer
Re-priming the surface is mandatory. It will ensure better bonding of the trellises to the slabs and will protect against glue penetration into the putty. The primer is applied 2 times. The second layer is applied only after the first has completely dried (about 12 hours).
Craftsmen do not recommend applying primer to puttied and unsanded walls. After sanding, be sure to remove all dust.
Wallpaper selection
To choose the right wallpaper, you need to familiarize yourself with their classification.
So:
- Regular ones are paper. Clean only with a dry cloth. They do not tolerate wetness and dampness.
- Waterproof – washable trellises. You can wash with a wet sponge and use gentle detergents.
- Fading in the sun - to determine whether the paint of the trellis fades in the sun or not, you need to look at the label (image of the sun).
- Customization of the drawing. There is a material that does not require joining the borders of the canvases (monochrome), but there is a material with large patterns that require joining for a single pattern. The connection is described on the label.
Each roll contains instructions that indicate basic information: fading, moisture resistance, type of glue, joining the borders of the canvases.
Wallpapering
Before wallpapering, craftsmen recommend gluing paper intended for this purpose to the surface. However, if the surface preparation has passed all the requirements, then this is not necessary.
Algorithm of actions:
- in a clean container you need to prepare the glue according to the instructions on the package;
- Next, you need to measure how long the glued strips will be and cut several sheets. If the material has a pattern, you should immediately select the pattern at the joints;
- After this, the finished glue is applied to the strip of trellis. The material is folded in half for good impregnation. At this time, glue is applied to the surface;
- the finished strip is applied on top to the required place;
- carefully, evenly (to do this, draw a vertical line on the wall - a guide), glue the material to the wall, expelling air from the middle to the edges. To do this, use a soft roller, a rubber spatula, or a soft rag.
On paper wallpaper, air bubbles will not disappear immediately. Time must pass, after which the place of the bubble is carefully pierced with a needle to release the air.
Features of OSB finishing
Let's look at the technology of puttying slabs and outline the range of materials that can be used for this.
Selection of putty and other materials
Before you putty the OSB board, the surface must be prepared: sanded to eliminate defects and primed.
Advice. It is easier to use slabs that have already been sanded in production. Their price is not much higher, and it takes much less time and effort to finish.
The question immediately arises about the primer - which one to choose. Of course, the one that is intended for wooden surfaces (see Priming wood - process features) and does not contain water. For example, drying oil or primer based on glyphthalic varnish.
Advice. The ends of the slabs have the greatest moisture absorption capacity. It is advisable to treat them with a protective primer before installing the sheets, since this will be impossible to do later.
Let's move on to choosing the main material. You need to choose from those compositions that are intended for finishing wooden bases and have an oil, adhesive, or synthetic base. Mixes for brick or concrete most likely will not last long on your surface. The most suitable are the following formulations, sold in ready-to-use form:
A special acrylic putty for OSB boards, also intended for leveling any wooden and particle board substrates.
Acryl-Spachtel OSB – acrylic putty
- Nitro putty ASh-24, ASh-32, MBSh. They are made from resins and cellulose ethers with various fillers and plasticizing additives. To achieve the desired consistency, they can be diluted with solvents.
- Oil-adhesive putties are compositions based on drying oil, varnishes and glue with the addition of chalk, thickeners, and modifying additives. Diluted with drying oil.
Universal oil-adhesive putty
Also, special paints with fillers are used for finishing OSB. Regardless of the composition, putty for OSB boards must have the following properties:
- Good adhesion to smooth, resin-coated substrate surfaces;
- Low degree of shrinkage when drying with a low probability of cracking;
- High strength of the created coating and its suitability for subsequent decorative finishing;
- No solid fillers in the mixture, homogeneous consistency.
To avoid the appearance of cracks when finishing oriented strand boards, experts recommend reinforcing them with elastic materials. The best option is painting (repair) non-woven fabric.
In the photo - non-woven fabric for finishing putty
To stick it, you will need glue for the corresponding wall coverings.
Putty technology
All necessary materials have been selected and purchased, you can start working. There is no difference in how to putty OSB for wallpaper or for painting, the procedure is the same:
The first step is to apply a primer with sealing properties, which creates a film on the surface. It will protect subsequent coatings from emerging stains from resin, essential oils and tannins contained in wood.
- Further, the instructions require a technological break in work to dry the surface. Its duration depends on the type of primer and can range from 4 to 12 hours.
- The second step is the direct application of putty. Work is performed only at positive air temperatures and humidity not exceeding 60%. How this is done can be studied in detail by watching the video in this article or reading other articles on the site dedicated to puttying walls and ceilings.
If necessary, putty is applied in two layers
- The second technological break is arranged to dry the putty layer.
- The third step is grinding the surface to eliminate minor defects and make it smooth.
- The fourth step is reinforcement. The interlining is glued overlapping, but in order to ensure that there are no thickenings at the joints, a double cut is made along the ruler in this place, excess material is removed, and adjacent sheets are fixed end-to-end.
Judging by the description, the process is simple and you can do it yourself. However, theoretical knowledge alone is not enough to finish such a capricious material, so if you have no experience in such work, it is better to use the services of a professional.
Technology of wall finishing with decorative stone
Regardless of the technology for laying decorative stone, you must adhere to the basic rules.
- First, you need to lay out a decorative stone in the form of the selected pattern on the floor surface. Thanks to this, you can imagine what the wall will look like and correct any existing errors.
- Then markings are made on the surface in a horizontal direction, maintaining intervals of up to 15 centimeters.
- After this, you must carefully read the instructions for the selected adhesive in order to have time to complete the installation before it hardens. As described in the instructions, prepare the adhesive composition; it should be thick, not sticky, and without lumps.
- If the glue is cement-based, then it is applied to the surface of the wall up to 6 millimeters thick, and the area should not be more than one meter, this will help prevent premature drying.
- The adhesive composition is applied to the rough side of the decorative stone in the form of a dotted line or in wavy stripes. This action is performed when choosing an adhesive on a different base, mastic or sealant.
- Then they begin finishing the wall, pressing the decorative glue to the selected surface, from the corner that is more convenient to work with. Start the work from the bottom row, this will help make all connections smooth and prevent individual elements from slipping.
- The finishing boards are pressed into the adhesive so that it protrudes at the edges. And excess composition is removed using a special rubber spatula.
- If the seams should stand out, then gaps of up to 10 millimeters are left between the stone slabs. This method is chosen when combining decorative stones of different colors and sizes. When laying, the marked lines must be strictly observed.
- To make the pattern unusual and more interesting. On some finishing fragments the corners are cut.
After installation, the seams are filled with a special grout or glue, which is used during work. To fill the seams cleanly, use a syringe or a special gun, since if the solution gets on the front surface of the finishing material, it will be difficult to clean.
All joints are rubbed together using a special spatula; the work is done after the glue has set a little.
To ensure waterproofing of the surface, it is completely coated with varnish based on polyurethane or acrylic. After four days, the surface will be completely ready, and the adhesive solution will harden thoroughly.
Is it possible to glue and are all types of panels suitable?
It is possible, but not all types of OSB panels are suitable for such finishing :
- OSB 1 - such panels are used for the installation of short-term structures; they are not used during the restoration of buildings.
- OSB 2 – suitable for dry rooms.
- OSB 3 – used for living rooms and apartments. They are massive, the coatings lay easily and evenly on such a surface.
- OSB - liquid does not penetrate into them. Most often they are used for the construction of removable formwork; the price of the material is high and not affordable for everyone.
How to prepare the surface?
In order to ultimately obtain the highest quality treatment of OSB boards, all stages of preparing the surface for gluing should be followed . These stages include:
- Grinding.
- Padding.
- Finishing joints (how to join wallpaper correctly?).
- Application of reinforcing mesh.
- Then putty is applied and the surface is re-primed.
- Then the stage of pasting the surfaces with finishing material begins.
Prepare in advance:
- brushes;
- rollers;
- containers;
- spatulas.
Need to purchase:
- wallpaper in rolls;
- putty and primer compositions;
- reinforcing mesh;
- glue.
Choice of wallpaper
It is necessary to consider all their types and properties that they possess:
- Paper . They can only be cared for with a dry cloth. Paper products do not tolerate getting wet.
- Washable . Can be wiped with a wet sponge.
- Fading in the sun . How can you tell whether canvases fade in the sun or not? Study the label carefully.
- Products that require customization according to the design . There are monophonic ones, that is, one color, and there are others with large patterns. They need to be adjusted for the integrity of the picture. All information is indicated on the label (how to select a pattern and cut wallpaper in difficult places?).
Each roll should contain important information:
- sunburn;
- moisture resistance;
- suitable glue;
- the need to adjust the pattern.
Carrying out the procedure in stages
For high-quality pasting, all steps must be followed. Let's take a closer look at how to glue wallpaper materials onto an OSB board.
Application of serpyanka mesh
Attention
The connecting seams between the panels should be secured with a special-purpose sickle mesh.
This can be done in two ways:
- apply a sickle mesh to a new layer of putty, press it into the mixture with great care, then apply a layer of putty again;
- apply the serpyanka to a clean surface, then apply putty (why and how to putty drywall?).
These methods are equally effective. This stage is simple, even a person without experience can cope with it. Functions of construction serpyanka mesh :
- eliminating the growth of seams and cracks during the period of building subsidence;
- combating the formation of seams on the main side of the wallpaper, which is necessary when using thin coatings;
- reliable bonding of the base with glue and putty thanks to a more even working surface.
Installation of the serpyanka mesh takes a minimum of time.
Primer
If you can do without the previous stage, then a primer is required, since without it the materials will not last long . This stage is necessary to improve the quality of the finished coating. Thanks to it, a film will appear that does not allow water to pass through (so OSB boards will not swell from contact with moisture and glue), and the surface of the panel will remain smooth. To produce it, you can use a special composition or mix PVA glue with water in a ratio of 1:3.
Attention
The primer must be applied in at least two layers, and if you create it yourself from glue and water - in three. It is applied only to a thoroughly dried surface.
As soon as the soil has dried, it needs to be painted. At this stage of preparation, white paint is applied. It is applied in two layers with a brush or roller. An additional layer of primer is applied to the dry panel. After it has dried, you can start gluing wallpaper.
Puttying walls
After priming, putty is applied to the walls . Conventional construction dry mixtures for walls made of concrete or brick are not suitable for OSB panels. Such a solution will not stay on the surface of the OSB panel for a long time. For puttying, use special leveling compounds for wood processing. For greater effect, you can use dispersion mixtures based on synthetic resin.
The puttying process is no different from other building materials:
- Dilute the solution according to the instructions on the package, stir well until smooth.
- Apply this solution with a trowel to the surface of the material from bottom to top in a thin layer.
- Wait until completely dry.
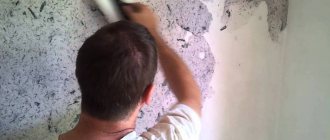
If, after applying the putty, “tracks” from the spatula are visible, they should be smoothed over with a grinding machine or sandpaper. To do this, you should treat the walls with semicircular movements with light pressure and remove any unevenness. Clean the surface from any remaining grains of sand and dust using a long-bristled brush. After completing all these procedures, apply paper to the walls.
Below is a video about the correct puttying of an OSB board:
Sticking
At this point, the preparatory stage before gluing the walls from OSB boards is over, and it’s time for the main work.
Important
Wallpapering
on the panel does not differ from the finishing of concrete walls.
Let's figure out how to glue the slab:
- Dilute the glue as indicated in the instructions (read how to weld, use and where to store the paste here).
- Cut the roll into fragments or strips of the desired size, adjust the pattern if necessary.
- Using a roller or brush, spread the adhesive base over the wallpaper and wall surface. This should be done as quickly as possible so that the strips do not have time to become heavily saturated.
- Place a sheet of wallpaper against the wall, trying to avoid bending and getting glue on the front side.
- It is good to spread the strip over the entire surface so that there are no noticeable bubbles or irregularities (read about why bubbles appear and how to glue wallpaper without swollen areas).
- Press down the joints with a rubber roller. Use a clean cloth to remove excess glue.
Wallpapering
Is it possible to glue wallpaper on OSB? It is possible, but preliminary preparation is required, without which the result will not be of sufficient quality.
Preparatory work
Instructions:
- We seal all joining seams with a special sickle mesh and putty.
This step performs the following functions:
Prevents gaps from widening due to shrinkage and vibration processes of the building. Eliminates the appearance of seams on the surface of decorative finishing
This is especially important when using thin wallpaper. Makes the base monolithic, which allows wallpaper glue or putty to adhere much better.
Serpyanka sample
- The next step is to prime the OSB surface. Do not skip this step under any circumstances if you want to get a high-quality result.
The tasks he performs:
- Creates a protective polymer layer that tightens the smallest flaws in the material and protects it from mechanical damage.
- Increases adhesion index. Adhesive solutions and putty mixtures adhere much more reliably to polymer coatings than to compressed shavings, although impregnated with special compounds.
- Reduces moisture absorption. We have already taken into account that oriented strand board is less hydrophobic than ordinary wood. But soil allows you to reduce this figure even more.
DIY primer application
- We putty the entire surface to be treated:
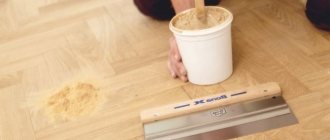
Mix the solution.
Mixing the putty mixture
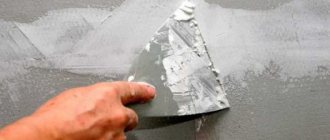
- Carefully apply it to the wall from bottom to top using a trowel.
- As a rule, stretch it into a thin layer.
Puttying OSB boards
You can skip this step, but it is not recommended. If you still decide to do without it, then you should prime the wall in several additional layers and use only thick wallpaper.
White is a neutral color for any finishing cladding.
- Prime the frozen putty again. After which you can start gluing wallpaper.
Wallpaper application
The actual process of gluing wallpaper onto an OSB board is as follows:
- Mix the glue according to the included instructions.
Kneading the adhesive mass
- We measure the required size on the roll and cut it.
Wallpaper cutting
- Apply glue to the canvas using a brush or roller, and then to the wall. This should be done within ten minutes so that the paper does not have time to get wet.
Necessary Steps for Finishing Oriented Strand Boards with Wallpaper
- Glue the piece onto the prepared area. At the same time, we try to avoid bending and getting glue on the front side of the material.
- Smooth the fabric with a rag, preventing the appearance of bubbles.
Compound
There is no special OSB for wallpaper. This is a sheet material consisting of large wood chips, which are impregnated with a special polymer composition and then pressed. The result is a fairly durable coating. In order to paste wallpaper on OMB boards, it is important to process them correctly. To do this, you can highlight several step-by-step actions that will help you complete the work consistently and efficiently.
- Fastening plates. In order for the slabs to hold up as efficiently as possible, it is naturally best to make lathing. But there are situations when the slabs are screwed directly to the walls. In this case, it is necessary to leave special gaps between the sheets. This is important so that the material does not swell. Any wood product tends to expand and contract with temperature changes. If the OMB board is attached end-to-end without any gap, there will be no room for expansion and the material will simply swell at the seams. For wallpaper, this is very important, since the slabs will swell and the wallpaper will definitely come off.
- Sealing seams. Gaps, as well as possible cracks, must be carefully eliminated. In this case, use a special putty or mastic specifically for wood. Everything is simple here. If you use putty under the tiles to seal the seams, you will get an unpleasant outcome. Putty under tiles is not intended to allow the material to expand and contract significantly. Therefore, if you use it for OSB boards, eventually, after drying and temperature changes, the material will crack and crumble. And if this happens under the wallpaper, they, unfortunately, will come off. Therefore, a special putty composition is used, which has sufficient elasticity. Due to this, even if the seam width increases due to the expansion of the slabs, nothing serious will happen.
- Plaster the surface. If this is not done, there is a high probability that the ground layer will not take hold and will roll off, as a result the wallpaper will not adhere well to the surface. Sheets can be sanded using fine abrasive sandpaper. No special pre-treatment of the slabs is required, except for sealing the seams, as well as treating them with putty. However, for better bonding, you can lightly clean the surface of the slab, and also level the seams, removing any possible excess layer of putty.
- Primer. Be sure to use deep soil. It is best absorbed and perfectly binds the layers, making a thin, uniform film for wallpapering. However, it is quite possible that the soil will roll away. This is mainly possible if the slabs are not treated with plaster. And, nevertheless, so that the primer does not roll off, it can be mixed with glue. In this case, when applying glue, the surface will be automatically primed.
- Using light wallpaper. Of course, you can take thick and heavy canvases, for example, non-woven or vinyl, but it is best to use paper wallpaper. In this case, the adhesive layer will more easily connect to the wood parts of the slab, and the lightness of the canvas will allow it to adhere securely. Now we move on to choosing wallpaper. As for the top decorative layer, it can be very diverse. Therefore, you should not be upset if you need to choose paper options.
Of course, you can also choose vinyl wallpaper. But in this case it is desirable that they are not too dense. In the case of non-woven wallpaper, it is also best for the glue and primer to be applied to the boards themselves.
Is it possible to glue wallpaper directly onto OSB boards?
In order to answer the question whether it is possible to glue wallpaper without puttying the walls or plastering them directly onto OSB boards, let’s find out what obstacles exist for this:
- Structure and relief of the material. Although the surface of OSB boards seems smooth and even, all the smallest surface imperfections will be visible on thin wallpaper. In addition, the structure of the wood can be visible through light-colored wallpaper.
- Traces of resins and paraffin impregnation may appear on the wallpaper over time.
- Environmental safety class of the OSB boards used. If it corresponds to E1, then, as already mentioned, you cannot glue wallpaper directly on it.
Thus, we see that, regardless of all other conditions, when using OSB boards of class E1, it is impossible to glue wallpaper directly on them.
Liquid wallpaper
One of the advantages of this type of wallpaper is that when applied it hides all small surface defects. The wood pattern will also not be visible through them, and the appearance of stains is unlikely. Therefore, liquid wallpaper on OSB boards of class E0 can be glued immediately, after first sealing the joints and treating the surface with a primer. This will improve adhesion and provide an additional guarantee of protection against the appearance of traces of substances included in the OSB composition.
Regular wallpaper
Fiberglass or textured wallpaper with a relief pattern can also be glued directly onto OSB class E0 immediately after priming and sealing the joints. For all other types of conventional wallpaper, preliminary leveling of the surface is required.
Now let's take a closer look at what needs to be done before gluing wallpaper onto OSB.
Types of primer for OSB panels
Before gluing wallpaper onto OSB, it must be coated with primer compounds to make the material more resistant to wet marks when applying wallpaper glue.
There are several types of primers; their positive characteristics when priming OSB panels depend on the composition class. There are three types of products suitable for treating such a surface:
Which is better: heated floors or radiators?
Warm floorBatteries
Adhesive primer is used under the putty mixture for better adhesion to the OSB surface. This mixture contains quartz sand with different grain sizes. Such a primer has a very positive effect on the final result of finishing walls with wallpaper after puttying.
Examples of design solutions
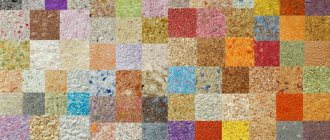
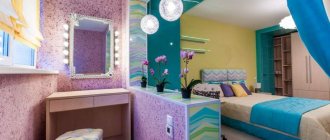
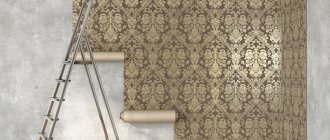
The use of liquid wallpaper makes it possible to realize various designers' ideas. For example, designers add shimmering elements to create a spectacular stardust that will look good in the bedroom. Silk fiber is also added to create a more comfortable and warm room. In addition, adding plaster with golden shimmer is popular; it will add sophistication and luxury. Liquid wallpaper can be used to create various patterns on the wall. It will not be difficult to diversify a children's room with drawings, and they will look softer than painted designs. Liquid wallpaper is also often applied to the ceiling, smoothly connecting it to the wall, using the same color.
To create a more comfortable and warm room, silk fiber is added.
Liquid wallpaper can decorate any room, and the ease of its application makes it more popular. By following simple rules for working with them, you can carry out repairs to the premises yourself, saving money on calling specialists.