Applying liquid wallpaper, taking into account all the features of the finishing material, is not a difficult process to master. The length of its service depends on the correct preparation of the wall, preparation of the mass and application of silk plaster. Surely each of us has performed unfamiliar work at least once in our lives. Only after completion do you understand that everything was much simpler - you just had to follow the technology and study the issue a little in advance. We tried to make our article just such a methodological guide.
Surface preparation
The durability of the coating, first of all, depends on the quality of surface preparation carried out before gluing liquid wallpaper. “Liquid” material is not intended for leveling the wall, so you need to take care of priming and cleaning the base in advance. It is possible that during the preparatory work circumstances will become clear that prevent the use of wallpaper material, and it will have to be replaced with decorative plaster or other finishing.
Depending on the condition of the walls, it is necessary to perform one or more of the following operations.
- Remove paper wallpaper from the wall and wash off the whitewash. Such coatings cannot be used as a substrate. The paint layer is checked for strength of adhesion to the walls; if peeling or peeling, the paint is removed.
- Examine the plaster. Be sure to tap the walls to look for peeling areas and other defects. If the paint and plaster are in poor condition, they are removed completely or locally, and the plaster is repaired.
- Small cracks in the plaster can be easily covered with wallpaper, while large cracks can be repaired.
- If the surface of the wall is too uneven, then you need to level the base with a layer of plaster along the beacons. Small differences will be covered with wallpaper paste.
- Places where mold or rot has settled are washed with mandatory treatment with fungicidal liquids. The rust is cleaned off. Metal products are painted over for insulation with oil paint or other insulating agent. The efflorescence is washed off and the cause of its appearance is determined. It may be necessary to waterproof the area.
- Since the wallpaper mass weighs little and is applied in thin layers, there is no need to reinforce the base. However, at the joints of structures, you can pre-glue sickle tape followed by putty.
The smooth paint layer is sanded to increase adhesion.
A primer is required before applying liquid wallpaper. For example, smooth surfaces are primed to increase adhesion. You cannot do without applying a primer in the case of wooden and porous walls.
Liquid wallpaper requires a primer with quartz sand. Typically these primers are white in color and do not require white painting. If the paint or other finishing on which a lot of liquid wallpaper is applied is not white, then for light wallpaper the wall must be painted with white paint or covered with white putty. The areas where the rust has been removed are also painted as a preventative measure.
The primer is applied in two or three passes. Each time the wall is dried.
The frames of windows, doors, sockets and switches are sealed with masking tape. The wiring is de-energized. The floor and abandoned furniture are covered with film. Although the wallpaper mass remains plastic for a long time and is washed off, it is better to take care of protection.
The most “successful” base materials:
- leveled plaster;
- fiberglass;
- clay;
- drywall (preliminarily putty the entire surface);
- primed polystyrene foam;
- concrete or stone.
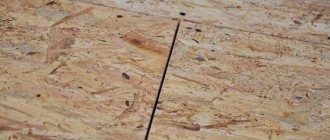
Less “successful”, but also suitable after priming:
- metal;
- OSB;
- tree;
- Fibreboard, chipboard, MDF.
Liquid wallpaper compositions cannot be applied directly to plywood, since the top plywood layer “shrinks.”
Advantages and disadvantages
Liquid wallpaper can be considered a universal finishing material. They have a number of advantages over other finishing options:
- They are flexible, easy to prepare and apply to walls. Installation does not require special skills or expensive tools. They are convenient for pasting over corners and relief surfaces (arches).
- This is an environmentally friendly material that is safe for health. Such wallpaper can be glued in a children's room.
- Liquid wallpaper allows you to create patterns.
- They look attractive and neat. Has no seams.
- Wallpaper regulates indoor humidity by absorbing or releasing moisture, depending on its excess or deficiency.
- The coating is soft and warm to the touch.
- Wallpaper has antistatic properties.
- They do not absorb foreign odors.
- They repel fungus and prevent the development of mold.
- They have sound and heat insulation properties due to their porous structure.
- Do not cause allergic reactions.
- They are not afraid of shrinkage.
- Suitable for any premises.
- Easily restored in case of mechanical damage.
- Attaches to many types of surfaces: concrete, wood, metal, drywall and even painted surfaces.
Among the disadvantages, it is worth noting the rather high cost and non-standard rules of care (you cannot get it wet). This coating does not withstand mechanical loads well. Otherwise, liquid plaster is trustworthy.
Advice! Since liquid wallpaper is afraid of moisture, when finishing it is worth covering it with colorless varnish. The coating protected in this way is suitable for all types of rooms, including the bathroom and kitchen.
Application of liquid wallpaper
Stock up on tools in advance. Applying liquid wallpaper is impossible without tools; you will need a metal or plastic (preferably transparent) grater, spatula and trowel. Compositions of a less thick consistency can be applied using rollers (ribbed or sparsely piled). If the mass is not applied manually, then you need a cartouche (texture) gun connected to a compressor.
You will also need:
- container for diluting dry mixture;
- tape measure for marking the wall (not in all cases);
- clean rags;
- roller or brush for priming;
- masking tape;
- knife for opening containers;
- water dosage measure;
- container with water.
It is advisable to apply the composition starting from the light corner towards the dark one. Finishing is carried out in daylight and artificial light.
You can apply wallpaper mass:
- mechanically;
- trowel or spatula;
- roller;
- just with your hands, immediately forming the stucco molding.
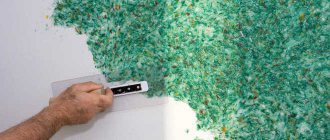
The composition, prepared in advance, is applied in sections, applying a layer of solution of 2-3 mm. The applied mass is immediately leveled. Then cover the adjacent area, achieving the same layer thickness over the entire surface. The main thing is to get a seamless finish.
In case of unsuccessful application, the composition can be further moistened and removed with a spatula. After this, a new portion of the solution is applied, comparing the thickness of the layer with the surrounding finish.
Final smoothing is best done with a plastic float. Before use, the instrument is wetted. During leveling, the grater is also moistened with water periodically. This makes it easier to achieve a smooth surface.
Let us consider in detail each of the above methods.
Plastic trowel
The tool is good because it is light. Correct application of liquid wallpaper is accessible not only to experienced plasterers, but also to beginners. The mass is applied to the trowel with a spatula, then, holding the trowel at an angle to the wall, the composition is transferred to the base. This is done in the same way as applying plaster mortar. You can even apply the wallpaper composition using a grater. If the composition sticks to the tool, the working surfaces are moistened with water.
There is no need to apply excessive pressure on the trowel. There is no need to rush. The composition can be corrected at any time: add (if necessary) dough where the layer thickness is lacking, remove excess. It can take from 12 to 72 hours for the material to set.
Periodically look at the laid coating at an angle, illuminating the surface from the side. This helps identify processing deficiencies. Against the light, voids or poorly executed transitions are clearly visible.
The application sequence is as follows:
- preparation of the composition;
- wall preparation;
- applying the mass manually;
- leveling with a grater or trowel;
- drying the coating.
With a cartouche pistol
To create a seamless coating, it is unacceptable to join together already hardened wallpaper and fresh mass when creating a finish (this is only possible during repairs). Therefore, it is better to process large-area walls using a texture gun (installing a large nozzle).
Some compositions are produced specifically for application with pneumatic tools. With the help of a mechanical assistant, the application of liquid wallpaper is accelerated. With experience, the applied mass can be laid evenly. If there is no experience, then additional leveling with hand tools will be required. The lifespan of the composition allows you to do this slowly.
For a cartouche pistol, you will need a compressor capable of delivering 2-3 atm, with a capacity of 250 l/min.
Subsequence:
- preparing the solution;
- preparation of the base;
- preparation of equipment (connection to a compressor);
- applying the composition;
- surface leveling;
- disconnecting the gun, washing and drying the device parts;
- drying the walls.
In reality, such a tool is most often used by professional finishers when working on large areas.
Drawings with liquid wallpaper
The material allows you to create various images. These can be oriental ornaments, abstract pictures, plant and floral motifs, figures of people or animals. In children's rooms, the walls can be decorated with a castle or a fairy-tale plot. Here you can completely surrender to the creative process. The technique of applying patterns on the wall with your own hands depends on the clarity of the shapes and what you ultimately want to get.
Where will we glue
This coating is ideal for uneven walls with complex terrain: it will hide imperfections and is easy to apply. In principle, you can glue liquid wallpaper in residential, unheated, and wet rooms. But in the bathroom or kitchen they will have to be coated with a protective varnish, which increases the cost of repairs and deprives the material of one of its main properties - a microporous structure that allows it to “breathe”. It makes more sense to use other wall coverings in such rooms.
As for surfaces, such wallpaper fits well on almost any of them: from brick to metal. But manufacturers recommend using special primers to avoid defects in work. Please note that for light wallpapers you should use light primers, and for dark ones - dark ones. Otherwise, the final appearance of the coating may be distorted.
A big advantage is the absence of seams; liquid wallpaper is convenient to mask small defects in the wall, they easily eliminate gaps around sockets and switches, and allow you to eliminate loose fittings of baseboards and trim.
How to breed at home
The packaging containing the dry mixture contains instructions for proper mixing and preparation of the mixture for use.
The manufacturer’s recommendations should not be violated, since their implementation guarantees the receipt of a high-quality finishing mass.
We provide only general information. The entire volume of the mixture contained in the package should be diluted at once.
Instructions for preparing the mixture
You will need clean warm water. Tap water or strained rainwater will do. Heat is necessary to soak and swell the adhesive granules and form a gel. In a cold liquid, the process will proceed slowly, so the specified holding time may not be enough.
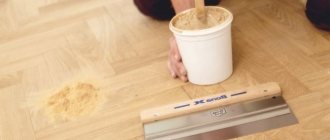
pour the dry mixture into a container
to stir thoroughly
- The water is not poured all at once. Leave about half a liter. This liquid is added after the curing mass has been kept for the required time.
- Having poured water, add separately purchased decorative components (glitter, mother-of-pearl, granules) into the container and mix. The dry mixture is kneaded in a bag and poured into a container.
- If you use a mixer for mixing, the fibers of the mixture are torn during stirring and the decorative inclusions are damaged. The structure of the wallpaper will be damaged. Therefore, the mixture is stirred and kneaded with hands. Separately added glitter should be evenly distributed throughout the entire mass. While stirring, the mixture swells and becomes similar to mashed potatoes, which must be made without lumps.
- The entire mixture is placed in a plastic bag and tied tightly, or the container with the mixture is hermetically covered with film. Leave to “simmer” for the time specified in the instructions (approximately 8-12 hours). Only after this the mass will be ready.
- If you need more mixture for application than can be obtained from one package, then after preparing the first batch, put the composition on film, and dilute another batch in the empty container. We combine the resulting masses, mix on the film and roll up a “package” from the film. We seal the edges of the bag with tape to create an airtight seal.
- After waiting for “readiness”, put the required amount of mass into the container, add the reserved water and mix the mixture again before applying.
For mechanical application, the consistency of the mixture is made similar to thick sour cream.
For a seamless finish, you need to prepare enough dough to cover the entire wall.
How long can you store diluted?
This question worries those who are getting acquainted with the material for the first time. The finished composition is stored for approximately 2-4 days in room conditions. The main thing is that it is closed hermetically. No refrigerator is needed for storage.
Characteristic
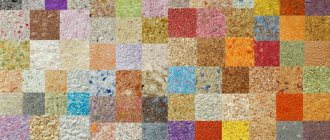
What is liquid wallpaper? This is a modern wall finishing material. In appearance, such wallpaper resembles sawdust or plaster. They consist of cellulose, silk or cotton fibers with the addition of acrylic, coloring, fungicidal and adhesive components. Sometimes they are supplemented with decorative elements: sparkles, stone chips. They are sold in two versions: as a dry mixture (in 1 kg plastic bags), which must be diluted with water, or as a ready-made solution.
Why is liquid wallpaper so attractive? The method of applying them differs from the labor-intensive gluing of rolls. This reduces repair time, which is good news. A layer of liquid plaster, just applied to the wall, resembles paint, but when it dries it turns out to be embossed, does not collect dust, lasts a long time and is easily removed when you get tired of it.
You can experiment with the coating. From a white mixture without additives, original compositions are prepared with the inclusion of various dyes and decorative elements. But this method is more accessible to professionals.
Protective varnish
To protect against accidental ingress of moisture during the operation of liquid wallpaper, varnish is applied to the wall. In this case, be sure to take into account the characteristics of the wallpaper. For example, after coating, the surface takes on a rougher appearance, and the color tone may even change slightly.
The charm of the softness and airiness of fabric upholstery disappears. The finish loses vapor permeability. Therefore, it is recommended to use varnish only where contact with water is possible (in the kitchen sink area, in the bathroom).
Finishers do not recommend varnishing materials from the Recoat 1 (2, 3) liquid wallpaper collections. This material contains wood and other adhesives that may cause stains.
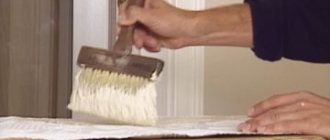
Special varnishes are produced for varnishing silk plaster. You can apply regular acrylic varnish (it is advisable to do a test). Apply the varnish with a brush or medium-pile roller in two or three layers. After each pass, dry the varnish for at least 6 hours. Drying time for the last layer is up to one and a half days (according to the instructions).
Tips and tricks
If you've never tried liquid wallpaper, don't be afraid to start today
Check out these helpful tips:
- The mixture is easily removed, so if something doesn’t work out, you can fix it later
- Do not apply the substance in a layer thicker than 4 mm. It will look sloppy and rude
- Use moderation with decorative components
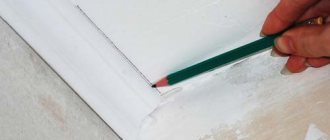
- If you accidentally extend beyond the area intended for liquid wallpaper, wait until the material sets and carefully cut it off with a knife
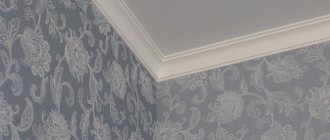
- Liquid wallpaper looks great on the ceiling, as a decoration for wall niches and openings
Cute floral ensembles
If you want to realize all your creative dreams in renovation, and at the same time strive to keep costs to a minimum, liquid wallpaper will be the ideal solution. With them you will give your walls a new, interesting and vibrant life. Make them a subject of admiration and delight.
Down with standard factory wallpapers with template patterns. Today, even the most expensive ones, you won’t surprise anyone. Make the working material yourself, and your design will definitely not go unnoticed.
Watch a short video clip that clearly shows the whole process of working with silk plaster:
VIDEO: DIY liquid wallpaper
We make liquid wallpaper with our own hands: step-by-step instructions, tips, application techniques, as well as useful ones (85 Photos & Videos)
Repair of liquid wallpaper
Silk plaster is not as durable as true decorative plaster, so it is more easily damaged. It is less resistant to abrasion. If the finish is damaged or the expiration date has expired, then restoring liquid wallpaper with your own hands will not be difficult. Especially if you have dried excess stock.
The damaged finish is removed, and the cleaned area is covered with a new solution.
Mixture consumption
In practice, the mixture consumption declared by the manufacturer is often exceeded. Therefore, it is necessary to calculate the number of packages that need to be purchased for repairs with a reserve. About 20% of the supply should be enough even for a beginner. The excess will be useful in the future, and you won’t find yourself in a situation where you can’t find an identical mixture to finish the rest of the wall.
Consumption depends on several conditions, for example, the thickness of the applied layer, the volume of waste due to lack of experience. When calculating the area of the walls, it is better to calculate the number of packages, reducing the number of squares that can be covered according to the manufacturer's figures.
Breeding rules
How to dilute liquid wallpaper? The instructions will allow you to do this correctly:
- The bag with the material must be shaken to mix the mixture and improve the fine structure of the wallpaper.
- For 1 pack of wallpaper you need a capacity of 7-8 liters. Typically, containers with a depth of 20-30 cm are used to make it easier to wash and mix the solution.
- The solution requires clean water at a temperature of 20-30 degrees. The quality of the product does not depend on temperature, but it is more convenient to knead the material with warm water. You can mix either one package or several, but in the second case it is more difficult to obtain a homogeneous mass. The second option is suitable when liquid wallpaper has a different shade and you need to get one color.
- How to dilute liquid wallpaper to get the desired consistency? Pour the mixture from the bag into the container and add about 5 liters of warm water. When pouring liquid, you should constantly stir the solution until the mass is homogeneous. The mixture is prepared by hand; a mixer or other equipment is not used. If it is difficult to mix 1 package yourself, you can mix the solution in small portions.
- The consistency of the solution should resemble thick cream. The approximate consumption of material is 5-6 liters per 1 packet of mixture.
These are all the manipulations that need to be carried out to dilute liquid wallpaper. The instructions apply to most materials. However, recommendations from the manufacturer may be provided.
Is it possible to apply liquid wallpaper to plaster?
This is a frequently asked question, to which we will devote a short, but hopefully very informative paragraph. So, a combination of two finishing materials: a plaster base and applying liquid wallpaper on top of it is the best of other combinations. However, you should check the existing plaster for strength and defects.
Applying liquid wallpaper is much simpler and easier than plastering walls. You won’t have time to get too tired, and you’ll create the finished finish in less time. If you follow the instructions, the liquid wallpaper applied by yourself will be pleasing to the eye and will last as long as possible for this material.
Tools for work
Prepare in advance all the necessary tools for applying liquid wallpaper. You may need:
- Plastic trowel, 3-4 mm thick pile roller or spray. Choose one thing from the list.
- Large spatula.
- Ironing iron.
- Notched spatula, paper tape or sickle tape (if there are seams on the wall).
- A large container in which you can dilute dry powder.
- Putty and deep penetration primer or white paint.
- Gloves. The composition of the powder is not hazardous to health, but for convenience you can mix it with gloves.
Instagram @zhidkie.oboi.novorossiisk
Instagram @std_sks_spb
- Decoration Materials
How to remove liquid wallpaper from a wall manually and mechanically