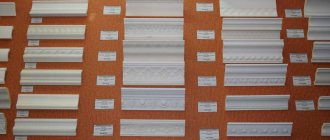
Types of skirting boards and their costs
- polyurethane 300-500 rubles per piece
- plastic from 40 rubles per piece
- expanded polystyrene from 20 rubles per piece
When purchasing planks you need to pay attention to:
- So that the skirting boards are the same color from the same batch
- Without defects
- No curvature
Choosing a cornice
The choice of hidden curtain rods usually involves selecting a design based on three main criteria: the weight of the curtains, the length of the window opening, and the number of strips. Also, when choosing, you should take into account the material from which the suspension will be made.
First you need to decide on the design of the curtains, and then choose a cornice
A separate niche above each window is a labor-intensive solution, but very original.
Types of materials and brief characteristics of cornices are discussed in the table:
| Type of cornice according to the material used | a brief description of |
| Wood | Suitable for absolutely any room. They harmonize especially well with classic, Provence, and country styles. Most often, wooden models are installed in children's bedrooms. These rooms always have high environmental requirements. Wooden hangers can withstand high loads. |
| Plastic | Modern plastic does not turn yellow for a long time, is environmentally friendly, durable. Affordable price is another important advantage. Plastic models are usually chosen for light curtains. |
| Metal | They are distinguished by a variety of designs, high strength, and can withstand enormous loads. Ideal for hanging heavy, multi-layer curtains. |
| String | Ideal for light, airy tulles. They are a metal string. The design of the cornice is as simple as possible and can last a long time. The main condition is not to hang heavy curtains on the strings. Due to the high load, the string will begin to bend over time. |
The most commonly used option is a plastic profile rail, which can be hidden in a niche just a few centimeters deep.
Step-by-step instruction
We will need:
- fillet
- roulette
- Can you use a laser builder?
- miter box and hacksaw for metal (or miter saw, or sharp knife, or grinder)
The blanks are cut using a miter box and a hacksaw according to the markings.
If you haven't hung wallpaper yet
- PVA glue
- container for stirring the mixture
- putty knife
- putty (read about putty on drywall and ceilings)
- water-based paint and brush
- sandpaper
If wallpaper is glued or there is a baseboard in the bathroom between the tiles and the ceiling
- white acrylic sealant
- mounting adhesive Moment Montazh Express decor white
- mounting gun
- rags
Brief description of the design, advantages
The cornice is usually closed with a special niche. Its arrangement and design features must be planned in advance - even at the stage of finishing the ceiling. In a niche you can hide all the unwanted functional parts of the curtain, install lighting, and create the effect of a floating curtain.
The niche space does not require special finishing; it will still be hidden by curtains
For hidden fastening of curtains, a cornice of any convenient design is suitable
Note! If you do not provide a niche in advance, in the future you will have to dismantle part of the decoration, change the tension structure, or come up with a decorative element to hide the suspension.
The dimensions of the niche depend on the structure that needs to be placed in it
How to cut a corner and make a blank?
First you need to understand which corners are in the room and mark out your blanks for each type (they are different!).
- External corner - in this case, the length of the base of the workpiece will be equal to the length of the span, and the cutting angle will be obtuse (that is, the top edge of the workpiece will be longer than the length of the bottom edge, 135 degrees).
- Internal corner - in this case, the length of the base of the workpiece will be equal to the length of the span, and the cutting angle will be acute (the upper edge of the workpiece is shorter than the lower edge, 45 degrees).
The saw must be used carefully and accurately to prevent chipping.
The blanks are cut using a miter box and a hacksaw according to the markings. To check the correctness of the cut blanks, you can dock “your creation” on the floor. If all the corners meet correctly, then you can start gluing and join them in place.
To check the correctness of the cut blanks, model “your creation” on the floor. If all the corners meet correctly, then you can start gluing.
If the corners do not meet, we make a new blank - this is why we bought fillets with a reserve.
Often the angles between the walls in rooms are not equal to 90 degrees. In such cases, you need to mark the workpieces “in place” and cut the corner without using a miter box. To do this, templates are made from paper and cardboard, and then a fillet is cut out using a sharp stationery or shoe knife.
Advantages
The most important advantage is aesthetics. The photos in our article will give everyone the opportunity to see how attractive and unusual a floating curtain looks. Closed pendants mask unattractive parts of the wall, visually adjust the height of the ceiling, and make it possible to decorate the design with light lighting.
Hidden fastening of curtains is appropriate in rooms with low ceilings
Possibility to adjust the distance from the window. Some apartments have wide window sills. In this case, the wall mounting option for curtains is absolutely not suitable. You can place the fabric on the ceiling at any distance from the opening - for any width of the window sill.
Fixing the curtains in a niche eliminates the problem of choosing the design of the cornice and accessories
Focusing on decor. Less than attractive fasteners will not distract from the beautifully flowing fabric. Even the lighting installed in a niche will not attract much attention. They will only slightly emphasize the textile composition.
Using lighting you can easily create a unique atmosphere in your bedroom
Thick curtains covering the entire wall will make a narrow room visually wider
Preparation of putty mixture
We prepare a mixture of putty and PVA glue for gluing the ceiling plinth to the wall and ceiling, as well as for sealing cracks and corner joints. Mix 4 parts of plaster and 1 part of PVA glue with water until it becomes sour cream, let it sit for 5 minutes and mix again. After this, you can use the mixture for 1.5 hours.
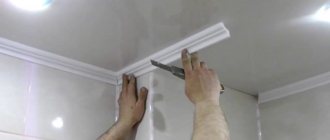
Apply putty in the center of the fillet along the entire length, press for 10 seconds, release, remove excess mixture.
- Dust the workpiece and the wall/ceiling area before applying the glue.
- Apply putty in the center of the fillet along the entire length, press for 10 seconds, release, remove excess mixture.
- We start gluing from the corner and from the wall that is opposite the door.
- You can draw a line around the perimeter using a laser builder and glue the fillet along it.
- We join pre-made blanks in the corners. If the spans are more than 2 meters, we make a direct joint of the fillets.
- Seal the cracks with the prepared mixture along the gluing process.
- The next day, after the putty has dried, we sand down the uneven areas and cover the baseboard with water-based paint.
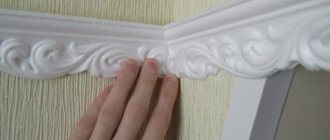
You need to press the ceiling fillet gently and smoothly so as not to leave fingerprints or breaks on it.
DIY glue
If it is not possible to purchase special glue for foam or polymer baseboards, then prepare it yourself. Required:
- finishing putty;
- water-based glue (PVA);
- water;
- container and accessories for mixing ingredients.
Examples of adhesive for ceiling plinths.
Preparation of the adhesive composition is carried out in the following sequence:
- Place the finishing putty mixture and PVA in a clean container in a ratio of 4/1, respectively.
- Water is added during the mixing process. Readiness is determined by the creamy consistency.
- Until it is ready, this adhesive composition should sit for at least 10-15 minutes.
Important! Self-prepared glue should be used within two hours. If lumps or clots form, they must be removed - kneading and application will worsen the final result.
How to attach a ceiling plinth if wallpaper is glued
Advantages
- Can be done at any time and even with existing repairs
- No need to get dirty and dilute the mixture
- You can change the baseboard at any time if you get tired of it
- Dust the workpiece and the wall/ceiling area before applying the glue.
- We start gluing from the corner and from the wall that is opposite the door.
- Apply glue in the center of the fillet along the entire length, press for 1 minute, remove excess glue.
- Presses well in corners and joints.
- We coat the cracks with acrylic sealant, and remove the excess with your finger.
- The main goal is to create the most even seam possible. If you can’t see an even seam by eye, you need to glue masking tape and create a seam along it.
The main goal is to create the most even seam possible. If you can’t see an even seam by eye, you need to glue masking tape and create a seam along it.
Estimate the layout of parts
The wall opposite the door is completely covered with two pieces; one will even have to be shortened a little.
On the side wall, after installing the corner elements, you will only need to glue an insert about a meter long. Illustration: Artem Kozoriz / Lifehacker The skirting boards are 2 meters long, so you can’t do without joints. They will be less noticeable if you start installation from the most noticeable place - the wall, which is visible when entering the room.
You should also avoid short pieces of baguette if possible. Instead, you can shorten the adjacent parts to make an additional plinth with a length of one meter or more.
All this needs to be thought through before gluing the fillets. Measure the length of each wall and estimate how many parts and what length are needed to cover it.
Ceiling
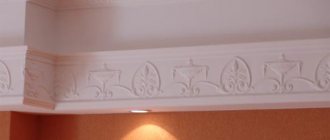
Many people perfectly imagine decorative stucco molding in the halls of castles and royal residences in the Baroque style, but have a weak or distorted idea of the use of molding in modern interiors.
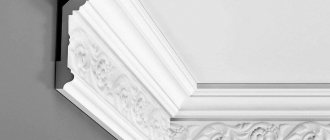
Molding is a fairly broad term that means any applied part, often for decorative purposes. The most common and frequently used type of molding is the ceiling plinth, which is also poetically called fillet, baguette or frieze.
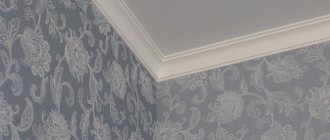
Ceiling plinth is designed to visually smooth the transition between the surface of the walls and ceiling, hide the joint of wallpaper and correct crooked corners and beams.
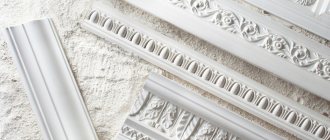
Most often, ceiling plinths are made from artificial synthetic materials - polystyrene foam and polyurethane.
Making a hidden suspension yourself
The easiest way to cover the cornice is to make a trench from plasterboard. To do this, you need to know in advance the features of the curtains, the length, width of the curtain rod.
Calculation of niche width
You should also prepare some tools and materials:
- construction tape;
- sheet of drywall;
- long metal ruler;
- knife with replaceable blades;
- roughing plane;
- ceiling, guide profiles;
- screwdriver;
- self-tapping screws
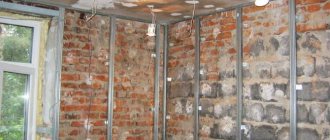
First you need to prepare the drywall. We cut it into strips of the required size - from four to fifteen centimeters. We cut drywall using a knife.
Having made the blanks, you can begin installing the ceiling guide profiles. From these you need to build a metal niche frame. The profiles are attached according to the markings. It can be applied to the ceiling with a regular pencil or paint cord. When fastening, we adhere to one rule - the dowel spacing is at least 60 centimeters.
First, the first profile is installed strictly according to the markings
Then a frame of short jumpers and a lower profile is mounted
Then we form the sides of the box. To do this, we use prepared plasterboard sheets. We fasten the sheets in increments of at least fifteen centimeters. Then we mount the end sides in a similar way. We process them with a plane. At the end, the bottom of the box is sewn up.
The box is ready for putty, which is done with a reinforcing mesh
After this, you can start designing the decorative component. The box can be puttied, painted, or wallpapered.
After completing the dirty work, you can fix the cornice
Preparatory stage
Before purchasing a ceiling plinth, calculate the required number of strips.
Complex calculations are not required; you just need to know the perimeter of the room. Depending on the length of the skirting boards, you can easily determine the number of slats. We recommend buying one or two spare slats in case one of them gets damaged during operation.
- It is very important to correctly and accurately cut the baseboard slats for the corners of the room. To keep the gaps to a minimum, the contact angle of the slats should be 45°. Use a sharp mounting knife for cutting.
- Choose which side you will glue the baguette to the wall. It is better to use the wide side of the profile to cover the areas with the greatest flaws in the wallpaper.
When should it be used?
When do you need to place curtains behind the ceiling plinth, in a special niche? There are two objective reasons for this.
- Functional necessity. This need arises in rooms with a stretched ceiling. It is forbidden to mount rigid structures on the surface of the film; wall-mounted cornice options are also not suitable for all. The easiest way is to provide a special niche at the installation stage. Its dimensions are determined individually.
The threads of this curtain seem to flow from the stretch ceiling; you cannot achieve this effect with an open cornice.
If the cornice does not match the style of the space, you can simply hide it
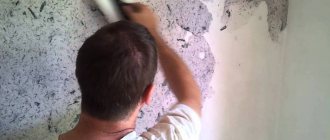
How to glue foam ceiling plinth to wallpaper
Method 1. Fastening the ceiling plinth before wallpapering the walls.
This method is often used by professional craftsmen and is considered the most correct. Marks when attaching the baguette can be immediately removed without the threat of damage to the wallpaper; in addition, the frieze is easy to paint.
The plinth is glued to the prepared walls and ceiling.
How and what to glue? It is better to use special glue suitable for gluing different materials, as well as putty left after leveling the surface of the walls. It can also be used to carefully cover the space between the molding and the ceiling (wall).
You can start gluing wallpaper only after the putty has dried. The wallpaper is glued so that there is a slight overlap on the baseboard. Then it is advisable to trim off the excess using a spatula or a mounting knife.
Method 2. Installing the baseboard directly on the wallpaper.
What glue should you use if you decide to attach the ceiling plinth to wallpaper that has already been glued? Polymer-based glue, for example, “Dragon”, “Moment”, or assembly adhesive - liquid nails - is suitable. This method will require maximum concentration, attention and accuracy from you so as not to spoil the wallpaper.
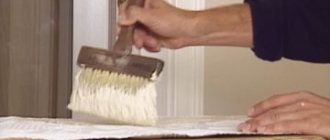
A small amount of glue is applied to the foam molding and the wall (ceiling).
Usually you need to let the glue sit for 5-10 minutes or as long as indicated in the instructions, and then firmly press the baseboard to the surface. If excess appears, you need to immediately wipe it off with a rag. Seams and gaps can be hidden using white sealant.
If you want to change the color of the baguette, then before gluing it, it’s a good idea to paint the slats in any color. After installation, it will be possible to touch up the joints with a brush.
A few simple tips:
- Before cutting and gluing the plinth, it is very advisable to wash your hands thoroughly, since the delicate light surface quickly gets dirty.
- Remember that when gluing, you do not need to press the baguette very hard, otherwise fingerprints or even indentations will remain.
- When fitting the last plinth, you first need to adjust the angle, and then measure and cut the strip to length.
- For beginners, we recommend gluing the ceiling plinth onto already pasted wallpaper.
Features of adhesives
Before gluing the skirting boards, you need to determine which adhesive to choose for installation:
- polymer – reliably fastens wood, foam plastic and polymer baguettes, is convenient to use, does not require special knowledge when gluing;
- liquid nails, produced on the basis of two different chemical composition bases - acrylic and neopropylene, are recommended for fastening fillets made of wood, polymer, in structures that require bends, complex profiling (stretch ceilings, multi-level structures);
- adhesive putty, where the composition is prepared independently by mixing PVA glue, putties and water, the scope of application is convenient for gluing gypsum cornices, eliminating installation cracks.
Advice! To glue light elements, you can use gypsum mixtures - the drying time is minimal, but for this reason you need to work very quickly.
Installation of ceiling plinth
How to properly organize decorative finishing using ceiling skirting boards?
Before you begin to carry out your planned work, you need to buy a high-quality ceiling plinth on the basis that one standard strip is two meters long.
Also, when choosing the correct fillet width, you must take into account the height of the ceilings in the house. If you have high ceilings in your home, wide baseboards work well. If the height of your ceiling is standard, for example, 2.80 meters, then a fillet 5 cm wide would be an excellent option.
The ceiling plinth can be glued in two ways: using putty and using acrylic sealant.
Many professional builders come to the conclusion that when performing repair work, the first option is more practical than the second. The peculiarity of the first option is that there is no need to dismantle the fillet when changing the wallpaper, and it is also quite convenient to seal the gaps between the baseboard and the wall, especially if there are significant unevenness of the walls.
Let's consider the technology of gluing ceiling skirting boards using putty.
- Using a special building level and a pencil, you need to mark the lower border on the ceiling for installing the plinth.
- Mix the finishing putty in the proportions specified by the manufacturer. After you have mixed the solution and it is ready for use, they need to go over the places where you will attach the baguette. After this, it is necessary to moisten the treated areas with a primer and begin gluing the ceiling plinth. All actions must be performed until the wall surface is dry.
- Using a spatula, apply putty thickly along the entire length of the fillet on the back side of the ceiling plinth. After this, you need to press the plinth to the ceiling and wall, and remove the protruding putty from the ceiling plinth using a spatula.
- If there are gaps between the wall and the baseboard, they are well coated with putty.
- After the finishing solution has dried, be sure to coat all existing cracks well with it, and also hide the joints of the ceiling plinth sections.
- After the putty has dried, you can begin painting the fillet.
- How to properly glue ceiling plinth to wallpaper
Installation work
The ceiling plinth can be installed after wallpapering or during the process of screeding the ceiling (before the last putty).
The second option, how to properly glue ceiling skirting boards, provides a number of advantages:
- When re-gluing wallpaper, you will not need to tear off the baguettes. In this case, the stripes will be adjacent to the friezes, and not go under them.
- Gluing a plinth to an uneven ceiling is usually much more difficult. If the walls are made unevenly, gluing baguettes after the wallpaper will certainly lead to the appearance of gaps between the planks and the plane of the walls. In the second case, all noticed cracks are carefully sealed with a mounting mixture, without the threat of staining the wallpaper.
It is recommended to start work from the corner near the window: it is more convenient to immediately glue the frieze to both walls in order to achieve the formation of a beautiful corner joint. The smoother the corner of the room is plastered, the easier it will be to decorate it with a ceiling plinth. The resulting structure of two baguettes will set a guideline for further work. You can choose any wall and start adding moldings towards the next corner.
[adsblock]
In the second chapter of the step-by-step instructions, we will learn how to properly glue the ceiling plinth to the wallpaper. To do this you need to do the following:
- For this work, you need to use a special glue, for example, “Moment Installation”, as well as white silicone sealant.
- On the reverse side of the ceiling plinth you need to apply a special adhesive solution in a continuous strip.
- The ceiling plinth must be pressed well against the corner between the ceiling and the wall.
- If gaps have formed between the baseboard and the wall, it is necessary to carefully treat the joints using white silicone sealant. Experts recommend sticking masking tape onto the adjacent part of the wallpaper to protect it from the adhesive solution.
- The fillet joint areas must be generously coated with acrylic sealant.
After the glue has dried, it is recommended to paint the ceiling plinth with water-based paint.
You can offer an alternative option: paint the ceiling skirting boards before gluing them. To do this, you need to cut out and prepare all the parts in advance with maximum precision, then paint, and after that start gluing the ceiling plinth to the ceiling.
Methods for insulating the ceiling in a wooden house, as well as the materials necessary for this, are described here.
Which laminate is better to choose for different rooms, what are the features of this choice and what does it depend on, you can find out by reading our article.
Painting
The final procedure for installing ceiling plinths is painting: it gives the ceiling a finished, beautiful look. Most often, water-based, acrylic or latex paints are used for this. Wooden products are decorated with nitro paint, after having been coated with a primer. Before painting the friezes, they need to be allowed to dry: usually a day is enough for this. Acrylic or water-based compositions demonstrate the greatest practicality. For application, a soft brush of appropriate width is usually used. It is most convenient to paint baguettes together with the ceiling, using identical material. Wallpapering or other types of wall decoration can be done after the paint has dried.
Calculation of the required amount of material
For a rational calculation, you need to determine the perimeter of the room. If the room has openings or projections, then each distance from the outer to the inner corner is measured separately and then summed up.
The results obtained will be useful for the following steps:
- The perimeter of the room is divided by the length of the ceiling plinth strip - standard 2 m.
- The number is rounded up.
- When purchasing fillets, glue for skirting boards, fasteners (if necessary), immediately add 2 strips to the stock and take all finishing materials based on the overall perimeter of the room (for example, check the glue consumption according to the instructions).
Conclusion
Have you decided to glue the baguettes yourself? This is the right decision, since the price of professional installation is equal to the cost of purchasing the material. It is very important to take the calculations and purchase of materials responsibly so that you do not have to purchase additional materials later.
This should be the result of the work done
It should be understood that gluing skirting boards to the wall is a job that requires maximum care and precision. It is likely that the same work will have to be redone several times in order to achieve the optimal result.
However, gluing baguettes is difficult only the first time; with experience everything will be much easier.