During a kitchen renovation, special attention is paid to various communications and their concealment. Everyone wants to have a beautiful and functional space. However, problems arise with the hood and the ventilation hole in the wall. Usually the stove over which the hood is installed and the ventilation window are not located next to each other. Therefore, it is necessary to make a plasterboard box in the kitchen to hide this nuisance.
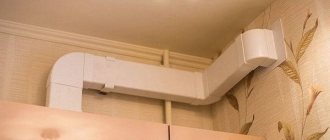
For a long time, a flexible air duct (rectangular or round) was considered the best solution for connecting a hood to a ventilation window. However, it also had to be hidden behind (above) the kitchen wall cabinets. A plasterboard box can be used with any layout and with any amount of kitchen furniture. With its help, a flexible air duct can be hidden anywhere without spoiling the appearance of the room .
Types of pipes and ways to disguise them in the kitchen
In many apartments, camouflage of the pipeline is provided for in the layout: the developer makes special grooves in the walls, into which water communications for hot and cold water supply and heating systems are hidden.
Sewer pipes are usually hidden in the floor or wall during construction or major renovations. The only type of pipe that cannot be closed tightly is a gas pipeline. For safety reasons, gas equipment must have unobstructed air flow.
If you wall up a pipe or place a column in a closed box, then if there is a leak, gas will accumulate in a closed space, and this situation may one day lead to an explosion. Therefore, according to existing requirements, it is strictly prohibited to close gas pipes using boxes or wall them up in walls.
There are several basic ways to close cold and hot water supply, heating, ventilation, sewer and gas pipes.
Standard options are using frame structures based on metal profiles and plasterboard sheets (plywood, plastic, chipboard). In this case, the structure will be perceived as part of the layout.
Another popular method of camouflage is using wall-mounted and floor-mounted furniture modules.
In any case, the use of any structures should not contradict safety requirements and be consistent with the gas service.
Each owner chooses his own method of masking pipelines, based on capabilities, general style decisions and aesthetic preferences.
Construction of boxes
With the help of boxes you can hide vertically and horizontally running utility lines in the kitchen. This is a simple way that allows you to maintain the aesthetics of the room design.
Using various materials - plasterboard, plastic panels, MDF or laminated chipboard - rectangular structures are mounted. They can protrude above the surface of the walls, be installed in existing niches and corners of the room, under the ceiling or along the floor, or combined with a furniture set.
Building a box is quite simple: it requires metal perforated profiles, a screwdriver and self-tapping screws. Using profiles, a frame of appropriate dimensions is made. The profiles are securely connected with fasteners and secured to the wall, ceiling and floor with self-tapping screws.
The width of the frame must be calculated in such a way that there is a free space of at least 10 cm on both sides of the pipe. When the frame is mounted, sheets of plasterboard, plastic or MDF are attached to it.
Related article: How to align walls at 90 degrees
Disguise with furniture
Furniture elements - wall and floor cabinets - are the easiest and most convenient way to hide utility pipes in the kitchen. In most apartments of our compatriots, a siphon and sewer drain are masked using a special cabinet under the sink.
Using the same principle, you can hide other pipes: for this, use the upper and lower modules of the kitchen unit. Depending on the thickness and location of the pipes, holes are cut in the body of the wall cabinet or the bottom or top of the module is completely removed, leaving only the side walls and facade (door).
Disguise using wall cabinets is a traditional way to hide exhaust ventilation pipes and gas pipelines. To do this, the kitchen set is hung on the wall so that the shelves inside the cabinet are parallel to the pipe.
If necessary, you can cut holes in them according to the diameter and location of the gas or heating pipe, and if it is a thick corrugated exhaust ventilation pipe, you can completely remove the shelves and leave a free niche.
If you need to hide pipes using a hanging furniture module, you cannot use it as a hanging support. The cabinet with the door needs to be attached only to the wall or side modules. It should not be subject to load, especially if it is a gas pipeline.
Another camouflage option is to use a countertop connecting the floor modules, sink or window sill. The countertop masks horizontally running gas, sewer or heating pipes.
If possible, you can even replace the window sill with one slab of natural or artificial stone (granite, marble) or 16-22 mm laminated chipboard. Many designers use one design that goes from the tabletop to the window sill.
Overheads
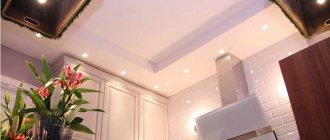
When designing a box in the kitchen, you should rely on the external dimensions of the hood, or rather its most massive parts - the muffler and the engine.
We find the lowest point and transfer it level to the wall. The part furthest from the wall is projected onto the ceiling. To do this, holding the building level vertically, press its flat surface against the protruding part of the structure, and the end of the level against the ceiling. Once you find the vertical position indicated by the air bubble, mark a point on the ceiling.
Draw the horizon line through a point on the wall. In the case of the ceiling, everything is a little more complicated, because you need to think through the kitchen furniture in advance, that is, maintain an angle of 90 degrees between the walls.
It is more convenient to mark all long straight lines with a painting rope (skip). When carrying out any complex renovation work, it is recommended to have 2 pieces of blue and red paint (sold separately) in stock, as the line of one of these colors will be more visible on different surfaces. For example, red is slightly better than blue almost everywhere, except exposed brick.
Rules and regulations
When deciding how to hide a gas pipe, you need to take into account the requirements and standards for gas communications in the apartment.
- It is necessary to ensure free and quick access to the gas pipe in case of gas leakage if it is damaged.
- It is strictly forbidden to hide pipes in solid solid non-removable boxes and in grooves punched in the wall to avoid an explosion due to gas accumulated during a leak.
- Even when installing boxes that are easy to disassemble and provide good ventilation, you should coordinate your intentions with the gas services.
- It is prohibited to move gas pipes and metering devices on your own. This can only be done by specialists who have permission from the gas service.
- Communications can only be masked using materials intended for such work.
- Coloring is a must. It protects pipes from corrosion and extends their service life.
- When working with gas pipes, it is prohibited to attach heavy objects to them, thereby placing additional stress.
Safety during work, as well as during subsequent operation of gas equipment, should always remain a priority issue.
Suspended slatted ceiling
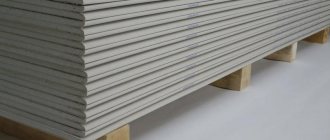
The wall thickness of load-bearing profiles for plasterboard structures must be at least 0.5 mm. Photo: KNAUF
The suspended system of the slatted ceiling consists of U- or L-shaped load-bearing stringer profiles with hooks for fastening slats and adjustable hangers with a maximum length of 500 mm. Manufacturers produce load-bearing profiles of different widths (15–40 mm) and heights (25–50 mm); the choice of one or another standard size depends on the design load, which means that when purchasing a set you need to know the mass of decorative slats, which varies between 0.9–5 kg/m2.
Installation of profiles
It’s easier to start installation with wall guide profiles according to plan:
- install the guide element on the wall, press it strictly along the line and make the first hole at the end of the profile directly through the wall, hammer a dowel-nail into it. Then move to the opposite edge and secure it in the same way. Then install dowels along the entire profile in 20 cm increments;
- the remaining profiles are installed in the same way as described;
- go to the ceiling and install profiles on it.
Important! We check the profile for level, make sure that there is no distortion
- The next step will be to install the transverse. They need to be cut from the rack profile. Equal sections with curved edges are screwed with self-tapping screws to the profile on the ceiling, the spacing of the jumpers should be 60 cm if a simple box is mounted and 40 cm if a reinforced one;
- Once all the jumpers around the perimeter are installed, the corner structure is assembled, two profiles of guides are taken for it, and nested into each other. Then you need to place the profile to the edges of the jumpers and screw it on. In this situation, you need an assistant. Check the level of the structure;
- Now you can begin installing jumpers from the bottom of the future box;
- When everything is ready, we check the structure again, all its edges should be on the same level. If there is a distortion, it must be corrected immediately.
After preparing the frame, place corrugation on its ribs from below and secure it in a stationary ventilation hole.
Placing the corrugation in a plasterboard box The corrugation should be of such length that it is sufficient to reach the hood installed above the slab. You can begin installing the gypsum board.
Mistakes when installing a kitchen hood
1
Some people, of course, leave a grille for natural air movement, but still manage to block it with the air duct itself.
2
Recommended dimensions for round air ducts are d=125mm. For rectangular ones - 204*60mm.
3
In most cases, this is prohibited by the rules. Specific points will be given below in the text.
You can, of course, lay a separate box along the facade straight to the roof. But is it worth it? Although in restaurants and cafes located on the ground floors of high-rise buildings, this solution is widely used.
By the way, the ban on venting air to the street through a wall does not apply to private houses, but only to high-rise buildings.
4
First of all, this will affect the noise. Although, of course, the turns themselves are not the greatest evil. And sometimes you can’t do without them.
It is the turns that follow one after another, without acceleration sections, that are dangerous.
5
Remember that a productivity of 200-300 m3/h is quite enough to effectively remove all odors, with minimal load on the ventilation of the house.
6
The installation height directly depends on what kind of stove you have - gas or induction hob.
7
Believe me, sometimes this structure has to be disassembled.
8
Why this is a mistake, and when it is still possible to do this, is discussed below.
9
As a result, connecting it haphazardly, through carriers and extension cords. Do not forget that in the end this is not a portable device, such as a fan, heater or mobile air conditioner.
This means that the wiring for it needs to be done stationary and wisely.
10
It must be embedded and installed in compliance with the appropriate angles and inclinations. Otherwise it will work every other time.
In general, installation of a hood can be divided into two main stages. The first is its connection to electricity. The second is the air duct structure and everything connected with it.
Let's look at each of them separately.
How to make a box from plasterboard
One of the distinctive qualities of gypsum boards is the ability to create the required shape, which is very convenient for the structure of the box. Installation work can be carried out independently, and it is not necessary to have special skills. It is appropriate to use curves, rounded lines and other design options, expanding decorative possibilities.
The most common shape is considered rectangular and is much easier to assemble. Let’s look in more detail at how to make a plasterboard box to securely cover pipes, with your own hands, following step-by-step steps:
- We start with the drawings, make marks on the wall in the places where the metal profile is applied, also below and along the top, using a level; it is especially convenient to work with a tool with a laser beam.
- We prepare holes in the walls for fastening screws and dowel nails using a hammer drill. The pitch between fastening holes varies from 30 to 60 cm.
- When working with the material, the profiles are cut with metal scissors, and the sheets can be easily cut using a construction knife or a circular saw; no difficulties arise, the main thing is to follow the installation instructions. If wooden slats are used, we trim them with a regular file.
We hide the riser and water supply in the toilet.
A frame is assembled from profiles.
We fasten the profile vertically along the walls, along the ceiling and floor, a stand is installed from the same profile, which we connect with horizontal jumpers to the wall profiles, and secure with self-tapping screws or a staple gun, creating a frame. The recommended step between horizontal jumpers is from 40 to 60; here you need to take into account that the edges of the sheets, when they are applied, fall on the profile. It is important to design the frame so that when assembling the box, the sheets do not come into contact with the pipes or riser and have enough free space for inspections and replacement of worn elements.
Pipe outlets are taken into account.
- In the right places we leave space for pipes to exit, places for meters, and reinforce them with jumpers, places for possible windows and doors to enter the building, we also create them using profiles. Inspection hatches are purchased separately; these are finished products with a frame and a door, which are mounted in a specially prepared place.
- Where necessary, the frame can be strengthened using a large number of jumpers between the vertical profiles, and with the help of built-in bars into the empty profile cavity.
Attaching sheets to the frame.
- We lay polyurethane tape on the assembled skeleton of profiles, on the part where the sheet is placed. It will serve as a shock-absorbing layer to reduce vibrations and the building will be better protected from cracks in the joints.
- The sheets are laid from the corner and secured with self-tapping screws at a distance of 25 cm. The screws go slightly deeper into the sheet, the main thing is not to destroy the edge and screw in without strong pressure. Cover the entire surface with plasterboard.
- The second layer of sheets is laid on top of the first layer and secured with self-tapping screws; the sheets must be laid in a checkerboard pattern. This way we get a stronger box and avoid possible cracks at the joints.
- The polyurethane tape dampens possible vibrations, thereby protecting against the appearance of cracks, this is an additional measure that increases the strength of the entire structure.
- Holes for the outlet of pipes and taps are prepared in advance by cutting holes of the required diameter on a sheet using a construction knife.
- We coat the joints between the sheets with plaster mixture. If the edge of the gypsum board is thinned, when puttying it will be necessary to use reinforcing tape; it is laid along the joint of the sheets and puttied on top of it, leveling the surface. If the edges are cut, they must be ground off at an angle of 45 degrees and puttied without tape; tape is also not used when the edge has a rounded shape. The photo shows the thinned edge and the method of puttying with tape, the rounded edge, and how deep the self-tapping screw is screwed.
- In the corners we use a special protective corrugated corner, place it on the putty and coat the top with the solution, then level the entire surface with finishing putty.
- After processing the joints and corner parts, for further application of the finishing coating in the form of paint, wallpaper or decorative plaster, it is necessary to completely level the base with putty, in some cases using reinforcing mesh.
- If decorative panels or tiles and similar building materials that do not require a perfectly flat plane will be applied, it is enough to treat the surface with primer with an antiseptic effect, especially for rooms with high humidity conditions.
Ventilation features
When installing a hood, you need to choose the right air duct. In practice, the following types of ventilation systems are used:
- Corrugated sleeve made of aluminum. The main advantage of such a model is the ability to change the shape for acceptable parameters. The material bends well, which makes it possible to make a ventilation duct with turns in the right places. The disadvantage of the product is the creation of noise during the passage of air flows. In addition, grease, dust and dirt constantly settle on the surface of the corrugated sleeve. It needs periodic cleaning to remove dirt.
- A round plastic air duct is assembled from several parts (adapters, angles and couplings). The connection of all parts is carried out using shaped parts. To prevent tears, the joints are coated with special glue, then additionally secured with self-tapping screws. The main advantage of such a system is considered to be silent operation.
- Square plastic ventilation ducts are made of polyvinyl chloride. The product in question has the same characteristics as the previous type.
The plastic models of air ducts are supplied with additional parts that can be used to install the most complex engineering systems. Such products are characterized by high cost and complex design; their installation must be carried out by a professional.
Save
DIY box manufacturing technology
How to make a plasterboard box for pipes in the kitchen yourself? Despite the fact that drywall is easy to process, all operations must be carried out carefully and carefully, since the material, along with many positive qualities, has fragility. The entire installation process occurs in several stages.
Preparing the premises
The essence of the preparation is to ensure that the box continues to perform its functions effectively and for a long time, as well as to facilitate the work.
To do this you need:
clear the space near the riser, remove all objects that interfere with work;
- clean old putty from the walls;
- check pipes for damage;
- treat the walls with a solution that prevents the appearance of mold and mildew on them.
After this, it is necessary to apply markings to the floor, walls and ceiling in accordance with the previously drawn up project. In this case, be sure to use a level to avoid curvature of the product.
Frame assembly
The manufacture of the box begins with the assembly of a metal frame, which serves as the basis for further fastening drywall to it. To do this, the metal profile is cut into pieces according to the width of the future box and mounted to the wall in increments of 30 cm. In this case, the first fragment is attached to the countertop of the floor cabinet or table, and the last one is attached to the bottom plane of the wall cabinet.
Step-by-step instructions for installing the frame:
- a guide profile is attached in accordance with the marking line;
- using a perforator, a hole is made in the wall and in the profile into which the dowel is inserted;
- the profile is screwed to the wall. Vertical racks must be secured to the walls and floor;
- all elements are checked using a building level;
- The profile is attached on the other side using the same principle.
The next step is to connect the fixed profiles with jumpers, which are installed in increments of 50 cm, which will result in rigidity to the structure. In this case, gas pipes should be hidden using elements that prevent them from dangling or not fitting tightly.
Video
Sheathing with plasterboard
After completing the installation of the metal frame, you can move on to the next, no less important and responsible step - covering it with plasterboard. To do this you should:
To do this you should:
- apply markings to the sheets in accordance with previously selected dimensions;
- cut out the required elements using a construction knife;
- Screw the resulting parts to the profiles with self-tapping screws. In this case, you must try to ensure that they do not protrude above the surface of the material, but are slightly recessed.
In addition, the box should be sewn up with plasterboard in such a way that the gap between the parts is as small as possible. The design requires final finishing, which will facilitate further design in accordance with the style of the kitchen.
This requires the following operations:
- serpyanka (special self-adhesive tape) is laid on the joints;
- putty is applied on top of it, and it is also necessary to seal all the places where the screws are screwed in;
- after it dries, all remaining roughness is rubbed down with sandpaper;
- The surface of the box is coated with a primer, and it is best to use a deep penetration material. After drying, the structure is treated with an antiseptic that prevents the appearance of fungus and mold;
- a thin layer of finishing putty is applied.
Carefully following these steps will result in a perfectly flat surface of the box.
Finishing the structure
In conclusion, all that remains is to design the closing box in accordance with the kitchen interior. The characteristics of drywall make it possible to finish it with almost any type of material:
- tile . An excellent option for the kitchen, especially if the riser is close to the sink or stove. Such a solution will look best in the kitchen;
- painting with waterproof paint. Also quite a popular option, since skillful painting allows you to effectively highlight the box or ensure its inconspicuousness;
- water-repellent wallpaper. Less common, but also used to hide structures;
- imitation stone. A stylish and attractive solution, but it is not suitable for every interior.
Method 5. Anchoring into a solid wall
This solution is used for main walls covered with plasterboard; it is not suitable for partitions made of gypsum plasterboard. Anchoring into the wall allows you to hang large structures, household appliances and cabinets on a plasterboard sheet.
To do this, hatch holes are cut into the gypsum board so that you can drill into the main wall with a hammer drill and install anchors. The anchor consists of a metal or plastic dowel and a long threaded screw or hook. I don’t take into account chemical dowels, because... they are used quite rarely and have some difficulties in installation.
It should be noted that the fasteners must be completely located in the main wall. Therefore, screws and hooks are selected to be longer so that the threaded part of the screw reliably wedges the anchor, and the head of the screw protrudes beyond the plasterboard wall.
You can hang heavy furniture on anchors if the distance from the main wall to the gypsum board does not exceed 5 cm. At a greater distance, even a thick screw that can withstand significant loads will bend over time. In this case, you can use a combined method, for example, by securing the tire to anchors and adding several attachment points to the gypsum board.
After installing the anchors, the cut sections of drywall are mounted in place. The joints and the hole around the anchor head are sealed with putty.
Advice! To cut out sections of plasterboard, it is very convenient to use a toothed bit clamped in a drill chuck. The crown will quickly and accurately cut round holes in the drywall, the discs from which will snap into place with a minimum gap. The diameter of the hatch hole of 100 mm is quite enough for installing the anchor.
Anchoring is effective if the main wall is made of concrete or brick without voids. In cinder block or foam concrete, the anchor holds much worse.
You can increase reliability by passing the anchor through the rack profile of the plasterboard lining. Unfortunately, the places where furniture is attached do not always coincide with the location of the metal frame parts.
The disadvantage of mounting on anchors is the need for very precise markings. Possible distortions and deviations will become noticeable only when the furniture is already secured to the anchors, and it will not be possible to hang the cabinet “a little higher” or move it to the side.
The quality of the indoor air mixture cannot be guaranteed without the use of modern and high-tech equipment. For these purposes, ventilation and climate control units, systems for maintaining humidity, and all kinds of ionizers are used.
However, it is not possible to fully ensure these activities using the listed devices, since this list lacks the most commonplace kitchen hood that can block the spread of unpleasant odors from cooking throughout the entire facility. And in order for the installation of a kitchen hood to bring only positive results, it is advisable to install it in full accordance with the technological process, adhering to very useful recommendations.
Types of pipe decoration methods
To begin with, there are several basic methods regarding the pipes through which water passes. Some of the methods have nothing to do with the gas pipe. It’s just that these methods of concealment do not allow their use in accordance with the current norms and rules for the operation of a household gas pipeline.
Hidden wiring
This is one of the most common methods used nowadays. To do this, grooves are made along the wall or floor from the riser to the sink.
This process is labor-intensive, requiring a good hammer drill and the skills to use it. It is in the grooves that pipes (water supply and sewer) are laid, where they are walled up with plaster or putty mortar.
How to sew pipes in the kitchen into grooves - a clear example
Here you must strictly adhere to three basic rules:
- Water pipes must be installed on top of the sewer pipe.
- The hot water pipe should always be located to the right of the cold water pipe if they are mounted in the same horizontal plane.
- The sewer pipe is laid with a slight slope (gravity sewer) towards the riser. The slope angle for pipes with a diameter of 32-50 millimeters is two millimeters per linear meter of sewer pipeline length. And three millimeters if pipes with a diameter of 80-100 millimeters are installed.
Plasterboard box
And now to the question of how to cover the pipes in the kitchen if it is not possible to install hidden wiring. The best option is to make a box from plasterboard sheets. In principle, you can use other sheet materials (chipboard, plywood, plastic, etc.), but drywall is easier to work with and cheaper.
Plasterboard box
To construct a horizontal box, metal profiles and drywall itself are required. Usually the pipes run near the wall, so the frame is attached to the wall and floor, which creates a fairly rigid and reliable structure.
To do this, a guide profile is installed horizontally on the wall ten centimeters above the pipes and secured with self-tapping screws. Its length is determined by the length of the pipes.
Exactly the same profile of the same length at the same distance from the pipes is installed and attached to the floor. Now small sections of the profile are cut, the size of which is determined by the distance from the wall to the floor profile. They are attached to a profile that is installed on the wall.
More sections are cut with dimensions equal to the distance from the floor to the wall profile. They are attached to a metal floor guide.
The intersection of the vertical and horizontal sections is the location of another profile that will complete the structure of the box frame. It is attached to the sections with self-tapping screws.
Now all that remains is to cut the plasterboard strips exactly along the edges of the frame and secure them to their destination. The next stage is finishing the entire structure. This is how a pipe box is constructed in the kitchen.
Kitchen hood boxes – see here.
Cabinets
Pipes hidden in a closet
This is probably the simplest option. To do this, you need to purchase a kitchen set with floor cabinets that do not have a back wall.
If you can’t find ready-made furniture of this type, you can assemble the cabinets yourself. Fortunately, this is not a problem today.
Calculation of the cross-section of plastic air ducts
Each hood model has a pipe with a certain cross-section, so round air ducts must be selected to this size. When installing flat boxes, it is necessary to calculate the cross-sectional area of a round pipe.
If the diameter at the hood is 110 mm, the area is calculated using the formula:
S=πD²/4= 3.14 x 0.11²: 4 = 0.01 m²
The area of a flat pipe with sides 125mm*80mm will be equal to 0.01 m2. This results in a replacement of a round air duct with a diameter of 110 mm. You can install a larger size, but you cannot install a smaller one. This will reduce the performance of the entire system.
The diameter of the hood outlet serves as the initial size when choosing plastic ventilation pipes. The exhaust power and the length of the air duct are also taken into account. The longer and more winding the route, the lower the performance of the entire system. The best option is one turn when moving from the hood to the horizontal section.
Correct calculation of the cross-section of plastic air ducts for exhaust will ensure efficient operation of the equipment and optimal air exchange in the room.
After the calculation, it is necessary to double-check the result and only then make a purchase decision and proceed with installation.
Partition technology
The whole process can be divided into 3 stages:
- layout;
- frame installation;
- frame covering.
After this, all that remains is to finish the partition so that it does not stand out from the overall style of the room.
Layout
At the planning stage, you need to mark the outline of the future partition on the floor and ceiling. Its walls must be strictly vertical, so when transferring the contour from the floor to the ceiling, you will need a building level.
The marking instructions look like this:
the outline of the future partition is drawn on the floor at right angles to the walls of the room
In this case, it is important to maintain the distance from the partition wall to the pipe itself. It is desirable that it be at least 5–7 cm;
Frame installation
When you need to cover pipes in a toilet with plasterboard or in another room with a high level of humidity, it is better to use galvanized metal profiles for the frame. You will need 2 types of profiles: UD - attached to the floor and ceiling, as well as CD profile - will act as racks and horizontal partitions.
Although, ordinary wooden planks can be used for the frame, but such a design will be more cumbersome. Besides, using wood in the kitchen or bathroom is not a good idea.
The metal profiles are connected to the floor and to each other with small self-tapping screws.
The frame assembly should be carried out in the following sequence:
- first, guides are attached to the floor and ceiling;
- then rack profiles are installed in the corners of the box, and their verticality is additionally controlled. The same profiles need to be installed against the wall;
- in order to ensure the rigidity of the structure, cross members from the same rack profile are fixed between the racks; the step between them can be about 60 cm.
Frame covering
The sheets are attached to metal profiles with self-tapping screws. It is convenient to use a knife to cut sheets. The sheet is cut along a pre-marked line to approximately 2/3 of the depth, then placed with its back on the edge of the table and sharply broken.
After this, all that remains is to cut through the thin layer of cardboard with a knife.
When all the work is done with your own hands, you must take into account the purpose of the room. So, ordinary plasterboard is suitable for the living room, but for the bathroom, kitchen and toilet it is recommended to use moisture-resistant plasterboard (it differs from the usual one in a greenish color).
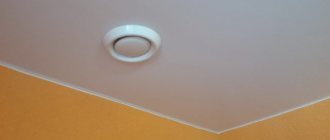
The interior of the box must be ventilated. To do this, when covering the frame, a small hole (at least 5 cm in diameter) is left in the upper part.
In addition, access to the pipeline may be needed at any time, for example, in case of leaking joints. For inspection in the box, it is advisable to provide a door opposite the taps and fittings.
After finishing the partition, the door will be almost invisible.
The space between the sheets and the wall can be filled with heat and sound insulating material, for example, mineral wool. Thanks to this, the noise in the pipes will become absolutely inaudible.
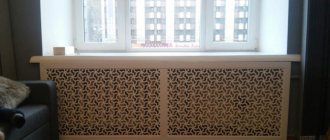
How to hide heating pipes?
When deciding how to cover heating pipes with plasterboard in a room, in general, the procedure remains the same. The differences in technology are associated with the high temperature of the coolant pipes.
As a rule, the heating radiator is located under the window, approximately in the middle of the wall. Therefore, in addition to the vertical pipeline, there is also a significant section of horizontal pipe in the room.
When masking heating pipes, it is better to bring the plasterboard partition all the way to the ceiling in the area from the riser to the radiator. The loss of free space will be almost unnoticeable, but the partition will not stand out.
In addition, more intensive ventilation must be provided. Large holes in the drywall will be too obvious, so you can drill many small holes along the piping.
Materials and tools
To make a decorative box in the bathroom, you will need the following equipment and tools:
- pencil and tape measure;
- long ruler and square;
- a hacksaw or jigsaw for wood (in case of installing a frame made of bars);
- impact drill, which is used as a screwdriver and hammer drill;
- metal scissors or grinder (when working with a metal profile).
In addition, the work requires a level and a knife for cutting drywall. The list of materials that will be required to make a do-it-yourself box in the bathroom includes:
Drywall. Its quantity is calculated based on the dimensions of the standard sheet and the dimensions of the planned box. It is advisable to use moisture-resistant drywall, since the bathroom has high humidity.
Material for the frame. Both wooden blocks and a special metal profile can serve as it. When using lumber, it is necessary to pre-treat it with products that will provide protection from moisture and prevent the appearance of mold and mildew.
The elements of the box are connected to each other using self-tapping screws and dowels. To work, you will need two types of fasteners: to fix the profile or bars to the walls and drywall to the frame.
How do kitchen hoods differ from air conditioning systems?
There is a significant difference between kitchen hoods and air conditioners. As you know, air conditioning systems absorb air from a room and return it cold or warm. Such air is very dry and harmful to health, since various odors, microbes and carbon dioxide, which is formed when exhaling, are not removed from the apartment.
There is a significant difference between kitchen hoods and air conditioners.
And the illusion of fresh air appears due to the fact that its density increases as it cools. While the kitchen hood removes air containing harmful substances and bacteria, thereby maintaining a healthy and fresh atmosphere in the apartment.
And the illusion of fresh air appears due to the fact that its density increases as it cools.
Note! If an air conditioner is installed in the kitchen, then there must be a ventilation system to maintain natural air exchange
Nuances of masking communications
Open gas pipes and valves do not look very nice. This can be corrected by placing them in a decorative casing. There are many options for these elements in hardware stores.
The second option is to make a box from plasterboard. It is made according to the dimensions of pipes and other elements of the communication system. The outer walls of the boxes are designed to match the color of the furniture or kitchen walls.
When choosing the option of how to close heating equipment, you should remember that the gas boiler and communications must remain freely accessible if they need to be repaired or checked for operating condition.
Finishing
The final stage has a standard sequence:
- Serpyanka reinforcement of joints;
- Strengthening the sheathing ribs with perforated corners;
- Applying primer and putty to the entire surface area of the box;
- “Bringing out” the corners of the ribs;
- Surface grinding;
- Decorative finishing.
Traditionally, glass wallpaper for painting is used for decorative finishing of drywall.
The process of making a plasterboard box for a kitchen hood is no more difficult than creating any other structures from gypsum plasterboard - this is one of the simplest and most convenient modern building materials to use.