Stencils for decorative plaster help you create three-dimensional patterns on the wall without much difficulty. Their use is simple, so you can carry out original surface design yourself without spending money on the services of professionals. The features of using stencils for plaster and their selection will be discussed in detail below.
Stencil painting - what is it?
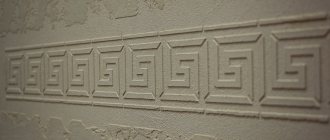
Stencil painting involves obtaining a three-dimensional pattern on a plaster layer, which is applied using special templates. These stencils help you apply any even complex pattern without much effort.
They are a material in which the desired images are cut out, and an additional layer of plaster is applied through them so that the result stands out from the main surface. This way you can get a bas-relief on the ceiling and walls.
Stencil painting involves obtaining a three-dimensional pattern on a plaster layer, which is applied using special templates.
Instructions for use
How to use stencils for design? This is a question every novice master asks himself. Everything is simpler than it seems. Working with stencil templates for decoration will not be difficult if you follow certain rules.
To begin with, prepare the necessary list of tools that will become an indispensable assistant in this skill.
- When decorating a room, you can’t do without stencils for wall decoration, which can be purchased or homemade.
- Stencil glue and tools for transferring the design onto the canvas (roller, sponge or brush).
- A paint base in the form of acrylic paints or aerosol cans is also necessary.
- Its choice depends on the individual needs of the master.
The advantages of this type of wall decoration
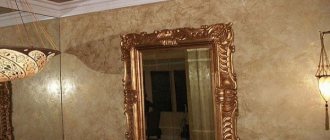
Stencils for three-dimensional plaster will give you the opportunity to create an unusual room design with your own hands. This effect has the following advantages:
- You can buy ready-made stencil designs or make them yourself;
- You can show your creativity by making the interior unique;
- It’s easy to apply even a complex design without any artistic skills;
- Get more unique designs than those presented on special textured rollers;
- The decor can be obtained on any type of plaster layer;
- Helps cover minor imperfections in the base.
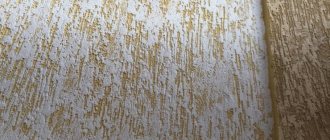
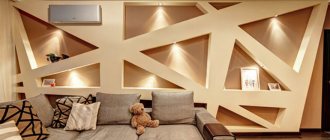
Stencil plaster looks beautiful, even if the color is made the same as the rest of the part. You can separately highlight three-dimensional patterns, then the space will visually increase.
Stencils for three-dimensional plaster will give you the opportunity to create an unusual room design with your own hands.
Making a template
The development of a stencil for DIY decoration takes place in several stages:
- Choice of ornament;
- Layout formation, copying;
- Cutting out the pattern;
- Preparation of materials for work;
- Fastening to a clean surface;
- Painting;
- Pattern adjustment.
Ready-made templates can be purchased in stores. But it is not always possible to find your ideal option that will perfectly match the design of the room. Therefore, stencils are often made independently.
Having artistic skills, you can draw a picture on your own, and if you don’t have them, use a computer and download interesting ideas.
- The pattern is copied, enlarged to a suitable size and printed. The template is divided into several parts, which are glued together after printing. True, with high magnification you can get very blurry contours.
- How to make stencils for decoration with your own hands if the quality of the printed picture is not particularly satisfactory? The next option is to sketch the pattern manually. You can use the size chart. It is also easy to transfer the printed drawing onto graph paper. All squares should be numbered.
- The next step is to take the material from which the stencil will be cut. The sketch is transferred to a base made of foam plastic, cardboard or wood using tracing paper. Using a sharp stationery knife or scissors, cut out the design along the contours. The last step is to trim the cut lines and align the edges of the layout.
How to choose the right pattern for a room
Stencils for walls for decorative plaster must be selected correctly so that they look consistent with the interior and perform a complementary function. You can recreate elements that are on furniture pieces and other decor in the room. They are often used in children's rooms to create colorful images of cartoon characters and more.
In other rooms you can use the patterns described below:
- It imitates stone or brick and is used for the kitchen, hallway, and living room. Rolled templates are sold that can be conveniently stretched over the surface;
- Natural motifs are applicable to any room. Well suited for the bedroom, if a large pattern is chosen, then the room should be large;
- Animals and birds can be depicted large, but they are not suitable for many styles;
- Reptile skin or animal skins can cover the entire area, or only certain areas.
Stencils for walls for decorative plaster must be selected correctly so that they look consistent with the interior and perform a complementary function.
How to properly place a stencil on the wall
In order to get started, you need to determine the location for the drawing. The next step is to attach the stencil to decorate the walls.
Manufacturers, in accordance with the requirements and demand of the population, produce adhesive-based silicone templates. But if you decide to make a stencil for the walls with your own hands, then you will need improvised fasteners.
Creative ideas are implemented in accordance with the basic rules of work. We mark the extreme attachment points. Stencils on the walls are fixed:
- aerosol glue;
- masking tape.
You cannot attach or glue prepared models onto a recently painted surface; you need to thoroughly dry and prepare the place.
You cannot attach or glue prepared models onto a recently painted surface.
How to make it yourself
If you don’t want to look for a suitable pattern on sale and spend additional money on them, then you can make the template yourself. Then you can get any image you like. Materials you can choose from are plastic, paper and silicone.
If you don’t want to look for a suitable pattern on sale and spend additional money on them, then you can make the template yourself.
Made from silicone
Silicone material can be used to cut out the desired image on the sheet. You can also apply a pattern using silicone-based glue.
For the latter option, it is convenient to use a special glue gun. They work on a flat surface, lay down paper with a pattern, lubricated with oil. Once drying is complete, it will be easy to remove the silicone.
Silicone material can be used to cut out the desired image on the sheet.
Plastic
Use a thin type of plastic 0.2 mm. For example, you can apply folder covers that are sold for files. They come in different sizes. You can redraw the pattern with a regular marker.
When cutting an image, try to avoid jagged edges.
Use a thin type of plastic 0.2 mm.
Papers
The paper stencil will be disposable; it is better to choose a dense type. So that he can withstand the solution. You can transfer the image tightly by pressing the stencil paper against the template, drawing an outline with a marker.
The paper stencil will be disposable; it is better to choose a dense type.
Mistakes when working with a stencil, how to avoid them
Before applying a picture, it is important to consider where the light falls on it from - this is most significant for three-dimensional images. To prevent the paint from flowing behind the template, it is taken little by little, slowly, slowly, and applied by “stuffing”. The stencils are fixed as motionlessly as possible to avoid distortions and distortions of the overall picture. Before you start painting, it is advisable to “train your hand” on an old piece of wallpaper, especially if this is your first experience of drawing with a stencil.
At the stage of creating a sketch, it is necessary to think through all the details - excessively small elements are inconvenient for painting, will overload the interior of a small space, and merge with each other when viewed from a long distance in a spacious room. In terms of color, subject, size, the stencil image must correspond to the general mood of the room and its purpose.
If paint is accidentally smeared, the excess is removed with cotton swabs, a cloth soaked in water, or solvent - depending on the paints used.
Stages of painting work
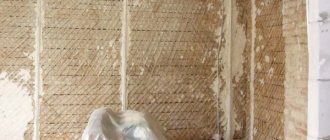
To get a high-quality result with your own hands, you need to carry out the process in compliance with technology. The base must be cleaned and all unnecessary parts must be removed. A location for the pattern is selected and markings are made to place the pattern in the desired location.
It is important to fix the stencil well; for this purpose, special glue is used, which will not be visible on the surface. But it’s easier to use double-sided masking tape.
If the drawing is large, then the parts must be securely connected together, so that there is no movement in the image. The plaster mixture or paint is being prepared. For details of the process, see the manufacturer's instructions.
The base must be cleaned and all unnecessary parts must be removed.
Making a stencil
The stencil must be carefully transferred to the selected material. You need to cut out the pattern with sharp tools so that the edges are even. You can strengthen the paper base by taping it with tape. You can draw a picture, or use a printout of the finished version.
You can draw a picture, or use a printout of the finished version.
Drawing with paint
To obtain a clear image, you must adhere to the work rules. Experts highlight the following principles:
- Provide reliable fixation of the template to the surface;
- The tool is used to select printed options for applying the composition;
- You can only use a clean and dry stencil for painting;
- The template is removed immediately after coating with paint; you should not wait for it to dry, then removal will occur with partial removal of the layer.
The tools you can choose from are:
- Special brush for stencils. It is round and the bristles lie flat. You don’t need to add too much paint so that it doesn’t run down the stencil onto the wall;
- Foam sponge;
- The roller is made of foam rubber, it is suitable for large areas, so that the image is bright in all areas, you need to roll the paint with a roller several times.
The template is removed immediately after coating with paint; you should not wait for it to dry, then removal will occur with partial removal of the layer.
Creating a relief image
The material should be applied in stages to make the pattern voluminous. First, the image is fixed to the surface. Then perform the following steps:
- Using a narrow spatula, the plaster is applied, and with a narrow spatula it is already distributed according to the template; it is important to completely cover the cut out parts. They work with effort;
- When the pattern is transferred, the stencil is removed;
- You can make adjustments with a small tool before the layer dries;
- If you have applied extra strokes, they can be cleaned after drying with sandpaper;
- The surface can be painted with acrylic or latex based paints. Options in spray cans are convenient, but it is better to paint the bas-relief pattern with a foam roller.
You can make adjustments with a small tool before the layer dries.
Types of stencils
There are several types of stencils, among which you need to find the one that suits you best. It is best to purchase them in a specialized store, especially if you plan to use it for the first time. Those more experienced in this matter often do them themselves. So, let's look at the main types of stencils and the features of working with them.
Simple stencils can rightfully be called the most popular type. This is explained by its ease of use, because even beginners in this business can easily make a gorgeous drawing. Application requires only one coat of paint. Most often, simple stencils are used to apply simple drawings, inscriptions or ornaments.
Combined or multi-color stencils, unlike the previous type, require certain skills. After all, several shades are used to apply the design, which allow you to highlight a certain element or create a multi-colored composition.
In addition, in this case the stencils are applied in a certain sequence in order to obtain the expected result. For beginners who want to do something similar, we recommend that you first practice a little and only then try to apply the drawing to the walls.
In turn, volumetric stencils allow you to create not just a beautiful pattern on the wall, but a 3D ornament or even a velvety surface. But in order to do something like this, special efforts and knowledge are required to make the result look decent. The material used for application is not paint, but putty. It is carefully applied to the surface in a thin layer. But after drying it won't look too nice. Therefore, many experts recommend covering the top with a layer of paint or clear varnish. If everything is done correctly, then after this the drawing will look perfect.
Reverse stencils are different from all the others. The fact is that this particular type assumes that it is not the inside of the stencil that will be painted over, but the outside. That is, as a result, there will be an outline of the drawing on the wall. This solution looks quite interesting, so it is used in many rooms with a modern design.
It is also worth mentioning that stencils are not only disposable, but also reusable. The first option is made of simple material, which cannot be restored after use. Most often these are stencils of inscriptions or simple drawings. Reusable products are made from moisture-resistant material, so they are suitable for repeated use. Most often acrylic or plastic is used for this.
Tools that will come in handy at work
Work can be carried out without interruptions if you prepare all the necessary tools in advance. The list includes the following tools:
- Spatulas;
- Roller;
- Palette knife, for correcting defects;
- Stationery scalpel;
- Tassels;
- Sandpaper;
- Markers;
- Templates;
- Containers for solutions.
Work can be carried out without interruptions if you prepare all the necessary tools in advance.
Type of stencil for different premises
Stencils for walls for painting are selected depending on the type of room. There are universal designs: geometric, floral patterns, landscapes. They are suitable for any room, hallway, kitchen, etc. You can find a lot of them, in different versions. And under strict minimalism, and under chic classics or romantic Provence. Moreover, it is often not only a matter of the drawing itself, but also the selection of paint. The same pattern will look different in black and pink. And this is worth remembering.
In the bedroom, the design should not be so provocative and bright
There are stencils for walls for painting with thematic designs that are appropriate only in certain rooms. For example, in the kitchen they usually use thematic pictures with food and products. In nurseries they often draw cartoon characters for smaller children, and for teenagers - game or anime characters.
For bedrooms they are trying to find calmer designs. Even if it's a man's bedroom. Here you need to relax and the atmosphere should be appropriate.
Specific stencils for walls for painting for children
In other rooms - corridors, living rooms, dining rooms - neutral images are selected that will appeal to people of different ages. These are all the same plant motifs or landscapes.
Options for beautiful designs
Any patterns can be chosen at the discretion of the owner. You can look for inspiration on the Internet, or come up with a picture yourself and draw it if you have artistic abilities.
For living rooms, you can choose large designs if there is a large empty area. Narrow patterns around doors and windows look beautiful; switches and sockets are decorated with patterns. Natural patterns are appropriate in any interior.
For living rooms, you can choose large designs if there is a large empty area.
Stencils for the plaster layer allow you to quickly update your interior without spending a lot of money. It is important to choose a pattern, taking into account the design features, in order to get a compatible addition. If I follow the working technology, it will not be difficult to create a three-dimensional bas-relief.
For decorating doors and furniture
Stencils are indispensable assistants that do not require special skills when using them. But they provide invaluable benefits when correcting minor defects in everyday life.
- There are often cases when household items have chipped or a pet has damaged the surface of the door leaf.
- Of course it’s unpleasant, but solvable. Stencils for decorating doors and furniture will eliminate the problem by introducing fresh notes into the modeling of the room.
The templates are presented in a variety of designs, ranging from children's patterns to complex textured patterns. One thing is for sure, everyone will find the necessary stencil for eliminating defects or adding brightness to the interior of the premises.