Gypsum plasterboard sheets (GKL) are often used for leveling walls and ceilings and arranging partitions. One of the ways to finish this building material is to apply decorative plaster. To apply decorative plaster on drywall with your own hands requires diligence, basic skills in working with mortars and knowledge of the sequence of technological operations.
Applying decorative plaster to drywall. What is the best way to apply plaster?
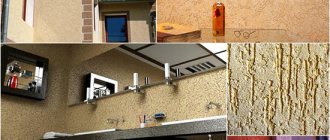
There are several ways to apply decorative plaster to drywall, depending on what is more convenient for you and what you have at hand. But professionals do this using a trowel and spatula, roller, brush, sponge, and even machine application. Let's dive into each type separately.
Square trowel and spatula
The simplest tools for work are considered to be a trowel in combination with a spatula. In skillful hands, they can be used to create Venetian, stone and other textures on the walls.
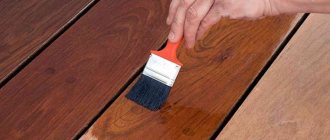
Using a thin spatula, carefully apply the solution over the entire area of the trowel, and then, using small strokes, decorative plaster is applied over the entire surface of the drywall.
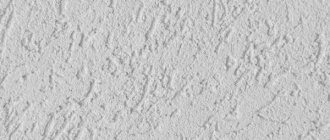
A favorite type of creating fancy designs is trimming with a trowel. The solution applied to the base of the trowel is pressed to the surface and the solution is spread on different sides with careless strokes. As a result, a slight fur coat effect appears. In the photo you can see what we are talking about.
Using a roller
A regular paint roller or a roller with a special pattern is used to apply a decorative mixture to plasterboard sheets. The effect of a fur coat is created by a fur roller.
The roller is immersed in the plaster solution and rolled over the wall, or the solution is applied to the surface with a trowel, and the desired texture is achieved with the roller.
Brush
A regular paint brush can save a large amount of solution. At the same time, the finishing speed is doubled. And even a beginner can handle brush and plaster.
Any additives in the plaster composition (sand, marble flour, etc.) only add texture after application with a brush.
Useful tips
When preparing walls for finishing, you should take into account several important features that can affect the quality of plastering:
- Each applied layer is thoroughly dried. As a rule, this takes about two days;
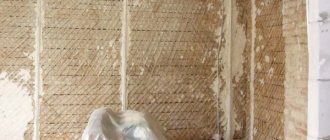
- to avoid the appearance of cracks, use serpyanka - a special mesh with a self-adhesive surface;
- as soon as the putty layer dries, the walls are treated with an acrylic-based primer mixture. Having penetrated deep into the pores, it will provide excellent adhesion to the decorative plaster mixture;
- You can improve the strength of the primer composition and protect it from delamination using special impregnation. It is also necessary to take into account that the chosen putty must have good absorbing abilities. Oil or alabaster based materials are not permitted.
When applying a primer under a layer of decorative plaster, it is recommended to use the advice of experienced craftsmen:
- the primer mixture is applied in an even layer; if the thickness is insufficient, you will not achieve a uniform composition and good quality;
- When rubbing the primer, it must be compacted;
- After completing the work, the treated surface is periodically moistened for a week;
- Only after all requirements have been met is it possible to apply plaster material.
Is it necessary to putty drywall before applying decorative plaster? To plaster or not?
During renovations, many often ask the question: is it worth plastering the plasterboard used to cover walls or ceilings before, for example, gluing wallpaper? Moreover, this material is already called “dry plaster”. Experts have different opinions: there are options both for and against. Some believe that if the drywall sheets are of poor quality and not moisture-resistant, then it is undesirable to do this. Over time, the material is deformed under the influence of moisture that is released from the plaster mass. Others do not see anything criminal in putting putty on the sheets.
It is better to plaster drywall in cases where it is necessary. Because under the plaster the drywall is deformed.
The exception to these disagreements is one thought: decorative plaster can and should be applied independently only on moisture-resistant drywall using special primers.
For those who haven’t yet realized, plastering sheets of drywall, oddly enough, is a delicate matter. What can you do, these are the characteristics of this material. If you apply a sufficiently thick layer of plaster on drywall, it is almost impossible to guarantee a good result.
So, you can plaster plasterboard sheets in the following cases:
- If there are significant defects on the sheathed walls, then plastering will definitely not solve this problem, but most likely will only aggravate it. It will be easier for you to eliminate the cause of curvatures or displacements, rather than wasting energy on dealing with the consequences. It is best to replace the plasterboard sheets with moisture-resistant ones.
- If you notice small unevenness on the sheets, then the plaster will do its job. It is also suitable in cases where the drywall has minor dents and the seams are previously puttied.
- If you have to apply decorative plaster. It contains a sufficient amount of substances that ensure rapid drying and polymerization. Decorative plaster comes in different textures.
Features of preparatory work
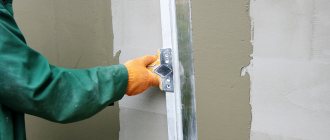
Carrying out preparatory work is an important point, without which the decorative layer may soon crack and begin to fall off. First, dust and dirt are removed from the surface. This can be done with a rag or using a vacuum cleaner. If fasteners protrude above the surface, they are cut flush. The peeled cardboard is cut off and the cut line is sanded with sandpaper. To ensure that the drywall joints do not appear after puttying, reinforcing tape “serpyanka” should be glued to them.
The next stage of preparation is applying primer. This is done especially carefully at joints. A primer is needed in order to:
- strengthen the wall;
- protect from moisture;
- simplify the application of subsequent materials and ensure their reliable adhesion.
At this stage, experts recommend using water-dispersed acrylic primer.
After priming, proceed to the next step - puttying.
Decorative finishing of drywall. We create an imitation of masonry
This is also a kind of applied creativity, and you might also want to try it.
Therefore, get acquainted with the process that we presented in pictures:
| Photo for clarity | Process description |
Marking on a piece of drywall | To make bricks, all you need is a metal square, a pencil and a utility knife. Set for yourself the size of the brick that you will adhere to when marking the tongue or butt sides. |
The front side is cut first | Now the marked sheet needs to be cut into bricks. To do this, first the top cardboard shell is cut along the lines. |
Then the back | Then the sheet is turned over and the second shell is cut at the bend. The sheet is first divided into strips and then into bricks. We don’t throw away the half-sized pieces; they will come in handy. |
ready-made bricks | Note: If the edges of the cuts are not very smooth, it doesn’t matter, this will also give your imitation more authenticity. |
| How to glue decorative stone onto drywall | To glue plasterboard bricks, you can use the most common and inexpensive tile adhesive. Dilute it according to the manufacturer's instructions and apply it to the wall. Note: The base should first be primed - you can use the same glue, but diluted to a more liquid state. |
How to glue decorative stone to drywall: reinforcement of the outer corner |
|
Applying glue | Apply glue to a small fragment of the wall and make grooves with a comb with the finest teeth. |
Installation of the first tile | If the wall is adjacent to an outer corner, start tiling from there. In this case, glue the first brick with a protrusion equal to the thickness of the drywall. Note: This is necessary so that, for complete plausibility, an imitation of the butt side of the brick is glued to the perpendicular side. Accordingly, its length should be reduced by the thickness of the gypsum board. |
How to glue decorative stone to drywall - laying with a gap | You lay the tiles by analogy with masonry - with offset joints. Make a gap between them of approximately 10 mm. You can use a piece of drywall as a template. |
Wetting the surface with a sponge | After the glue has hardened, you can begin the decorative part of the work. First, you will need to remove the cardboard shell from the surface of the bricks, for which it is moistened with water using a dish sponge. |
Removing the paper casing | The moistened paper is easily removed, after which the exposed gypsum layer is also saturated with water. |
How to make decorative brick from plasterboard - applying relief | This is done to make the plaster more pliable. Arm yourself with a utility knife, a chisel, and “straighten” the masonry - causing chips and chips in the corners that bricks have. |
Do-it-yourself decorative brick from plasterboard - sanding | You clean the surface with a stiff brush and sandpaper, sweep away the dust, prime it - and your “masonry” is almost ready for finishing. |
Decorative plaster on gvl. Choosing plaster for drywall
The range of mixtures in finishing and building materials stores is quite wide. When planning to purchase finishing materials, you should prepare for the fact that plaster on drywall can be different. If necessary, you should use a putty mixture for walls and ceilings, which allows you to seal seams, cracks and chips. Decorative plaster for drywall is also in demand on the market. When choosing the types of mixtures offered in stores, you need to take into account a number of advantages of the material:
- Long shelf life and the ability to use only part of the composition.
- Economical consumption of the mixture when plastering GVL.
- Preservation of the original characteristics of the material during storage.
- Resistance of the mixture to temperature changes.
A ready-made putty solution, unlike plaster for plasterboard walls, can lose its original qualities under the influence of various factors. Depending on the component used, putty is divided into the following types:
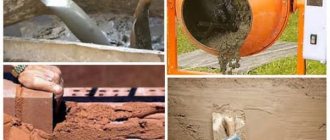
Plaster for drywall can be prepared by hand. In this case, you should take into account the type of premises in which construction work is to be carried out. GVL ceilings or walls in the kitchen or bathroom should be puttied with a cement mixture, since gypsum is not moisture resistant. Putty on this basis quickly cracks when dry. It is better not to use gypsum plaster mixture for finishing plasterboard walls in the bathroom, toilet, or kitchen.
Polymer putty is distinguished by the versatility and plasticity of the solution during operation, as well as ease of application. In this case, the mixture is consumed in smaller quantities compared to other compositions. Polymer putty is considered the best option for finishing plasterboard walls. This versatile material can be used in any room.
Sealing joints and irregularities
Before plastering drywall, repair defects formed during installation or by ignoring storage and transportation conditions. Why the surfaces are primed and putty is applied with a layer of 3 mm, and a thin plaster composition is applied on top of it.
If there is a significant depth of errors on the plasterboard surface, it is prohibited to lay plaster too thick. Since after drying the finish may simply crack. Before plastering the drywall, the fastening elements are carefully buried. During pre-processing of the structure, increased attention is paid to joints, which are never ideal.
After this, the plaster mixture is prepared. Compositions for these purposes may exhibit unique qualities. It all depends on what type of additives predominates in them. Gypsum material, as well as polymer compositions, are considered quite in demand. Their advantages include moisture resistance and mold prevention functions.
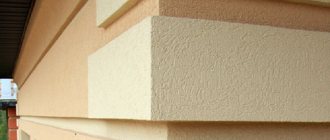
Applying bark beetle to drywall. How to apply bark beetle
Before applying plaster, the surface must be leveled (if possible, desired or necessary) and primed. So, if there are remnants of previously used finishing materials on the wall (paint, wallpaper, plaster), they need to be eliminated.
Instructions for use are attached to each material. It is important to strictly follow the described requirements for using the material.
However, the general usage parameters are:
- When you start preparing the mixture, it is important to add the dry composition to the water as you knead, but not vice versa;
- The water temperature should be at least 20 degrees;
- The material is mixed using a construction mixer at minimum speed;
- Manual kneading does not produce a quality substance;
- You need to mix the mixture until there are no lumps at all. Then the finished mixture should stand for several minutes (5 - 10), mix again and only after that it becomes ready for use;
- The instructions for each manufacturer of the plaster mixture contain individual indicators for the required proportion of water and the duration of use of the finished mixture. Some batches dry out after an hour, while others last for three. Therefore, it is recommended to make batches in small portions; besides, you should not add water to the finished drying mixture - it will not be possible to refresh it. That is why the manufacturer's instructions must be strictly followed;
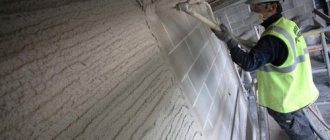
- The finished substance is applied in small doses to the surface and shaded in even layers;
- After 30 minutes, the thicker mixture is processed with a grater. The movements are light, as if gliding along the surface. This way the layer will be even. Using a grater, a unique pattern is created. Experts recommend that inexperienced “repairmen” draw simple shapes (waves, rain, semicircular elements, etc.). The main thing here is to learn to hold your hand, movements with equal pressure. Softness and confidence in the hand guarantees a uniform pattern. Remember, the longer you iron the bark beetle, the less noticeable the grooves and bends are. If you overdo it at this stage, the “bark beetle” effect will be lost - the wall will become smooth and shiny;
- If work is carried out over large areas, then single execution is impossible. Mutual assistance is needed from at least two people - one applies the plaster, the second paints while rubbing. Decorative “bark beetle” is easy to use, so even a beginner can work with it;
- The temperature in the workroom should be from +5 to +25 degrees. However, if a colored substance is used, then the temperature is at least +10 degrees;
- Breaks between applications of plaster are not possible, but if there is an urgent need for a short time, the edge of the applied mixture is sealed with masking tape. This will temporarily stop drying;
- The plaster takes 1 to 5 days to dry, depending on the manufacturer’s brand. Only after complete and uniform drying does coloring begin. If you decide to use acrylic paint, it is recommended to wait 2 weeks after applying the plaster. When painting with silicate, three days is enough for the paint to lay down evenly.
What problems may arise when choosing a material?
In construction stores, you can often find a person (seller) who is well versed in the offered range of plastering materials. But before you make a purchase, you should decide on a number of important points:
- Plaster will be used under what type of finish. Subsequent application of paint products, tiles, wallpaper or other decorative coating is possible.
- What is the maximum allowable cost of materials (depending on the allocated budget).
- What is this material for? After all, it can be used for roughing, decorative and finishing work.
How to apply decorative plaster. How to properly apply decorative plaster on walls
Application of decorative plaster
Decorating with woven materials comes from ancient times. The walls of ancient rich houses were decorated in this way. Today, a lot has changed thanks to the introduction of modern technologies. Today's wall coverings are fundamentally different from their predecessors.
Do-it-yourself decorative plaster and its application in various variations allows you to create unique masterpieces and adds sophistication to any interior. Don't be afraid to experiment! It is not difficult!
Types of decorative plaster
Types of decorative plaster are distinguished by the nature of applying the solution to the surface:
- Texture. The formation of textured patterns is achieved by adding various fragments to the mixture. For example, stone chips, fine and coarse sand, mica and others. As a rule, plastic, rubber or metal spatulas are used for work.
- Relief. This type involves initially giving relief to the composition applied to the walls (unevenness and heterogeneity).
- Smooth surface. Only Venetian “decorative” can be included here. However, with its help, imitations of many surfaces are recreated. The mixture may include malachite, marble or other particles of natural materials. Venetian plaster will allow you to decorate walls with silk, marble, granite, cork, metal or leather. This type of decoration can highlight and decorate any room.
- Structure. Homogeneous compositions are used here. The structure is formed with special tools (graters, rollers) using a variety of techniques. But this type of plaster application requires the master to have both practical skills and artistic talent.
Why do this?
The cardboard wrapping of the drywall is unpresentable, so a finishing coat is supposed to be placed on top of it. Most often this is a “shirt” made of wallpaper or painting. Both of these types of finishing are thin-layer, do not hide joints and fastenings, and require a particularly flat, smooth surface. For this reason, before gluing wallpaper or applying paint, drywall needs additional leveling using putty or plaster.
In addition, drywall plaster serves as a protective layer for the easily vulnerable external “misfortunes” of a fragile material.
A separate type of finishing coating for gypsum boards is decorative plaster. This is a recognized leader among means of interior transformation and ways of self-expression for homeowners.
Modern plastering materials allow you to create a unique design without overloading load-bearing structures with their weight, protect plasterboard walls from moisture, fungus, mold and rodents, and allow the walls to breathe. Making plasterboard partitions with the effect of malachite, marble or onyx, for example, decorating a ceiling in the Venetian style with any wallpaper will not work - only with decorative plastering.
However, it is recommended to plaster drywall only for leveling littered or bent walls, when it is not possible to remove the sheets and replace them with new ones. During dismantling, the sheets break; fasteners must be installed in new places. In all other circumstances, the plasterboard lining is puttied.