Laying the floor is carried out after performing a series of sequential technological operations (more about this here). The most important stage of the preparatory work is to correctly mark the floor level in the apartment (room, house).
The apparent simplicity of this procedure is deceptive. The master performing it must be able to work with different types of levels, be careful, and not make mistakes in calculations. An error of just 2 mm can lead, after a short period of time, to a complete replacement of the screed and flooring.
The purpose of this operation is to determine the floor level for the screed, i.e. level out base height errors.
When laying floors, it is impossible to achieve an even horizon and a clean surface. There is always a slope and various ledges.
The screed holds the floor well only if its thickness at the thinnest point is at least 30 mm. Therefore, by drawing the zero level, we find the highest place on the base of the floor and, adding 3 cm to it, we determine the horizon along which the screed will be poured.
Floor leveling beacons - what are they and when are they used?
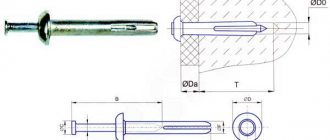
Beacons mean auxiliary structures that are pre-leveled relative to the plane. The rule is based on them in order to evenly distribute the solution over the surface to be treated. Depending on the type of screed and the nature of the accompanying material used, the elements must be removed or remain in the thickness of the coating being formed.
General requirements for installing beacons
Installation of beacons for pouring the floor is permissible only on a prepared base. Old decorative finishing, weak and flaking areas of the once leveling coating are removed from the floor. Cracks need to be expanded, primed, and filled with mortar.
On the floor in places of splits, it is important to additionally reinforce it with pins (preferably threaded ones: a rod or a self-tapping screw without a head). They are placed across the line of damage.
If there are areas of mold, mildew, or rust, they are neutralized and treated with preventive agents. Grease and oil stains are removed with alcohol-containing or specialized compounds.
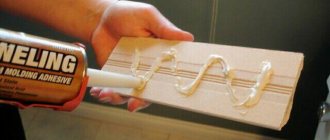
After restoration work is completed, all debris and small debris are removed from the site. It is better to additionally use a construction vacuum cleaner after a broom. Finally, the surface is treated with primer. Before the screed, a waterproofing layer is installed with an overlap on the walls up to 20 cm high. Finally, a damper tape is laid around the perimeter.
If it is concrete, then it is better to use coating-type materials; a technical film 150-200 microns thick is sufficient for dry backfilling. A 20 cm overlap of the canvases is sealed with transparent, double-sided or plumbing tape.
Guide bending
There are cases when the profile needs to be given a curved shape (for example, when creating arches). In such situations, before placing the guides under the drywall, it is bent. Despite the fact that modern stores offer already bent guides, the relevance of this procedure remains the same, since they are quite difficult to find.
To carry out this operation, you only need metal scissors. First you need to make small cuts on one “side”. In this case, the back of the profile should not be affected.
Important! You cannot saw the guides with a grinder, as this will damage the zinc layer, which will lead to rust of all floors.
The notches should be located at a distance of 5-10 cm from each other. It is worth understanding that the smaller this distance, the smaller the radius the profile can be bent. Then it is enough to apply a little force to give the material the desired shape.
What types of lighthouses are there?
Floor beacons can be divided into 2 groups: ready-to-use and homemade. The first are represented by planks or tripod devices (benchmarks), the second are installed from gypsum mortar or a similar screed. This also includes a tensioned metal cable. Installation is carried out according to a similar scheme:
- the zero level is determined;
- point landmarks are set;
- straight segments are formed.
Additionally, for the plaster beacon, you will need a rule or other straight-line material at hand to level the mixture along the supports. To tension the cable, you will need to install special anchors at the extreme points.
Types of rack beacons for floor screed
A beam, plasterboard or T-shaped profile, or a metal pipe can be used as a rack beacon for the screed. All options must be smooth, without pronounced deformations. All options must be removed from the dry screed; only galvanized materials without damage are left in the wet solution.
How to determine the zero level of the future floor
Before placing the beacons on the floor, under the screed, you need to determine a horizontal reference point. It is set based on the identified zero point. It is understood as a protruding section of the floor relative to the entire leveled plane.
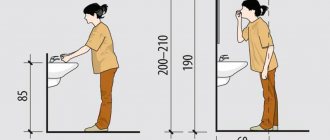
To make it easier to find the starting point, it is easier to use a laser level. Any height can be taken as a reporting unit, for example, 100 cm. Based on the laser set, the entire surface is examined using a tape measure; observations are reflected with a pencil or marker on the floor or walls.
The approximate line is drawn at the height of the zero level or taking into account the required height. So, for example, for a dry screed with expanded clay it will be 40 cm, and for concrete - at least 3 cm.
How to properly level with your own hands without a laser level
Without laser equipment, a visual inspection is carried out and the results are checked using a bubble or hydraulic level. Beacon slats are fixed with a solution before use.
At this stage, it is important to monitor the horizontal position of the planks, plaster or rule.
How to install a frame from profiles for plasterboard structures yourself?
It is quite possible to do the installation of a plasterboard frame on the ceiling yourself. There are several simple ways to assemble a structure from a metal profile. So that you can quickly install drywall frames yourself without the help of professionals, we offer practical advice on the simplest method. Compared to other systems, this option is more suitable for use in small spaces, and is also quite economical. For drywall builders, this installation of a frame under drywall is called P111. Having mastered the installation of such a single-tier ceiling, you can then easily learn how to model more complex structures from plasterboard sheet (GCR). If you understand the principle and sequence of actions, then installing a two-level frame structure under drywall will not seem like a difficult task, not to mention design solutions for walls.
Types of profiles for drywall.
How to place beacons under a floor screed using dry technology
Dry screed involves the presence of backfill without the presence of water. On a wooden floor, it is easier to use timber logs as beacon elements. They are permanently fixed to the base. The step is kept relatively frequent, approximately 50 cm. This will prevent the sheet or board flooring from sagging.
In the case of concrete slabs, removable strips are used. They can subsequently be used for other purposes. This will save time, money and effort. Here it is more convenient to take flat slats or a U-shaped profile, placing their soles up.
Backfill is used for fastening. It is easy to distribute the bulk material, so there is virtually no pressure on the supporting structures. On large areas, the beacon elements are moved one by one as the backfill is leveled; on small areas, it is more convenient to remove them as the hard flooring is formed.
Types of profiles
Today there are many types of profiles for drywall, which differ from each other in functional purpose and connection method.
Therefore, before you figure out how to install drywall guides, you should familiarize yourself with the main classifications:
- Guide (NP) . It is not difficult to guess from the name that this type of profile serves as a guiding link in the structure. It is actively used for the manufacture of various structures.
- Rack-mounted (SP) . This type serves as the main element in any design. It is inserted into a guide profile, which must be secured around the entire perimeter of the surface.
- Ceiling (PP) . It is the main element in the manufacture of ceilings. Installation of guides for drywall is carried out using special fasteners (“crabs and hangers”).
- Guide – ceiling (NPP) . Performs the same role as the guide, but exclusively for plasterboard ceilings.
- Corner (UP) . Designed for finishing the corners of drywall frames after finishing.
Selection and installation of beacons
Installation of beacons for filling the floor is carried out with their fixation to the base using screws or mortar. It is better to use quick-hardening compounds to reduce the waiting time before installing the screed. The planks are attached fully or partially. The main thing is that when pressing on them, the rule does not cause sagging. The distance can be any, but it is more convenient to work when the step does not exceed 1.2-1.5 m. The slats are directed away from the window, but this is not important.
In the case of a T-shaped beacon profile (it is better to take a larger size, since the stiffener rib is higher), you can use a quick-hardening compound or modern fasteners. With the latter, there is no need for water-containing materials, so leveling the floor can begin immediately after installing the supporting structure.
The procedure is as follows:
- Holes are drilled in a straight line in increments of 0.5-1 m.
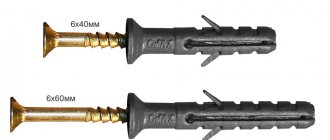
- Dowel-nails are immersed in the seats.
- The screws are screwed in to the approximate height.
- The level is checked by applying the rule to the caps (if necessary, their position is adjusted).
- The planks are fixed to the hardware with special metal or plastic fixtures.
The most practical option is to use hand-made plaster beacons. For this, a cement composition is used, which is similar in nature to screed. This creates a monolithic leveling coating.
The process consists of three steps:
- Stands are usually formed from scrap materials (planks, screws, scraps of hard building materials).
- Slides of mortar are placed between the supports, the tops are cut to the height of the temporary supports.
- The guidelines are removed, and straight lines are formed along the hardened points using plaster and rules.
The self-leveling floor has a self-leveling effect, but beacons are still used to control the coating.
Benchmarks will be needed here. These are compact tripods, the central part (rod) of which is adjusted relative to the level. They are installed in increments of 1 m. After the solution has dried, the devices can be easily dismantled. Only dotted marks from the stand remain. This does not have any effect on the overall result.
Some craftsmen make benchmarks with their own hands, so as not to buy expensive equipment for one time. To do this, use punched tape or direct drywall hangers. A tripod structure is assembled from them. A dowel-nail is fixed in the center. The head of the self-tapping screw will serve as a guide to the level.
How to attach drywall guides so that they form a strong structure
The use of drywall involves the creation of a massive structure from a profile. It ensures the stability of the floors and it is impossible to imagine any project without it.
This article will look at how to properly attach guides under drywall.
The metal profile is a guarantor of structural strength, so it is impossible to do without it