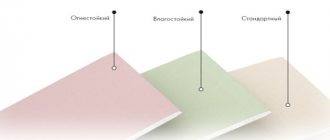
How far can you bend drywall?
Still, drywall is not paper and you can bend it only to certain radii. The bending radius of drywall depends on its thickness and the size of the sheet that needs to be bent.
In the table you can see the dependence of the bending radius on the parameters of the Knauf plasterboard sheet.
| Thickness of plasterboard sheet, mm | Bending radius, mm | Bending radius, mm |
| Drywall bending technology | Dry way to bend drywall | Wet way to bend drywall |
| 6mm | more than 1000 | From 300 |
| 9mm | more than 2000 | From 500 |
| 12mm | more than 2750 | From 1000 |
Please note that the table shows two ways to bend drywall, these are the so-called “wet” and “dry” ways to bend drywall. The very names of these methods reveal the technological principle of bending drywall. The wet method involves moistening the gypsum plaster sheet, which causes the gypsum core to soften and be easily bent. The dry method of sheet bending is based on the technical characteristics of the sheet itself. The thinner the sheet, the easier it bends. The developers initially checked the safe bending radii of plasterboard sheets and compiled tables in which the bending radius is tied to the thickness of the sheet. Let's take a closer look at the wet and dry bending methods.
What is a metal wedge dowel?
This fastener is commonly called a metal wedge anchor. It is made from metal. The word "anchor" is translated as "anchor".
The metal dowel for drywall has a different installation technology. The moving part of the fastener is driven in with a hammer, due to which the dowel is wedged into the surface.
According to GOST, 2 types of metal dowels for drywall are produced: 6/40 and 6/60, where 6 is the diameter in mm, 40(60) is the length in mm. Wedge anchors are available for sale in packages of 100 and 200 pcs.
How to hammer a metal dowel wedge quickly with a hammer drill, watch the video.
Video:
Features of using a wedge anchor
The wedge anchor is made of galvanized steel or stainless steel. Carbon steel is used and coated with white or yellow zinc. On the head of the anchor there is a manufacturer's mark indicating the density of the metal used.
The wedge anchor is produced in the form of a metal rod. There is a locking cap at one end, and a wedge-shaped spacer end at the other. When mounting, an anchor is placed in the hole made and the moving part is driven in with a hammer. In this case, the wedges diverge in different directions, thereby fixing the fastening element in the ceiling. The wedge anchor is particularly reliable when attached to the base.
Factors affecting structural strength
In order for the wedge anchor to have a long shelf life and also maintain strength, there are some factors that influence these indicators:
- The wedge anchor is driven into the base, which has no voids. This ensures fastening strength.
- With high humidity, the concrete base will constantly absorb moisture, which can cause premature corrosion of the metal.
- If there is constant pressure (movement, vibration) on the base into which the wedge anchor is mounted, the wedge will soon break out.
- If there is a moving part left above the surface - the rod, this means that the anchor has not fully opened. However, the service life is limited.
- Chemical solutions should not be allowed to come into contact with the fasteners. They will destroy the fastener.
We advise you to study - Where to start building a private house if you only have a desire and don’t know what to do next
Comparative table with which you can determine the strength of the anchor wedge:
| Name | 6/40 | 6/60 |
| Diameter of wedge anchor, mm. | 6 | 6 |
| Wedge anchor length, mm. | 40 | 60 |
| Max thickness of fixed material, mm. | 5 | 8 |
| Drill diameter for hole, mm. | 6 | 6 |
| Min depth of hole for anchor, mm. | 45 | 65 |
| Pull-out force minKN from concrete B25 | 3.60 | 5 |
| Weight 1000 pcs, kg. | 10.70 | 16.05 |
Separately, it should be noted that for fire safety reasons, all suspended structures must be secured with metal wedge anchors.
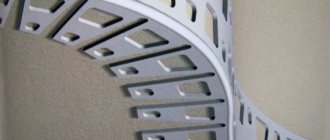
Dry way to bend drywall
If the radius along which you need to bend the drywall is large enough, you can use the dry method. It's quite simple. The dry method does not involve making a template according to which you need to bend the sheet. You can immediately make a curved frame and immediately attach drywall to the frame.
Note: To avoid accidental breakage of the sheet, it is recommended in this method to wet the two sides of the drywall with clean water.
A sheet of drywall is wetted and simply sewn to the frame, starting from the edge of the structure (concave surface) or from the middle (concave surface). In this case, the sheet of drywall lies, smoothly bending, along the made frame.
Important! When using the dry method of bending drywall, refer to the following technological table, in which the bending radius of the sheet is tied to the thickness of the sheet. The table was created for Knauf sheets.
But this method has its limitations and is applicable only for large bending radii (see table). The exception is 6 mm gypsum plasterboard.
Installation features
When installing a profile with dowels and nails to the walls, certain difficulties may arise. To avoid this, you should familiarize yourself with certain nuances:
- When installing into a brick wall, you should determine the location of the dowel-nail. If the fastener gets on the boundary (in the mortar) between the brick, then there is a high probability that it will pop out. Because the solution may crumble.
- Before drilling into the wall, you should know for sure that there are no electrical wires going through there. Otherwise, a short circuit will occur.
- If there is metal reinforcement running through the wall, this will also have a negative effect on making the hole.
- To properly install the dowel-nail, you need to make holes with the same diameter as the dowel (6mm).
- You need to drill the wall at low speed so that the material does not come out from the surface in one piece, which will create a large hole.
- When driving the dowel, the limiting collar will prevent the fastener from falling into the hole. Therefore, the dowel should be driven in carefully.
Useful tips
If the hole turns out to be large and the dowel does not hold, this can be corrected in the following ways:
- tighten the self-tapping screw next to it;
- if possible, drill with a larger diameter and select the appropriate dowel;
- insert a plastic dowel and drop a little foam there. Overnight it will expand, press against the plastic part and harden. Only after this can a nail be screwed in and excess foam removed;
- squeeze liquid nails into the hole;
- insert the plastic part of the dowel-nail into the hole, apply plaster. It will dry overnight, then screw in the nail.
On a ceiling structure for a suspended ceiling, it is better to use an iron wedge anchor, because in the event of a fire it does not melt, but holds the metal structure. And for reliable fastening of direct ceiling suspensions, this is the best option for holding the structure.
But, if the ceiling is being leveled with plasterboard in an old panel house, then a plastic dowel-nail can be used. It wedges better and holds the metal frame.
In addition, familiarize yourself with the types of dowels for fastening directly into a gypsum board sheet.
https://youtube.com/watch?v=IpkNvkmhz-Y
Video:
Video:
Video:
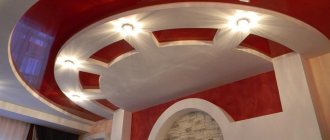
Arched or flexible plasterboard Gyprok
The Giprok company produces several elastic sheets that can be bent without tools. This
- Gypsum fiber sheet (Glasrok GFL);
- Elastic gypsum sheet Glasroc F Reflex;
- Design plasterboard sheet (Gyproc GKLD, GSE) with PC and UK edges.
The first two sheets consist of a gypsum core lined on both sides with non-woven glass fiber. The last sheet, 6 mm, has a special reinforcing layer in the middle, which allows it to be bent dry with a radius of 60 cm.
On sale in Russia, flexible sheets of Giprok are called arched plasterboard with a thickness of 6.5 mm.
Work methodology
Before bending a sheet of drywall for an arch, you must wait until the water is absorbed into the material. This may take about an hour. Work with great care, as a wet panel can be damaged. Once you have given the sheet the desired shape, you need to check the room to get rid of excess moisture.
Do not wet the sheet too much, otherwise the paper may tear. At the next stage, you need to fix one of the edges of the sheet, then you need to start bending the sheet by screwing in the screws. It is important to take care to achieve a smooth curve. The distance between the self-tapping screws and each other should be equal to the limit of 10 to 15 cm, otherwise the curve will turn out wavy. It is necessary to install the screws very carefully, because otherwise you will have to spend more effort on the final leveling of the surface by applying putty.
Arched plasterboard Knauf
company produces a special arched plasterboard sheet . It is marked: GKL-A-UK-2500x1200x6.5 GOST 6266-97. The width of the arched plasterboard Knauf is 900 and 1200 mm, length 2500 mm, thickness 6.5 mm. The radius of dry bending is from 1000 mm, wet from 300 mm (table above).
Knauf arched plasterboard needs to be bent only in the longitudinal direction of the sheet. The longitudinal direction is the direction along the long side of the sheet. In the transverse direction, a sheet of plasterboard is bent only by cutting the sheet from the outside or inside.
Preparation
Since acrylic is a synthetic material, it collects an electrostatic charge on its surface, thereby attracting dust and small particles. Surface contamination reduces the transparency of the glass. Before starting the bending procedure, the acrylic sheet will need to be washed with a soapy water solution, after which the material must be dried for at least 24 hours.
To ensure high-quality bending, it is important to properly heat the material. It is necessary to heat the plexiglass from the side opposite the bend, that is, where the surface tension of the material will be greatest
In order to prevent melting of the polymer surface of organic glass during the heating process, it is important to choose the right temperature regime. If an error occurs, the glass may not only melt, but also catch fire.
The temperature range used for heating should be between 100 and 150°C.
Wet way to bend drywall
An alternative to the dry method is the wet method of bending drywall . This method allows you to significantly reduce the bend radius. This method requires a special tool. I will repeat the table with minimum bending radii:
Tool for wet bending drywall
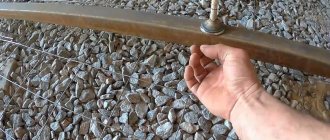
In order to bend drywall “wet” you need a special needle roller.
Stages of the wet method to bend drywall
The technology of the wet method of bending drywall is quite simple.
- Accurately measure and cut the desired piece of drywall;
- Lay it with the inside of the bend facing up on a flat surface;
- Roll the surface of the sheet with a needle roller, thereby piercing the paper lining of the sheet through and through;
- Using a wet sponge, generously moisten the punctured surface of the sheet. Do not pour water on the sheet, but use a wet sponge or foam roller. Move the sponge until the surface of the sheet begins to shine from the absorbed water (± 8 minutes depending on the thickness of the sheet);
- Wet gypsum in a sheet changes its properties and becomes plastic, like plasticine. But I’ll note again: don’t pour water on the leaf, you might get it wet.
- Next are two options.
- Immediately attach the “wet” sheet to the made frame;
- Place the “wet” sheet on a pre-made frame template, press it to the template with clamps and let the sheet dry in this position for a day.
The second option is used in stationary workshops and the already bent sheet is brought to the site. At home, the first version of wet bending is used.
Fold strip with moisture
There are two options for bending drywall using dampening materials. Let's consider the simplest of them, which is used in cases where it is necessary to bend strips of drywall of small width.
The gypsum board strip is wetted with a damp sponge on one side. When exposed to moisture, the cardboard will soften and allow water to pass through to the core. The gypsum itself is sufficiently porous to begin to absorb this moisture; eventually, from being hard, it will become soft and pliable.
We moisten the strip of drywall with a sponge
The strip should be given the desired shape and fixed in that position. When the moisture evaporates, the plaster dries and becomes hard again, so that the strip takes on a new shape. Make sure that the wet side is concave and the dry side is convex.
This option is well suited for thin stripes and small curves. If a more convex design is required or you need to work with a whole sheet, then this method will not work.
Stationary bending of drywall using a template
In the photo we will see stationary bending of plasterboard according to a pre-made template.
- Pierce the surface of the sheet with a needle roller;
- Stationary template for bending drywall;
- Place the wet sheet on the template;
- We press the edges of the drywall sheet to the template with a clamp through the gasket;
Conclusions of the article
For self-repair, or as it is called, do-it-yourself repair, it is unlikely that you will need to make a stationary template, as shown in the photo. There are more readable templates. which you can read about in the article: How to make How to make an arched ceiling. Any curved surface, for example a straight bucket or barrel, can serve as a template for bending drywall. According to such spontaneous patterns, a strip for a plasterboard arch bends well.
That's all! Now you know how to bend drywall.
©Gipsokart.ru
Other articles in the section: Drywall arch
- Arch made of plasterboard, three design options
- Arched plasterboard Knauf
- Types of plasterboard arches
- Flexible plasterboard Giprok
- Door arch made of plasterboard
- How to make an arched ceiling
- How to bend drywall
- Do-it-yourself interior arches
- Make an arch from plasterboard in the doorway
- Installation of an interior arch
The nuances of fixing gypsum boards on a metal frame
Solid sheets are mounted perpendicular to relatively long guide profiles. Their joining is carried out in the middle of the profile. In order to carry out the work of installing gypsum boards efficiently, it is advisable to do it together. To connect the sheets to the profile, self-tapping screws are used, and the screws should be recessed 2-3 millimeters into the material.
According to the rules for installing plasterboard on the ceiling, the gap between the fasteners should be about 25 - 30 centimeters, and the distance from the corners of the plasterboard should be 3-4 centimeters.
If plasterboard ceilings are installed, the technology for performing the work has several features:
- In the corners of the room there is a narrow profile and this circumstance complicates the fastening of the sheets, which must be taken into account. There is a rule: the more beautiful the plasterboard surface is, the fewer joints it has.
- When screwing self-tapping screws into gypsum boards, you need to monitor the depth of their “recession”, since it should be approximately the same over the entire ceiling surface. This will make the painting work better.
- The ceiling structure in the room must be assembled from material from one manufacturer, otherwise differences in height will appear at the junction points.
Now let's look at how to bend a pipe using a pipe bender
When constructing complex buildings, square and round profiles with thick walls are used. They are difficult to bend by hand, so a pipe bender is needed. There are two types of machines:
- Manual. The devices are of simple design and inexpensive. Quite suitable for use on the farm.
- Automatic. They are classified as professional and are used by specialists. They are expensive and therefore not suitable for home use.
Photo – mechanical profile bender
The machines also differ in operating principle and come in different models. Let's look at the most practical ones:
- Crossbow pipe bender.
- Spring pipe bender.
- Segmental pipe bender.
- Mandrel pipe bender.
Working with a pipe bender is convenient and easy. It holds the profile securely and exerts uniform pressure on it. The bending radius can be adjusted. The output is perfect arcs.
Plasterboard wall in a semicircle
To create such a wall with your own hands, you need to put in a little effort and have a little knowledge.
A plasterboard wall installed in a semicircle will add originality to the room
To make an even line of a semicircle, you need to use a thread and a pencil (a kind of compass).
Which is better: heated floors or radiators?
Warm floorBatteries
- for the durability of the plasterboard structure, a galvanized profile is required;
- to bend the gypsum board to the required radius, you need a template;
- with a small bending radius, water will be required for the wet method;
- the height of the wall to the ceiling will be easier for installing the structure.
To create a semicircular plasterboard wall, you should collect a set of tools and materials:
- Drywall. It is desirable that it be 9 mm thick (ceiling gypsum plasterboard).
- Galvanized profiles.
- Fasteners - self-tapping screws, dowels.
- “Finish” – putty.
- Primer for interior work.
- Electric drill.
- Scissors for cutting metal.
- Set of spatulas.
- Roller and brush.
- Knife.
- The hammer is ordinary.
- Plumb lines and level.
- Screwdriver Set.
- Meter, pencil.
- Thread, marker.
Metal profile
To prepare a metal profile, you will have to go through several steps.
- It is necessary to purchase the main posts and guides, and also make equal cuts along their entire length.
- It is important to know that the cuts should not be made deep, as otherwise the metal may break while working with it. Ideal cuts are 5 cm.
- The cuts are made evenly and parallel to one another.
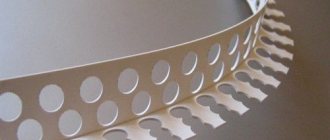
- You need to bend the drywall very carefully in individual parts. When you need a circular decor, it is better to make a drawing on the floor.
- Taking into account what kind of circle you need, cuts are also made: either from the outside or from the inside.
If you don’t know how to bend drywall in a semicircle, then keep in mind that the frame for it is made in the same way. The same applies to working with complex configurations and making decorative elements. The profile is cut at different angles and at the required distance - this depends on the shape that will be used in the work.
After the bend is made, the frame is installed in the chosen location and secured with crabs or dowels. Then, on the ceiling, it can be cut into petals or bent.