Framing a doorway is an essential part of decoration. Almost all available building finishing materials are used for this purpose. However, if the opening has an unusual configuration, not all of them are suitable for cladding.
Corner
A flexible arched corner is ideal for solving this problem.
Types of designs
An arched plastic corner is not the only option for this type of finishing.
However, steel or aluminum options are not suitable for every style, and therefore are used for decorative purposes much less often. Another thing is that such a design strengthens the doorway and can also be used as a surface for fastening when covering with plasterboard, for example. Plastic products can also perform several functions, and on this basis they are divided into 2 groups.
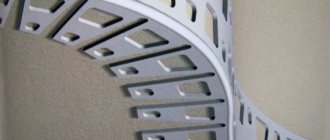
Functional - soft perforated strips that are installed under the plaster. One side of the product is perforated, the second has the shape of petals. This allows you to frame an opening with an arch length of up to 3 m. Both PVC and metal products are produced. They have no decorative value.
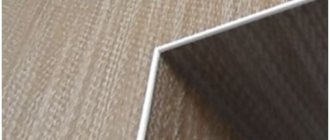
Decorative - not perforated, usually with a smooth outer surface. Flexible corners can have different colors, imitate wood or stone. It is very easy to secure a soft product, so you can do this type of finishing yourself.
Functions of arched trim
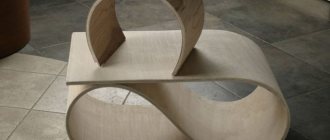
An arched doorway is one of the underrated architectural details in modern housing. With its help, the layout of the most ordinary apartment or house can easily change its appearance, acquiring features of originality. The arch becomes an alternative to interior doors and makes it possible to move away from standard design solutions.
By choosing an arch, the owners receive a harmonious, integral space, designed to their liking, because the shape and size of the arched opening is created individually. However, along with their originality, the owners acquire an additional problem. The fact is that the curvilinear shape of an arched opening is much more difficult to make straight. Getting the perfect line becomes a difficult task even for a master with solid experience in plastering work.
However, even if the renovation is carried out by owners who are not familiar with the intricacies of finishing work, they have an easy opportunity to get perfectly smooth edges in the arched opening.
Varieties of flexible corner Source windowvtyumeni.rf
The possibility is to use a flexible corner for the arch. This type of finishing is specially designed for the design of complex-shaped openings and joints. The corner profile is considered a universal material, as it performs several functions at once:
- Smoothes corners, aligns edges, and gives the arched structure completeness.
- Protects the decorative coating of the arch. It is no secret that over time the corners of the structure suffer: the wallpaper wears off, the plaster crumbles, and the putty deteriorates.
- As a rule, an arched opening is decorated, trying not to use bright colors and wallpaper with large patterns (their edges are difficult to join neatly). A correctly selected corner profile makes the arch design more interesting.
- Plays the role of a reinforcing element, helps to avoid deformation of the opening material from mechanical damage.
- Hides defects of imperfect alignment of the edges of the structure.
What is needed for finishing
First of all, you need to purchase all the necessary materials and tools. To properly finish the arch you will need:
- corner;
- assembly adhesive (it depends on the selected material);
- sealant;
- liquid Nails;
- metal nails;
- rubber hammer.
You may not use any of the above, it depends on the specifics of the installation - some will just want to glue the corners, others will find fastening with nails more reliable. When choosing your method, consider the following points:
- Liquid nails are often the cause of stains.
- Do not choose too strong liquid nails for working with plastic, they can destroy the material
- Metal nails are visible and have a negative effect on the appearance of the decoration.
- When tightening self-tapping screws, you can overdo it and cause cracks, chips, or bend the material.
When everything is prepared, you can proceed directly to finishing the arch.
Installation
Installation of corner profiles on the arch is carried out in the following sequence:
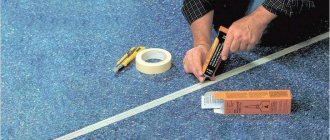
- Before gluing the corner onto the arch, calculate how much material is required. The possibility of joining is taken into account: if it is performed at an angle, some material will have to be cut off. It is recommended to purchase material with a small margin in order to insure against errors in calculations.
- The planks for joining are cut and adjusted. It is better not to cut all the material at once, but to do it gradually, as needed. If the profile length is not enough, it is better not to sharpen it on one side, but to add length symmetrically on both sides.
Laying a corner along the edge Source zhk-akvapolis.rf
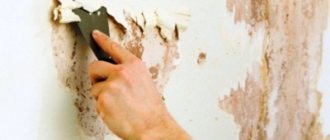
- For a perforated profile, prepare the surface: clean it of the old finish, degrease it, prime it and putty. The smoother the edge, the better the plank will fit, and the easier it will be to secure it.
- The glue is applied to the profile in an even layer, and then it is fixed on the arched edge (liquid nails are applied pointwise). Many compounds do not set immediately, so it is possible to correct the position.
- For work, choose a transparent adhesive composition (silicone plumbing sealant, liquid nails). Under the white trim, you can use white glue.
- For a more durable fixation, it is recommended to secure the decor additionally using masking tape.
The profiled corner is mounted on the base of the arch Source zhkpribrezhny.rf
Interior and arches made of plastic
Arches are often finished with plastic, and there are reasons for this.
What can you say about such a wonderful solution as plastic arches? In general, this is a great option for finishing a doorway. This building itself can be called unique.
Nowadays, for example, a very popular solution is the following technique: when a corridor with an arch is finished with different materials that suit each of the two rooms well. However, there are no doors between these rooms.
The absence of doors is a very important technique. Due to it, the passage is constantly open and minimal discrepancies will immediately be evident.
What can you say about the purpose of plastic exclusive arches in the interior? In addition to its basic functions that traditional arches perform (separating rooms visually while maintaining the integrity of the space, decorating openings), an arch with plastic trim creates a special originality. This design will make your home unique and non-standard. Perhaps the interior will acquire a certain asymmetry - which is also approved by interior designers.
Installation of corners on drywall using corners
When starting to install a corner on drywall, you need to have tools and material on hand.
Required material
- the selected type of corner will need to be purchased with some reserve;
- using a primer, the surface of the drywall is strengthened;
- It is best to buy Vetonit putty, which is of high quality.
Tools
- metal scissors will help you cut out the necessary parts correctly and quickly;
- a brush that will be needed to apply the primer;
- wide and narrow spatulas will be needed for puttying drywall;
- The sanding block will remove all unevenness on the plane, while the angle will be perfectly even.
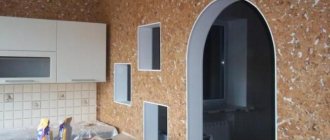
This is what mounted corners look like on drywall
When starting installation, you need to familiarize yourself with the sequence of leveling the corners with putty so as not to damage this fragile material.
Stages of work
- First, the surface must be thoroughly cleaned and treated with a primer. You need to proceed to the next stage only after it has completely dried.
- Measurements are taken and the required length of the corners is cut. They are applied to the drywall as a sample.
- For further work, you will need non-woven tape, serpyanka mesh for the internal corners, one of the types of perforated corners: plastic, adhesive, rounded, either made of a metal profile or paper-based.
- Before you putty the gypsum plasterboard corners, you should select a putty for the gypsum plasterboard. To form internal and external corners, it is better to buy a dry gypsum mixture. It has a reasonable price, good quality and can securely fasten elements to the structure.
- The putty is prepared following all the steps: poured, poured, stirred, allowed to settle, kneaded again.
- When working with external corners, you need to remember that they are most often subject to mechanical stress; it is better to mount metal samples, in some cases having a rounded shape.
- Check the flatness of the end.
- Putty is applied to the area to be treated with smooth movements. Without allowing the composition to dry, you need to secure the corner with pressure, check the accuracy with a level, and if necessary, you can tap with a rubber mallet.
- Sometimes the corner is attached to the drywall with a stapler or glued with glue, and then covered with putty.
- Another layer of the mixture is applied to the installed element and now alignment occurs with the general plane of the wall.
Advantages of a plastic corner for finishing an arched opening
- Ideally hide unevenness on the wall and problem areas in the arch design. Protects wallpaper or other finishing material from wear.
- Elegant and effective emphasizing the curves of the arched doorway according to the design ideas.
- Plastic elements can be easily mounted and glued to any surface.
- A wide range of colors allows you to choose a plastic corner to match any wallpaper.
- Durability and strength.
- There is no need for additional painting or surface treatment.
- Easy care, not afraid of wet cleaning.
- Affordable price compared to other finishing materials.
How to secure (stick) an arched corner with your own hands
Before we talk about how to fasten or glue an arched corner, let's figure out what this finishing element is and what it is needed for. After completing the preparatory procedures, you can proceed directly to attaching the corner to the glue. If your choice is still on liquid nails, then it is most convenient to apply them using a special gun, which you should also acquire.
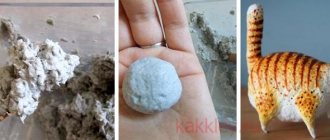
During the production of such corners, the material most often used is polyvinyl chloride, but currently natural samples made from balsa wood are also presented on the market. What is an arched corner? Its main purpose is to design structures that do not have a rectangular, rounded shape, using building and (or) finishing materials.
If the installer is faced with the task of obtaining a smooth edge on curved structures, then this is precisely what perforation is used for. An example of this would be plasterboard arches, curved suspended ceilings, etc.
How to install?
Let's look at how the installation of plaster and decorative corners is carried out during the arch repair process.
Installation of plaster corner
The operating procedure is as follows:
- attach the perforated product to the edge of the structure, achieving the tightest possible fit;
- using a construction stapler, “shoot” the part or secure it with self-tapping screws;
- apply basic putty, filling all the unevenness of the perforated part;
- using a spatula, remove all protruding excess mortar;
- wait for the putty to dry, sand with sandpaper;
- If the structure is to be painted in the future, then it is also necessary to apply a layer of finishing putty. This is not required when using other finishing options.
Installation of decorative parts
The decorative corner can be secured in three different ways:
- stick;
- fasten with self-tapping screws;
- secure with small nails without heads.
Experts prefer to glue corners, as this is the simplest and most effective installation method.
Advice! Before you start gluing the decor, you should make sure that you have chosen a suitable glue that does not dissolve plastic. In addition, when choosing an adhesive composition, you need to take into account the color of the part. White glue is only suitable for white decorative parts; if the corner is colored, then it is better to use colorless adhesives.
Let's look at how to properly glue decorative parts:
- Before you start gluing, you need to prepare the surface well, otherwise the decor will not stick;
- it is necessary to thoroughly clean the surfaces from dirt and dust;
- then wipe with a degreasing solution;
- Apply primer to a dry surface, which will ensure better adhesion;
- after waiting for the soil to dry (depending on the material used, drying will take from several hours to a day), you can stick on the decor;
- the adhesive composition is applied along the entire length of the part, after which it is applied in place. In order for the glue to be evenly distributed, you should move the part slightly, making sure that it does not move and the glue does not stain the surfaces that will not be covered with a corner;
- then the part is carefully detached from the wall, wait about a minute for the glue to dry a little, and then press firmly to the installation site. To better fix the part, you can use masking tape.
It is not allowed to glue corners onto loose materials, including wallpaper. If the arch is finished with wallpaper, then you must first put the corner in place (without glue) and outline the location of its borders. Then, using a sharp utility knife, you need to carefully cut off the wallpaper in the place that will overlap with the corner. Only then will it be possible to glue decorative parts.
If you use a cork corner rather than a plastic one, the installation process is carried out in the same way, but you should choose a special glue designed for working with cork. Fastening with staplers or nails is used less frequently, as this method has certain disadvantages. The disadvantages of this method of fastening are:
- parts of the fasteners will remain on the front side of the parts, which can spoil the appearance of the finish;
- When using nails without heads, there is a high risk of cracks and chips forming on the decorative part, and its deformation may also occur.
So, a flexible corner is a part that is used when finishing an arched opening. The purpose of installing this part is to improve the appearance of the arch. In addition, decorative corners perform protective functions; thanks to this detail, the finish retains its attractive appearance longer. Installing the corners is not difficult, so any home craftsman can easily handle this job.
Work technology
In order to ensure high-quality gluing of the finishing material, it is advisable to divide the entire work procedure into stages.
Preparatory operations
Aimed at procuring all components and tools. After all, in addition to the decorative corner, you will need to purchase adhesive, tape, a glue gun, and a mounting knife.
In addition, at the preparation stage, you should ensure that the base base is of good quality (high-quality wallpaper or painting).
Also, using a wooden beam or similar object, you should prepare a spacer (with a length equal to the distance from the floor to the top point of the arch), due to which the decorative corner will be held in a given position (until the glue hardens).
Corner installation technology
Implemented in the following sequence:
- The decorative element is bent in the shape of an arch and applied to the intended installation location.
- The location for laying the corner is marked, and it should be taken into account that joining adjacent elements should only be done on level areas of the arched opening (approximately at a height of 1 meter from the floor level).
- The adhesive composition, which can be used as liquid nails or silicone sealant, should be applied in a snake onto the underside of the decorative corner. Moreover, the glue must be distributed with a small roller (with a diameter of up to 3 mm) and applied to both shelves of the corner.
- The decorative corner is glued to the installation site and supported by a pre-prepared stand. At the same time, the material is manually pressed over the entire area for the purpose of complete gluing. For additional fixation of the finishing element in places where the arched opening is bent, it is allowed to use adhesive tape. Moreover, to avoid direct contact of the adhesive tape with the corner material, it is recommended to use paper or film spacers.
- Using a similar technique, the second arched corner and straight elements are installed.
In addition, after all the work has been done, it is permissible to glue the problem areas. For this purpose, it is quite justified to use a homemade clamp (shown in the photo below) and move it to the required places as needed.
What size and color to choose for a certain style
Arch in the interior of the apartment
You can make the corners neat without highlighting the arches in the interior using a narrow profile matched to the background color of the wallpaper
A contrasting dark edging will emphasize the shape of the opening and concentrate attention on it. For folk and natural styles, decorative plastic wood-look corners are used.
The smaller the room and the arch, the narrower and more inconspicuous the corner should be. Contrasting bright finishes make the interior expressive and visually reduce the space.
The tone profile should match one of the three colors most often used in wallpaper designs.
purpose and types of arched corners
Decorative corners
- The decorative arched plastic corner has a different width on each side. For example, 20×10mm or 20×5mm. From the very name of this angle it is clear that it helps to highlight and decorate their arches against the background of a non-specialized interior in a room.
- In addition to the design function, this type of finishing allows you to hide small irregularities in arched openings. This is especially true at a time when arches are made by hand. For example, from plasterboard (see DIY plasterboard arch).
- And, of course, such decor protects the finishing coating of the walls from various types of actions: wallpaper from abrasion, putty and high-pressure paint from chipping and delamination from the surface of the corners.
- Decorative corners are produced with a length of 2 meters 70 centimeters. They have different colors: white, wood-like (repeating its structure), colored.
- The main material for production is polyvinyl chloride. It is precisely the PVC arched corner that has become extremely popular among finishers. You can also find cork corners for arches on sale in stores.
Plaster arched corners
- This type of finishing aid has perforations (holes) throughout its entire surface. One side of these corners has petals (similar to cuts). Thanks to this design, they bend remarkably well.
- In the main, a perforated arched corner is used to give a smooth edge to curved structures. For example, when installing plasterboard arches, figured suspended ceilings, beautiful partitions.
- Corners for plaster are made of plastic. The most popular length is 3 meters.
A little about the cork corner
This material is environmentally friendly and has a high degree of elasticity. You can install it yourself. The main thing is to measure the opening correctly; mistakes are not allowed here.
The stages of working with cork corners are as follows:
- pre-clean and degrease the surface;
The process of preparing a cork corner - glue is applied inside the cork corner; it must glue the part for at least 20 minutes;
- lay and carefully press the element along the entire plane of the opening;
- the glue from the cork transfers to the wall, no air bubbles should form;
Glue for cork corner - Lightly tap the corner to remove excess glue;
- You need to wait at least two hours for drying.
Options for finishing arched corners in the room
As a result of performing such actions, a single structure is obtained, the connections in it will be smooth and harmonious.
What and how to glue plastic corners to the corners of the walls?
For this purpose, liquid nails or other universal PVC glue are used. There is nothing complicated in the process itself. First, apply a continuous line of glue about 5 mm wide on one side and spread it over the entire plane of the corner with a spatula or other available material. Repeat the procedure on the other side. Wait about 5 minutes and press it firmly against the wall. Secure the first part of the decorative corner with tape. Please note that soft pads must be placed under the spacers: fabric, polystyrene foam, polyurethane sponges or other available materials. If you forget to do this, there is a risk of damaging the surface of the decorative corners. While the first part is drying, measure the remaining distance and glue the last pieces of the profile on both sides.
Adhesive for PVC plastic corners.
During gluing, excess glue may be squeezed out and come out. Wipe it immediately with a wet cloth and check the residue after a while. If there are any, use your fingers to roll them into balls and remove them.
Remember that it is better to use a metal square to mark and cut off excess material. It is more accurate than wood.
Mounting methods
Reinforcement
How to properly reinforce corners when puttingtying walls with your own hands?
Actually, there is nothing overly complicated in this work.
- A small amount of gypsum or acrylic putty is applied to the corner along its entire length.
- A reinforcing profile is pressed into it. Part of the putty will protrude through the perforation or mesh.
- Excess putty is leveled with sliding movements of a medium-width spatula (about 30 centimeters). Possible protrusions are removed with the same spatula, only at a right angle to the surface - to avoid its deflection.
- After the first layer of putty has dried, the corner is puttied again, after which it is sanded and primed for painting or wallpaper.
Finishing right angles with plastic
A typical example of such work
- when we use a plastic corner for...
So, how and with what to fasten the profile?
- The surface of the wall is primed with penetrating soil.
- The corner is marked using a square and cut to size.
- A strip of liquid nails or universal polymer glue - Titan, Dragon or their analogues - is applied to both planes of the corner from the inside. The author, however, used high-quality silicone sealant for this purpose - with consistently excellent results.
Here we need to make a small lyrical digression. A sealant whose price per tube is at least 130-150 rubles can be considered high-quality, and the manufacturer has considered it possible to sign on the packaging. Cheap sealants differ from expensive ones, first of all, by much worse adhesion to smooth surfaces.
- The corner is pressed tightly against the corner of the wall along its entire length. If it lags a little due to unevenness, you can press it to the surface by leaning a board, galvanized profile or any other object of appropriate height against the wall; fortunately, the force should be very small.
On durable surfaces, you can use regular or masking tape for temporary fixation.
Arch finishing
What do the instructions for the arch look like? Obviously, when fastening, the straight angle will lag behind the curved surface.
- The plastic profile must have sides of different widths. The wide one will be pressed against the bend of the arch, the narrow one (no more than 10-15 millimeters)
- against the flat wall. - The corner placed on glue or sealant is pressed against the arch with several slats, pieces of plywood, laminate or wall panels nailed to it with thin nails. After the glue has dried, the fixing elements are removed and the nail holes are filled with putty.
MDF profiles
Universal corners for finishing MDF panels are attached extremely simply:
- A strip of synthetic glue is applied to the surface of the corner facing the wall, after which it is pressed to the place of permanent dislocation.
- Then the product is peeled off and left for about a minute. During this time, the glue on both surfaces will thicken.
- The corner is pressed against the wall again - this time for good.
Plastic panels
How are plastic corners installed for finishing corners at the junction of PVC panels?
- The profile is put on the end of the panel. A spatula 10-12 centimeters wide will help do this job without crushing the thin plastic.
- The next panel is inserted into the free groove of the profile. As you can see, everything is extremely simple.
Wooden corners
How to decorate the corners of walls in an apartment with wooden corners?
There are two possible ways.
- The already familiar technique with silicone sealant is suitable if the finishing is not intended to be dismantled in the future.
- Reversible fastening method - with copper nails 20-25 mm long without heads. To avoid crushing the wood with a hammer blow, a hammer is used - a steel rod with flat ends.
Duralumin and aluminum profiles
And here, too, two solutions are possible.
- A high-quality sealant has excellent adhesion not only to wood, but also to metals.
- Plan “B”
- fastening with thin galvanized self-tapping screws with preliminary drilling of holes and countersinking them to fit the caps.
It’s easy to find ready-made profiles on sale - with holes and fasteners.
Feng Shui recommends creating an environment in your home with a minimum of corners. The arch is fully consistent with this technique, and most importantly, it visually expands the space of the apartment and the doorway itself. But to be durable, it needs to be strengthened. By learning how to attach an arched corner, you can increase the life of the arch and ensure the integrity of its edges.
Types and purpose of arched corners
Decorative
- The decorative element has a different width on each side. For example, 20x10mm or 20x5mm. From the very name of this angle it is clear that it serves to decorate arches and highlight them against the background of the overall interior of the room.
- In addition to its design function, this type of finishing allows you to hide small irregularities in arched openings. This is especially true when the arches are made with your own hands. For example, from plasterboard (see DIY plasterboard arch).
- And, of course, such decor protects the finishing coating of the walls from various types of influences: wallpaper from abrasion, putty and high-pressure paint from delamination and chipping from the surface of the corners.
- Decorative corners are produced with a length of 2 meters 70 centimeters. They have different colors: white, wood-like (repeating its structure), colored.
- The main material for production is polyvinyl chloride. It is the PVC arched corner that has become most widespread among finishers. You can also find cork corners for arches on sale in stores.
Why are decorative corners for walls needed?
Most often, these plastic fittings are used to close door and window openings, but they can also be used on other surfaces; they can act as fasteners for shelves to the wall. Frame the interior details of the room in order to thus combine the interior elements, creating a single composition; they can be supplemented with special stencils for the corners.
Plastic corners for walls are distinguished by their flexibility, and by bending them into the required shape, you can be sure that they will be able to serve in this form for a long time. But MDF material does not have the ability to bend. They can also be used:
- to close the slopes of windows outside and inside the room;
- they are also used on the outside of the house to serve as a protective element for the walls there too;
- inside apartments or houses they are attached in the corner part of the buildings where wallpaper was used for decoration, so they will last a long time and will not receive damage from frequent touching;
- they are used for facing materials such as plastic panels and serve as fastening for external and internal connecting elements.
Plastic corners for walls are distinguished by their flexibility, and by bending them into the required shape, you can be sure that they will be able to serve in this form for a long time.
The advantages of these products include:
- the ability to protect the surface and hide minor imperfections in these areas;
- create an even angle;
- durability;
- the process of attaching them can be done with your own hands, because it is easy;
- a variety of colors, it’s easy to choose the right option for any decoration;
- budget price.
There are also disadvantages:
- the fragility of the material, when cutting it is necessary to use tools suitable for these purposes so as not to spoil it;
- are flammable, cannot be located near sources of fire, emit an unpleasant odor when burning, and are deformed.
The process of attaching them can be done with your own hands, because it is easy.
Tools for work
Prepare the following tools and additional materials:
- square;
- stationery knife;
- water level;
- masking tape;
- wooden planks;
- rags to remove excess glue;
- metal scissors or hacksaw.
If there is no square, but only a school ruler, then remember your geometry lessons from high school. Draw a right triangle on anything with sides of 3 and 4 centimeters and a diagonal of 5 centimeters. Or take a school arithmetic notebook and draw a right angle in it, and then transfer all the measurements to the surface. If the amount of work is small, then several cuts can even be made with a hacksaw blade, holding it in your hand.
To ensure an even cut, apply a metal square to the surface. Its side will be a guide and will not allow the hacksaw blade to go to the side. The cut must be strictly perpendicular to the longitudinal axis, otherwise the seam will be visible.
Although arch corners are not a mandatory element of room design, they are recommended to be used in order to give the interior a finished look.
What is the appeal of an arched corner
If we take into account all the advantages in the complex, both technical and “human”, arched corners are the most profitable option in arranging door and window openings
On the one hand, they hide possible shortcomings of the corner surface, and on the other hand, they favorably highlight a part of the arch that is invisible under normal conditions or the entire arched opening as a whole.
If decoration elements are glued following all the rules, they will stick well and for a long time on any surface. No additional processing is needed. The service life of decorative elements is almost unlimited. 50 years is long enough. The wide range of colors of the product allows you to implement any design solutions. They are almost not subject to contamination and are easy to clean. If you use PVC corner parts, the total cost of material and work will be the lowest compared to other types of finishing.
Advantages and disadvantages
The plank is used for finishing free doorways or openings with very large depths, where it is not possible to seal the slopes with wood or MDF panels. Of course, first of all, they have to be glued to arched portals, however, they are also quite suitable for rectangular or arches with corners.
The advantages of framing are:
- PVC products are not afraid of water and large temperature changes, so you can finish the opening to both the kitchen and the bathroom;
- decorative arched corners emphasize the interesting entrance solution and highlight the portal against the background of the wall;
- installation of the product is extremely simple: the corner is simply glued to the wall. Moreover, it may not even be perfectly smooth;
- the color range of products is very extensive;
- the parts are easy to wash and clean; they do not require special cleaning or preservation measures;
- If the finish is properly secured, it will last for many years;
- The frame can be glued to any surface: stone, plaster, concrete, wood.
The only disadvantage of this option is the inherent flammability of plastic products: the material burns weakly, but quickly deforms when the temperature rises above 120 C.
Installation of an arched corner
The process of installing an arched corner is surprisingly simple. There are several ways:
- glue the arched corner;
- secure the corner with self-tapping screws;
- nail with nails without heads.
How to glue an arched corner
In order for the arch to serve for more than a year, it must be strengthened. Having learned how to glue an arched corner, the service life and safety of the arch will increase significantly. Typically, decorative corners are attached with liquid nails or glue. It is better to buy nails in a special tube for a gun. This will allow you to quickly and easily apply the adhesive.
Before purchasing glue, you should pay attention to its color. Clear glue is suitable for colored corners, and white glue is suitable for corners of a similar color.
So, the adhesive is applied in a thin layer and distributed evenly over the profile. Next, the decorative corner is applied to the opening. To distribute the adhesive more evenly, the corner can be moved slightly. Then you need to remove the corner from the surface for a while and wait a little time. After which the arched corner is pressed tightly again and additionally secured with adhesive tape or masking tape.
How to secure a corner with self-tapping screws
Decorative arched corners can be screwed through special holes. In order for the profile to fit tightly to the arc of the arch, the frequency of fastening the screws is determined. However, this method of attaching arched corners has its drawbacks. If you tighten the fasteners a little, the profile will bend. And also the very moment of tightening the screws can lead to the appearance of cracks on the surface of the corner. It is also necessary to take into account that the fastening elements will be visible, therefore, little will remain of aesthetics.
Video description
You can find out which plastic corner is suitable for an arch in the following video:
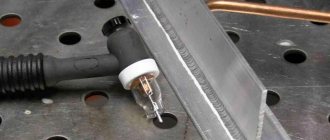
Sometimes, if the corner is made of thin PVC, you can bend it with a household hairdryer. To do this, the profile is run along the arch, and at moments of increased tension (usually 3-4 places), the plastic is heated with hot air. When the stress on the fracture is removed, the plastic itself falls further along the arch. The method is suitable for ordinary (not figured) arches.
Profiles offered in hardware stores have a length of 3-7 m; When working with a corner on an arch, you often have to cut it. The choice of tool for cutting planks depends on the material.
The thin plastic from which the arched trim is made can be cut with a knife (construction knife or stationery knife) or sharp scissors. A perpendicular cut is easier to make with scissors. To do this, the corner is cut from both sides to the bend point, and the rest is cut with a knife. If the cut is not ideal, it is smoothed with a knife or polishing sandpaper (fine-grained).
If a cut is needed along the fold, then it is first marked along the inner corner, and the cut (not through) is made with a knife. Then the shelf that is supposed to be removed is folded back, and it breaks according to the mark. Irregularities are smoothed out with sandpaper or a knife.
Assembly adhesive (liquid nails) Source yandex.net
To install the arched corner you will need the following tools and materials:
- Arched corners, decorative or perforated.
- Spatula, mallet (rubber hammer), possibly a hair dryer.
- PVC glue, liquid nails.
- Nails, screws (for both metal and plastic products).
- Primer, putty.
How and what the arch is attached to
Rounded openings are a fairly popular element in architecture. In small apartments, the spaces of two adjacent rooms are increasingly being combined by creating rounded openings. Different in shape, made of different materials, in the corridor, in the kitchen, in interior partitions and blind niches, they create unique shapes and fill the home with comfort.
Drywall is the most common material for arranging volumetric rounded structures. It is relatively lightweight, bends freely and can take on a wide variety of geometric shapes.
Such an opening can be assembled from plasterboard elements on a metal or wooden frame, which in turn is attached to the wall. To do this, in the selected opening it is necessary to install a metal or wooden frame from vertical and horizontal profiles, to which drywall will be attached in the future, and take measurements for the manufacture of parts of the decorative element. And then, having cut out the opening elements from plasterboard sheets, assemble the structure. It will be rough, requiring finishing in the form of plaster, putty and topcoat. For the latter, a variety of materials are suitable, from water-based paint and wallpaper to stucco and stone.
It is important to take care of strength and practicality in advance by strengthening the corners with special building materials. There are several installation methods, each of which has its own pros and cons.
It is important to know that each fastening method has its disadvantages:
- liquid nails can cause stains;
- when attached to metal staples or thin nails, the fasteners will be visible, which will affect the appearance;
- when tightening self-tapping screws, chips or cracks may appear on the surface of the plastic;
- When tightening the fasteners, you can overdo it, which will lead to excessive bending of the material.
Feng Shui recommends creating an environment in your home with a minimum of corners. The arch is fully consistent with this technique, and most importantly, it visually expands the space of the apartment and the doorway itself. But to be durable, it needs to be strengthened. By learning how to attach an arched corner, you can increase the life of the arch and ensure the integrity of its edges.
Installation of arched corners
We have already figured out what this material is, its main purpose and types, now let's look at how to secure (stick) an arched corner.
Installation of decorative arched corners
If during the renovation it was decided to remove the interior door and make an arched opening in its place, then in such a situation an arched decorative corner will come in handy, which can make the opening more attractive.
To install such material, you can use various methods:
- Fitting with special glue;
- Fastening with self-tapping screws;
- Fastening with nails without heads.
Let's look at each method in more detail.
The most common way to attach PVC corners is with glue.
Important! You should not use liquid nails intended for use with heavy structures for these purposes. Such glue may contain substances that corrode plastic. Therefore, you should only use adhesives that belong to the “Express Decor” class.
Perforated profile for arches
Arch and corners for it under wallpaper
The corner of the arch can be finished if it is smooth, without changes and does not go to the side. To do this, special perforated corners are installed during putty:
One side of the profile consists of segments. When bent, they easily fan out or compress, taking the desired shape, and adhere to the surface of the arch and figured multi-level ceiling. When putting putty they serve as beacons. Attach them:
- construction stapler;
- nails;
- adhesive composition.
When renovating indoors, plastic corners are mainly used. Outside the house it is more practical to use metal ones. Cardboard is rarely found on sharp and obtuse corners under wallpaper in the interior.
The use of a plaster profile makes the lines of the arches correct and the transitions of the planes clear. The trellises and paint lie flat. At the same time, perforated profiles strengthen the corners and protect the finishing material from destruction and chipping.
Briefly about the main thing
When finishing an arch, the biggest problem is the outer corners, which are difficult to design perfectly and reliably protect from accidents of use. The solution is to use flexible corners: arched trim made of plastic, metal or cork.
Corner profiles can serve as a base, like a perforated corner, which, after fastening, is masked with finishing. Another type, decorative profiles, perform not only a protective, but also a decorative role.
To fix the finish, various adhesives, screws, and nails are used. Gluing begins from the middle part, pressing the profile and fixing it with tape. When the glue dries, remove the tape.
Ratings 0
Why are arched corners needed?
The advantages of arched corners are undeniable, therefore, by choosing this type of finishing, the owner will receive a lot of advantages. Decorative arched corners have an impressive service life - up to several decades. However, they do not require painting and are easy to clean. The price for arched corners is quite reasonable and affordable for everyone, and the choice is simply amazing with the variety of colors and shades. In addition to the fact that decorative arched corners are mounted on any type of surface, they also hide irregularities, gaps and other corner errors. But still, their main function is to highlight the ornate curves of unique design ideas.
Subtleties of arch finishing: tools and techniques
You can choose an arched corner after the furniture has been placed in the room, curtains and carpets have appeared. This will help you imagine the end result and decide on the appropriate color. The arched corner is not only flexible, but also has a special design that allows the finish to be firmly fixed on a curved surface.
Design of an arch between the room and the balcony Source derevyannie-doma.com
Types of corners for arched structures
Depending on the room conditions, design features, its strength and size, you can use several materials for cladding and decoration. All of them are designed to prevent shedding and cracks in the wall, prevent deformation of the edges of the arch, and reliably protect wallpaper, paint and other finishing materials used in the interior.
Currently, the most popular types of corners for arches are:
- plastic;
- wooden;
- metal;
- polyvinyl chloride;
- MDF;
- aluminum;
- duralumin and many others.
Due to the fact that such materials are distinguished by their strength and durability, you can easily hide cracks and unevenness in the opening. The corners will look harmonious both on a rectangular arch and on more original options: arches are often made in the shape of a semicircle or wavy lines.
Tip: think in advance about how your arch will look and order the corners of the appropriate sizes. Some materials are quite elastic and can be bent into a semicircular shape, but it is advisable to make corners made of wood and other durable materials to order.
Since you will have to cut materials when installing the corners, purchase at least 10% more length than your calculations require. This way you will save yourself from having to look for exactly the same materials and come up with ways to disguise the joints on the arch.
Consider in advance what color design you need. Some materials can be painted, but it is advisable to immediately purchase an option that matches the color, since the paint may lose its appearance over time.
Corners for finishing arches can be solid or divided into several parts, each of which must be secured in its place
Please note that some types of corners are not intended for cladding, but for strengthening a wide structure from the inside: for such options it is necessary to ensure reliable fastening (for example, using screws and plaster)
Most often, protective corners are used in the case of creating a wide arch from plasterboard yourself.
Installation instructions for drywall corners
Galvanized corner for plasterboard 25x25 mm is one of the types of material that is used to level parts of walls. As you know, drywall is popular in construction and is easy to work with. However, prefabricated interior partitions made of plasterboard have problem areas - corners, which are most often subject to mechanical stress.
This is where the different types of existing corners come to the rescue.
- Installed under plaster, perforated. They have separate petals on one side of the corner, allowing you to place a sufficient strip on any arched curve. There are plastic and profile ones;
- Decorative, which are glued to the plaster.
These representatives have many subspecies. The corners are not glued, they are practically “slung onto the structure and secured with putty or gypsum plaster. They perform the protective function of parts of the walls and will help to build even corners. Knowing their classification, you can choose a suitable specimen.
This sample is more resistant to moisture than the profile, but the resistance to mechanical damage is lower. Among the advantages are the low price and the absence of corrosion of the material. There is also a type of plastic corner, for example, AquaBead, which has special paper with glue applied in the inside.
Putty is not required for fixing here; it is enough to moisten the adhesive surface with water and simply glue the corner to the desired place.
Types of corners for an arched opening
Depending on the place of use, corners are divided into two types:
- those that are installed under plaster;
- and decorative ones for finishing, which need to be glued on top of the plaster.
The first ones are perforated. For better adhesion to putty, they have holes on each strip. Plus, one side of the corner is made in the form of separate petals, which allows you to apply a long strip (up to 3 meters) to the bend of an arch of any diameter. We can say that this is a flexible building material of universal use in a particular area. It can be either metal or plastic.
The latter have a wider range. They can be made of metal, PVC, cork and be white, colored, plain or with a wood pattern. The surface on such products is smooth, there are no perforations. Some modifications of the corner elements for the arch have one side that is smooth and solid, and the other in the form of petals. Design decisions determine the appearance.
How to attach a corner to drywall
- PVC (polyvinyl chloride). The price of these products is the lowest, and their advantages are no less than those of metal corners. First of all, it is absolutely inert to the effects of moisture and aggressive chemicals - plastic corners do not corrode, do not rot, and do not deform.
We will tell you in detail how to finish corners with your own hands using the products described. Let’s take one of the most difficult options, when it is necessary to “remove the joints of window or door openings with walls, when plastering which the workers did not bother themselves with maintaining the level. At the moment, the best brand on the Russian market for the production of putty mixtures is considered to be “Fgenfüller”. Most construction professionals recommend using it when processing drywall corners.
To process drywall corners you will need: initial and finishing putty, perforated corners (metal or plastic), non-woven tape, sickle tape or construction mesh, metal flat and corner spatula, construction knife.
Necessary tool
The plastic corner for the interior arch must be properly secured. For this purpose, a list of such tools is prepared in advance:
- Plastic element to match the style of the room.
- Assembly adhesive.
- Liquid nails will help attach the element.
- Rubber mallet.
Important! Gluing decor using liquid nails is simple, but risky. Firstly, the plastic can be damaged, and secondly, a large amount of material used leaves greasy marks on the finish.
It is best to attach a bent corner using assembly glue or liquid nails, since installation with metal nails or screws looks awkward and also increases the chances of cracks and chips.
Drywall is one of the most common materials for creating interior portals. It is lightweight, attached to the frame and makes it possible to draw internal and external radius corners. Since the material requires subsequent cladding, corners are used for ease of design. Glue for installation - putty.