Before we talk about how to fasten or glue an arched corner, let's figure out what this finishing element is and what it is needed for.
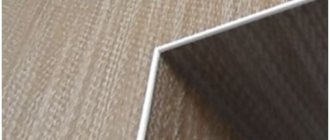
What is an arched corner? Its main purpose is to design structures that do not have a rectangular, rounded shape, using building and (or) finishing materials.
The decorative coating of the corners is not strong enough to withstand mechanical stress, so arched corners protect it. With their help, you can avoid abrasion of paint, damage to wallpaper, etc. In addition, they serve to give a certain shape to the structures on which they are mounted. Examples of such forms can be figured ceilings, various arches, etc.
How to glue a plastic corner the first time and without errors (21 photos)
Arched corners are used for finishing rooms. They have two main functions:
- decorative;
- protection of corners from damage.
Arches, as an element of architecture, appeared in ancient times for one reason: there were no reinforced concrete beams, and wooden lintels did not last long. Recently, the fashion for decorating doorways with arches has returned. Plastic corners protect sharp edges from accidental damage, abrasion and from people passing by.
Summary
As you can see, installing the corner yourself should not cause any particular difficulties. The use of a profile element has some differences, since in most cases such a corner does not require additional fasteners; it is held in place by putty on the surface of the arch. In some cases, it is possible to fix it with self-tapping screws, but in such a way that their heads can be hidden under the trim. In this case, the layer of putty that will be applied on top should not be too large, since this may spoil the appearance. If, when storing the corners, tape was used to hold them, then the place where it was needed to be treated with a degreaser so that dirt does not stick to it.
Features of arch finishing with plastic corners
Among the most popular elements for finishing openings, the arched corner should be noted. The protective element, which at the same time serves as decoration, is made in two types: metal and plastic.
Installation is not difficult, but has features that a person doing the work with his own hands should know. So, let's look at how to finish an arch with a plastic corner.
Important function of arched corners
The finishing corner has been used for many years to simplify renovation work. It allows you to form corners and also protect the doorway. The main advantage of arched corners is the possibility of extending the service life of the finish, since with them the wallpaper will not break off at the corners and the paint will not be erased.
And if during the installation of an interior arch you need to plaster a corner made of chipboard or plasterboard, then an aluminum corner will allow you to display 90 degrees. Any home corner is subject to external influence, especially for arched openings - rearranging furniture or regular Saturday cleaning can damage it. There is a solution - glue a decorative corner.
Important! A perforated corner provides a smooth edge for a curved design. At the same time, the consumption of putties is reduced.
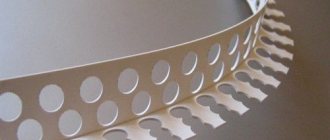
Thanks to perforation, the corner can not only be framed with clear lines, it can be bent and drawn into various shapes. The soft curved element makes it possible to design not only square or rounded arches in a classic style, but also to create semi-arches, as well as openings with non-standard bends. Arch corners have the following advantages:
- Affordable price.
- Practical - can be used in most interior solutions.
- Finish – produced in a wide range of colors.
- Installing decorative elements is not difficult.
Necessary tool
The plastic corner for the interior arch must be properly secured. For this purpose, a list of such tools is prepared in advance:
- Plastic element to match the style of the room.
- Assembly adhesive.
- Liquid nails will help attach the element.
- Rubber mallet.
Important! Gluing decor using liquid nails is simple, but risky. Firstly, the plastic can be damaged, and secondly, a large amount of material used leaves greasy marks on the finish.
It is best to attach a bent corner using assembly glue or liquid nails, since installation with metal nails or screws looks awkward and also increases the chances of cracks and chips.
Drywall is one of the most common materials for creating interior portals. It is lightweight, attached to the frame and makes it possible to draw internal and external radius corners. Since the material requires subsequent cladding, corners are used for ease of design. Glue for installation - putty.
Finishing an arch with a plastic corner (video)
Installation of decorative corners
Any apartment will look much more impressive if the edging of existing arches is decorated with plastic corners. Therefore, let's look at how to glue a plastic corner to an interior arch and make the frame durable and reliable.
There are two needs to use a PVC part: to glue and remove a right angle, or to paste over an arc. Condition for creating right angles:
- Surface treatment with a penetrating primer solution.
- Use a square to mark, mark and cut to the required size with a grinder.
- Apply the adhesive mixture to two inner planes of the element.
- Apply the strip, gently pressing it along its entire length.
First, you should level the surface of the opening.
The flexible corner for the arcuate arch is fixed in a slightly different way. Photos and videos will help beginners understand the differences and features of installation. Installing such an element yourself will be no more difficult than the previous option, but pay attention to the following nuances:
- The width of the sides of the corner when finishing the arc varies. The wide side is laid on the end corner of the arch, and the narrow side is pressed against the wall.
- Silicone sealant or adhesive solution is applied to the element, as in the first case.
- You need to fasten it with several nails - a necessary measure, since the hot solution must completely set.
- Instead of nails, it is allowed to use masking tape - it secures the edge of the plastic corner.
Gluing a decorative corner
Important! It is prohibited to use a home or construction hair dryer to speed up drying, especially if photo wallpaper or paint is used for the walls.
Corners for interior arches are easy to glue onto wallpaper. The finishing material quickly sets with glue and allows you to test your strength the very next day. But if you want to cover an arch with an MDF corner, then use these tips:
- This type does not require additional fixation, but after applying glue to the corner and pressing it to the surface, wait a couple of seconds and then peel off the element again.
- After waiting for the glue to thicken, you can safely return it to its place. Usually 1-2 minutes is enough.
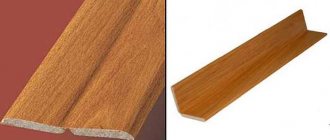
It is better to use a wooden corner for arched openings made of the same material. It is difficult to bend, so you can glue it on straight planes. Ideal use is rectangular portals where there is no round element.
We use decorative plaster
Today, finishing arches with decorative plaster is not so rare - people often choose just such a cladding for their structures. And there are reasons for this, which we will talk about right now:
This is what a blank arched opening made of wood looks like
- Applying decorative plaster to an arched opening is very simple; no difficulties arise here. The finished finish will be durable - you can’t argue with that;
- Among the disadvantages, it can be noted that work aimed at restoring the finish is not so easy to carry out. In addition, keeping the relief clean is not as easy as just washing it. Keep this in mind if you decide that finishing the arch with decorative plaster is exactly the solution from which your interior will benefit.
To cover the surface of the opening with decorative plaster, you will need relief stamps or rollers.
Please note: using slow-drying mixtures for finishing arches (we are talking about ready-made compounds) is the right option to make the whole process easier. While the plaster is damp, it is easy to create relief on it - any master will confirm this
Execution order
- The mixture must be distributed over the surface. To avoid mistakes, carefully read the instructions: the recommended layer thickness is given there. As a rule, this figure does not exceed 15 mm;
- Then, using relief stamps or rollers, the relief is created. Rollers are generally a very convenient option for such work - they will help save not only time, but also the material itself. The same cannot be said about stamps;
- When the above procedures have been completed and the relief has already dried, the arched opening is primed (more precisely, the finish that was applied to it).
Then you have to wait - usually at least twenty hours. And you can color it. There is a special scheme here:
- To effectively highlight the relief, first apply dark paint with the roller that has a longer pile;
- The organization of the second layer looks like this: light paint is applied with a roller (the tool has a shorter pile than in the first case).
Sometimes they even choose a rubber tool. That's all - only one thing remains: you need to paint all the tops of the relief so that the work looks finished.
Installation of arched corners
We have already figured out what this material is, its main purpose and types, now let's look at how to secure (stick) an arched corner.
Installation of decorative arched corners
If during the renovation it was decided to remove the interior door and make an arched opening in its place, then in such a situation an arched decorative corner will come in handy, which can make the opening more attractive.
To install such material, you can use various methods:
- Fitting with special glue;
- Fastening with self-tapping screws;
- Fastening with nails without heads.
Let's look at each method in more detail.
The most common way to attach PVC corners is with glue.
Important! You should not use liquid nails intended for use with heavy structures for these purposes. Such glue may contain substances that corrode plastic. Therefore, you should only use adhesives that belong to the “Express Decor” class.
However, before the process of planting with glue, the surface needs preliminary preparation. First you need to completely remove all dust and dirt from it. Then you should degrease the surface, after which you can start priming it. It is important to remember that it may take a certain amount of time for the primer to dry (from 6 to 24 hours), so you should start applying glue only after the surface has completely dried.
Important! Even if the wallpaper on the walls is held firmly enough, it is forbidden to glue PVC corners on them.
To remove wallpaper, you can do this: attach a corner to the place where it will be mounted, then mark this place with a pencil. Then you need to use a stationery knife to remove the “extra” wallpaper.
After completing the preparatory procedures, you can proceed directly to planting the corner with glue. If your choice is still on liquid nails, then it is most convenient to apply them using a special gun, which you should also acquire.
Glue is applied to the corner along its entire length. After that it is applied to the wall. Then, to evenly distribute the glue over the surface of the corner, you need to move it a little.
After this, the corner must be disconnected from the wall, wait a few minutes, and reattached, then press well. To fix it, you can use masking tape.
Important! To glue white PVC corners, use white glue, but if the corner is colored, the glue should be colorless.
If you still choose balsa wood as the material, the gluing process will be identical, you just need to purchase contact glue specially used for products made from cork.
Before choosing nails or staples as a fastening for an arched corner, you need to familiarize yourself with the disadvantages of this method:
- The fasteners will be visible, so this will negatively affect the overall aesthetics;
- If the screws are not screwed in carefully enough, cracks may form on the surfaces of the corners;
- Excessive zeal when screwing in can lead to bending of the corner.
Installation of perforated arched corners
This process includes the following actions:
- The corner is pressed as tightly as possible to the surface, after which it is point-fixed on both sides with self-tapping screws;
- Then you need to apply gypsum plaster or basic putty to the corner. In this case, it is necessary to press it as tightly as possible;
- Clean the surface from any remaining excess;
- After waiting until the solution dries, use abrasive brushes to grind it.
Even if the design has various flaws, the flexibility of the perforated corner allows you to completely hide them.
Using the above tips, you can fix the arched corner yourself. If you are not confident in your abilities, you can always turn to the help of specialists.
Photo gallery of finished works
Well, gentlemen, novice finishers or home craftsmen, you still don’t know how to bend or fix bent components for building plastic * (PVC facing plastic)? Then you will definitely like this material! After all, only here will they teach you how to lay a plastic corner, L-shaped profile or F-shaped profile on an arch and tile, and indeed on any surface. BUT! Initially, the material was conceived to help those people who are still carrying out finishing work using plastic or carrying out partial dismantling of it, during which waves bend or appear on the corner, F-shaped profile, and especially at the start, or as it is also called the L-shaped profile.
So that everyone understands what we are talking about, I am attaching this photo.
I’ll tell you a little further about how to bend a plastic corner, and also along an arch, but now I would like to talk about how to align this corner, an L or F shaped plastic profile that has undergone some kind of deformation, not particularly critical!
I'll start with a small example.
In a toilet lined with plastic, it was necessary to get a long PVC panel clamped on both sides with a start (L-shaped profile). The plastic was on the front side, the toilet was standing flush against each other, and there was no other way to pull it out without additionally dismantling the entire right wall. Which is what I didn’t want to do. In general, using a heroic force, the plastic jumped out of the starting panel, bending it and making nicks and waves in it. It looked very ugly and it didn’t occur to me how to fix it without replacing the panel. Well, maybe cut out the place of deformation, at a loss of aesthetics! umnyestroiteli.ru
This is still a decent picture, since out of fright they leveled most of it with their hands; before that it was simply disgusting. So. What we did.
As it happens with a Russian person: - Laziness gives rise to ingenuity. I didn’t want to go to the store, and I didn’t want to spend money on starting either! Yes, and going through the entire right side of the node is not a “vein”. Taking an ordinary home hair dryer and turning it on to the third maximum speed, I brought it to the bent starting plastic.
And then a miracle happened. The waves formed on the L-shaped profile at the time of dismantling simply leveled out and the launch itself even seemed to hug the plastic panel a little. Yes, here’s the actual result, the still hot result in the photo below.
As you can see, all the deformation on the component has practically disappeared and everything doesn’t look so sad anymore. After further manipulations everything became even better!
As for the internal and external plastic corners, F-shaped profile, their deformation is corrected in the same way, using a hair dryer.
And now, actually, how to bend a plastic corner onto an arch, and for any decoration in principle.
The working process
If you want to achieve a good result, then you need to have all the necessary materials and tools at hand. We will only discuss the wallpapering stage; you must prepare the surface in advance. The base must be dry and level.
Materials and tools
The following materials are needed for work:
For an arched structure, if you will paste it separately, it is better to prepare the composition a little thicker than for smooth walls. When cooking, use 10% less water to obtain the desired consistency.
Tool for work:
- Construction knife . You need a very sharp version with a hard blade 25 mm wide. In addition to the knife, be sure to purchase a set of spare blades. A good option is a tool with segmented blades; they are very rigid and cut very accurately;
A sharp knife allows you to perfectly cut wallpaper along the edge of the arch
- Brush for applying glue. You need an option with thick pile to distribute the composition evenly and quickly. The most commonly used is a poplar, but ordinary options with a width of 10 cm or more can also be used;
Polyurethane glue
Not every polyurethane adhesive is suitable for carrying out the intended procedure. Before purchasing such glue in a store, you must carefully read the instructions on the tube.
The advantages of this glue:
- High bonding reliability.
- The applied stripe can be adjusted.
Main disadvantages:
- Pungent, unpleasant odor.
- High cost of the product.
- Small packaging.
Application Features:
- The glue is applied in a thin layer to the plane of the wall.
- They are waiting for it to harden soon.
- Then you need to press the corner to the wallpaper after 25 minutes.
Important! This glue sets in 24 hours and completely dries in 48 hours.
Arch pasting
You need to start from the window. Calculate the number of stripes in advance. The latter should be located at a distance of 25 cm from the arched opening. Further actions can be performed in two ways.
Method No. 1
First, the walls around and above the opening are covered in the following order:
- Lubricate the remaining area with glue
- soak the wallpaper with a sticky solution;
- stick it;
- cut out the hanging part along the contour of the opening, leaving an edge at least 3 cm wide;
- cut it into petals and bend them inside the opening;
- press;
- leave for a day until completely dry.
The opposite side is designed in the same way.
Method No. 2
Start work from the inside of the arch opening.
- The canvases are cut.
- An adhesive mixture is applied to the internal (round and vertical) areas.
- The cut fragments are also treated with an adhesive composition.
- They are carefully fixed along the entire length. Press and smooth.
All that remains is to glue the vault.
- Cut two strips, length from the floor to the middle of the arch.
- The rounded part is coated with an adhesive mixture.
- Fixation begins from the bottom, carefully reaching the central part.
- Excess glue is removed with a rag or a dry, clean rag.
- Using a roller, press the sheets to a vertical plane, simultaneously smoothing them and removing air bubbles.
Start gluing the walls around the arch opening. It is performed similarly to the first method with a slight difference. No need to leave an edge. The butt seam is masked with a decorative flexible corner.
Silicone sealant
Sometimes silicone sealant is used instead of glue. This approach cannot be called successful, since corners in most cases are not just decoration, but protection of external corners. The sealant interacts poorly with plastic and will not provide a good result for a long time. If you still choose this option, then you need to choose not from acidic sealants (based on acetic acid), but from neutral ones.
There are brands of neutral sealants specifically designed for working with plastic, such as BARTON'S. They have high tensile strength - up to 1.2 MPa - and will provide high adhesive strength for a long period. The disadvantage of neutral sealants is their higher cost compared to acid sealants and assembly adhesive.
The sealant is applied to the dry, clean surface of the bend - in a strip - or on the flange of the corner - in dots or snakes. Setting occurs within 5 minutes, and complete drying occurs within 5 days.
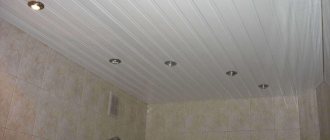
How to attach a plastic corner to the ceiling?
To attach the plastic plinth to the ceiling, you need to additionally prepare the surface. The ceiling is leveled using a primer, cleaned and only then proceed to gluing.
A strip of the required length is cut from the panel and glued with putty with PVA or polymer glue. After installing the corner, the joints are sealed with putty and leveled with sandpaper.
You can design the joints and corners in the house yourself, even without the skills of a builder. I hope that the material presented is enough to correctly glue the corner in any situation. The following video will help you understand the above.
Preparing the opening
At the beginning of work, measure the dimensions of the opening - in case you have to slightly change them. Drywall, putty and other materials are used to change the size or shape; if you plan to do this, then prepare the necessary materials in advance.
Now we need to prepare the surface. Clean the opening from dirt, seal all cracks and degrease the mounting area. Create as smooth and even a surface as possible, preferably by sanding and wiping it.
Before starting finishing work, the surface of the arched opening should be leveled as much as possible.
In cases where the opening is plastered, make sure the surface is smooth. If there are any cracks, chips, or unevenness, remove this layer and apply a new one. Then wait for it to dry completely and clean the surface and sand it.
Glue the corner to the arch
A finishing element such as an arched corner is used to decorate curved structures. Such corners, like ordinary straight ones, protect corners, prevent paint from falling off and rubbing off, and clearly highlight the shape of structures.
The corner on the arch can be attached in the following ways:
- Glue with glue - the gluing pattern is similar to vertical corners;
- Secure with self-tapping screws;
- Secure with nails without heads.
The last two options slightly spoil the appearance of the corner, as they are noticeable and can leave cracks or bend the corner.
In addition to PVC arched corners, there are also perforated ones. They are attached as follows:
- The tightly pressed corner is adjusted to the surface with staples;
- Next, a solution of gypsum plaster is applied to it with a spatula, which is pressed tightly;
- After the plaster has dried, it is sanded with a mesh or sandpaper.
The white corner on the window slope prevents the wallpaper from peeling off
Which glue to choose?
Today there is a large selection of different adhesives on sale for gluing PVC corners to various surfaces. Among them are four main groups:
- liquid Nails;
- polyurethane glue;
- silicone sealant;
- liquid plastic.
In addition to the listed types, there are also two-component compositions (epoxy and polyurethane), which must be mixed independently. But since working with them is more labor-intensive, and the required proportions cannot always be obtained, in this article we will look at ready-to-use one-component products. They provide sufficient adhesion and are completely ready for application.
How to glue a corner to a wall
Before you start attaching the corners to the surface, prepare it. If installation will be carried out on surfaces finished with panels, then it is simply wiped and degreased, if required.
Brick and concrete surfaces with plaster applied to them must first be leveled. To do this, plaster, putty and primer solutions are applied to the wall. The primer will create enhanced adhesion to the adhesive.
Then they move on to measuring in order to cut the corners based on the results obtained. 5-10 millimeters are added to the size of the overlap to leave space for applying the adhesive. A cut is made along the length, taking into account the angle of the part to be trimmed, usually cut at a 45-degree angle. It is more advisable to use a hacksaw or miter box.
5-10 millimeters are added to the size of the overlap to leave space for applying the adhesive.
To work you will also need the following tools:
- a stationery knife for cutting small parts on products, or cutting off tape;
- metal scissors. They will help you make an even cut with the required angle;
- a ninety-degree square;
- ruler;
- plumb line;
- roulette.
Choosing glue
Today, there are a huge variety of high-quality adhesive compositions with which you can carry out the intended procedure. Among such compositions there are four main groups:
- Assembly adhesive;
- Polyurethane glue;
- Silicone sealant;
- Liquid plastic.
There are also two-component formulations:
- Epoxy.
- Polyurethane.
You need to mix them yourself. Since such work is quite labor-intensive and time-consuming, below we will consider the properties of the adhesives that were listed above.
Why use wall corners?
Improving the appearance of the finish
Decorative corners on the corners of walls are used to give a finished appearance and decoration - like a photo frame or lace for a tablecloth. This technique works both with the same wall finishing material and when transitioning from one material to another.
Protection against damage and contamination
External corners, especially in the hallway or hallway, are susceptible to damage: abrasion, accidental impacts or scratches. Such defects appear due to carelessness, and durable decorative corners will help to avoid them.
Docking material
When finishing walls with hard materials not intended for corner transitions, difficulties arise precisely at the junction of two surfaces adjacent at an angle. For example, plastic panels, lining, stone or tiles require decorative design of the joint.
Adding functionality or decoration
How to decorate the corners of an apartment beautifully and, if possible, functionally in a non-standard layout? In such a case, the designer faces a difficult task - he needs to save space or make an inconvenient corner useful. The solution lies, for example, in arranging a corner with furniture that turns it into a place for reading, relaxing, or a house for animals.
Kinds
There are two types of flexible corners; when finishing an arch you may need the following:
- plastering;
- decorative.
Plastering
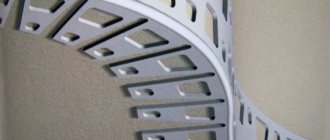
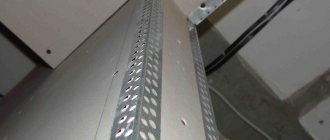
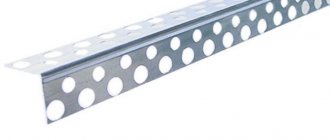
Plaster elements are made of aluminum or plastic. But even metal parts are light in weight, since almost the entire surface is covered with perforations. In order for the element to be easily bent, there are petals on one side that look like cuts.
Perforated profiles are used in the process of plastering work. Without their use, it is extremely difficult to achieve a perfectly even angle, and the use of perforated overlays allows you to easily solve this problem.
Advice! The standard length of plaster profiles is three meters. If necessary, they can be easily cut to the desired length.
Decorative
As the name implies, the main function performed by a plastic decorative corner is to provide aesthetic appeal. Thanks to this detail, you can make the arch more beautiful and emphasize its shape. However, it is recommended to glue plastic decor not only as decoration. Additional features of this item:
- masking possible finishing flaws, which can be difficult to avoid when doing the work yourself;
- protection of the arch edges from premature wear.
Advice! In a doorway, the most vulnerable place is its edges, as they are constantly exposed to various mechanical influences. As a result, the wallpaper begins to peel and peel, and chips may appear on the plaster. To protect the edges of the arch from damage, it is recommended to glue plastic decor around the perimeter.
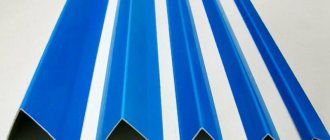
Decorative corners made of plastic can have different colors; a popular option are elements whose surface imitates natural wood.
The manufacturing material is polyvinyl chloride, the standard length is 2.7 meters.
Advice! If the owners of the apartment carry out renovations using exclusively natural materials, then instead of plastic decor, you can purchase and glue parts made of cork.
How to cut finishing corners
The tool should be selected based on what the corner is made of. For metal, wood, thick plastic, you can use a hacksaw suitable for the type. Thin plastic can be cut with scissors or a knife.
Corners are able to preserve the decorative properties of finishing materials longer. The variety of products makes it easy to choose the option that suits your design. The gluing process does not take much time, and you can do the work yourself.
What it is?
Before we talk about how to glue arched corners, it is worth finding out what kind of part it is and what it is intended for. So, a corner for arches is an element designed for the design of curved structures. They are easy to bend, so corners can be used for an arch or other curved structure of any size and shape.
Advice! Arched corners are used not only when finishing arches, but also when creating complex suspended ceilings and other plasterboard structures.
Fastening
Fastening decorative elements
If you decide not to install an interior door and make a semicircular opening (see Arched openings), then you need to “ennoble” it - attach an arched decorative corner along the entire contour.
There are several ways to do this:
- Glue it with glue.
- Secure with self-tapping screws.
- Pin with nails without heads.
Let's look at each of these methods in more detail. Most often, PVC elements are glued to the wall using glue. For example, for liquid nails or Titanium.
You should know! No need to use liquid nails for heavy structures! They may contain solvents that can corrode plastic. The best option is Express Decor glue.
Before you start gluing the corners to the surface, you should prepare it:
- First of all, you need to clean it from dirt and dust.
You should know! Do not under any circumstances stick plastic corners onto wallpaper. Even if the latter are firmly attached to the wall.
- All loose materials must be removed.
- If you already have wallpaper glued, then remove it from the place where the corner will be glued as follows: attach it tightly to the “native” place and mark its edge on both sides with a pencil. Then remove and carefully use a sharp utility knife to trim and remove the wallpaper.
Now you can start gluing. If you decide to use liquid nails, it is better to take them in a tube (under a gun). It will be more convenient to apply glue from such packaging. Also buy the gun itself.
Tools and materials
The following tools will be required:
- actual arched corners;
- liquid nails or similar adhesive;
- glue for PVC materials;
- primer, putty;
- screws or nails;
- spatula, mallet.
You can not only glue the planks, but also secure them with nails and screws. This option is most often used when installing metal models, but is also applicable to plastic ones.
Installation of a flexible arched corner
Soft planks are sold in lengths of 3–7 m. Before gluing the trim, you need to measure the length of the arch and calculate the required quantity. If the length of one product is not enough, then it is necessary to provide a small margin: the arched strips are joined at an angle of 45 or 90 degrees, and for this you need to cut off a certain amount of material.
- The surface of the opening is cleaned of old finishing dirt and dust. Be sure to treat with a degreasing compound.
- The wall is pre-primed and puttied. It is necessary that the joint between the slope and the wall is exactly 90 degrees. The smoother the surface, the easier it will be to attach the flexible strip.
- Prepare an adhesive composition: colorless for colored products, and white for white.
- The glue is evenly applied to the profile and then glued to the joint. The composition does not set immediately, so the position of the soft bar can be adjusted. Builders recommend that after this first “trying on”, remove the profile and then re-glue it to improve the polymerization of the adhesive.
- To fix the product firmly, the bar is additionally fixed with masking tape or tape.