To ensure that the joint between wall planes has the correct design when leveling, craftsmen often use various plaster corners. Yes, at first glance this detail may seem completely simple to you - it is not so easy to use. If you decide to do this, you must follow a number of rules.
This is exactly what we will talk about in more detail in this material. Let's look at how to choose a plaster corner and how to use it correctly.
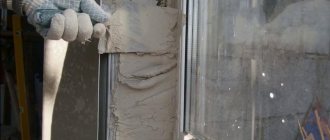
This is what a plaster corner looks like
Wall marking
To correctly install beacons for plaster, it is necessary to make preliminary markings of the walls.
Important! the distance between the beacons when installed on the wall = the length of the rule you will work with, minus 20-30 cm. That is with a rule length of 2 meters, guide profiles are placed every 1.7 m. This is necessary so that when leveling the plaster, you can guide the rule left and right, constantly relying on the profile.
Accordingly, you can calculate the consumption of beacons on the wall: (length of the wall / length of the rule) + 1.
The walls are marked in several steps:
- Draw strictly vertical lines from floor to ceiling using a level. They must be performed at the beginning and at the end of the wall. It is important to leave 15 cm from the floor and 30 cm from the corners.
- Measure the distance between these lines, divide it by the distance between the beacons (see above). The resulting number will indicate the required number of profiles. It is important that the beacons should be 30 cm shorter than the ceiling height.
- Draw vertical lines along the entire wall.
- Dowels are screwed in at the beginning, end and middle of each line. Their caps are aligned exactly vertically using a plumb line or level (bubble/laser). It is important to align the dowels on all lines in the same plane. The beacons will rest on their caps when installed on the wall.
An example of marking using a plumb line, dowels and threads
Types of structures
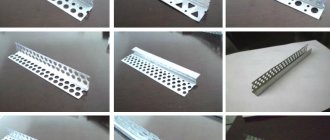
There are perforated corners of different shapes on sale, which need to be selected depending on the need.
Straight corners
This product looks like an ordinary metal or plastic strip, which is bent 90 degrees in the center. The sides of the profile are covered with perforations, which is required to make it lighter and to simplify fastening. Typically, the thickness of right corners is 0.5 mm for metal and 1-1.5 mm for plastic.
Arched products
Such profiles are made only from plastic, since metal products cannot bend according to the shape of the arch. Arched corners are used to trim the outer and inner sides of curved edges. Usually they are perforated on only one side, or are made divided into segments.
Universal corners
Products are made from plastic, metal and some other materials. In essence, they are a tape that allows you to edge any non-standard corners where the use of conventional straight profiles is not possible. The most commonly found on sale are plastic, metallized and non-woven tapes. They have a width of up to 5 cm, a fold line in the center, and are also equipped with micro-perforation.
Products with mesh
Reinforcing mesh is attached to such corners from the sides. The profiles are ideal for plastering work performed using the “wet” method, or when applying a too thick layer of building mixture. The width of the attached mesh is 2-4 cm, the corner material is metal or plastic.
Combined corners
A combined type profile has a metal base (aluminum or galvanized) with a plastic or fiberglass mesh fixed on it. It allows you to create clear corners, strengthen weak areas or form joints correctly.
Is it necessary to remove the guide profiles?
Experts recommend removing non-galvanized metal beacons so that they do not rust in the plaster. You can do this in the following way:
- After applying the plaster, after a couple of hours, mark the location of the beacons with a pencil.
- Dry the walls thoroughly.
- Using a hard spatula, separate the beginning of the beacon.
- Use pliers to remove the beacon, gradually bending it away from the wall.
- Cover the resulting holes with mortar, leveling with a spatula.
- Leave the plaster until completely dry.
Remove the beacons and cover the grooves with solution
Plastic beacons can be removed and left in the wall.
Types of profiles depending on the material of manufacture
The corner for plastering corners can be made from different materials. Wooden products are practically never found on sale. The most popular among builders are plastic and metal accessories.
Metal
Such products are used mainly under latex, acrylic or gypsum plasters. They can be made from aluminum and galvanized steel. Aluminum is a soft metal, but it is practically not susceptible to corrosion and has sufficient strength. You just need to cut it more carefully so as not to bend it.
Aluminum profiles last for many years, have minimal weight and do not place additional load on building foundations. They are easy to install, even a beginner can handle the job, and the price of the products is quite affordable. Only the impact resistance of aluminum is not too high, so you should not subject the treated areas to excessive mechanical stress.
Otherwise, the plaster layer may crack, the profile will bend, and the repair will have to be done again. Therefore, aluminum corners are not used in workshops, industrial enterprises, warehouses, or shops.
A galvanized corner is much more expensive than an aluminum one. This is due to a more expensive production technology, including the application of a zinc layer. The coating prevents metal corrosion, but if the top layer wears away from damage, rust can still occur. To reduce the risk of rusting, galvanized corners should not be cut with a grinder. For “cutting” only metal scissors are used, which are more gentle.
The advantages of galvanized profiles are:
- high reliability;
- long service life (subject to installation rules);
- good shock tolerance.
The disadvantages of profiles are associated with their greater weight than aluminum. Due to their mass, if fastened insufficiently, they can slide down and come off over time.
Plastic
In terms of strength, plastic is inferior to aluminum and steel, because with a strong impact it does not just bend, but cracks or even falls apart. You have to buy rather thick products, and apply the plaster in a thin layer. However, plastic linings are indispensable under a number of conditions. For example, in rooms with high humidity they will be the most suitable option for edging corners. They are completely corrosion-resistant and will not rust even after many years.
Plastic is considered chemically inert; it reacts poorly to the presence of various chemicals. This allows the use of plastic profiles in workshops, production and where there is a risk of contact with caustic substances. The material even withstands interaction with alkalis and acids, of course, taken in small concentrations. Metals in such conditions will quickly become unusable.
Plastic is a lightweight material, so it does not weigh down the structure. You can easily make a curved corner (arc) from it, with almost any bending radius. The integrity of the product will not be compromised if handled carefully. To cut a plastic profile, you can use a simple stationery knife and even break it with your hands, after aligning the edges with pliers.
Useful video
Below we have selected several videos with master classes on installing beacons and plastering walls.
Quick installation using a laser level.
The next video shows the technology for plastering walls using beacons with your own hands. Leveling is carried out with gypsum mortar on brick without mesh reinforcement.
We hope that the article was useful to you. Ask questions and share your experience in the comments.
Previous
Tool Angle for plaster: types and installation rules
Next
Tools Construction floats: types and features
Fastening rules
To securely fix the perforated corner on the surface, you need to study the instructions in detail and get all the necessary tools (spatulas, brushes, rule, level, etc.).
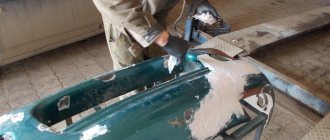
Preparing the corner and wall for finishing
In order for plaster profiles to hold tightly and serve for a long time, it is necessary to carefully prepare the walls and especially the corner areas. Preparatory activities include the following steps:
- complete removal of the old coating or removal of all loose, poorly secured elements that may subsequently fall off with a new plaster layer;
- sealing large gaps, cracks, and other serious defects with cement-based mortar;
- cleaning the surface from any contaminants;
- priming with a primer or deep penetration primer 2 times with complete intermediate drying.
If the junction of two walls or the outer corner is severely damaged, and there is even nowhere to attach the profile, pre-plaster it, and only then attach a metal or plastic cover.
Product fastening
Using metal scissors or another suitable device, cut off a corner of the required size. The solution is applied to the corresponding section of the wall, and the mass is leveled around the perimeter with a special corner spatula. The layer after attaching the profiles should be located on the same level as the rest of the plastered wall.
While the mortar has not yet hardened, apply the product and press it so that the plaster appears from the holes. Level the composition over the surface of the part or mesh (if a corner with a mesh is used). Using a level, the correct location of the profile in relation to the beacons is verified.
Hold heavy metal pads with your hand while working, otherwise they will slide down. If necessary, they are additionally secured. This stage of work will also be required if the walls are plastered in too thin a layer and there is no way to level the profiles. The order of fixing the parts will be as follows:
- apply a corner to the joint of the walls, make markings for fasteners;
- use a drill to make holes on the wall and insert plastic dowels into them;
- fix the corner with self-tapping screws, screws;
- The fasteners are treated with an anti-corrosion compound so that they do not subsequently rust from the plaster.
Cleaning the construction base and leveling
After fixing the corners, wait until the solution completely hardens. Then the entire surface is plastered along the beacons, simultaneously closing the corner and leveling the new layer with a spatula. Let the plaster dry again and rub it with a construction trowel. The tool is carefully moved over the area of the perforated corner so as not to damage it. The inner corners are rubbed with a coarse grater.
The use of plaster corners can significantly improve the quality of finishing and help facilitate the work of the craftsman. They are recommended for use by both beginners and professionals, as they have real practical value.
Results
Special element for rounded surfaces
The use today of corner overlays for plastering walls significantly facilitates the work of those owners who want to carry out repairs in an apartment or house on their own - without the involvement of professional teams.
Yes, if you have little experience (or none at all), it’s not so easy to design a corner well, so you definitely don’t need to neglect various auxiliary devices. Take action - and everything will definitely work out, experience will come with time and everything will work out perfectly - right the first time!