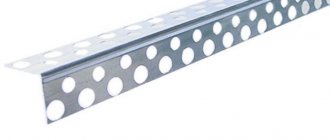
Galvanized corner for plasterboard 25x25 mm is one of the types of material that is used to level parts of walls. As you know, drywall is popular in construction and is easy to work with. However, prefabricated interior partitions made of plasterboard have problem areas - corners, which are most often subject to mechanical stress. This is where the different types of existing corners come to the rescue.
Existing types of corners for drywall
They perform the protective function of parts of the walls and will help to build even corners. Knowing their classification, you can choose a suitable specimen.
How does he work
Briefly, its operating principle is as follows: using a bent long metal or plastic plate, which is installed on a corner, creating a flat surface there, a base is formed, which will then be processed with a solution. The holes are needed so that the mixture can pass through them freely (in both directions), that is, so that the deficiencies are filled and the excess comes out; in addition, applying holes to the product (perforation) reduces its weight, thereby reducing the load on the solution and grip increases.
Installation features and procedure
Before attaching plastic panels to ceilings or walls, they decide on the installation method - will it be a frame or an adhesive connection.
For a wooden frame, slats or beams measuring 50 x 50 mm are usually used, for a metal frame - a standard profile with a cross-section in the form of a channel, bent from galvanized sheet, which is usually used for installing drywall. Wooden beams are attached to the wall with self-tapping screws of the appropriate length, in increments of 400...500 mm and are leveled in the required plane with wooden pads in the form of wedges. Metal profiles are secured and leveled with special perforated bendable sheet metal strips.
Alignment of frame elements in a vertical or horizontal plane is carried out using a plumb line, as well as a water and bubble level. A laser level can also be very suitable for these same actions.
Instructions on how to cover walls with plastic panels with a two-layer structure. To connect adjacent sheets together, they are equipped with special locks similar to a parquet tenon joint. That is, on one side there is a tenon (protruding part), and on the other there is a groove. The design of the lock is designed in such a way that when the tenon of one panel fits into the groove of another, they snap into place. As a result, they are pressed against each other with little tension, which makes the seam between them unnoticeable. There are plastic trim elements with the same width on the front and back sides. How to attach PVC panels to the wall with this configuration? This type is fixed to the frame using special metal devices called clasps. Another type has a wider bottom surface with a small shelf at the bottom. The plastic panels are attached to the frame mounted on the wall through this protruding part using nails, screws or even staples. Installing plastic panels on a ceiling or wall also involves installing additional elements called moldings in the right places. They have profiles specifically designed for masking end seams, external and internal corners, and interfaces with surfaces that have a finish other than plastic. In most cases, covering walls with plastic panels is so simple that you can do it yourself without involving help.
Installation of PVC panels on walls using glue can be recommended on a well-prepared, flat surface that has sufficient strength of the top layer. Installation of PVC panels on the wall with glue is best if they are sheet panels. These sheets, which are available in sizes 980 x 480 mm, 955 x 480 mm, 980 x 498 mm, are glued end-to-end and resemble very hard PVC linoleum with most often a pattern or design applied.
Installation of PVC wall panels must be carried out using adhesives specifically designed for this type of work. They must have good adhesion (gluing ability) both to the finishing element and to the surface being finished. And also have sufficient thixotropy (anti-creep property) so that after gluing until the glue sets, the plastic sheet does not slide down the wall under its own weight. Before covering walls with plastic using glue, you should always carefully read the instructions on its packaging, which should contain information about the scope of application, gluing technique, as well as consumption per 1 square meter of glued surfaces.
Is it possible to make a corner without a corner?
By and large, yes. But you need to understand that the corner overlay is used not only to form a joint between wall surfaces, but also to strengthen it and make it resistant to mechanical damage. Without an overlay, your corner will crack from the slightest shock, and if we are talking about an apartment, you will have to plaster it again in about half a year. Finishing without overlays is used when there is absolutely no threat of impact loads, which is extremely rare.
How to choose
They are mainly made of plastic and metal. Let's consider the characteristics and purpose of each type of product.
Metal
Metals are sensitive to alkaline and acidic environments, so they are used mainly when latex, gypsum or acrylic are used as finishing materials.
- Aluminum. Linings made from this material are the cheapest and most common. They have good corrosion resistance; due to their lightness, they stick well to the wall and do not move during operation. But, since aluminum is a very soft metal, its impact resistance and resistance to mechanical damage is minimal. This can lead to the fact that from a weak blow, not only the plaster will crack, but also the corner will bend, which means that it will no longer be necessary to carry out cosmetic repairs, but a thorough one, with the replacement of the entire lining. This is why aluminum angles are not used in areas where there is an increased risk of impact loading on walls, such as factories, loading bays or shops. Where workers frequently hit corners, steel should be used.
- Galvanized steel is not as common because it is much more expensive than aluminum, but it has higher strength characteristics. Thanks to this, steel corners withstand impacts very well and do not bend even from a very large-scale collision, however, this metal is heavier than aluminum, so the technology for installing steel corners is somewhat different. It must be taken into account that due to its mass, the lining will peel off or slide down. In addition, it is important not to damage the galvanization, because it protects the steel from rusting. The product should be trimmed with special metal scissors, and in no case with a grinder, so that after a few years the repair does not have to be done again.
Shapes of metal overlays
The appearance of the product can be completely different, depending on the purpose of the repair, but basically it is just a strip of steel or aluminum, bent at a right angle, in which many small holes are drilled. The thickness of the lining is small - a little more than half a millimeter. Such simple corners are used for dry plaster, and if moisture is present in the process, an additional metal mesh is used, which increases adhesion to the wall due to the fact that more mortar is in contact with the product. Rounded corners are very rarely made from metal, because, as a rule, it is required that the radius of curvature can be changed, and in the case of such durable materials this is simply impossible.
Plastic products
In terms of its strength characteristics, plastic is inferior to metals, and even aluminum, because if the latter simply bends from an impact without causing further destruction of the plaster, then the plastic immediately cracks. In order to achieve at least some strength of the product, the corner has to be made thick, and the plaster, accordingly, must be applied in a thin layer. However, it has an advantage in rooms with high humidity - it is not at all afraid of corrosion, so it is usually used in such cases.
In addition, it is much easier to make a curved corner from plastic (of course, from the point of view of geometry, it will no longer be a corner, but an arc, but they still call it that) with an arbitrary variable bending radius. After all, plastic is very malleable, and the aluminum plate is difficult to bend due to its large length. And products with an adjustable angle are generally a typical phenomenon for plastic, since it bends very easily without violating the integrity of the structure.
Chemical inertness of plastic corners
Since plastic reacts very poorly with other substances, it is advantageous to use it in areas where reagents are used or, for example, in chemical production. Since the air in these places contains a certain concentration of alkalis and acids, they are also absorbed into the walls, negatively affecting the materials. As a rule, metals under plaster become unusable after just a few years.
Description of finishing material
Plastic corners belong to construction fittings, which are often used for decorating external protrusions. These can be slopes, niches, boxes, columns and other architectural elements with 90-degree turns. The material is used to solve the following problems:
- masking installation seams;
- transition between different finishes;
- protection of corners from mechanical damage, penetration of moisture, dust, dirt.
In most cases, a plastic corner is installed on slopes. This gives the opening a finished look. The polymer product is not afraid of moisture, lasts 20-25 years, and is easy to wipe clean. The advantages also include light weight, a wide range of colors and sizes, simple installation, and low cost. But scratches become a place where dirt accumulates, and if excessive pressure is applied to the workpiece, irreparable deformation of the soft strip occurs. It is worth noting the release of toxins when the polymer burns and gradual fading under ultraviolet rays.
Variety in color Source sense-life.com
What material corner is best suited for a wooden wall?
The tree itself is already quite strong, especially if we are talking about timber, and it does not need additional reinforcement, so you can save on material here. However, plastic should not be used unless the corner is combined with a built-in metal mesh. The fact is that wood does not hold plaster well, and therefore, when finishing wooden houses, they use mesh of very large areas, ideally covering the entire wall - then the plaster will last longer. In general, in such cases, preference is usually given to either aluminum or combined plastic products.
Kinds
Until recently, the types of most plastic panels were not very diverse. Most often you could find boring white panels.
Now, the market offers types of decorative finishing panels of numerous colors with drawings and patterns applied to them using lamination or thermal paint. Covering a wall or ceiling with PVC panels is increasingly included in the projects of the most advanced designers.
Manufactured plastic panels intended for wall decoration can be classified according to the following criteria:
- thickness and its type – sheet (single-layer) or two-layer with internal stiffeners;
- width and height;
- design of a lock connecting adjacent sheets;
- surface color;
- the presence of flat patterns and designs;
- embossed relief imitating more expensive finishing materials.
In terms of their characteristics, two-layer plastic finishing elements differ from each other and in terms of use. With a thickness of 5 mm and with reduced strength and weight, they are suitable for cladding ceilings, with a thickness of 8...10 mm - for finishing walls. The width of the sheets produced can be from 200 to 370 mm, and the length - 2.6...3.0 m.
How to use
Working with corner overlays consists of several stages, these are:
Preparing the wall
In order for the plaster to hold tightly, you should break off everything that is loose, so that a monolithic structure remains without any cracks or breaks. Do not skimp on the solution, because in the end the corner will only be stronger. Once you have knocked off all the loose pieces, you should move on to cleaning and priming. Remove dust from the surface with a special brush (but you can also use a simple rag), then prime the wall to ensure reliable adhesion to the solution.
Sometimes the wall joint is so damaged that a corner cannot even be attached to it, because there is simply nowhere to do it. In such cases, the surface is first plastered, preparing the base, and only then the corner overlay is installed on it.
And the last stage of preparation is the installation of beacons, which contribute to a more accurate location of the corner, with minimal deviations.
Product Installation
First you need to trim the overlay. Cut it with tin snips if it is steel or aluminum, or with a knife if it is plastic. Next, apply the solution to the wall and place the product on the corner. Press down lightly so that the solution begins to seep through the holes, and press down the mesh, if there is one, as firmly as possible. Check the correct installation using a level, and do not forget to check the beacons.
If the pad is made of heavy materials such as steel, then due to its large mass it will move down a little, so it would be a good idea to hold it for a while, especially if you are attaching it to the ceiling.
Using Fasteners
Holes in the corners are made not only to increase adhesion, lighten the structure and ensure the passage of the solution, but also in some cases to use screw fastenings. Plastic sleeves are driven into the hardened plaster, into which stainless screws are then screwed. This fastening allows you to significantly increase traction, but is used when it is not possible to use a mesh. And there is practically no point in using them at the same time, unless you are installing a corner in an elephant nursery.
When the solution under the pad dries
After the overlay firmly adheres to the wall, you should begin plastering the outer part of the corner and leveling it. The first step is to plaster everything next to the overlay to get the approximate thickness of the layer applied to the corner. When you have leveled the surface of the wall and the surface of the corner, start smoothing the plaster, but you should not get too fanatical - anyway, later, when it dries, it will need to be treated with sandpaper.
How to check your work
After completing each step, you should ensure that it was completed correctly. So, if in the middle of work you notice that you haven’t cleaned the wall well and there are broken pieces of plaster hanging on it, don’t be lazy, remove the corner and do it all over again, this will significantly increase the service life of the structure. If, for example, you notice that you pressed a corner onto the mortar too hard, so that it all flowed out through the perforation, remove it and put on new plaster, because the final result of your work depends most on such little things.
Installation of plastic corners
So, in fact, we have three types of corners, which are mounted on different materials and for different purposes. Let's take a detailed look at how to install each.
Hidden corners for putty
To work we will need the following set of materials and tools:
- The perforated corner itself.
- Putty or gypsum plaster, depending on what stage you are doing the installation.
- Container for mixing the mixture.
- A pair of spatulas.
- Something for cutting the corner, such as tin snips.
- You can also use a construction stapler to pre-fix the part.
Step 1 – applying putty to the corner. Cut the corner to length and mix the putty in a bucket. Next, we scoop it up with a spatula and apply it directly to the corner so that it hits both adjacent walls. In this manner we go through the entire area on which the corner will be glued.
Applying putty to a corner
Step 2 – installation of the corner. Place the corner in place and press it into the putty. Press down better so that a minimum layer remains under the plastic.
Interesting to know! Plastic corners often have a bulge in the middle, which is why you need to build up a layer of putty in order to smoothly approach the corner. To prevent this from happening, the walls can be sanded, which will allow the part to be recessed inside. You can’t do this on drywall, so we go as we go.
Installation of the corner
Step 3 – press down the corner. The corner must be pressed on both sides at once. Use a spatula for this - this will allow you to align it as accurately as possible with the walls.
Press down the corner
Step 4 – level the putty. Then we run a spatula along the corner and remove all the putty that has come out, simultaneously leveling it and filling the voids. Make the edges as smooth as possible, but do not try to create a perfectly smooth surface - this is useless now. At this stage, you can check the level position of the corner and make adjustments if necessary.
Leveling the putty
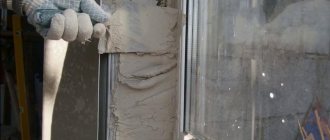
Step 5 – pulling out the corner. Let the starting layer of putty dry, after which we begin leveling the corner. We will need a small rule that will help smooth out the difference as much as possible due to the protruding corner. We apply putty to the walls and stretch it, getting an even and beautiful angle. In principle, that’s all, but if you wish, you can coat everything again with a spatula after hardening this layer.
Pulling out a corner
Thanks to the rigidity of the corner, we were able to achieve the correct geometry of the outer corner of the window slope; it is also possible to do this only with a trowel, but some experience is required, and such a corner will not be strong.
If you are not a supporter of whitewashed plaster walls, but at the same time you want to be able to change the appearance and mood of the rooms again more often and without special costs, then why not look towards wallpaper that can be painted many times? In a special article we will tell you how to paint wallpaper for painting correctly, strictly according to technology, so that it lasts a long time.
Prices for various types of putties
Putties
Video - Installing plastic corners
Installing external corners with glue
Do you think that gluing plastic corners with glue will be easier than walling up perforated ones in putty? You are deeply mistaken, since this work requires high precision in measuring and cutting the material. Now you will see everything for yourself.
To work we need the following:
- Masking adhesive tape for preliminary fixation of parts.
- Glue liquid nails and a gun under it.
- A stationery knife with thick blades or metal scissors for cutting corners.
- Tape measure and pencil for measurements.
- White silicone sealant for masking possible cracks.
- Square for adjusting the angle of 45 degrees.
In the example, we will look at how the window slope is framed.
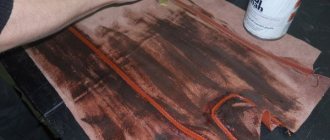
Step 1 – prepare the workplace. In order not to spoil the window sill (get it dirty and scratched), you first need to cover it with something. For us this is a laminate backing. We put all the necessary tools on top so that they are always at hand.
Preparation of the workplace
Step 2 – measuring the sides of the slope. Using a tape measure, measure the height of any of the sides of the slope. It is important to focus on the distance from the window sill to the edge of the horizontal side of the slope. Errors are not allowed, so measure everything to the nearest millimeter - use a good tool, not a rusty old one on which you can’t read the graduations.
Measuring the sides of the slope
Step 3 – marking the corner. We transfer the resulting dimensions to the corner and put a mark with a pencil. Make sure that the corner does not bend, otherwise you will get large errors. It is best to lay it on a flat surface and take all measurements in this position.
Corner marking
Step 4 – marking at 45 degrees. We take the square and install it as shown in the photo, oriented exactly according to the mark made earlier. Draw an oblique line along which we will cut the part.
Marking at 45 degrees
Advice! It is also better to make the first mark along the corner, setting it exactly 90 degrees, so as not to make a mistake when cutting.
Step 5 – cutting the corner. We cut our corner exactly along the drawn lines. No one should have any questions here. The only thing is, if you use metal scissors, you can carefully trim the edges.
Angle cutting
Step 6 – Apply glue to the back of the corner. We load a tube of glue into the gun and squeeze it onto the inside of the corner. We advise you to double-check the part first; you may have made a mistake in the measurements. The glue can be applied in a continuous strip or dotted.
Applying glue to the back of the corner
Step 7 – gluing the corner. Then we apply the corner to the installation site and press it along its entire length. If any glue comes out over the edges, wipe it off immediately with a damp cloth.
Gluing the corner
Attention! Do not use a composition based on synthetic resins. It can only be washed off with a solvent. You will definitely stain the wallpaper and putty with untidy yellow spots. Buy acrylic glue, you can also use silicone, but it will also be difficult to remove.
We install the second vertical side in exactly the same manner.
Tips for working with acrylic glue
Step 8 – preparing the corner up. You will have to tinker with the upper part of the slope longer. We need to accurately measure the distance from corner to corner, then transfer it to the workpiece and make marks. In this case, we measure not from the edge of the part, but with an indentation wider than the thickness of the corner. Next, ears are cut out on the corner, as shown in the photo. We do not mark the oblique cut, since we will do this after the fact.
Preparing the corner up
Step 9 – simultaneous marking and cutting. We take our workpiece and install it on the slope, sliding the ears under the oblique cuts of the vertical elements. Then we take a stationery knife with a sharp blade - with it we carefully first mark a line, and then go deeper into the cut with repeated passes until we completely cut off the excess part.
Simultaneous marking and cutting
As a result, we will get a very smooth joint. If, nevertheless, a gap remains, then it can be easily covered with white silicone sealant. Next, the upper corner is removed, glue is applied to it, after which it is finally mounted.
It is recommended to further strengthen the glued corners with tape. This will protect it from accidental displacements.
Prices for different types of liquid nails
Liquid Nails
Video - How to glue plastic corners to slopes
Installing corners under ceramic tiles
We have already written that the use of such corners not only decorates the finish, but also makes the external corners in the room less dangerous. For this reason, we advise you to always use them, especially since it is much more difficult to make corners from tiles with a 45-degree cut. In our work we must take into account the following points
Step 1 – select a corner of the desired size. Wall tiles from different collections can be from 5 to 12 mm in thickness. Therefore, it is necessary to choose the correct size of the corner. To do this, be guided by the numbers, choosing so that the corner is 1 mm larger, since you also need to take into account the thickness of the tile adhesive layer. Or take one tile and push it into the cavity of the corner - it should fit into it and go inside a little.
Choosing a corner of the right size
Interesting to know! If the tile does not go inside the corner, you will not be able to hide the unevenness of its edges.
Step 2 – tiling one side of the corner. The corner has only one mounting lip, so it will only be held in place by the tile on one side of the corner. On the other edge it has a small protrusion that should hide the edge of the tiled surface on the adjacent wall. From here we derive the following procedure. First, one side of the corner is covered with tiles, and it is advisable to leave the factory, uncut side at the corner.
Tiling one side of a corner
In this case, it is necessary that the resulting edge be aligned strictly to the vertical level. Also, it should not protrude too far beyond the corner (only 1 mm, it is better to check this by placing the corner on a dry surface) or, conversely, not reach it.
The plane of the wall itself must also be level and not have differences throughout, otherwise gaps will appear between the finishing and the decorative element.
Step 3 – preparing the corner. Then we take a tape measure and measure the exact distance, in the same manner as we did in the previous instructions. The corner also needs to be cut at an angle of 45 degrees, but this is difficult to do due to the rounded shape of the element. In our work, we will need a miter box in which to place the corner, and, guided by the mark, cut the part with a hacksaw.
Preparing the corner
Advice! Immediately shorten the mounting part of the part by half a centimeter, as it may subsequently interfere with joining with the horizontal corner.
Step 4 – fixing the corner. We install the corners in their place. In the example in the photo, the master is laying tiles on a gypsum fiber wall, so he fixed the frame using self-tapping screws with a press washer. This solution is temporary - the screws will unscrew as the corner is covered with tiles. Alternatively, you could use a stapler with staples, then you wouldn’t have to remove anything.
Fixing the corner
If your wall is concrete, then you can strengthen the corner with a thin layer of tile adhesive, which is applied before installing the element. You can do without temporary fixation, but then there is no guarantee that you will be able to accurately combine the parts. Please note that the artist in the photo did it perfectly.
Step 5 – cutting the tiles and trying them on. According to the planned layout, we cut the tiles that will be installed on the second side of the corner. We apply it for preliminary measurements and see that it cannot fit into the corner. The fact is that all ceramic wall tiles have some narrowing at the edges. Some models even have a deliberately convex shape, and the difference can be up to 3-4 mm. What to do in this situation?
Tile cutting and fitting
Step 6 – marking the back surface of the tile. Firstly, you can initially worry about buying a wider corner, but again, without cutting the tiles, you won’t be able to measure it on the spot. Secondly, we can slightly reduce the thickness of the tile in the place where it overlaps the mounting strip of the corner. To do this, first make a mark with a pencil on the back side of the tile, then take a block of sandpaper and remove 1-2 mm of the material. Of course, such work takes much more time from the master, but if you were unable to accurately select the size of the corner in advance, there will be no other choice.
Marking the back surface of the tiles
Step 7 – fixing the corner. We proceed to installing the tiles and simultaneously fixing the corner. We take the diluted tile adhesive and carefully press it into the perforation of the mounting strip with a spatula. Do not make layers and immediately remove all excess, as this glue will interfere with the tiles’ ability to fit properly into the corner.
Fixing the corner
Step 8 – Apply glue to the wall. Apply glue to the wall using a comb. You can also apply it without tiles, but then you will need to remove the excess from the edge that we ground before installation.
Applying glue to the wall
Step 9 – gluing the tiles. Glue the tiles. To begin with, we feed it forward a little with the turned edge so that it fits into the corner. Then press the other side and gently tap it on the surface. We align the plane with the rest of the already installed tiles and continue to move on, simultaneously unscrewing the screws so that they do not interfere with the work.
Gluing tiles
Step 10 – additional fixation of the corner. When the tile adhesive dries, the corner will be embedded in it, and it will be impossible to simply remove it, but while the composition is still liquid, the decorative element can be accidentally displaced, which will disrupt the structure of the adhesive. To prevent anything like this from happening, we additionally secure the corner with pieces of masking tape.
Additional corner fixation
Prices for different types of ceramic tiles
Ceramic tiles
Video - How to install corners on tiles with your own hands
Is it worth doing the corner plastering yourself, or is it better to entrust it to a professional?
On the Internet today you can find a huge number of articles and training videos on all types of construction and repair work. There are so many of them that it seems as if anyone could build a house and make repairs on it themselves, using only these manuals. But that's not true. The fact is that here you need not only knowledge of how to do it, but also skill, that is, experience. Because, for example, you can know how to hammer a nail, but not be able to do it in practice, the nail will be hammered crookedly, your finger will be damaged, etc. If you've ever glued wallpaper, you should know that even in such a seemingly simple task, you often have to redo everything several times, let alone plaster. A master who not only knows, but also knows how, will set you a high-quality angle in a minimum amount of time, while you can do other more important things.