08/14/2020Repair0
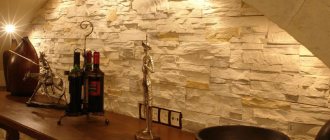
Arched openings are very popular not only in private houses, but also in large apartments. To decorate them and protect the edges from chipping, special overlays are used - plastic or metal corners. Metal is expensive and requires additional decorative finishing. Plastic is more popular, however, not every novice finisher knows how to bend a corner of this material under an arched opening.
- 1 Advantages of plastic corners
- 2 Ways to bend a corner
Types of corners for finishing arches
According to the place of use, corners are divided into:
- those that are installed on plaster;
- corners that are glued under the plaster.
The first ones have a wider range: they are made of different materials and can be of almost any color. The latter have special holes for better adhesion to the surface. They come in both metal and plastic.
Functions of corners:
- alignment of external arched corners;
- protection of corners from accidental damage;
- surface decoration.
Wallpaper tends to peel off from the base over time. A doorway trimmed with decorative corners will hold them on the wall and also give the room a finished look.
Perforated corner for strengthening corners and slopes.
Description
An arched corner is a profile for interior decoration that performs a protective and decorative function. Used to frame curved openings of doors and windows. Made of PVC, has a length of 2.7 meters and a cross-sectional size of 10x20 mm.
Advantages of an arched corner profile
- Easily bends to the desired shape.
- Hides defects, ensures the safety of the finish, prevents tearing of wallpaper and abrasion of paints and varnishes at the edges of openings.
- Makes rounded lines clearer, prevents the edges of the arch from being visually blurred and blending into the background.
- Suitable for designing openings with non-standard bends.
The corner is attached to the arch with assembly glue or liquid nails, using a rubber hammer, which enhances adhesion to the surface material. It is allowed to install the profile at right vertical and horizontal angles.
Why should you use a decorative corner?
The arch is a classic structural element and is used as a design element. At the same time, being in an area of active use, this structure is very susceptible to minor deformations (chips, cracks, etc.). In view of this, even at the stage of finishing work, it is desirable to protect the outer corners of the arched structure by applying (gluing) decorative corners.
In addition, such corners act as design elements and give arched systems an attractive, finished look.
Why are arched corners needed?
The advantages of arched corners are undeniable, therefore, by choosing this type of finishing, the owner will receive a lot of advantages. Decorative arched corners have an impressive service life - up to several decades. However, they do not require painting and are easy to clean. The price for arched corners is quite reasonable and affordable for everyone, and the choice is simply amazing with the variety of colors and shades. In addition to the fact that decorative arched corners are mounted on any type of surface, they also hide irregularities, gaps and other corner errors. But still, their main function is to highlight the ornate curves of unique design ideas.
Notch method
Previously, we looked at hot methods of bending metal pipes. When using them, a protruding fold may appear at the bend. Therefore, next I will talk about one more labor-intensive, but sometimes very justified method - the notch method for bending metal pipes.
It is necessary to make cuts for bending the pipe in several places and in depth up to half of the pipe itself. The distance between the cuts depends on how much bending is needed, as well as on the diameter of the pipe itself.
If the diameter is small, then the thickness of the cut will be sufficient to obtain a smooth bend. Also keep in mind that the more cuts, the more accurate the bend will be. To bend pipes with a large diameter, several small wedges should be cut.
Source prom.st
The second method is usually used in decorative structures.
Before bending the pipe through which the liquid will move, it is necessary to clean the weld seam and grind it with a grinder, and carefully weld all the cuts. After painting, such a product will take on a decorative appearance without any traces of deformation.
Keep in mind that after bending by cutting, the inner surface of your pipe will remain rough and with sharp protrusions. This means that rust will settle here and various debris will linger. For heating and plumbing, this is a clear disadvantage of the incision method.
What materials can the corner be made of?
To decorate arched openings, corners made of the following materials are used:
- plastic;
- metal;
- tree;
- MDF;
- polyvinyl chloride;
- duralumin;
- and others.
Such building materials are very durable and have a long service life. With their help, you can hide the imperfections of the arch - cracks and protrusions. Corners are great for both rectangular openings and more non-standard designs; they can be bent without any problems.
When choosing corners for finishing an arch, keep in mind that they can be solid or folded. Corners are also intended to strengthen the structure (relevant if you are installing an arch yourself). This type requires more reliable fastening, using screws or plaster, for example.
The most popular are profiles made of plastic - it is easy to glue, the material is quite flexible, it is easy to bend and can be given the desired shape.
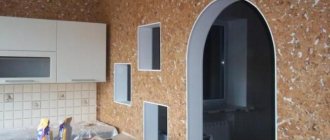
The most common option for finishing arched openings is framing with a plastic corner
What is needed for finishing
First of all, you need to purchase all the necessary materials and tools. To properly finish the arch you will need:
- corner;
- assembly adhesive (it depends on the selected material);
- sealant;
- liquid Nails;
- metal nails;
- rubber hammer.
You may not use any of the above, it depends on the specifics of the installation - some will just want to glue the corners, others will find fastening with nails more reliable. When choosing your method, consider the following points:
- Liquid nails are often the cause of stains.
- Do not choose too strong liquid nails for working with plastic, they can destroy the material
- Metal nails are visible and have a negative effect on the appearance of the decoration.
- When tightening self-tapping screws, you can overdo it and cause cracks, chips, or bend the material.
When everything is prepared, you can proceed directly to finishing the arch.
How to choose a decorative corner
Currently, the building materials market offers many products for finishing corners on arches, but the most popular elements for solving these problems are plastic decorative arched corners, which are available in a wide range of colors and overall dimensions. In view of this, we consider it advisable to consider the methodology for selecting these particular components.
So, firstly, you should pay attention to the design of the finish (arched corners should have shelves of different widths). If you use corners with identical shelves, then in places of bending, these attributes will turn out and it will be problematic to glue them.
Secondly, when choosing a decorative finish, you should take into account the color shade of the material. Moreover, it is advisable to build on the colors of the attributes already installed in the room (doors, floors, etc.).
Thirdly, you must immediately decide on the number of elements (a standard arch usually requires 4 corners).
Advantages and disadvantages
The plank is used for finishing free doorways or openings with very large depths, where it is not possible to seal the slopes with wood or MDF panels. Of course, first of all, they have to be glued to arched portals, however, they are also quite suitable for rectangular or arches with corners.
The advantages of framing are:
- PVC products are not afraid of water and large temperature changes, so you can finish the opening to both the kitchen and the bathroom;
- decorative arched corners emphasize the interesting entrance solution and highlight the portal against the background of the wall;
- installation of the product is extremely simple: the corner is simply glued to the wall. Moreover, it may not even be perfectly smooth;
- the color range of products is very extensive;
- the parts are easy to wash and clean; they do not require special cleaning or preservation measures;
- If the finish is properly secured, it will last for many years;
- The frame can be glued to any surface: stone, plaster, concrete, wood.
The only disadvantage of this option is the inherent flammability of plastic products: the material burns weakly, but quickly deforms when the temperature rises above 120 C.
Types and purpose of arched corners
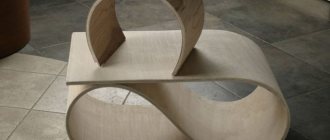
Decorative
Arched element PVC
So:
- The decorative element has a different width on each side. For example, 20x10mm or 20x5mm. From the very name of this angle it is clear that it serves to decorate arches and highlight them against the background of the overall interior of the room.
- In addition to its design function, this type of finishing allows you to hide small irregularities in arched openings. This is especially true when the arches are made with your own hands. For example, from plasterboard (see DIY plasterboard arch).
- And, of course, such decor protects the finishing coating of the walls from various types of influences: wallpaper from abrasion, putty and high-pressure paint from delamination and chipping from the surface of the corners.
- Decorative corners are produced with a length of 2 meters 70 centimeters. They have different colors: white, wood-like (repeating its structure), colored.
- The main material for production is polyvinyl chloride. It is the PVC arched corner that has become most widespread among finishers. You can also find cork corners for arches on sale in stores.
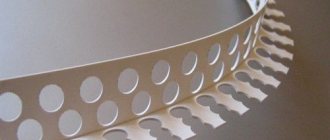
Perforated plastic element, photo
Plastering
So:
- This type of finishing auxiliary materials has perforations (holes) throughout its entire surface. One side has petals (like cuts). Thanks to this design, they bend perfectly.
- Basically, the perforated arched element under consideration is used to give a smooth edge to curved structures. For example, when installing plasterboard arches, figured suspended ceilings, elegant partitions. It will not be difficult to bend it, because it is very flexible.
- Corners for plaster are made of plastic. The most common length is 3 meters.
Perforated profile for arches
Arch and corners for it under wallpaper
The corner of the arch can be finished if it is smooth, without changes and does not go to the side. To do this, special perforated corners are installed during putty:
- plastic;
- metal;
- cardboard.
One side of the profile consists of segments. When bent, they easily fan out or compress, taking the desired shape, and adhere to the surface of the arch and figured multi-level ceiling. When putting putty they serve as beacons. Attach them:
- construction stapler;
- nails;
- adhesive composition.
When renovating indoors, plastic corners are mainly used. Outside the house it is more practical to use metal ones. Cardboard is rarely found on sharp and obtuse corners under wallpaper in the interior.
The use of a plaster profile makes the lines of the arches correct and the transitions of the planes clear. The trellises and paint lie flat. At the same time, perforated profiles strengthen the corners and protect the finishing material from destruction and chipping.
Types of designs
An arched plastic corner is not the only option for this type of finishing. However, steel or aluminum options are not suitable for every style, and therefore are used for decorative purposes much less often. Another thing is that such a design strengthens the doorway and can also be used as a surface for fastening when covering with plasterboard, for example.
Plastic products can also perform several functions, and on this basis they are divided into 2 groups.
- Functional - soft perforated strips that are installed under the plaster. One side of the product is perforated, the second has the shape of petals. This allows you to frame an opening with an arch length of up to 3 m. Both PVC and metal products are produced. They have no decorative value.
- Decorative - not perforated, usually with a smooth outer surface. Flexible corners can have different colors, imitate wood or stone. It is very easy to secure a soft product, so you can do this type of finishing yourself.
Interior and arches made of plastic
Arches are often finished with plastic, and there are reasons for this.
What can you say about such a wonderful solution as plastic arches? In general, this is a great option for finishing a doorway. This building itself can be called unique.
Nowadays, for example, a very popular solution is the following technique: when a corridor with an arch is finished with different materials that suit each of the two rooms well. However, there are no doors between these rooms.
The absence of doors is a very important technique. Due to it, the passage is constantly open and minimal discrepancies will immediately be evident.
What can you say about the purpose of plastic exclusive arches in the interior? In addition to its basic functions that traditional arches perform (separating rooms visually while maintaining the integrity of the space, decorating openings), an arch with plastic trim creates a special originality. This design will make your home unique and non-standard. Perhaps the interior will acquire a certain asymmetry - which is also approved by interior designers.
Work technology
In order to ensure high-quality gluing of the finishing material, it is advisable to divide the entire work procedure into stages.
Preparatory operations
Aimed at procuring all components and tools. After all, in addition to the decorative corner, you will need to purchase adhesive, tape, a glue gun, and a mounting knife.
In addition, at the preparation stage, you should ensure that the base base is of good quality (high-quality wallpaper or painting).
Also, using a wooden beam or similar object, you should prepare a spacer (with a length equal to the distance from the floor to the top point of the arch), due to which the decorative corner will be held in a given position (until the glue hardens).
Corner installation technology
Implemented in the following sequence:
- The decorative element is bent in the shape of an arch and applied to the intended installation location.
- The location for laying the corner is marked, and it should be taken into account that joining adjacent elements should only be done on level areas of the arched opening (approximately at a height of 1 meter from the floor level).
- The adhesive composition, which can be used as “liquid nails” or silicone sealant, should be applied in a snake onto the underside of the decorative corner. Moreover, the glue must be distributed with a small roller (with a diameter of up to 3 mm) and applied to both shelves of the corner.
- The decorative corner is glued to the installation site and supported by a pre-prepared stand. At the same time, the material is manually pressed over the entire area for the purpose of complete gluing. For additional fixation of the finishing element in places where the arched opening is bent, it is allowed to use adhesive tape. Moreover, to avoid direct contact of the adhesive tape with the corner material, it is recommended to use paper or film spacers.
- Using a similar technique, the second arched corner and straight elements are installed.
In addition, after all the work has been done, it is permissible to glue the problem areas. For this purpose, it is quite justified to use a homemade clamp (shown in the photo below) and move it to the required places as needed.
Mounting methods
Reinforcement
How to properly reinforce corners when puttingtying walls with your own hands?
Actually, there is nothing overly complicated in this work.
- A small amount of gypsum or acrylic putty is applied to the corner along its entire length.
- A reinforcing profile is pressed into it. Part of the putty will protrude through the perforation or mesh.
- Excess putty is leveled with sliding movements of a medium-width spatula (about 30 centimeters). Possible protrusions are removed with the same spatula, only at a right angle to the surface - to avoid its deflection.
- After the first layer of putty has dried, the corner is puttied again, after which it is sanded and primed for painting or wallpaper.
Finishing right angles with plastic
A typical example of such work
- when we use a plastic corner for...
So, how and with what to fasten the profile?
- The surface of the wall is primed with penetrating soil.
- The corner is marked using a square and cut to size.
- A strip of liquid nails or universal polymer glue - Titan, Dragon or their analogues - is applied to both planes of the corner from the inside. The author, however, used high-quality silicone sealant for this purpose - with consistently excellent results.
Here we need to make a small lyrical digression. A sealant whose price per tube is at least 130-150 rubles can be considered high-quality, and the manufacturer has considered it possible to sign on the packaging. Cheap sealants differ from expensive ones, first of all, by much worse adhesion to smooth surfaces.
- The corner is pressed tightly against the corner of the wall along its entire length. If it lags a little due to unevenness, you can press it to the surface by leaning a board, galvanized profile or any other object of appropriate height against the wall; fortunately, the force should be very small.
On durable surfaces, you can use regular or masking tape for temporary fixation.
Arch finishing
What do the instructions for the arch look like? Obviously, when fastening, the straight angle will lag behind the curved surface.
- The plastic profile must have sides of different widths. The wide one will be pressed against the bend of the arch, the narrow one (no more than 10-15 millimeters)
- against the flat wall. - The corner placed on glue or sealant is pressed against the arch with several slats, pieces of plywood, laminate or wall panels nailed to it with thin nails. After the glue has dried, the fixing elements are removed and the nail holes are filled with putty.
MDF profiles
Universal corners for finishing MDF panels are attached extremely simply:
- A strip of synthetic glue is applied to the surface of the corner facing the wall, after which it is pressed to the place of permanent dislocation.
- Then the product is peeled off and left for about a minute. During this time, the glue on both surfaces will thicken.
- The corner is pressed against the wall again - this time for good.
Plastic panels
How are plastic corners installed for finishing corners at the junction of PVC panels?
- The profile is put on the end of the panel. A spatula 10-12 centimeters wide will help do this job without crushing the thin plastic.
- The next panel is inserted into the free groove of the profile. As you can see, everything is extremely simple.
Wooden corners
How to decorate the corners of walls in an apartment with wooden corners?
There are two possible ways.
- The already familiar technique with silicone sealant is suitable if the finishing is not intended to be dismantled in the future.
- Reversible fastening method - with copper nails 20-25 mm long without heads. To avoid crushing the wood with a hammer blow, a hammer is used - a steel rod with flat ends.
Duralumin and aluminum profiles
And here, too, two solutions are possible.
- A high-quality sealant has excellent adhesion not only to wood, but also to metals.
- Plan “B”
- fastening with thin galvanized self-tapping screws with preliminary drilling of holes and countersinking them to fit the caps.
It’s easy to find ready-made profiles on sale - with holes and fasteners.
Feng Shui recommends creating an environment in your home with a minimum of corners. The arch is fully consistent with this technique, and most importantly, it visually expands the space of the apartment and the doorway itself. But to be durable, it needs to be strengthened. By learning how to attach an arched corner, you can increase the life of the arch and ensure the integrity of its edges.
Methods for installing arched corners
Installation begins with surface preparation. Regardless of what the arch is made of (brick, drywall or other materials), the preparatory stage must first be carried out. It is also necessary to strengthen the surface of the opening before gluing the decorative corners. Let's look at how to glue a plastic corner to an arch in two situations:
- In a new building, where the walls are only plastered and not finished with anything;
- In a residential building with finished walls (painted, wallpapered).
Methods for installing arched corners
Methods for installing arched corners
Methods for installing arched corners
In the first case, the scope of work is small, it can be easily completed even by novice builders:
- Products are attached to brick walls with plaster or quick-drying putty.
- The corner is screwed to the drywall with screws, glued with liquid nails or placed on gypsum putty.
- At the next stage, the installation site is plastered, sanded, painted or wallpapered. After this, decorative protective corners are installed.
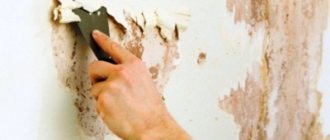
In the second case, when the opening has already been made and the wallpaper is pasted, more complex work has to be carried out. Procedure:
- First, you need to carefully draw a parallel line on both sides of the arch the width of the perforated corner. To do this, you can make a template from a plank.
- Remove excess plaster from both sides of the corner with a putty knife.
- Secure the perforated corner using one of the above methods (with nails or glue).
- Putty and level the walls in one plane.
- After puttying work, check the plane with a straight, long ruler or slat. There should be no gaps between it and the wall.
If the plane is level, proceed with the sticker.
If the walls are crooked, the corners will need to be spread out.
Nuances you need to know about:
- To fix the perforated profile in the opening, prepare spacers from wooden planks.
- First, the upper part (along an arc) of the profile corner is installed and the places at the lower points are marked with a pencil on the wall.
- Then the lower pieces of the corners on the right and left are installed and fixed.
- After the lower profiles are secured, the upper part is installed. Due to the elasticity of the plastic, the profile will press against the base and will not fall.
- Another fixing option is to glue a corner to the wall with masking tape, if the wall surface allows this.
If in some places the perforated corner moves away from the surface, press it and fix it with a self-tapping screw, and only then treat it with putty. If the screw is sticking out above the surface, ignore it. After the putty has set, you can unscrew it and seal the hole.
How to install?
Let's look at how the installation of plaster and decorative corners is carried out during the arch repair process.
Installation of plaster corner
The operating procedure is as follows:
- attach the perforated product to the edge of the structure, achieving the tightest possible fit;
- using a construction stapler, “shoot” the part or secure it with self-tapping screws;
- apply basic putty, filling all the unevenness of the perforated part;
- using a spatula, remove all protruding excess mortar;
- wait for the putty to dry, sand with sandpaper;
- If the structure is to be painted in the future, then it is also necessary to apply a layer of finishing putty. This is not required when using other finishing options.
Installation of decorative parts
The decorative corner can be secured in three different ways:
- stick;
- fasten with self-tapping screws;
- secure with small nails without heads.
Experts prefer to glue corners, as this is the simplest and most effective installation method.
Advice! Before you start gluing the decor, you should make sure that you have chosen a suitable glue that does not dissolve plastic. In addition, when choosing an adhesive composition, you need to take into account the color of the part. White glue is only suitable for white decorative parts; if the corner is colored, then it is better to use colorless adhesives.
Let's look at how to properly glue decorative parts:
- Before you start gluing, you need to prepare the surface well, otherwise the decor will not stick;
- it is necessary to thoroughly clean the surfaces from dirt and dust;
- then wipe with a degreasing solution;
- Apply primer to a dry surface, which will ensure better adhesion;
- after waiting for the soil to dry (depending on the material used, drying will take from several hours to a day), you can stick on the decor;
- the adhesive composition is applied along the entire length of the part, after which it is applied in place. In order for the glue to be evenly distributed, you should move the part slightly, making sure that it does not move and the glue does not stain the surfaces that will not be covered with a corner;
- then the part is carefully detached from the wall, wait about a minute for the glue to dry a little, and then press firmly to the installation site. To better fix the part, you can use masking tape.
It is not allowed to glue corners onto loose materials, including wallpaper. If the arch is finished with wallpaper, then you must first put the corner in place (without glue) and outline the location of its borders. Then, using a sharp utility knife, you need to carefully cut off the wallpaper in the place that will overlap with the corner. Only then will it be possible to glue decorative parts.
If you use a cork corner rather than a plastic one, the installation process is carried out in the same way, but you should choose a special glue designed for working with cork. Fastening with staplers or nails is used less frequently, as this method has certain disadvantages. The disadvantages of this method of fastening are:
- parts of the fasteners will remain on the front side of the parts, which can spoil the appearance of the finish;
- When using nails without heads, there is a high risk of cracks and chips forming on the decorative part, and its deformation may also occur.
So, a flexible corner is a part that is used when finishing an arched opening. The purpose of installing this part is to improve the appearance of the arch. In addition, decorative corners perform protective functions; thanks to this detail, the finish retains its attractive appearance longer. Installing the corners is not difficult, so any home craftsman can easily handle this job.
Preparing the opening
At the beginning of work, measure the dimensions of the opening - in case you have to slightly change them. Drywall, putty and other materials are used to change the size or shape; if you plan to do this, then prepare the necessary materials in advance.
Now we need to prepare the surface. Clean the opening from dirt, seal all cracks and degrease the mounting area. Create as smooth and even a surface as possible, preferably by sanding and wiping it.
Before starting finishing work, the surface of the arched opening should be leveled as much as possible.
In cases where the opening is plastered, make sure the surface is smooth. If there are any cracks, chips, or unevenness, remove this layer and apply a new one. Then wait for it to dry completely and clean the surface and sand it.
Preparing the surface for installing the corner
The first thing to do is to clean the arch from dirt and dust. Before you begin installing the finish, you should degrease the mounting area with special compounds. This work is necessary to ensure that the installation is reliable.
If the opening is simply covered with a layer of plaster, then you need to ensure that it does not crumble during work. There should be no cracks on it, and the plaster itself should be smooth. If there are any defects - chips and cracks , then in this case it is necessary to remove the damaged layer and then apply a new one. When the plaster has dried, it is necessary to clean it from dust. Work on installing an arched corner can only be carried out in a room that is warm and free of drafts.
How to glue a flexible corner onto an arch
Before you start gluing, you need to accurately measure the opening and the length of the corner. Measure the perimeter of the opening from the baseboard with a margin of 2-3 cm on each edge (just in case). Please note that the perimeter of the opening will be at least 5 meters, and corners longer than 3 meters are not sold. Thus, it will not be possible to cover it with one piece. To begin, attach the flexible corner to the arch and start marking from top to bottom.
Plastic protective corners.
The lower ends of the corner should be at the same distance from the floor. You can level them with a water level. If it is not there, then take marks from the floor. We will assume that it is horizontal. Even if he is not, the human eye will not be able to perceive it. The seam between the corners will be visible in any case: if one end is lower than the other, then aesthetically this design will lose.
How to glue a flexible corner onto an arch
How to glue a flexible corner onto an arch
How to glue a flexible corner onto an arch
How to glue a flexible corner onto an arch
Bend a metal pipe at home
Before bending any metal pipe, the following procedure must be carried out:
- Fill the pipe section to capacity with fine sand.
- Next you need to plug the ends of the pipe. Use two homemade wooden chopsticks for this. Also be careful not to push them in too deep, otherwise they will be difficult to remove and you will have to burn out the plugs.
- After this preliminary preparation, you can bend the pipe without fear that it will break or become deformed.
If you perform bending in winter, you can replace the sand with ordinary water.
The tube is filled with water, which freezes after a while, and choppers are driven into the ends of the tube. Then you can bend it, and after that the pipe is defrosted, the choppers are taken out, and the water is drained.
Source ytimg.com
Silicone sealant
This material is often used instead of glue. However, many people notice that this option is not considered successful, because corners are not just decoration, first of all, they protect the outer corners of the room from external influences.
Important! If you decide that it is better to glue a plastic corner to the wallpaper using this composition, then the ideal option would be to purchase a neutral silicone sealant.
Pros of a neutral composition:
- High adhesive strength.
- Bonds the material to the surface for a long period of time.
The disadvantages include:
- High price.
- Long drying - the sealant dries in approximately 5 days.
Characteristics
Product type External corner Weight, kg 0.105 Length (m) 2.7 Width (mm) 20.0 Main material PVC Country of origin Russia
Prices and availability may vary. Please check the exact cost and availability of goods in stores.
238,00 Adhesive Moment Superstrong Plus, white, 314 ml 20,00 PVC corner 15Х15Х2700 mm white 281,00 1,003.57,57 Transparent mounting adhesive Moment MVP-70 superstrong 280 g 32,00 PVC profile starting/finishing T8/10 mm , 3 m, white 18,00 PVC window sill plug 600 mm, double-sided 327,00 Titeseal mounting adhesive, 280 ml, transparent 101,00 Beading 10x14x2700 mm, PVC foam, white 103,00 Mounting adhesive, 260 ml, white Show all Related Products
Tools for work
Prepare the following tools and additional materials:
- square;
- stationery knife;
- water level;
- masking tape;
- wooden planks;
- rags to remove excess glue;
- metal scissors or hacksaw.
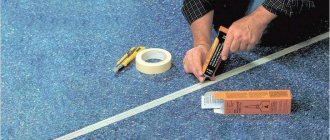
If there is no square, but only a school ruler, then remember your geometry lessons from high school. Draw a right triangle on anything with sides of 3 and 4 centimeters and a diagonal of 5 centimeters. Or take a school arithmetic notebook and draw a right angle in it, and then transfer all the measurements to the surface. If the amount of work is small, then several cuts can even be made with a hacksaw blade, holding it in your hand.
To ensure an even cut, apply a metal square to the surface. Its side will be a guide and will not allow the hacksaw blade to go to the side. The cut must be strictly perpendicular to the longitudinal axis, otherwise the seam will be visible.
Although arch corners are not a mandatory element of room design, they are recommended to be used in order to give the interior a finished look.
Working hard
Photo 3.
After measuring the corner and trimming the corner, I spread it with glue with a snake, almost reaching the edge ( photo 3
), so that it does not protrude after pressing.
Excess glue is removed after pressing, but it is better not to do this immediately, but after it dries a little, after 10-15 minutes. Using a rag is more difficult, it works best with your fingers - it gradually gathers into a pellet and falls off.
Photo 4.
The corner fits perfectly in an arc, almost doesn’t lag behind. I gradually press down and then walk around once or twice more. Along the way, after 20 minutes I check it again and, if necessary, press it completely. Excellent grip!
The corner adheres perfectly to both wallpaper and paint, especially if the wall planes are even. Where there are irregularities, the corner needs to be pressed harder
and he will still lie down, just not right away. I glue any loose wallpaper on arches and corners in advance with the same “liquid nails.”
Photo 5.
I had to get a little creative on the arches to make the corners look better. Where there was no corner, I cut off one shelf of the corner
, leaving only a flat strip and covering the junction of the wallpaper and the wall with it
(photo 6
).
Later I will repaint the area between the corners, so I don’t worry that the glue has come out a little, it is painted over perfectly.
Photo 6.
Several useful points are reflected in the video.
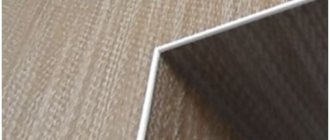
See how the transition from an arch to a flat wall was made by trimming.
Rate the material and subscribe
to the channel.
AND THIS IS INTERESTING:
I bought a 31 in 1 screwdriver. Now I think that I can turn with such bits
6 more ideas for replacing the mosquito net handle
DIY movable plug for socket
A little about the cork corner
This material is environmentally friendly and has a high degree of elasticity. You can install it yourself. The main thing is to measure the opening correctly; mistakes are not allowed here.
The stages of working with cork corners are as follows:
- pre-clean and degrease the surface;
The process of preparing a cork corner - glue is applied inside the cork corner; it must glue the part for at least 20 minutes;
- lay and carefully press the element along the entire plane of the opening;
- the glue from the cork transfers to the wall, no air bubbles should form;
Glue for cork corner - Lightly tap the corner to remove excess glue;
- You need to wait at least two hours for drying.
Options for finishing arched corners in the room
As a result of performing such actions, a single structure is obtained, the connections in it will be smooth and harmonious.
( 1 rating, average 5 out of 5 )
What in the end...
Bending metal pipes is not difficult if you know how to do it correctly. Therefore, I talked about the types of pipes and how to correctly bend each type of metal pipe. The heaviest turned out to be a profile pipe with a square cross-section due to its peculiarity - to “resist” to the last, and then sharply bend in one place. Do not forget to carry out a preliminary procedure before bending the pipes - fill them with sand, and hammer the edges with choppers in order to use the internal limiter.
Question
Write in the comments which pipes you think are easier to bend – metal or metal-plastic?
Plastic corners for protecting wall corners, colored
The standard length of a plastic corner for an arch is exactly 3 m.
ATTENTION! When buying corners for an opening, take it with a reserve, because... a lot of material goes into fitting the rounded part of the arch.
To avoid noticeable joints over time, it is best to glue a corner from the middle, starting from the center of the arch in both directions. Then try to symmetrically connect with the side corners of the opening. Usually, after a few years the joints will be noticeable, but since they are symmetrical, it will look good.
What size and color to choose for a certain style
Arch in the interior of the apartment
You can make the corners neat without highlighting the arches in the interior using a narrow profile matched to the background color of the wallpaper
A contrasting dark edging will emphasize the shape of the opening and concentrate attention on it. For folk and natural styles, decorative plastic wood-look corners are used.
The smaller the room and the arch, the narrower and more inconspicuous the corner should be. Contrasting bright finishes make the interior expressive and visually reduce the space.
The tone profile should match one of the three colors most often used in wallpaper designs.