When renovating, it often becomes necessary to remove the old layer of plaster. It is impossible to do this by hand, without a special tool.
You need to carefully prepare for work, stock up on personal protective equipment, cover all objects and more.
To learn how to quickly and independently remove plaster from walls at home, read the article.
Preparation
Before you start removing a layer of plaster from the walls, you need to prepare. Regardless of the chosen method of dismantling the old coating, this process is always associated with the formation of a large amount of dust, which must be taken into account before starting work.
Preparation consists of the following steps:
The room is de-energized.- They twist sockets, switches, lamps, and a chandelier (it is removed if the plaster is to be removed from the ceiling). The resulting holes are covered with masking tape.
- Protect the floor covering from construction dust and dirt. If the layer of plaster is thick, it will fall in heavy pieces. Therefore, first, corrugated cardboard is laid on the floor, which is covered with plastic film on top.
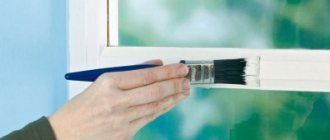
- Window sills are covered with newspapers or thick fabric, pressing them with a weight so that they do not fall to the floor.
- Interior doors are covered with stretch film. When carrying out work, the gaps between the doors and the floor are sealed around the perimeter with masking tape. This will prevent dust from spreading throughout the apartment.
- Cover the windows with polyethylene, leaving a small hole to allow the room to be ventilated.
- They take out all the electronics so that dust that gets on them does not lead to damage. The remaining furniture in the room is covered with film.
You should not be lazy and ignore the preparatory stage, so that after completion of the work you do not have to painfully collect dust from all surfaces.
Categories
- 3D apartment projects
- Repair video
- Apartment design
- All about repairs
- Doors
- Window
- Ceiling
- Walls
- Plaster and putty
- Drywall
- Furniture
- Other about repairs
- Floor
- Leveling the floor
- Cement strainer
- Dry floor screed
- Semi-dry screed
- Self-leveling floor
- Flooring
- Warm floor
- Electric floor
- Water heated floor
- Floor coverings
- Tile
- Laminate
- Everything about plumbing
- Water pipes
- Bath, shower
- Faucets
- Toilet
- Heating
- Everything is electrical
- Wiring
- LED in everyday life
- Ventilation
- Construction materials
- Tools
- Materials
- Construction calculators
- Repair of a country house
- Miscellaneous articles
- Top review
- Question answer
- News
How to remove old coating?
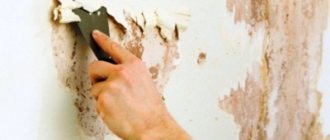
To remove plaster from the wall, you can use a percussion tool in the form of a chisel, hammer or hammer drill . If the plaster layer is thin, use a grinding or vibrating machine. In the absence of power tools. They resort to using a scraping spatula.
Chisel and hammer
You can get rid of a layer of plaster using available tools in the form of a chisel and a hammer. It’s easy to work with them, the main thing is to control the force of the blow. If you hit the chisel too hard, you will leave nicks on the wall that will have to be smoothed out.
Procedure:
- divide the walls into small fragments - to do this, lean the chisel against the wall vertically and hit it with a hammer;
- when the outline of the fragment is knocked out, the chisel is tilted at an angle of 45 degrees, inserted into the groove and tapped on it with a hammer;
- As the elements move away, the chisel is moved forward.
This method is suitable for removing plaster of medium to significant thickness.
Grinder
It is best to use a grinding machine to remove decorative coatings that have been applied in a thin layer.
Mode of application:
- Choose an attachment in the form of a brush or coarse sandpaper.
- Put the device into operating mode and sand the coating.
- You need to control the work visually, continuing sanding until the base becomes visible.
Sanding produces a significant amount of dust, so whenever possible, use a tool with a built-in dust collector. If it is not there, the wall must be wetted before work begins.
Hammer
You can quickly cope with the task using a hammer drill. To do this, you will need a tool with attachments in the form of blades of different thicknesses.
Mode of application:
- the device is put into working condition;
- set the crushing mode on the hammer drill;
- lean it against the wall at an angle of 80 degrees;
- they pierce the plaster to the full depth, right to the very foundation, and make a groove;
- tilt the hammer drill at an angle of 40 degrees, insert it into the groove, knock down the plaster, moving in the desired direction.
A hammer drill is used to remove a thick layer of plaster.
Vibrating machine
A vibrating machine is great for removing thin layers of plaster. Its working surface is represented by abrasive materials of different grain sizes. The coating is removed by small but very frequent movements of sandpaper along the surface of the wall.
No special skills are needed to operate a grinding machine. It is enough to plug it into the network, attach it to the wall and systematically work it until the plaster is completely removed.
Roughing spatula
A scraper is an affordable tool for removing plaster. Working with it, you will be able to carefully clean the wall without damaging its base. A spatula is used to remove medium thickness coatings.
Mode of application:
- Using the corner of a spatula, make small notches over the entire area of the wall.
- Starting from the most convenient side, remove the plaster, gradually moving forward. Hold the tool at an angle of 30-45 degrees.
- Sometimes you can tap the handle of the spatula with a hammer to drive it deeper under the base.
The advantage of using a spatula is that the work will be carried out quietly and with a minimum amount of dust.
Is it necessary to plaster walls during cosmetic repairs? on the Nedvio website
Question from a reader of our portal: Is it necessary to plaster the walls during cosmetic repairs?
Answer: It depends on what kind of “cosmetics” and what condition of the walls in your house or apartment, how long ago the plaster was applied. In most cases, replacing one coating with another does not require plastering the walls. But there are other situations: for example, when instead of wallpaper you need to put tiles, but they do not tolerate even the slightest flaws in the walls.
So, when is it possible not to plaster the walls:
- You are renovating a separate room and don’t want to go big. Everything is clear here - the ceilings are whitewashed, the wallpaper is re-pasted and you're done;
- You are making cosmetic repairs to your home without remodeling. Almost the same as in the first case - the geometry of the rooms does not change, there is no need to install new electrical wiring, the walls need not be touched;
- The renovation budget is very limited and you would like to save on plastering. This is where the issue is controversial - on the one hand, you can limit yourself to a small leveling of the walls with mixtures. It's not so grandiose, and it's cheaper in terms of work. But the costs will still be considerable, and the result will not be ideal.
When plastering walls is necessary:
- The old plaster no longer adheres well to the walls and in some places there are cracks and chips;
- The walls are very crooked and this is clearly visible;
- After the redevelopment, traces of the interior partitions will remain, and the planes of the walls of the former adjacent rooms may not coincide;
- It is planned to groove the walls - you can use the new plaster to make grooves for electrics without fear that it will fall off.
Also, do not forget that the life of plaster is limited to a maximum of 20-30 years, after which it loses its properties and may begin to fall off. Is it worth the risk? You decide.
Don't forget to add the Nedvio website to your Bookmarks. We talk about construction, renovation, and country real estate in an interesting, useful and understandable way.
Source
Removal from the ceiling
Removing plaster from a ceiling is more difficult than removing plaster from a wall. A person will have to perform work in a position where his arms are always raised up. This requires more time and physical effort.
The choice of tool depends on the thickness and composition of the plaster applied to the ceiling, but there is one universal method to make the work easier.
To do this, you need to prepare a special solution that softens the coating. For 1 liter of water take 2 tablespoons of starch, which is mixed until completely dissolved. The resulting solution is used to treat the ceiling.
Under its influence, the plaster will become looser and it will be easier to remove it from the wall surface. After 15 minutes you can start cleaning. The work will go much faster.
If the layer is dense, then irrigation with starch solution can be repeated when the top soaked plaster is removed.
Methods for dismantling plaster
Depending on the type of surface, the progress of dismantling work may vary. It is better to handle brick, wood, and plasterboard walls more carefully so as not to damage them, because major repairs will be more difficult than regular plastering.
From the walls
Most often, the walls in a house or apartment are covered with cement and gypsum compounds. Sooner or later you have to change the finish, since any solution has its own service life.
Methods for removing plaster from walls can be as follows:
- Application of water. Wetting the walls allows you to remove old paint, wallpaper and plaster much faster. To do this, you need to wipe the wall with a sponge, spray it with a spray bottle, and after a while scrape off the old materials with a spatula or construction scraper. Where the plaster sits tightly, wetting will have to be repeated. Professionals use special equipment for this purpose - water jet machines operating under pressure.
- Special scraper. Cement plaster can stick firmly to a concrete wall, and then it is better to remove it with a scraper with a highly sharpened iron edge. Since the risk of damage to concrete is minimal, you can make even the most intense movements without worrying about accuracy.
- A hard sponge or mitten. Such devices are ideal for dismantling a thin layer of finishing or decorative plaster. Just wet the base and rub it with the abrasive side of a sponge or mitt, and the finish will quickly fall off.
- Sander. To speed up the work, you can rent or buy a grinding unit with a diamond bowl or coarse sandpaper. It is worth keeping a construction vacuum cleaner nearby, as large amounts of dust cannot be avoided. When the plaster layer is no thicker than 3 mm, it is better to use a vibration grinder, which works on a different principle.
It happens that a crack appears on a section of a plastered wall. If it spreads only locally, you can cut out the damaged area with a grinder, then beat off the remaining pieces of the solution. The surface must be dust-free, primed, and plastered with a new mixture. When the finish on the wall swells, you need to remove the damaged material with a scraper, dry the base with a hairdryer, and only then begin re-repair.
From the ceiling
Removing ceiling plaster is especially difficult. You will have to work in an uncomfortable position, raising your arms up and throwing your head back. The master will be forced to take frequent breaks to rest, and as a result, the work will proceed rather slowly. The choice of method for removing plaster is made on an individual basis, assessing the condition of the ceiling in practice. In some cases, you will need a hammer drill or a grinder, but you can often get by with an ordinary spatula or scraper.
To quickly dismantle the plaster on the ceiling, you can use the so-called softening solution:
- take 2 tablespoons of any starch;
- dissolve starch in a liter of water;
- carefully treat the ceiling surface with the composition;
- after 15 minutes the plaster will loosen and can be removed.
If the plaster layer is thick, you need to chop off only its upper part, and then saturate the ceiling again with the starch composition and remove the remaining material.
From a brick wall
To dismantle plaster from brickwork, prepare the following tools: chisel, chisel, chisel, large scraper and hammer. First, remove the solution from areas where swelling, peeling and crumbling are observed. First tap the wall with a hammer, and some pieces will immediately begin to fall off.
The remaining areas are cleaned with a chisel or chisel, placing the tool at an angle and hitting it with a hammer. Difficult, stuck pieces of plaster are removed with a scraper, and for the most stubborn pieces, you can use a hammer drill with a spatula attachment in the “chisel” mode.
There is another method for cleaning a brick wall from plaster. If you have a grinder with a disc for stone, then furrows are made along the coating, as if zoning the surface. Afterwards, the plaster is knocked out from the resulting strips with a chisel or hammer drill. The finishing must be removed down to the brickwork. The wall is primed, allowed to dry for 24 hours, and only then the new finishing begins.
From a wooden wall
Old wooden walls can be plastered using shingles, other available materials, and metal mesh. When beating off the plaster, initially do not touch the reinforcing structure - in some cases it can be left. If you plan to replace the mesh, make a wide vertical furrow in the center of the wall, clearing it right down to the wood. Afterwards, the reinforcing coating is torn off along with the plaster.
Features of removal depending on the type of building material
Depending on the type of plaster, the features of its removal from the wall differ:
- The cement coating adheres firmly to the surface and is difficult to knock off, even if the material was applied a long time ago. Its removal is started only when there are no other finishing options. For removal, use a breaking tool, for example, a hammer drill. The layer of cement plaster is most often thick.
Gypsum coating holds strong, but it is prone to cracking when impacted.
Therefore, a breaker tool is used to remove it. If the layer is thick, use a puncher, and if it is thin, use a spatula or chisel.- Decorative coating is most often applied in a thin layer. It does not hold as firmly as a cement-based mixture. Therefore, a grinding or vibrating machine is used to remove it.
- The clay coating must be removed. If you leave it on the wall, then the new decor, for example, wallpaper, will not stick firmly. This type of plaster is prone to breaking and peeling. Therefore, cleaning it will not be difficult. If the area is small, then you can use a roughing spatula or chisel for the work.
- The polymer coating holds firmly due to special additives in the composition. It is difficult to remove it by hand; it is better to use a grinding machine.
When is surface cleaning necessary?
Before finishing, it is necessary to make a competent assessment of the old plaster layer. It is possible that the coating is still intact and reliable, it just requires minor adjustments. It’s another matter when the plaster clearly comes away from the walls, showing signs of serious damage. At the end of its service life or after poor quality repairs, the coating begins to deteriorate.
Here are the obvious signs that the coating needs to be replaced:
- The plaster layer is covered with mold or wet traces of streaks are visible (how to get rid of mold on plaster?).
- Convex formations appeared on the surface, and a crunching sound was heard when pressed.
- The coating has crumbled and is peeling off.
- Appearance of cracks.
Nuances of removal from different types of bases
Depending on the base on which the plaster is applied, the methods for removing it will differ:
- Tree. It is one of the softest and most pliable substrates, so it is better to use a grinding or vibrating machine to process it. The last option is preferable.
- Concrete. This base can withstand any processing, including crushing with a hammer drill.
- Brick. To remove the coating from a brick wall, it is not recommended to use a hammer drill, as it will either get into the seam or slide off the masonry. Therefore, it is better for a non-professional to give preference to a grinding machine and remove the thick layer manually.
- Drywall. Its integrity cannot be violated, so do not use a hammer or punch for the work. It is necessary to start stripping from the corner, carefully separating the exfoliated fragment. To do this, you can use a knife or screwdriver. When the coating gives way, they arm themselves with a scraper, which in appearance resembles a spatula, but its edge is sharpened more sharply. With its help, the plaster is removed by carefully pushing the tool under the coating.
Auto
The automatic (or mechanical) method of removing plaster is almost always used due to the high speed of execution.
Involves the use of power tools.
• Angle grinder (grinder).
• A hammer drill with a chisel or a drill with a chipping function.
The surface of the wall is wetted with water.
This significantly reduces the amount of dust during operation.
When working only with a hammer drill, the first stage of removing plaster is to knock down its main layer.
To do this, the tool is held at an angle of 80 degrees relative to the wall.
The second stage is rough cleaning of the wall.
The hammer drill is held at an angle of 40 degrees and is driven along the wall, removing all the remaining mortar.
If you happen to have a grinder at hand, you can use it to divide the wall into 0.5x0.5m squares, cutting through the plaster to its entire depth.
Then the sections are hammered out with a hammer drill.
If the plaster solution was applied in a thin layer that adheres tightly to the base material of the wall, the best solution for removing it is to use a sander.
The soleplate of this power tool is equipped with toothed rollers for grinding the surface.
If the main material of the wall is brick, in any case the seams require additional final cleaning with a chisel and hammer.
Otherwise, the new layer of plaster will not adhere to the wall as it should.
Personal protective equipment and safety precautions
In order not to harm your own health when carrying out work, you need to take care of safety precautions, compliance with which is impossible without personal protective equipment.
It is not enough to simply turn off the power to the room. It is necessary to study the wiring diagram so as not to damage it during dismantling.
Basic rules:
Construction glasses should be worn over the eyes, which fit tightly to the face and prevent fine dust from entering the mucous membranes;- protect the respiratory system with a respirator - it will catch dust, preventing it from entering the respiratory tract;
- clothes should have long sleeves - you need to work in pants made of thick material;
- protect your feet with hard boots so that heavy pieces of plaster cannot cause a bruise or fracture;
- If the plaster will be removed from the ceiling, it is necessary to use a hard hat.
You are your own master, or how to quickly remove plaster from walls at home
When renovating, it often becomes necessary to remove the old layer of plaster.
It is impossible to do this by hand, without a special tool. You need to carefully prepare for work, stock up on personal protective equipment, cover all objects and more.
To learn how to quickly and independently remove plaster from walls at home, read the article.
How can construction waste be used?
After removing the plaster, a significant amount of debris is generated. About 15 kg of material and even more are removed from each square meter.
Tips to make your work easier:
- So that after completion of the work you do not have to spend several days cleaning, it is better to do it immediately, as dismantling proceeds.
- Do not fill bags to the top. Otherwise it will be impossible to lift them. In addition, heavy weight can cause the container to burst.
- A dustpan and broom are used to rake up debris. Do not use a vacuum cleaner, as the plaster can damage the equipment.
- To remove garbage, you need to hire a special car, since management companies are not obliged to deal with this procedure.
Plaster is not always a useless material. Even after being removed from the wall, it can be reused. It is used to fill the foundation for pouring a porch, to improve an area for parking a car, and to level garden paths. This is especially true for owners of country houses and dachas.
Clay plaster can be completely reused. Just soak it in water and mix thoroughly.
Gypsum coating is used as insulation in outbuildings. Lime plaster can be used to cover the soil in areas where weeds grow.
Articles on the topic
Staircase in a brick house - types, features of the foundation, instructions, advice from masons
Reinforcement of brickwork - types, materials, instructions, advice from masons
How to install a door in a brick house - options, installation, instructions, advice from masons
Service life of a brick house and how it can be increased?, instructions, advice from masons
Cladding a house with bricks - how to calculate how much material is needed, instructions, advice from masons
Switching from brick to sandwich - installation, pros and cons, instructions, advice from masons
Waterproofing a brick plinth - horizontal, vertical, instructions, advice from masons
Mosaic with bricks - preparation, masonry features, instructions, advice from masons
Reviews ()
What not to do and why?
When removing plaster from a wall, do not do the following:
- You should not start repairs without personal protective equipment;
- It is unacceptable to remove a thin layer of plaster with a percussion tool;
- when working at heights, it is not recommended to use a stool or table; it is better to purchase a construction ladder - there is no need to place it close to the wall, since broken fragments will fly into your face;
- The power tool should not be left turned on for longer than 20-30 minutes - failure to comply with this recommendation will lead to its overheating and failure; the break should be at least half an hour so that the equipment has time to cool down.
In what cases may such an operation be required?
When carrying out a major renovation, we evaluate the condition of the finish on the walls and make a decision on whether to preserve, repair, or remove it. If the layer of plaster is severely damaged, then sometimes the ideal solution is to break it completely, reaching the brick or concrete wall, since repairs will become too labor-intensive.
Sometimes, as part of a major renovation, we want to implement a radically different concept for decorating a room, and then the only option is to completely clean the walls, gaining access to them, then carry out insulation and finish everything again in accordance with the plan. For example, old plaster must be removed when installing heavy elements such as tiles and natural stone, since the base for them must be as strong and reliable as possible.
Helpful information
Tips for removing plaster from a wall:
Gypsum and lime coatings are susceptible to moisture, so it is recommended to moisten them generously with hot water before removing them. It will take about 20 minutes to soften, after which the work will go faster.- A thin layer of plaster is moistened using a spray bottle. If its thickness exceeds 6 cm, use a roller, rag or sponge.
- If you need to do the work quietly and with minimal dust formation, use a chisel and hammer, or a spatula.
- If the processing area is impressive, it is better to use a power tool.
- Garbage must be removed immediately so that it does not interfere with movement around the room and does not cause injury.