The concept of a rough ceiling refers to a structural element, usually an interfloor ceiling, laid by builders during the construction of a building.
Of course, the version of such a ceiling differs depending on the type of building. In particular, in brick houses this function is performed by concrete slabs, which during finishing only require the application of a decorative layer.
The design of wooden houses looks somewhat more complicated. Here the rough ceiling is laid on wooden beams, often using boards. The work is simple and completely doable on your own.
The advantage of filing a rough ceiling on cranial beams
You can also make a hem for the ceiling surface using cranial wooden blocks.
These are wooden slats with a cross section of 40x40 mm, sewn on both sides of the beam along its entire length. The rough ceiling is made from short wooden planks or scrap boards laid on cranial supports along the entire length of the ceiling. This filing method has its advantages:
- Laying the material can be done independently, without assistants, while the worker is located directly on the ceiling from the attic side, so it is much more convenient to lay the lining material than to lift it with outstretched arms above his head;
- A stacked ceiling is much simpler than the option of padding long boards along the entire length of the ceiling. You can always remove one or two boards in order to check the condition of the insulation or lay additional communications.
The technology of laying a rough ceiling on cranial blocks also has its own rather serious disadvantages. Firstly, the dimensions of the support rail-bar must be at least 40x40 mm, otherwise the weight of the filing will simply push it through. Secondly, the thickness of the insulation of the rough ceiling is reduced by the height of the support. Otherwise, the floor surface will need to be raised by the same 40 mm.
Thirdly, the horizontal dimension between the wooden beams is automatically reduced by 80 mm, which leads to a deterioration in the permeability of vapors, most of which are not removed through the ventilation gap, but will linger on the sub-ceiling.
Another factor is that short boards do not in any way affect the strength and rigidity of the rough ceiling. Conversely, long hemming significantly improves the load-bearing capacity of the timber, so it is recommended to hem very elongated ceilings without the use of cranial supports.
Plasterboard sheets
This material is often used if you need to decide what to put on the ceiling in a private house.
You can use plasterboard to finish the ceiling as usual or build a multi-level system with built-in lighting fixtures. GCRs sew up niches between beams or completely cover them, creating a perfectly flat surface. The plasterboard ceiling covering is puttied and then painted with water-based emulsion in any color. This finishing method can, if desired, be combined with wooden elements or tensile structures.
Due to the difference in thermal expansion coefficients and the large size of gypsum boards, they are not attached directly to the beams. They are mounted on hangers and guides, which have flexible contact with a wooden beam.
Advantages:
- low price;
- ease of processing;
- you can create structures of different shapes;
- good combination with any decoration;
- the material “breathes”, so condensation does not collect on it;
- easy to paint.
Flaws:
- the plasterboard structure turns out to be quite heavy and therefore puts a load on the floors;
- the material is at risk of water leaks;
- fragility.
Work in a wooden house
Previously, houses made of wood were built with 1-2 floors. Wooden beams were used to create a ceiling between floors or a roof. The beams were covered with floorboards on top. From below, the ceiling of beams was covered with lath and plastered. This type of finishing is short-lived, as the wood ceiling bends, causing cracks and destruction of the plaster. The use of modern materials makes it possible to create a strong and durable coating characterized by high aesthetic qualities. In order to install a new ceiling, it is necessary to get rid of the old covering and prepare the base for work.
This event is carried out in the following sequence:
- All furniture, curtains and paintings are removed from the premises. Lighting fixtures are disconnected. The exposed ends of the electrical wiring are insulated.
- All the old plaster is coming off. This is done using a hammer, chisel and nail puller.
- The slatted sheathing is disconnected. You can use brute force, so this material will be recycled.
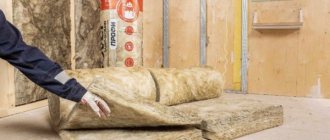
- The insulation, which has lost its quality over the years of use, is removed and thrown away. It must be immediately packaged in plastic bags to prevent clogging of the home and area with small fibers.
- Beams are cleaned of debris, dust, mold and mildew. You can use a sander with a stiff brush and sandpaper. After cleaning, the beams are treated with antiseptic and hydrophobic preparations.
When everything unnecessary has been removed, you need to check the condition of the electrical wiring. If it is worn out, it is better to replace it.
After the base for work has been cleared, a rough ceiling is installed.
This is done like this:
- Waterproofing is carried out. A special membrane-type film is fixed between the beams. The joints between the film strips are hermetically sealed with tape.
- Insulation is laid between the beams. You can use basalt wool or polystyrene foam. They are laid so that there are no gaps left.
- Another layer of vapor-permeable material is fixed on top of the insulation. The film is attached to the supports with staples.
- Raw boards are screwed to the wooden beams. They will be the basis for finishing.
After fixing the rough ceiling, the wires are brought out and the cladding is installed. Read about how to hem the ceiling in the final section.
Preliminary preparation
It is necessary to calculate all the expenses necessary to build a rough foundation.
- Ladder;
- Construction trestle;
- Self-tapping screws, screwdriver;
- Sheathing material, heat and vapor barrier;
- Construction level, stationery knife;
- Antiseptic, construction adhesive, fire-fighting compound.
First, I inspect the beams for defects: cracks, chips, curvature, mold, cover the cracks with putty, clean suspicious areas, treat them with an antiseptic, primer, after which they can be painted, if necessary, to do it once and for centuries.
The rough base together with the beams can be treated with an antiseptic with the addition of a teaspoon of universal construction glue so that the mixture does not drip and creates a more durable film.
Technology for installing ceilings on beams
If you want to figure out how to make a ceiling in a private house, the installation sequence given below will help you understand the specifics of the work.
Tools and materials for work
Before making a ceiling in a wooden house, prepare the following materials and tools:
- saw or jigsaw;
- hammer;
- stapler;
- screwdriver;
- cranial bars (used if the ceiling is hemmed above the bottom of the beams, the section of the bars is 5x5 cm);
- self-tapping screws (optimal length 4.5-5.5 cm);
- slats for making a supporting frame for sheathing made of plywood and other boards;
- material for filing;
- nails;
- building level;
- thermal insulation material;
- hydro and vapor barrier.
Laying vapor barrier
Before making the ceiling in the house, a vapor barrier membrane is laid. It is attached using a stapler to the supporting beams from the bottom.
For these purposes, the following materials are used:
- foil products;
- polypropylene films;
- reinforced polyethylene films;
- multilayer membranes.
Strips of vapor barrier material are attached with an overlap of adjacent elements to a width of 15 cm. The joints must be sealed with tape. To protect the film from damage, fixation is carried out through a strip of thick paper. The vapor barrier is installed on the walls to a height of 20-30 cm. All junction points are carefully insulated.
Laying insulation
After laying the film, insulation is laid on the back side (between the floor beams).
The following materials are used as a heat insulator:
- mineral wool;
- expanded polystyrene;
- Styrofoam;
- basalt wool;
- sawdust;
- expanded clay
Before installing the rough ceiling, only lightweight materials (construction wool, polystyrene foam and expanded polystyrene) can be laid on the vapor barrier membrane. Bulk insulation is poured into the gap between the beams after installing the rough ceiling.
Installation of a rough ceiling
When making a ceiling with your own hands in a private house, do not forget to mount the rough ceiling surface. It will be the basis for the finishing layer. In some cases, the rough base is used without finishing as a finishing coat.
Installation of the rough ceiling surface takes place in the following sequence:
- We attach a frame of wooden slats to the load-bearing beams on top of the vapor barrier layer. It will be the basis for the rough ceiling and support for the thermal insulation material, which is best laid after the frame is made. We make the lathing from slats with a cross-section of 3x4 cm. We attach the slats to the beams in increments of 50 cm. For fastening we use screws or nails. The frame will simultaneously serve as a ventilation gap between the ceiling itself and the ceiling lining.
- After this, we attach the selected material for making the rough ceiling. We attach plywood or ceiling slabs joint to joint so that the joint points fall in the middle of the sheathing strip. We attach the slabs to the frame with self-tapping screws, which we screw in at 150 mm increments.
- We periodically check the evenness of the surface using a building level.
https://youtube.com/watch?v=2H6Ad7JnGfk
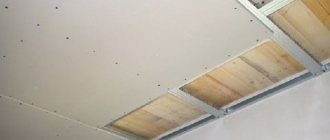
Sheathing with plasterboard
This type of finishing differs from board design in that it is necessary to use a galvanized profile for gypsum boards to prevent deformation of the ceiling surface.
The work is carried out in stages:
- The profile is mounted along the beams using hangers or U-shaped brackets. The transverse profiles are installed so that a sheathing is formed, having dimensions that allow the gypsum boards to be joined.
- Drywall is cut with a sharp knife, hacksaw or jigsaw. Fix the sheets to the sheathing with self-tapping screws, trying to immerse them in the material to a depth of 1 millimeter.
- The joints between them are puttied using sickle tape, sanded and again covered with finishing putty. You also need to rub out the fixation points for screws and other irregularities.
- The ceiling is coated with water-based or acrylic-based interior paint using a roller. To create a more even tone, apply a second layer.
If the ceiling lining in a wooden house in the kitchen is made of plasterboard and painted with water-based paint, it will look good if the fillets are selected well.
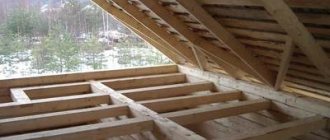
Option with attic
Hemming the ceiling
The simplest option for filing a ceiling is to use a regular board, ideally tongue-and-groove; however, a regular edged board 25-30 millimeters thick will do.
The great advantage of traditional material is that the boards do not sag even with a significant step between the beams, so you can do without additional sheathing.
A few nuances associated with filing a plank ceiling:
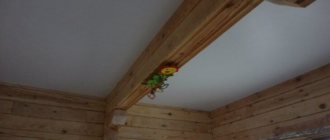
- Each board is attached to each beam with at least two nails.
- The nails are driven into the spacer at an angle of 45 degrees to the vertical towards the edges of the board. This way the board holds more securely.
If a nail sews two boards together, as in the picture, it will also prevent the seam between them from coming apart when the wood dries.
Soundproofing the ceiling
- In any case, a layer of vapor barrier is laid on the rough ceiling between the beams. This can be glassine or regular plastic film. It is necessary for two reasons: the soundproofing layer should not spill out in the gap between the boards; it should not gain moisture.
- Then the sound insulation itself is laid. This can be a layer of mineral wool 100 millimeters thick; however, filling with dry sand or a mixture of sawdust and lime is more often practiced. The height of the backfill is approximately three-quarters of the height of the beams.
- A layer of waterproofing on top is optional; however, if you use mineral wool, it will prevent small fibers from becoming airborne.
- Then logs are laid along the beams and the floor is laid. The best material is a board with a thickness of 30 - 40 millimeters; You can also use OSB or plywood - in one layer with a thick sheet or, better yet, in two layers with a thinner sheet overlapping the seams.
The resulting sandwich will look something like this.
Types of ceilings
- Installation of a monolithic slab
- Slab floor
- Wooden floor
Every person who has ever encountered the construction of buildings or structures with their own hands knows that one of the most difficult elements is the ceiling.
You can do without a foundation when building a house, a bathhouse, or a gazebo without impenetrable walls, but the construction of the ceiling must always be of high quality.
The ceiling is divided into three types of slabs, monolith and wood. Each of them has its own advantages and disadvantages, and the installation process varies greatly.
The ceiling can be of three types: slabs, monolith and wood. Each has its own advantages and disadvantages, and the installation process varies greatly. There are a number of other features that should be taken into account before installing a ceiling, since not everyone may be suitable for a particular case.
Installation of a monolithic slab
Monolithic ceilings are the most durable, but also the most expensive and labor-intensive. It is also not suitable for all building structures.
Oriented Strand Boards
Ceiling lining is also done using oriented strand boards. They are made from wood chips. During the production process, a multilayer board is created from it with the addition of synthetic glue.
The advantages of oriented strand boards include:
- good appearance;
- good sound and heat insulation qualities;
- environmental cleanliness;
- ease of installation;
- lower price compared to materials made from solid natural wood.
This material is not used very often, but experts note its excellent performance qualities. But it also has disadvantages. Since the basis for creating the boards is wood chips, they are susceptible to the effects of water and moisture. High temperatures also have a negative effect on the appearance of the ceiling. Despite the ease of installation, the work will take a lot of time, since finishing will be required.
How can I hem the ceiling?
The interior and style of the room largely depend on the material with which the rough ceiling will be covered. In addition, the specific features of the repair location should be taken into account.
You can hem the ceiling with the following materials:
- Drywall. GCR is affordable and quite easy to use. It is glued to the rough ceiling or screwed to a spatial frame made of a steel profile. Please note that in damp rooms only moisture-resistant drywall should be installed. External putty of the assembled surface is required.
- Plastic panels. These products have a presentable surface and are light in weight. As a rule, they are fixed to a frame made of timber, steel or plastic profile. If the base is well leveled, then the panels are glued to it using liquid nails.
- Wooden lining. This type of finishing has a pleasant and beautiful appearance, is environmentally friendly and durable. The slats can be attached either to a solid base or to a frame. Fixation is carried out using thin nails without heads or self-tapping screws.
- MDF panels. The front part of these products can imitate wood, natural stone, sky or plants. Fastening is carried out using special clamps (clasps), which press the edge of the slats to the base or frame.
- Plywood. Before installation, plywood sheets must be treated with an antiseptic and primer. If installation is carried out on a frame, then the joints of the sheets should be on its guides. After installation, seams are sealed and painted.
- Siding. Plastic siding is an ideal material for finishing non-residential and damp rooms, such as a bathroom, summer kitchen, garage and balcony. Installation of this coating is quite simple and does not take much time.
The choice of material for lining a rough ceiling depends on the purpose of the room, the taste and financial capabilities of the owner of the building.
Video description
The installation of an insulated ceiling with visible beams is illustrated in this video:
Most modern lumber for decorative finishing is made with longitudinal and end edges that are different in purpose, but similar in shape. This was done to make it easier to mount a solid sheet using the tongue-and-groove system. The main thing here is to ensure that the comb is driven evenly into the recess and to avoid distortions. To fix the workpieces, a hidden type of fastener made of terminals and nails is used. The latter are often replaced with small self-tapping screws.
An example of a fastening element for lining Source baykalles.ru
Tips for working with drywall
To assemble a frame with a large area, experts recommend using only a special metal profile and guides and stands. This will ensure the reliability and durability of the ceiling regardless of the complexity of the design solution. To fix the drywall, self-tapping screws are used, the heads of which must be recessed into the canvas by 1 mm.
Before finishing, all joints must be filled with plaster. To do this, the edges are cut at an angle. First, the recess is primed, dried and filled with solution. Then, after the composition has hardened, reinforcing tape (serpyanka or construction bandage) is laid and a leveling layer of putty is applied. The heads of the self-tapping screws are also primed and hidden by puttying. After sanding the surface and treating it with a primer, you can perform decorative finishing.
Options for installing plywood on the ceiling in a wooden building
There are different options for installing plywood sheets on the ceiling of a wooden house. The size of the ceiling in a wooden house depends on the purpose of the room.
Typically, the following layers should be present (from top to bottom):
- Rough or finishing floor of an upper floor or attic.
- Vapor barrier.
- Floor beams.
- Thermal insulation placed between the beams.
- Vapor barrier layer.
- Lathing.
- Rough or finished plywood ceiling.
Tools and necessary materials
Depending on the method of installing plywood sheets, you may need different materials and tools from the following list:
- ladder;
- drill;
- screwdriver;
- construction and laser level;
- wooden slats or metal profiles for making sheathing;
- dowels and screws;
- chop cord;
- plywood sheets;
- perforated hangers;
- glue for working with wood, if you plan to glue the sheet to the base;
- roulette;
- ruler;
- pencil;
- notched spatula;
- jigsaw for cutting wood;
- antiseptic impregnation or primer for wood.
If the house is new and no work on waterproofing the floor has been carried out before, then the film is attached to the floor beams with a stapler, overlapping the strips by 150 mm and gluing the joints with tape. The material is placed on the walls to a height of 20-30 cm.
Installation on the lathing
Plywood ceilings in a wooden house are easiest to install on lathing. This method is suitable if the base ceiling surface has defects and is not even. Please note that when installing plywood on the sheathing, the height of the room will decrease by at least 3-5 cm. The exact value depends on the communications being laid, the evenness of the base and the thickness of the sheathing.
We carry out the installation of plywood sheets on the sheathing in the following sequence:
- If the base ceiling is uneven, you need to find the lowest angle in the room using a laser level. Then we calculate how much the new ceiling will go down and put this value down from the found angle. After this, we transfer the marks to the remaining corners and connect them using a paint cord.
- According to the markings on the walls, we attach sheathing bars or a metal profile. They are installed around the perimeter of the entire room.
- Then we attach longitudinal lathing strips to the batten on the wall surface in increments of 40-50 cm. If the structure is mounted from the base ceiling at some distance, then we use perforated hangers to fix the battens to the ceiling.
- Next, we check the evenness and horizontality of the frame and proceed to installing the plywood.
- We begin to attach the sheets from one of the corners of the room. The junction of adjacent slabs should be in the middle of the sheathing strip. We fasten the sheets with wood or metal screws, installing them in increments of 15-20 cm.
- We leave a gap of 2-3 mm between adjacent slabs to compensate for the expansion of the material when the temperature and humidity in the room changes.
- We cut the last slabs in the row to length and width.
Installation with glue
If the house has a rough ceiling and it is relatively flat, then plywood sheets can be glued directly to the base. First you need to prepare the basic wooden ceiling. To do this, it is cleaned of the old finish. Then all holes and cracks are carefully puttied and significant irregularities are eliminated. After the solution has dried, the surface is treated with a wood primer.
Now you can start gluing the plywood sheets. Apply the adhesive mixture to the back side of the slab using a notched trowel and distribute it evenly over the surface. Then we apply the slab to the ceiling and press it well. We hold the sheet for about a minute so that the adhesive mixture has time to set.
Adjacent slabs are glued with a gap of 2-3 mm. They also leave a technological gap of 0.5 cm around the perimeter of the room. Subsequently, it will be covered with a ceiling plinth. Before finishing, the seams between the sheets are carefully puttied and sanded.
Installation on beams
Now let's talk about how to line a ceiling with plywood over wooden beams. This method is suitable for a new building in which the ceiling has not yet been finished. First you need to attach a layer of waterproofing film to the beams. We described how to do this above. After this, the waterproofing layer is additionally fixed with a wooden sheathing 2 cm thick. This is necessary so that there is an air gap between the plywood covering and the waterproofing layer. Thanks to air circulation, condensation will not accumulate here, which will contribute to the appearance of mold and rot, as well as deterioration of materials.
Next, we screw the plywood sheets to the sheathing with self-tapping screws. We install fasteners in increments of 10-15 cm around the perimeter of the sheet. You can additionally secure the plate in the central part. Don't forget about the gaps between the slabs and around the perimeter of the room.
What to consider when choosing a material
When choosing a particular material for finishing the ceiling in a room, you need to take into account several nuances:
To prevent damage to the wooden ceiling from moisture and temperature changes, it is coated with a special protective solution.
- how smooth the surface is. Otherwise, leveling with putty and subsequent plastering will be required;
- what is the expected humidity in the room. Will this room be heated in winter or not? If the room will be without heating, it is worth considering other finishing options;
- how high is the likelihood of moisture getting in or condensation forming on the finishing building material. If it is possible to prevent such unexpected moisture from appearing on the ceiling, then you need to use it. Otherwise, after a few years of using the structure with an attached wooden frame, major repairs will have to be carried out, which will cost a tidy sum;
- the degree of illumination of the room - it determines whether the material will fade or whether it is resistant to direct sunlight. In general, well-treated boards are not in danger;
- Is it important to provide sound and heat insulation during finishing? In this case, it is necessary to first create a draft version, and only then heat and sound insulation is laid, which will then be hidden by decorative cladding made of coniferous wood boards.
If wooden boards or slats are used to cover the ceiling, then these used lumber must be coated with a special solution that will protect the wooden material from possible contamination and moisture.
Plastic panels
The most practical and inexpensive materials for ceiling cladding, in almost any room, are panels made of plastic material. The use of such a coating became possible thanks to the development of modern production of artificial materials.
Plastic panels are lightweight, which is very important for ceiling structures, are easy to install even with a stapler, and are also easy to clean from dirt.
The main disadvantage of artificial material is its inability to allow air flow to pass through, which sometimes leads to the formation of fungus or mold.
If the ceiling has a flat surface, plastic panels can be attached directly to it. If it is necessary to correct the curvature of the base, you will have to install a sheathing made of wooden slats or an aluminum profile.
It is very convenient to use plastic panels for finishing bathrooms. But they are not suitable for covering the ceiling of a bathhouse.
Installation of ceilings in similar houses
To do the ceiling correctly, you need to have an idea of the scope of future work. To do this you need to know its design. It is quite simple, and consists of the following layers, in order from bottom to top:
- Interior finishing
- Vapor barrier film
- Layer of thermal insulation material
- Waterproofing
- Flooring or flooring of the next floor
The last point can be excluded if you do not plan to use the room directly above the area of the ceiling in question. Also, in the case when the outer side of the ceiling is the roof, this layer is not needed; it is replaced with roofing material.
Rough ceiling finish
There are many durable materials for lining a rough ceiling, embodying the intended interior, a special design of the room, even without cladding, in an antique style. Depending on the purpose of the interior of the room, finishing and decor are selected.
Filing the rough ceiling
For example, for rough renovations, interior design, when planning a design or decor in a bathhouse, you cannot use the following elements:
Various wooden ceiling panels: chipboard, fiberboard, plywood, because with high humidity they will deform. Plastic, it can be used to decorate a rough base, a ceiling with a wood and antique look, to emphasize the design even without facing cladding, but it has poor thermal insulation properties, condensation will form, and then mold on the finish. Timber containing resins that will drip when heated
This can be lath or MDF, it is important to check before purchasing.
A few words about insulation
After filing the rough ceiling, a waterproofing film is laid. After this, the insulation is installed. This function can be performed by ordinary sawdust or expanded clay, which fills the free space between the beams. Foam plastic is considered a good option for insulation, which not only provides reliable thermal insulation, but also does not attract harmful insects.
A subfloor is laid on top of the insulation. At the final stage, finishing is performed. If the interfloor pie is made correctly, any materials can be used for finishing, the risk of damage and deformation is minimal.
Do I need to treat the rough ceiling?
When choosing how and with what to hem the ceiling, one should not forget about the impregnation of the materials. Warm air in a room always rises, carrying moisture, dust, and pollution. If you leave the coating without impregnation, the plywood or solid wood will quickly become saturated with moisture, begin to rot, and become deformed. Therefore, processing is mandatory.
Impregnate the wood with a fire retardant, antiseptic, or protect it with a primer with bioprotective properties. Factory-impregnated plywood sheets retain shape stability and resistance to stains for quite a long time, but after 3-4 years they also lose quality and need to be treated too.
Any finishing of the rough ceiling is allowed. The owner chooses how to line the ceiling in a wooden house, depending on his own skills, financial capabilities and the characteristic features of the structure. For example, if the ceilings are high, you can build a frame from a metal profile and line the ceilings with plasterboard, or you can install tension fabrics, paint the surface, hang wallpaper or line the ceiling with textured plaster.
Basic properties of wood
When choosing an option for installing a ceiling, you should take into account the basic properties of wood. First of all, you need to understand that wood is a natural material with many microscopic pores. Quite often you can hear that a tree is breathing. This means that wood is able to absorb moisture from the environment during periods of high humidity and release it into the space when a dry microclimate is established in the room. In this case, the wood itself swells slightly and then shrinks again. From this we can conclude that maximum strong fastening of materials to a wooden surface is not allowed, otherwise deformation and warping cannot be avoided. In addition, in order to ensure a normal air exchange process, you should not choose materials that do not allow moisture and water pores to pass through.
In conclusion, it can be noted that installing a ceiling in a wooden house can be done with your own hands.
It is only important to know the features of the materials used, as well as adhere to the technologies developed by professional builders. If self-confidence is not enough, then you can always hire qualified craftsmen who will help create exactly the kind of ceiling that the owners have dreamed of all their lives.
After all, only a competently and correctly finished ceiling surface can positively influence the atmosphere and create truly homely coziness and comfort.
Construction of a wooden rough covering
Before hemming the ceiling surface, you should understand the layers that make up the interfloor ceiling in a wooden house.
Floor layers from top to bottom:
- The topmost layer is plank flooring, which can be the base for the topcoat or serve as a final finish.
- A vapor barrier membrane is a mandatory layer. Membrane fabric prevents the formation of condensation on wooden structures, prevents the formation of wet areas, mold and fungal growth.
- Thermal insulation. It can be installed in any case, regardless of whether the premises are residential or not on the floor above. If the attic is not residential, the energy efficiency of the house increases; if the attic is residential, the sound insulation of the floors increases.
- Waterproofing. The layer is designed to protect insulation and wooden structures from moisture. If you do not lay waterproofing, humid air and hot steam, rising to the ceiling, will destroy the thermal insulation material - which will reduce the practical characteristics of the product.
- The rough ceiling is the last layer that is finished with the finishing cladding.
Sometimes boardwalks are left unlined, especially when good quality boards are used. If, after arranging the floors, the floor needs to be laid on the floor above, then a layer of vapor barrier is laid on top of the insulation, then the plank base of the floor can be laid.
Structural diagrams
We looked at materials that are attached to beams and cover them completely. To increase space and create a special design, the beams can be left open. They can be decorated with hand carvings and varnished.
If they are solid, then you can leave them without additional mechanical processing. When they are prefabricated or look ugly, they are sewn up with another material. Old beams are cleaned of fungus and mold and treated with fire-retardant and bioprotective impregnation.
The interfloor and roofing scheme is the same:
- ceiling. There is rough and finishing;
- vapor and waterproofing. Non-woven films and films with foil that have a polymer reinforcing frame are used. It prevents the appearance of fungus and mold, prevents the insulation from absorbing moisture, and improves thermal insulation;
- insulation. Polymer materials are used: polystyrene foam, polyurethane foam, polystyrene foam. Organic: peat, straw, sawdust. Inorganic: expanded clay, perlite, vermiculite, mineral wool. It allows you to retain heat and serves as sound insulation;
- waterproofing. Polypropylene films, roofing felt, glassine, and polyethylene are used. It prevents moisture from penetrating into the insulation and onto wooden structures;
- floor or roof. For the floor, use flooring or edged boards, chipboards, OSB, lining, plywood. For roofing: slate, metal tiles, corrugated sheets, flexible tiles.
Design features - use of a draft ceiling or without it. It is required if organic material is used as insulation. It is also needed when covering the ceiling with fiberboard sheets. If it is crooked, it should be straightened.
Expert advice
To ensure that the plywood ceiling pleases you and lasts as long as possible, during the installation process follow the following recommendations from the experts:
It is not enough to secure large plywood sheets only around the perimeter, because they will sag in the central part. Provide intermediate frame slats so that the slab can be screwed with self-tapping screws in the central part. Be sure to leave 2-3 mm gaps between adjacent sheets and around the perimeter of the room from the walls. Otherwise, when the humidity or temperature in the room changes, the surface may swell and become deformed. To hide these gaps, you can use wooden slats, putty and ceiling skirting boards. Smaller slabs are easier to install alone, so it is recommended to cut large sheets into pieces
It is important to take into account the pitch of the sheathing slats. The joint of all sheets should be exactly in the middle of the batten. To make a supporting frame, it is better to use planks with a width of at least 5 cm
Otherwise, it will be difficult to secure the two edges of the joining sheets on one strip. If you screw the screws in close to the edge, the sheet may crack or chip.
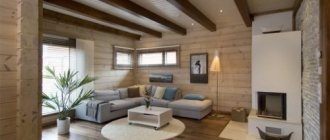
Design
The design of the ceiling in a wooden house is subject to a specific stylistic direction. This way you can introduce the necessary mood and convey a certain atmosphere to any interior, which, regardless of the chosen style, should please and correspond to the temperament of the owners of the house, taking into account the opinions of everyone. With a skillful approach to ceiling design, you can visually make any room in the house aesthetically pleasing.
For classical trends, which include classics, neoclassics, classicism, Italian style and notes of English design, it is worth choosing plasterboard structures on a frame. To decorate the ceiling according to all the canons of palace solemnity, it is worth decorating the box with lighting, a chandelier with crystal and decor in the form of plaster stucco, as well as moldings or ceiling plinths. Additionally, you can install strip lighting around the perimeter of the box, and if space allows, install two central lamps in the ceiling.
If modern trends are chosen as the basis for the style, you can decorate the ceiling with stretch fabric or its combination with plasterboard. Options with photo printing on a film or textile base of stretched fabric, selected in the same style as the interior design, will look good. If the style is minimalism or modern, you can limit yourself to a plain panel without a pattern with a glossy texture. This solution will visually increase the volume of the room.
Wood cladding materials look great in ecological style ceiling decoration. It is possible to combine two different finishes. For example, you can combine false beams with panels, using them around the perimeter, leaving space inside for wooden tiles. There are many design options, but you need to apply the cladding carefully: if the floor in the interior of the room is laid out in a solid pattern, an imbalance is possible.
Ceiling materials are applicable in the design of vintage styles, which include Provence, Baroque
In this case, it is important to cover it with white material, using light-colored lamps to decorate the ceiling
It is impossible not to note the creative trends of loft and grunge. Even they can be recreated in a wooden house using beams, imitation of communication systems, and ergonomic adjustable lamps (spots) in the design.
Such design options will be especially appropriate on the attic floor, where there are natural beams and the ceiling height allows the use of pendant lamps. In addition to beams, painting and unusual lamps, such a ceiling can be decorated with windows or their imitation, skillfully complemented by LED lighting. False windows look realistic, and at the same time fill the space with light spots, which is especially lacking in the attic space. You can use this technique in the bedroom, as well as the living room, by choosing a successful image with photo printing for decoration.
Selection of wooden floor beams
There is a certain sequence of actions on how to properly hem a ceiling with a board, which involves two stages:
- The boards are secured to the joists by nailing them or tightening them with self-tapping screws.
- Insulation and waterproofing are laid on top of them.
But there is another way to fasten the boards, which has a more complex implementation - in this case they are placed on top of the beams:
- first, cranial bars are secured to the joists;
- then boards are laid on them;
- then a thermal insulation and vapor barrier layer is installed, and they can be placed both under and on top of the boards.
Plywood is considered an ideal material for making a rough ceiling on beams. With its help, it will be easy to make a base for placing the cake from an insulating, waterproofing, vapor-permeable layer.
When the ceiling is hemmed with plywood along the beams, its sheets are exposed to a minimum of mechanical and thermal load. For such work, the dimensions of the material used must correspond to the interbeam distance.
The sequence of manufacturing this type of rough ceiling:
- if necessary, assemble a slatted frame and attach it to wooden beams from below;
- cut sheets of material 4-6 millimeters thick are hemmed to the sheathing;
- Sound-insulating and heat-protective mats and waterproofing films are placed on plywood.
The work on arranging the rough ceiling is carried out in such a way as to subsequently use the lattice frame and beams as the basis for installing finishing plasterboard panels.
The materials for such floors are lumber, laminated wood or plywood, special prefabricated structures, beams, boards, and beam shoes as fasteners.
- The load on wooden floors is their own weight plus temporary operational loads. The dead weight of interfloor wooden ceilings reaches 230 kg/m2, and their temporary loads – up to 200 kg/m2.
- The weight of attic floors depends on the weight of the insulation and reaches 300 kg/m2 with an accepted temporary load of 100 kg/m2.
- Taking into account the load-bearing characteristics of wooden beams on the ceiling, the length of their span, and the magnitude of the loads, we determine the distance between the beams, but, as a rule, no more than 1 m.
- Optimal are beams with a thickness of 5 and a height of 18 cm, if they are laid every 50 cm using mineral wool insulation. This will prevent the beams from sagging and the ceiling from collapsing.
The choice of beams depends on the subsequent magnitude of the possible load on them
Briefly about the main thing
You can hem the ceiling over the beams, partially or completely hiding them.
Various boards, panels, sheet and slab materials can be used as cladding materials.
To partially hide the beams, the sheathing elements are connected to guides along the side walls of the beams.
Solid decking is attached either to the bottom of the beams or to the sheathing, which can be formed in the same plane as the load-bearing supports, or it is attached to them.
Before installation, wooden beams and boards must be pre-treated with bioprotective and fire-retardant agents and dried.
Ratings 0
Board installation
It is a reliable basis for the implementation of the intended design. The structure is hemmed with treated boards or narrower slats, clapboard, which, even without cladding, can emphasize any design, especially antique. The boards are attached at a distance of no more than 30-40 cm from each other - if we do not have enough funds. Ideally, end-to-end with minimal gaps between each other. Also, if the wooden ceiling will be plastered with heavy clay with antique decor, then it is necessary to connect the slats not on one beam, but in a checkerboard pattern, if the facing finish is clapboard, slabs, plasterboard, then you can save a lot of time by securing all the slats to one beam .
The structure is hemmed with treated boards or narrower slats
There is one method for a high-quality installation of a rough ceiling, which I really like: the boards (inches, 25 mm) are not cut to length (6 m), not fed through windows, doors, but from the outside, under the joists, on the side of the building, all the slats at once . To do this, two people are enough, you need to make sure that the distance between the wall and the beam lying on it is 5 cm, and I also secure the boards together with a metal plate. A mauerlat (a wooden lath, for ease of construction) is placed under them, under it there are strips of roofing material on three sides, the 4th side is needed to supply the wooden lath and materials, I install the last beam with the mauerlat on this side at the end.
Beams in a private house
Subtleties during the initial board finishing
Let's consider the main subtleties of the work, allowing you to make a rough base and a wooden ceiling much faster and save a lot of timber
It is important that the board extends the entire length of the room, lays on the walls, which is very convenient, there is no need to level, trim a lot of boards, and in fact there is no small waste. All slats along their entire length are placed on the outside of the wall, then moved by one person, and a second person arranges them from the inside of the building onto another wall.
Ceiling board
After the material is supplied, it is leveled and then mounted with self-tapping screws to the beams. It should be noted that even 2 self-tapping screws are enough to hold a person on the board from above, which simplifies assembly and speeds up work when feeding slats and adjusting them. If the length is much longer than required, then the slats are not attached to the last beam; if less, then they are cut along the last beam with a jigsaw along the entire length, taking into account that the slats can be secured to the beam on the other side. The missing length can be easily eliminated in the same way - by feeding all the material, fixing it on the logs, we also cut off the remaining hanging length with a jigsaw, having first placed an evenly long strip under the material so that the cut is even.
DIY rough ceiling
Completion of installation
The design of our design is such that a small gap remains at the edge, for which we cut the required width from the inch to the full length, after which we mount it to the beams. Then we are left with one side from which we fed the timber. We attach roofing felt and Mauerlat to it with strips; let me remind you that we don’t have timber at the edge, so the boards can be bent upward, for which they are not nailed to the outermost existing beam. After assembly, they are nailed to the mauerlat and nailed to the timber.
When performing work, do not forget about safety
When performing finishing work, it is extremely important not to forget that the wooden ceiling is not yet ready, the bars at the edge are not screwed in, you need to be on the walls and in the places where the beams are attached, in order to avoid injuries. There are also MDF boards - they are a reliable support for the implementation of design masterpieces and finishing
Assembly is carried out much faster than with a board. But a ceiling made of wooden slats wins against MDF boards, because the remains will definitely be used for the frame for filing. Not to mention the high price of MDF, so the boards are inferior, but rough assembly is also faster, which is a significant plus.
Wooden ceiling upholstery
Assembly of hydro- and vapor barrier
First, you need to decide what the room will be used for; if there is another heated room on top, then there is no point in installing heat and sound insulation on the sub-ceiling; wooden surfaces distribute noise and heat quite well. The vapor barrier is installed along the entire perimeter of the ceiling, especially well stretched in the corners, laid with an overlap, the boards are mounted overlapping. This will help protect the rough base and wooden ceiling from rotting and mold.
Ceiling vapor barrier - effective and high quality
Subtleties of laying insulation
If the insulation is installed incorrectly, it is possible to destroy the baseboards and decor, the rough ceiling, even cause a fire, for which you should slowly study the instructions so as not to confuse the sides, because the markings of different companies may contradict each other.
Important! If suspended ceilings are not planned, and the distance from the spotlights to the rough ceiling will be less than 5 cm, then when assembling thermal insulation you should know in advance where the fixtures will be attached, since the insulation can catch fire due to temperature. It is enough to cut circles of about 20 cm in the material around the planned lamp, this will create good fire safety, which is extremely important for a wooden house and wooden decorative elements
It is important to establish these places during the installation of the material - we measure the places from the wall, then put a mark on top, in the form of a circle with a diameter of 20 cm
It is enough to cut circles of about 20 cm in the material around the planned lamp; this will create good fire safety, which is extremely important for a wooden house and wooden decorative elements. It is important to establish these places during the installation of the material - we measure the places from the wall, then put a mark on top, in the form of a circle with a diameter of 20 cm
Integrated thermal insulation reduces building energy losses
The same applies to vapor barrier, although the material is quite durable, but unstable to high temperatures, it can melt and lead to a fire, especially if the rough, facing and decor are made of untreated lining. Thus, an emphasized design can lead to dire consequences for the interior and the integrity of the room. But since the lamps and decor are not mounted to the sub-ceiling, like the wiring, it is enough to install heat-reflecting foil, 20 by 20 cm squares, on the vapor barrier below, at the mounting points. It will not be visible, but it will help preserve the interior of the room and not damage the intended design with decor.
Installing thermal insulation in a wooden ceiling
As we see, it is quite possible to make a wooden ceiling with your own hands quickly and efficiently. In addition, you can hem the rough base yourself, faster, better than many workers.
We also recommend reading:
Originality of plastic panels
How to glue skirting boards to a suspended ceiling yourself
Comparison of ceiling lining methods with different materials
How to make a connection between walls and ceiling? Little tricks Tips for painting ceilings made of foam boards