Undertone is the base color of your skin. Divided into four groups:
- warm (yellow or golden shades)
- cold (pink or red shades),
- olive (yellowish-greenish, often dark, swarthy shade)
- neutral (balanced yellow and pink shades).
Skin undertone has nothing to do with whether you have rosacea, eczema or acne, and has nothing to do with how light or dark your skin looks (this is the degree of pigment saturation).
Look at your face, neck and chest in daylight. Then read the following descriptions and choose the one that suits you best.
Flesh colors
Great news: There is no such thing as “correct flesh colors.” You can dye your skin any color imaginable and it will still look like skin.
Skin does not have one color. Three main color zones can be distinguished:
- more ocher, brown shades in the upper part of the face;
- warm, reddish on the cheeks and nose;
- colder in the lower part of the face.
Let's understand this in a much simpler form than the human head - on an egg. Let's give it a base beige color - Marco uses colors from the palettes above, taken from the paintings, for both examples. Now for the upper part of the face we move the slider on our color wheel from the base colors towards the ocher shades. The color should not be saturated yellow, a light shade will be enough.
The resulting color will be different in the two stages because they have different base colors. The effect we want to achieve will not change from this. We use the same technique for the “red zones” - we move from the base towards the red shades. The color does not have to be bright scarlet, it is enough that it is “redder” than the previous colors used.
It's time for a cooler lower zone - we draw it using the same method. Most likely, if you choose other works for the stage, you will get a visually different result. But these are good starting points for reliable nude colors.
No pores
At the final texturing stage, I will again refrain from drawing in the pores. If you are drawing a newborn, you can try adding small rashes, which are common in small children. We do this, we place dots of different sizes of a reddish color on top of each other - we’ll start with large spots that are highly transparent, gradually moving to small ones with a little transparency. Particular concentration on the cheeks and chin areas. You can also add tiny highlights to your nose and lips - these little touches add extra cuteness!
If you're drawing a vampire, use a huge Airbrush to follow the contours of the face. This will add a mysterious glow to painful skin.
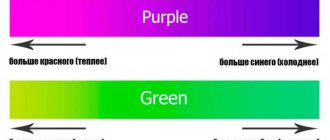
Colorful temperature
Before we go any further, we need to understand lukewarmness. The words “warm” and “cool” in relation to shades do not describe specific colors, but the relationships between them. Each hue on the color wheel can be warm or cool depending on the context.
This whole idea is based on the assertion that one part of the color wheel is warm colors: red, yellow, orange, in a word, those that, when you look at them, seem like a hot flame (ouch). The other part is blue, purple, etc. – cold, stereotypically represented by the colors of ice, snow, water and everything cold. The remaining shades are considered to be “transitional” from warm to cold and back.
To some extent, these definitions are true, red often feels warmer than blue, but this approach misses the nuances. Artists most often have to deal with colors that are closer to each other on the color wheel, and then determining which one is warmer is no longer so easy.
Let's compare these two colors:
This is a basic example with bright red and blue colors. Here it is easy to determine which color is warmer and which is cooler.
Now let's look at this option:
Here the difference is not so obvious.
Now let's compare these colors:
This and similar examples show that any color can be colder, it all depends on what color we compare it with.
This approach is based on a model in which color “moves” around the color wheel depending on lighting. Let's talk about this in more detail.
Warm (WARM)
It is yellowish, golden peach or honey. Your skin is absolutely not pink or red.
You look amazing in earth brown, olive green, orange red, orange, mustard yellow, brown, coral, cream, ivory and peach
You usually don't look as amazing in pink tones (fuchsia, pink, purple), emerald green, sapphire blue, aqua, gray and black.
Best suited for you: gold jewelry
Check the undersides of your wrists: your skin has a peachy, yellow or golden hue, with greenish, olive veins.
You have: blue, brown, hazel or olive green eyes.
Your hair: golden brown, brown or black.
When you tan in the sun: you tan easily and don't burn very often
Celebrities with warm undertones: Jennifer Aniston, Sandra Bullock, Taylor Swift, Kate Hudson, Gisele Bündchen, Amanda Seyfried, Cameron Diaz, Lindsay Lohan, Beyoncé and Mary J. Blige
The wrong mineral foundation will be too pink, red or ruddy. Choose bases in yellow or gold shades.
How does light affect color?
Local, or basic colors, are not what our eyes see. The human eye sees a combination of “base color + light”.
Let's see how this works on the color wheel. First, let's decide on a base color. This red one will suit us:
For ease of perception, let's draw a ball of this color. Now it looks like a flat circle painted in a single base color.
Let the light source be a regular yellow incandescent lamp. First we will divide the ball into light and shadow zones. For now we are not using other colors, but only changing the light and shadow tone of our base red.
The real color change will happen next. Since we're talking about light, let's start with the color of the illuminated side. We remember that light is the strongest factor influencing color, so the yellow-orange tint of light will “pull toward” our base red.
We don't touch saturation. Both of these colors are quite saturated and clearly located in the “warm” sector of the color wheel, so you shouldn’t expect big changes in temperature. The degree to which the color shifts from base red to yellow depends on the strength of the light directed at the subject.
If the light source is intense enough, its color can completely replace the base color of the object, as in the example below. This is not the most common case, so be careful when choosing this scenario.
An idealized example in which the hue of the light source displaces the base one.
Now let's return to the original red shade of our ball. If we had chosen a cooler shade of red as our base color, the light would have made the ball “warmer.” But not as rich and warm as our original red ball turned out to be.
Let's take the afternoon sun color, which is much less saturated, and go back to our original red base color. At first glance, it may seem that the color of such lighting will make our red less saturated. But no. As long as the light source is in the “warm” part of the color wheel, the colors of the warm spectrum will not lose their saturation.
The result of this interaction will be a slight change in hue, not as strong as in the case of a saturated tone of the light source.
Cold light
What happens if the base color remains the same but the light source is cool?
On the way from the base color to the hue of the light source, we must pass through the “gray area” in the middle of the color wheel.
The “gray zone” is a universal section, because in theory it is what unites all the colors of the circle. When passing from one section to the opposite one, the colors must pass through this area. And our base red color, in the case of cold lighting, will be drawn towards it, closer to this “gray zone”.
The more saturated the “start” color, the more it struggles with the color of the light and may stop before it reaches the “gray zone”. In this example, the light source has cooled the original warm hue, pulling it closer to the cool side of the color wheel. But the color stopped before it entered the bluish range.
If our base color were closer to a gray shade, then it would have a much higher chance of being tinted with the cool blue color of the light source. Cool light will pull this starting color through the gray area.
The same logic applies when the light source is warm and the base color is cool. Now you understand that to determine the warmness of a particular color, we need a second color for comparison.
Balancing skin tone
We will divide the work with skin color into two parts. In the first part we will try to balance the skin tone using the Info panel and a Curves adjustment layer. In the next part we will create a template for the color of the skin we have been working with.
Prepare the image
Select a properly exposed portrait (preferably a head portrait). A photo without a lot of detail in the background is ideal. If possible, adjust the white balance before working on skin color. The technique we'll use to balance skin tone will generally correct the color balance of the entire image, but working on skin tone will be much easier if you don't have to deal with white balance corrections that might have been skewed by lighting.
You can also retouch the portrait before working on the skin color. In some cases, it is easier to get rid of imperfections after the color balance of the skin has been corrected. And sometimes the need for subsequent retouching disappears altogether. Experiment and decide which option works for you in different situations.
Select a sample
To begin, open the Info panel (Window > Info or F8) and select the Eyedropper Tool . In the tool settings panel, select a Sample Size of 11 by 11 pixels (“11 by 11 Average”). If your image is low resolution, then it makes sense to choose a smaller sample size.
Select an area of medium-light skin. Avoid bright highlights as the color saturation will be too low and the area will not serve as a good reference. The cheeks are not the best place for a sample: girls' cheeks, as a rule, are made up, and many men have a reddish tint. Good sampling points in women are the chin, forehead and neck. If you are working on a male face, then take samples from the forehead and the area just below the eyes where the cheekbones begin. Once you have selected the desired area to take a sample, click on this point with the Eyedropper Tool while holding down the Shift .
In the Info panel, click on the eyedropper icon located next to the information about the skin sample you selected, and select CMYK from the drop-down menu. This way you will get CMYK color values, but at the same time the entire image will remain RGB.
Evaluate color information
Analyze the CMYK values for your sample. For example, in my photo, the values for the selected point are as follows:
C—18
M - 48
Y - 48
K–1
According to my CMYK chart, the average Caucasian skin should contain 25% more yellow than magenta. In my photo, magenta and yellow have equal values, so I should add some yellow.
Also according to my table there should be less cyan than magenta, ideally cyan should be 25% of magenta. In my photo, the cyan is about one-third magenta, so it should be reduced.
Caucasian skin typically doesn't contain black at all, so I'll need to make sure it's completely absent as I process the image. Black is created by combining cyan, magenta and yellow, manipulating these colors will help change the level of black.
Use Curves
To start working with colors, create a new adjustment layer with curves ( Layer > New Adjustment Layer > Curves ). In the adjustment layer panel, select the adjustment tool on the image (a hand with a pointing finger).
You will have to work with separate channels: Red, Green and Blue. Therefore, you should remember:
- To add yellow, you need to reduce the amount of blue, and to add blue, you need to reduce the amount of yellow.
- To add magenta, you need to reduce the amount of green, and to add green, you need to reduce the amount of magenta.
- To add cyan, you need to reduce the amount of red, and to add red, you need to reduce the amount of cyan.
Working with each layer separately, click with the tool on the previously set point and move the cursor up or down, thereby modifying the curve and affecting the color of the skin. The values in the left column in the information panel will be your starting point. The values obtained after manipulations will be displayed in the right column.
For this photo I started by working in the blue channel to add some yellow, and then I moved into the red channel and reduced the amount of cyan. When you make adjustments in one channel, you affect the other channels, so you should be very careful about changing the values, making small changes.
Adjust saturation
Changing the color balance will affect the color saturation of the image. Therefore, after finishing working with the Curves adjustment layer, adjust the saturation of the photo. To do this, add a new Hue/Saturation adjustment layer ( Layer > New Adjustment Layer > Hue/Saturation ). Reduce saturation if necessary.
Don't be surprised if you have to go back to the Curves layer and adjust some settings after reducing the saturation. It is quite possible that you will also want to correct the ratio of shadow and light zones; to do this, select the RGB channel in the Curves adjustment layer and experiment with the position of the curve.
Once you achieve the desired result, be sure to save a copy of the image before moving on to the next stage of processing.
Before
After
Let's return to the egg: add light
Now let's return to our egg. Without thinking about the color characteristics for now, let’s select the illuminated and shadow sides of the egg and make the latter darker.
Having decided on the most illuminated area, we will apply the shade of our light source. In this case, it is a warm color. Let's remember about the variety of flesh tones and bring all our base colors applied to the egg closer to warm.
It's time to go to the dark side. Color in this zone undergoes great changes and is more influenced by the environment. Marco colored the background blue to further demonstrate the interaction of light, shadow and environment.
The environment acts as a collection of small light sources that have their own strength: the light bounces off the environment and falls on the shadow side. This is called a "reflex".
Reflected light in the shadow is weaker than the main light source. Therefore, it will affect the color of the object less than the main source. In this example, the blue background will pull the base colors away from the light color. Those parts of the egg that face upward are more influenced by the blue color. You don't have to make these colors literally blue/blue, just move them slightly along the "path" of the color wheel in that direction. Here you can choose from many possible shade options that are cooler than the base colors.
Those parts of the egg that are not facing upward receive less exposure to blue light. The colors in this part of the shadow will be cooler than those we used in the light, but not as cool as the colors exposed to maximum blue influence.
Be free in your choice of color! As long as the colors in the shadow move in approximately the same direction on the color wheel, the puzzle will be put together.
One of the most common clichés in painting, that warm light produces cooler shadows, is misleading. This is not an axiom. Warm light by itself does not create cold shadows. The fact is that a warm light source “moves” the base colors closer to this warmth, but does not affect the shadows, because it does not touch the shadowed parts. And that's why only the context/environment can make the shadow cooler.
Texture time
It's time to create the illusion of transparent skin - let's draw the veins. Since the skin is very thin, veins are more visible on the child's forehead and above the eyes. And you should also remember that the older the children, the less noticeable the veins will be.
If you draw a vampire, do as your heart tells you. I use a combination of expressive, almost black, veins around the eyes and lips, gradually disappearing, it looks interesting and gives a convincing look to the vampire.
Select a purple or blue brush color (Hard Round or Airbrush) and create a thin web of lines that should look like veins (1 in the image below). Smooth the layer slightly and experiment with blending modes until we get the result we are interested in. Now let's emphasize the thickness of the veins using a dark red airbrush, paying special attention to the junction of the veins (2), add some dark strokes (3). If necessary, to enhance the effect, lightly darken the area with mid-tones with an airbrush.
Drawing shadows
Now let's apply the shadows. Create a new layer and use the Ctrl+Alt+G key combination to transform it into a clipping mask. Set the blending mode of this layer to Multiply (Multiplication) and begin to paint the shadows, using the same shade of brown as for the base.
Using a soft round brush with Hardness 0%, concentrate the shadows on the neck and around the perimeter of the face.
Shaping facial features with highlights
Step 1
Open the Color Picker and move the slider to the very top to select a color for the highlights. This color will help us shape the bones of the face by focusing the highlights where the most light hits the skin.
For each individual color, create a new layer. This time we leave the blending mode at Normal . Apply highlights with the selected color. Outline the shape of the nose, cheeks, chin and forehead. Brush strokes should be hard and rough, so adjust the Hardness to around 50-100%.
Step 2
Change the hue again by moving the slider down. Carefully mix the highlights with a more muted shade of brown. As you work, remember to compare your drawing to the photo to make sure you are on the right track.
How to determine your appearance color type: online test
Time limit:
out of 8 tasks completed
Questions:
- 1
- 2
- 3
- 4
- 5
- 6
- 7
- 8
Information
Let's find out if you understand color correctly and take an online test to determine your individual appearance color type. Diagnostics are free.
You have already taken the test before. You can't start it again.
The test is loading...
You must log in or register in order to begin the test.
You must complete the following tests to start this one:
results
Time is over
- Your appearance color type is winter. Feel free to choose bright shades for your wardrobe: red, emerald, lemon, black, chocolate. Avoid pastel and orange tones. Read more in the article: Women of the winter color type: suitable hair color, makeup palette, clothes, perfume
- Your appearance color type is spring. Natural tenderness and femininity are emphasized by soft shades of pink, beige, lemon, soft raspberry and blue. Avoid dark and cold shades: black, purple, bright red. They will look tired. Read more in the article: Spring color type: what colors of hair, clothes, makeup are suitable
- Your appearance color type is summer. Choose calm, pastel colors: milky white, beige, pale blue, mint, gray, lavender. Among bright shades, give preference to red-coral, raspberry, light yellow, and grassy green. Avoid bright red, white, black, emerald. Read more in the article: Summer color type: what colors of hair, clothes, makeup palette, photo examples are suitable
- Your appearance color type is autumn. Natural shades of cherry, emerald, orange, and mustard will suit a bright girl like you. Avoid cold blue-blue shades, as well as cold scarlet and pink. They will blur your personality. Read more in the article: Autumn color type: what hair colors are suitable, clothes, makeup palette, perfume
- 1
- 2
- 3
- 4
- 5
- 6
- 7
- 8
- With answer
- With a viewing mark
- Task 1 of 8
- Dark chestnut, blue-black, brown with a cool tint or very light, ash blonde.
- Wheat-straw or light brown hair with a golden tint, often fluffy and curly.
- The color ranges from light blond to dark blond, with a cold, ashy undertone. Hair is thin or dense and heavy.
- Cognac, fiery or copper-chestnut with a red tint. The hair is dense and curly.
- Task 2 of 8
- Thick black or dark, pronounced.
- Very light to medium shades with a golden tint.
- Light ash or gray-blond.
- Dark to medium tones of honey-cognac tones.
- Task 3 of 8
- Dark brown, blue-black, emerald green, blue, blue - a clear outline and bright white white of the eye.
- Walnut-brown, green with yellowish splashes, pale blue, gray - a light shade.
- Grass-green, green-blue, pale blue, have cold tints and a fuzzy outline.
- Light or dark brown, cognac, green with golden splashes, blue - bright.
- Task 4 of 8
- Almost snow-white, porcelain or very dark with a cool olive undertone.
- Light milky, peachy with golden or warm pink undertones.
- Light or dark skin with a cool gray-beige tint.
- Light beige or golden beige with honey undertones.
- Task 5 of 8
- The skin tans quickly, acquiring a light or dark olive tint.
- Tans quickly, acquiring a golden beige tone, the tan lasts a long time.
- The skin is sensitive, but the tan goes on in an even beige shade and washes off quickly.
- Does not darken, often burns and turns red.
- Task 6 of 8
- Light, practically absent, sometimes pale pink spots appear on the cheeks.
- It often appears, especially when excited. It goes on with a peachy pink tint.
- Absent. Or a weak, cold pink hue, more often after frost.
- There is no blush, the skin is even golden, in the cold it turns completely red.
- Task 7 of 8
- No freckles, few moles.
- There are moles and golden freckles.
- A small number of moles and freckles of a gray-brown color.
- There are moles and a lot of red or bright brown freckles.
- Task 8 of 8
8.
Your lip color:
- Cool tones with an olive tint.
- Warm shades: from light peach to scarlet.
- Pale pink cool shade.
- Warm coral, possibly red.
- The best hair treatments in the salon: treatment, restoration, growth
- Proper nutrition for women after 20, 30, 40, 50 years. Beautiful figure at any age
2018, . All rights reserved.
Makeup
For those with dark skin, it is better to use bright and cool colors in their makeup, focusing special attention on the lips and eyes. For this they can use smoky or steel-colored shadows, a dark pencil, eyeliner, black mascara and plum lipstick, as well as blush in muted shades, but in no case golden
Girls with light olive skin should use colorless powder in their makeup and paint their eyes in light blue, lilac, purple, pinkish or green tones. Such shades can emphasize the depth and expressiveness of the look inherent in these ladies. When choosing mascara, you can choose black, brown or blue. You can complement your makeup with pink lipstick and blush of the same tone.