It’s decided: the day has come! Today we are connecting a new chandelier! Here she is, a beauty with 5 horns! Now let’s connect it to the wires!.. and for some reason there are four wires from the ceiling. And all different colors. So you feel like a hero from an imported blockbuster: and which wire is responsible for what?
Sound familiar? Familiar. The only difference is that it’s easier for the hero: at the last moment he will choose the right wire at random. But we can’t do it at random - we need to understand what’s what.
What wires come out of the ceiling, and how to connect a chandelier to them? Let's figure it out together.
Design features of the chandelier
Chandeliers are most often used as lighting devices in residential premises - multi-lamp lamps designed for installation on the ceiling.
A chandelier is a structure that connects several lighting elements - light bulbs - to provide good lighting in the room.
If you use a regular light bulb in a room, then to ensure proper lighting you will need to install a powerful lighting element, and even then, if the room is large, it will not be enough.
But such light is not always needed, so the best option is to use several lamps.
But in the case of using ordinary light bulbs, each of them will have to run its own wire or branch from the junction box.
But if you install a chandelier, the design of which involves installing several light bulbs, then the complexity of the connection will be the same as for one or more light bulbs.
But at the same time, all lighting elements included in the design will be powered, and from one wire.
And all because the wiring branching occurs at the entrance to the chandelier, and not in the junction box.
Well, don’t discount the aesthetic side of the issue. A lonely light bulb hanging on the ceiling looks dull, or maybe a beautiful chandelier.
To get good lighting in a room with a perfect combination of lighting fixtures with the interior, it is not enough just to purchase a suitable chandelier, you also need to hang it and connect it correctly.
Therefore, next we will consider how to properly connect the chandelier.
Tools
To hang and connect the lamp, you will need the following tools:
- A multimeter or indicator screwdriver will be required if you need to determine the purpose of the contacts.
- Terminal clamps or caps are used for reliable connections.
- Pliers.
- Marker.
- Screwdriver.
Connection
You also need a stepladder that has a suitable height for the work.
What is taken into account before carrying out work?
Let’s immediately identify a few key points that should definitely be taken into account:
- Design of a chandelier (They are usually divided among themselves by horns - elements at the end of which sockets for light bulbs are installed. As mentioned above, the division into power branches for light bulbs is made at the entrance to the chandelier, and the horns can be considered these branches. By design, chandeliers are hornless, two-, three-, four- and five-horn);
- The switch used (the method of connection depends on this. If, for example, the switch is a single-key switch and when the light is turned on, all the lamps of the chandelier will light up, then this is one connection diagram, but the use of two- or three-key switches, each key of which will be responsible for the operation of a specific group lamps require the use of a slightly different connection method);
- The presence of additional equipment in the design of the chandelier (a fan or a remote control unit makes certain adjustments to the connection diagram);
- Features of the electrical network of the house (in old buildings, two-wire wiring is usually used, and in new or restored buildings the number of wires is already three).
And one more thing - it’s one thing to simply remove the old lighting fixture and connect a new one in its place, and quite another thing to completely create a lighting power line, including laying wiring from the distribution board, installing switches, junction boxes and lighting fixtures, and then connecting them into one network.
We will not delve into the specifics of independently installing the power supply branch of a chandelier, since we are more interested only in how to connect the lighting elements, although some points regarding wiring will be touched upon.
Helpful information
Let us immediately point out some features that can help:
- Breaking the circuit with a switch is carried out only through the phase line, and the neutral conductor and grounding conductor (if any) go directly to the consumer;
- For each branch, a separate phase wire is laid at the output of their switch (It is separated in the switch itself. A single-key switch has one phase conductor at the output, a two-key switch has two, a three-key switch has three). This affects the wire used leading from the switch;
- On the terminal blocks of the chandeliers you can find the designation of the terminals, which makes the connection easier (the marking “L” indicates that the terminal is phase, “N” is neutral, “PE” is grounding).
Now directly, how to connect the chandelier to the switch.
Let's assume that the line is made in advance, the switch is in place, and 2 or 3 wires stick out from the ceiling (with the third wire being “ground”).
In general, the connection diagram is the simplest - “one-key switch - 1 lighting fixture.”
If the chandelier is armless (with 1 lamp), then the connection method does not differ at all from powering a simple light bulb.
Also, connecting a chandelier to one or more bulbs is greatly simplified by a multi-channel wireless switch.
Available about theory
First, let's try to understand the essence - without complex formulas and sophisticated graphs. From a half-forgotten physics course, we know that electric current enters the house through two wires: one - phase, designated by the letter L - supplies voltage to the consumer. The current does its job (say, rotates the engine or lights a light bulb) and goes through another wire - zero, it is designated by the letter N (neutral). The situation is controlled by the ground wire, designated PE. This is ideal.
Single-key switch – 1 chandelier
Before starting work, you should determine which wire is which. It would be good if modern wiring with color differences between the cores was used. At the initial stage, only “land” is of interest.
If the electricians did not mess anything up, the ground wire will have a yellow-green braid.
But you will have to figure out the phase and zero yourself and for this you will only need an indicator screwdriver, but all precautions should be taken, since the test is done in live wiring.
Therefore, before applying voltage, you should make sure that the ends of the wires are separated in different directions and do not touch each other.
And only after this can voltage be applied (you also need to turn the switch to the “on” position).
Read on the topic - why aluminum wiring is dangerous.
After we touch the ends of the wiring with the tip of the indicator screwdriver, the indicator light that comes on when touched will indicate that the core is phase, which means the second one is zero.
If there are three wires at the output, and it is not clear which of them is zero and ground, you can use a test light to determine it (we connect a two-core wire to a regular 220 lamp through a socket). Then we identify the phase with an indicator screwdriver.
And then we connect the light bulb to the phase wire and one of the other two.
If the lamp lights up after applying voltage, then the second wire will be zero (if it doesn’t light up, the “ground” is connected to the control). For reliability, the wires should be swapped.
Types of wire connections
It is necessary to connect the wires according to existing rules. After all, such places are characterized by high resistance, which leads to their strong heating. Correct connection will ensure safe and trouble-free use of the luminaire. This work is done using:
- Soldering, which is carried out after twisting the wires, but with experience, solder, flux and a torch.
- Welding performed after twisting homogeneous cores and using a special transformer. Work is carried out using electrodes and protective equipment (goggles, gloves).
- Crimping carried out using press tongs using connecting copper, aluminum or copper-aluminum sleeves.
- Bolts that allow you to connect copper and aluminum wires. However, a steel washer must be placed between the cores.
- Screw terminal blocks used for connecting homogeneous and dissimilar conductors.
- PPE caps made of plastic with internal springs that compress and fix homogeneous wires.
- Self-clamping terminals that allow you to make quick-release connections of homogeneous and dissimilar wires by pressing special levers on the products.
Two-button switch - chandelier
Now let's talk about how to connect a chandelier to a two-key switch.
Since the number of lamps and their division into groups can be very different, we will consider several options:
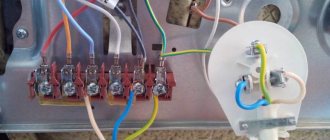
- “The switch is a chandelier with two lamps.” Since it was mentioned that in such a switch the phase is divided into two lines, for which a separate key is intended to open the circuit, then 3-4 wires should come out on the ceiling (two phases, zero and ground). It is assumed that each key will power its own lamp. To connect everything, you must first decide where the phase and neutral terminals are. We take the wires of each of the horns, separate two of the same color (for example, blue), twist them and connect them to the zero terminal of the power line. All that remains is to deal with the brown wires of the chandelier. Each of them must be individually connected to the phase terminals of the wiring. There should be three connections in total - two phase (with brown wires) and one neutral (with double blue wires);
- “The switch is a three-arm chandelier.” The peculiarity of this scheme comes down only to the correct separation of the wires. Since there are three lamps, and only two keys (and therefore two phase wires), one of them will power two chandelier bulbs at the same time. As a result, we also get three connections. First we connect zero. To do this, we select one wire of the same color (blue) for each horn, twist them all together and connect them to the neutral wire. That leaves three brown wires. We twist two of them and connect them to one of the phase conductors, and the third to the second phase;
- “Switch – 4-, 5-, 6-arm chandelier.” Here the connection diagram is the same as above, that is, the total number of connections will be three. As before, we twist all the wires of the same color (blue) into one twist and connect it to the neutral core (here a twist is more suitable, not a terminal block). We divide the remaining wires into two halves (for example, in a 4-arm chandelier, you can divide them so that when you turn on one key, two parallel light bulbs light up). We twist each half of the wires and connect them to one of the phase wires. We do the same with the other part of the wires.
Connection diagram for two wires coming out of the ceiling
Chandeliers with one lamp or a frame, which is made of plastic parts that do not conduct electrical energy, may have two wires for power. If you follow the following instructions, there will be no connection difficulties:
- The purpose of the conductors coming out of the ceiling is determined;
- If the chandelier is single-circuit, but has three terminals, the “ground” is identified, cut off, completely isolated, and excluded from the connection process;
- Connection work should begin with “neutral” conductors;
- If there are two or more circuits, the phase conductors of the lamp are combined with terminal clamps, and a separate output is connected to the electrical network of the house or apartment;
- The supply voltage is applied and the result is checked.
One switch – several chandeliers
Now let's look at how to connect several chandeliers to one switch. Here you will also have to consider the features of the power line.
For example, let’s take a single-key switch that will power three chandeliers at once.
The lighting line diagram with this switch is as follows: phase and zero go from the switchboard to the distribution box.
A wire goes into it from the phase conductor to the switch, and returns to it again.
As a result, in the box we have a zero and a phase (with a switch included in the circuit), to which we can connect the wiring leading to the consumer.
Therefore, in order to connect three chandeliers to this switch at once, it is enough to throw one common line and insert the phase and neutral wires of the lighting devices into it.
Moreover, it is better to connect each chandelier to a common line in distribution boxes (they additionally need to be installed). And then in the chandelier itself, divide it into horns (branches).
Connecting a chandelier with additional equipment
Now about connecting the chandelier in which the fan is mounted. This lighting device does not require anything special to connect, since the fan is the same consumer as a regular light bulb (that is, the circuit is the same as that of a two-arm chandelier).
It should be connected to a two-key switch so that you can turn off the light or fan if necessary.
Also, when connecting such a chandelier, you should read the instructions, which should indicate which of the wires going to power the fan is phase and which is neutral, and use this information when connecting.
The same applies to chandeliers that have remote control using a remote control.
Inside such a device there will be a special executive unit with a controller that receives signals from the remote control.
So, this unit requires power, and it works on the same principle as a light bulb.
But in chandeliers with LED lamps, the lighting elements operate from a 12V network with direct current. And for this purpose, the design of the lighting device contains a step-down transformer, which has phase and neutral terminals.
Connecting this chandelier is as easy as connecting a regular light bulb.
Sometimes there is a need to install a combination switch to power the chandelier, combined with an outlet.
Safety precautions
When connecting a chandelier or any electrical work, you must be careful and be extremely careful. Receiving an electrical injury causes cardiac arrest, and a spasm of the respiratory muscles may occur. The rules are quite simple:
- Any work is carried out only when the power is turned off, even if it is necessary to change the light bulb;
- The voltage is switched off at the common input circuit breaker of the residential premises. Clicking the switch keys is not enough, since the initial connection may be incorrect;
- All instruments must have handles covered with insulating material and no signs of damage;
- Before starting work, you must make sure, using an indicator screwdriver, that there is no voltage;
- It is advisable to lay a dielectric mat under your feet, or use a material that does not conduct electricity.