Hanging a chandelier on a plasterboard ceiling means completely finishing the room. Plasterboard ceilings require compliance with the rules for attaching lamps. This is especially true for heavy lighting fixtures, since gypsum board does not have high rigidity and the required thickness of the panel slab.
Features of drywall
It is a flat sheet consisting of layers of special cardboard and gypsum with various additives that make it stronger.
The material has advantages:
- holds heat well and “breathes”;
- is an environmentally friendly and hypoallergenic material;
- has a good level of fire safety;
- does not, of course, completely solve the problem of sound insulation, but significantly reduces noise from the outside;
- there are moisture-resistant types of drywall, which expands the scope of its application;
- has absolutely no odor;
- cuts perfectly with the most common tools;
- the process of fastening and installation can be done either using a metal frame or using glue, long nails, etc.;
- used as a final finish for wallpaper, paint, ceramic tiles, stucco and other decorative elements.
When composing an ode of praise to drywall, one cannot ignore its weaknesses:
- insufficient strength, so it is very difficult to hang heavy structures on it;
- even moisture-resistant drywall should not be used in very wet rooms, because gypsum tends to deteriorate;
- you have to be very careful when transporting, because... The slightest bend will lead to splitting of the sheets.
Now, knowing all the features of the building and finishing material, you can move on to more specific issues of its use, for example, when installing lighting.
Ceiling plasterboard: what is it and how to attach it
There are plenty of types of drywall. Among them: wall, ceiling, fire-resistant, moisture-resistant, arched, laminated, façade, reinforced. We are interested in the ceiling. What he really is?
- Sheets that are too heavy will be very difficult to attach to the ceiling, so for this it is proposed to use slabs with a thickness of no more than 8-9.5 mm, and to create something shaped, even thinner - no more than 6 mm.
- Select the correct finishing material according to the room’s humidity level. For bathrooms and kitchens, it is better to take more moisture-resistant samples that do not absorb moisture.
- It is unlikely that you can install sheets of plasterboard on the ceiling using glue. For reliable fixation, it is necessary to install guides and ceiling profiles.
- But the installation tool you need is the simplest: a screwdriver, self-tapping screws, a building level and a hammer drill.
How to get started with a plasterboard ceiling
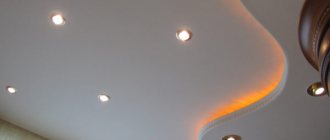
Mounting spotlights on a plasterboard surface is not difficult. The material is an ideal basis for spots. LED lamps also work well with drywall. In addition, they bend well, so they can be used with any configuration of plasterboard construction.
It will be more difficult with chandeliers as they are heavier devices. This requires special stages of preparation for installation and special methods of fastening. Let's consider what experts recommend before starting work with a plasterboard ceiling:
- if the finishing is just beginning, you should think carefully about where exactly the chandelier will be located;
- if the ceiling is already finished, then there is only one way out: select not very heavy models of lighting fixtures;
- the number of profile strips will depend on the fastener: one is enough for a hook, two profiles are needed for a bracket;
- At the place where the chandelier is mounted, attach an additional profile for strength;
- be sure to purchase special fastenings; which ones exactly will be advised to you at a hardware store;
- if you haven’t marked the location of the profile in advance, you can find it using a magnet;
- You must not forget about safety measures: turn off the electricity during installation, use a special screwdriver with an indicator, insulate the contacts.
Information about the weight that drywall can withstand will not be superfluous. High-quality sheets and the right technology allow you to hang lighting fixtures weighing up to 6 kg or even more. This is quite a lot, most lamps are approximately like this.
That's basically it. All that remains is to decide on the type of fasteners and the model of the chandelier.
Preparing for installation
To secure the chandelier to the plasterboard sheet as firmly as possible, it is recommended to perform the following steps:
- Decide on the area where the lighting device will be installed.
- Attach the metal profile to the intended location of the chandelier.
Note! Finding a metal profile under plasterboard sheets is easy. For this you will need a magnet. Sometimes, instead of a metal profile, a wooden beam is used. It will be more difficult to find him.
Types of fasteners
Do you have the right tool and know how to use it? Then all you have to do is choose the right fasteners and know where and which one fits.
- Self-tapping screws of various lengths. To use them you definitely need a profile. If you drive it directly into a sheet, it will not be able to hold absolutely anything, even the lightest appliances.
- An anchor will serve as a more reliable fastening. Its peculiarity is that you will have to make a hole in the drywall and drive the anchor into the concrete floor. For this work you will need an electric drill with a hammer function.
- An extended hook or ring will allow you to calculate the height at which you want to hang the chandelier. It, like amperes, needs to be mounted in a concrete floor.
- Flexible cable hangers will allow you to increase the hanging height.
- The most reliable types of fasteners are brackets, which can be a square solid plate or a cross. If you plan to hang a massive or even cascading chandelier, then brackets are the most suitable option.
You will also need dowels, each type of which has its own application features:
- a plastic dowel nail with tendrils that straighten out after driving; he plays, most often, an auxiliary function;
- The dowel received the name “butterfly” because of the design that looks like wings; the permitted load on it is high - up to 28 kg;
- the “molly” element is screwed into the hole and only then the screw; permissible load – up to 25 kg;
- dowels with or without a drill, made of nylon or metal - driva;
- for the heaviest structures, the Knauf-Hartmut is suitable, where special antennae lock the latch and screw;
- A very common method of fastening is on a spring dowel with a hook and blades.
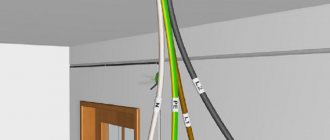
Electrical wiring
The organization of light in any room should be based on a pre-prepared scheme. According to the standard diagram, it is assumed that the wire cross-section is always taken with a margin. This is necessary to prevent short circuits in the network due to changes in the composition of electricity consumers. If new devices that consume electricity appear in the future, you will need a cable that can withstand a larger load. It is not always possible to change it later; it is better to do it in advance.
When the laying of the wires is completed, a hole is made in the plasterboard sheet in the area where the lamp is attached for a new connection.
The procedure for installing a chandelier on different mounts
- Hook mounting
- drill a hole with a diameter of 60-80 mm, choosing a place between the concrete floors, use a hammer drill for this;
- insert a pre-prepared harpoon hook into the hole and secure it securely using special tendrils;
- hang the chandelier by a ring under a decorative glass;
- When installing, take into account the height of the hanging sheet, because the base of the device will fit tightly to it;
- the resulting cracks and inaccuracies can be repaired with alabaster.
- Ceiling profile installation
The fastening method is suitable if you have just started installing the ceiling and lighting. In addition to the mandatory guides and ceiling profiles for the plasterboard sheet itself, additional ones are installed where the chandelier is supposed to be installed. Then an electrical cable is brought to the center of the structure, always in an insulating sheath. Next comes the important stage - hanging the sheet, but before that you need to mark exactly where the hole will be. Remember the advice about the magnet if you suddenly forget to do this. The lighting fixture is attached with self-tapping screws through the canvas to the prepared profile.
- Installation using anchor bolts
Powerful mount that can support a massive chandelier. Follow the correct technology:
- drill a hole in the concrete floor, carefully calculating its diameter, because the anchor should fit into it easily, but not dangle;
- pull out the stud, unscrew the nut a little, insert the anchor, tighten the nut;
- To increase the distance between the canvas and the chandelier, insert a rigid rod on which to hang the device.
Everything ingenious is simple, and in our case it is also reliable.
- Bracket Mounting
The plate or cross type bracket is installed before the drywall is hung. The part is securely attached directly to the concrete floor. In the center of the bracket there is a hook for hanging the chandelier. On the sheet of finishing material, the location of the hole is marked, through which the main fastening of the chandelier to the ring occurs.
- Installation using a mounting strip
This method is used if the lighting fixture is equipped with a strip. For fastening using this method, a place is provided under the drywall for the embedded part, which is securely screwed with anchors. After installing the finishing sheet, a standard strip is attached using self-tapping screws, onto which the chandelier itself is hung. It is quite possible to use a wooden beam as a mortgage element.
When installing a chandelier using any of the above methods, it does not hurt to check the reliability of the fasteners. To do this, you need to hang a test weight on it, tug on it, and hang on it a little.
Technology and sequence of work
Initially, you should choose the right location for the chandelier. Professional builders, even before the installation of the suspended covering, specify the location and method of fastening the lamp, and after completing all the work, including painting, they indicate the location of the electrical wiring. With an unprofessional approach, there may be a frame element at the installation site or a missing electrical outlet, so these points should be taken into account at the repair planning stage.
The chandelier fixation unit, like the rest of its components, must be correctly assembled before fixing it to the ceiling and be sure to check the correct connection of the electrical wires. For complex options or custom solutions that allow you to assemble only the body, it is preferable to stop at the stage of assembling the main structural elements. This means that you shouldn’t think about decor at the same time.
Having marked the location for attaching the lamp to the ceiling hook, using a drill and ring drills, make a hole in the plaster slab with a diameter sufficient for a light and free dowel or plastic plug in the reinforced concrete slab. If there is insulation or a soundproofing layer in the inter-ceiling space, it is recommended to clear the drilling hole for the dowel from mineral wool or other insulation to a clean slab.
Attention! All installation work must be carried out in compliance with electrical safety rules
In this case, it is important that the electrical network is de-energized; testing the functionality by applying voltage is carried out after the final fixation of the wires in the block
How to hang a chandelier if there is already drywall
There are situations when you want to change the lighting, but there are no plans to renovate the entire room. The ceiling is already covered with plasterboard. Installation of a lighting device is also possible in this case. Actions must be carried out strictly in accordance with the proposed plan.
- Cut a hole in the desired location. This can be done using the following tools: a circular saw, a jigsaw, nibblers, a hacksaw blade, or drill with a drill.
- Using a drill inserted for convenience into a plastic bottle of the same circumference as the hole, drill another hole, but this time in the main ceiling. The bottle will play the role of a garbage collector.
- Using a suitable size wrench, tighten the anchor thoroughly. The end of the anchor bolt must be wrapped with insulating tape.
- Hang the chandelier on the hook, connecting all the necessary wires.
- Put on a decorative cap.
Wiring a chandelier on drywall
If you are not a power supply specialist, then you need to know at least the basic rules for connecting a lamp to power. But a chandelier with several lighting options will still require the help of specialists.
To ensure that the device works and you remain safe, follow the following rules:
- turn off the electrical panel;
- you need to have a special adapter for fastening the wires, because this cannot be done directly;
- pass the phase wire through the switch;
- be sure to use terminals and not twist;
- Protect all exposed contacts with insulating tape.
To install a chandelier on plasterboard, use only high-quality elements and parts. The reliability of the design and your safety depend on this.
Useful tips
Some tips for those wishing to install a chandelier on a plasterboard ceiling:
- We determine the type of lamp and mounting methods in advance.
- We equip the area where it is planned to install a ceiling lighting fixture with an additional profile or embed. To attach a heavy chandelier, you will need an additional strip.
- If the chandelier is light and will be mounted on plasterboard, you need appropriate fasteners (dowels, spring structures). If the lamp is heavy, we use anchors.
When performing installation, we take into account the requirements of safety regulations
We are talking about reliable scaffolding, turning off power during work, and using personal protective equipment. A responsible attitude towards electrical wiring is especially important. It should be placed in a corrugated pipe. This will better protect the wires. If the wire is installed in the base ceiling, you will need a groove - a special channel with a depth of 5 cm. The chandelier should be attached to the anchor hook after the reliability of the fastening has been checked.
This can be done, for example, using a 16-kilogram weight hung on a thick rope.
This will better protect the wires. If the wire is installed in the base ceiling, you will need a groove - a special channel with a depth of 5 cm. The chandelier should be attached to the anchor hook after the reliability of the fastening has been checked. This can be done, for example, using a 16-kilogram weight hung on a thick rope.
The quality of drywall and fasteners is especially important. You shouldn't skimp on safety. Poor quality materials will not allow the fasteners to support the weight of the chandelier, and the structure may collapse
Poor quality materials will not allow the fasteners to support the weight of the chandelier, and the structure may collapse.