If you want your room to have a beautiful and perfectly even ceiling, try making it yourself. Show your imagination!
Drywall is perfect for implementing the most complex and unusual ideas.
With its help, you can assemble various types of ceiling coverings, among which the following designs are especially popular:
- double (an excellent solution for obtaining soundproofing properties);
- two-tier (ideal for spacious rooms with high walls);
- figured (allows you to add dynamics to the interior, used for additional decoration of rooms);
- tension (an alternative for those who do not want to work with joints).
What is drywall?
Drywall belongs to the category of universal building materials, widely used for finishing horizontal, vertical and inclined surfaces.
The design of a plasterboard sheet (GKL) includes two layers of thick cardboard, between which there is a core. The main ingredient of the internal filler is a hardened gypsum solution, which may contain various modification additives.
Gypsum plasterboard, unlike other similar building materials, has moisture-resistant qualities, relatively light weight and a variety of sizes, making it ideal for rough and finishing ceilings.
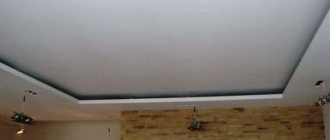
With the help of gypsum boards, you can construct both a classic single-level ceiling with lighting, and install a two-level ceiling with hidden light elements.
Why drywall? All the benefits.
If you are still in doubt about your choice, here are the main advantages of the material that allow it to be among the market leaders in finishing materials for walls and ceilings:
- optimal leveling of any, even the most neglected surface;
- dry installation method;
- a unique opportunity to create multi-level structures of any shape;
- organization of special niches and boxes for LED lighting;
- large space for creating lighting scenarios;
- the possibility of insulation and sound insulation of the mounted structure;
- high-quality camouflage of wires and pipes, as well as all traces of communication in general;
- possibility of painting and combining with other materials (stretch ceilings);
- simple care;
- affordable price.
Perhaps the last item on our list will have the most impact on someone, but this will not overshadow the fact of the numerous advantages that you receive.
Advantages and disadvantages of drywall
Correct work with drywall is carried out in strict accordance with prescribed technical standards, requirements and safety rules.
Experts in the field of major repairs and construction highlight the following positive qualities of the material:
- Versatility of use. Suitable for finishing heated and unheated premises for various purposes (living rooms, bathrooms, domestic and garage extensions, loggias)
- Soundproofing effect, combined with good air exchange and minimal heat loss - gypsum ceilings are popular in private homes and country cottages with roofs made of corrugated sheets or metal tiles.
- Easy to install spot and main lighting fixtures. Electrical wires, telephone lines, ventilation systems and other utilities can be unnoticed over gypsum board slabs without harming the aesthetic component of the issue.
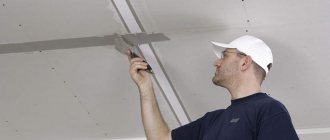
Difficulties in carrying out installation work include the need for high-quality processing of joining seams. Finishing the ceiling with plasterboard requires the active participation of at least two people. When assembling a slatted ceiling box, errors in calculations are unacceptable; even small errors can lead to the formation of cracks and deformation of cardboard sheets.
Features of installing plasterboard on the ceiling
To attach drywall to the ceiling, it is recommended to use profiles, both guides and ceiling ones.
The first ones are shaped like a “P” and are installed initially to make it possible to mount the frame.
Ceiling, C-shaped ones are then attached to them using “crabs”.
- The ability of plasterboard sheets to bend makes it necessary to install hangers over the entire surface.
- Metal structures, along with weighted sheets, are attached using both self-tapping elements and dowels, along with anchors.
- At the same time, the hats need to be recessed a little so that the surface looks even.
Necessary materials for assembling a plasterboard ceiling structure
To create a suspended ceiling from gypsum plasterboard you will need:
- plasterboard sheets (their type is selected taking into account the individual technical specifications and the format of the room);
- metal profile (with its help, a frame skeleton is created for the future structure);
- ceiling wedge anchor (allows you to quickly and reliably attach a metal profile to the ceiling);
- construction knife with replaceable blades (for cutting plasterboard into the necessary fragments);
- cordless screwdriver and self-tapping screws with a press washer (for attaching drywall to the profile);
- hammer drill (to create holes for anchor bolts);
- expansion dowels;
- special tape for sealing gypsum boards;
- construction narrow spatula;
- putty for subsequent finishing.
Required materials and tools
The following tools and materials are required for work:
- drywall;
- marker and pencil for marking;
- grinder and metal scissors, if a frame will be used to arrange the suspended ceiling;
- screwdriver and screws;
- hammer for securely fixing dowels;
- a laser or water level is preferable, a simple level is an alternative;
- ladder;
- profiles;
- straight suspensions, anchors and rods;
- crabs;
- self-tapping screws of different types;
- serpyanka for seams;
- primer;
- brushes or roller for applying primer;
- spatula for applying putty;
- fine-grained sandpaper P 80 – P 100;
- rule;
- knife for cutting drywall;
- putty;
- sealant;
- hammer or drill for making holes in a concrete base.
Preliminary calculations, marking and surface preparation
Before you start sheathing the ceiling, you need to determine the lowest area of the rough ceiling in the room. From it you need to note the distance in height at which it is planned to mount the future structure. This is required to ensure that the plasterboard ceiling frame is installed correctly.
According to accepted standards, the gap between the ceiling base and the plasterboard suspended ceiling must be at least 5 cm. In cases where the interceiling space acts as a kind of box for masking utility networks and large lighting elements, the level of the decorative ceiling must be lowered at least another 15-20 cm.
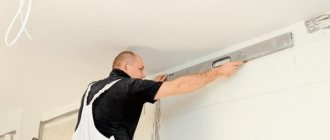
From the resulting point it is necessary to draw an even continuous line, thus capturing the entire perimeter of the room space. The easiest way to do this is with a building level (a laser level is suitable for a large area, a bubble level is sufficient for small spaces).
The next step is to apply construction markings in the places where the profile skeleton is planned to be installed. The distance between the longitudinal profiles must be a multiple of the width of the plasterboard sheet. The standard width of the material is 120 cm, so the ideal option is to install the metal structure with a distance of 40 cm: two guides are fixed at the edges, one in the middle. The places where the hangers are attached must also be marked in advance. Their interval step should be from 40 to 50 cm.
An example of marking is shown in the photo.
At the final stage of preparatory work, it is necessary to mark each plasterboard sheet in accordance with the approved installation plan. Additional markup details can be found in the video at the bottom of this page.
Frame installation
- We fasten the suspensions with anchors; they hold the suspended ceiling much better. The dowels can be pulled out by slightly pulling with pliers, so they are not suitable for ceilings. Also, don't forget to apply sealing tape to the hangers. When you secure the suspension, bend its ends properly so that they bend as much as possible. During subsequent fastening, they should not sag any more, otherwise the profiles will be fixed unevenly.
Attaching the profile extension
- Now you can begin installing the ceiling profiles. They are 3m long, so if your room is smaller, use tin snips to cut them 1cm shorter than the room. If the room is longer, you will need special connecting fasteners to increase the length of the profile.
Note! When extending a profile in length, the joints of adjacent profiles should not be on the same line. There should also be a suspension near the joints.
- Attaching ceiling profiles to suspensions begins from the corners of the room. To secure them without sagging, your partner should take the rule and hold it with a wide grip (so as not to sag) against two guides that form an angle (that is, the rule should be diagonal). This way it will maintain your profile at the level of the guides. At this moment, you will screw the profile to the hangers using 4 self-tapping screws with a press washer. Also, do not forget to attach the profiles to the guides. To prevent them from dangling, it is better to buy self-tapping screws without a drill.
- The corners are ready, now we fix the center of the ceiling profiles to the hangers. If you can’t apply the rule to the center in the same way, then apply it exactly from the starting profile. Be sure to check the evenness with a long level. After attaching the hangers, bend the excess length of the ends up.
- Attach the second profile in the same way, supporting it with the rule. Then go to the opposite wall and attach the next 2 ceiling profiles. Then go to the center and hang the remaining profiles, relying on the ones already installed.
- Now you need to secure the jumpers where the drywall joints will be (every 2.5 m). They are attached using special single-level fastenings - crabs. Screw the crabs into the required places using 4 self-tapping screws. If you retreat a small distance from the main ceiling, then the crabs may not pass from above, so you will have to hang them in advance.
Fastening elements for hanging frame
- Cut the jumpers from the ceiling profile and fasten them to the crab with 4 self-tapping screws, bending the antennae. There is no need to attach the lintels to the profiles at the bottom; they will be secured by plasterboard.
- If you need to soundproof the ceiling in an apartment, mineral wool is usually used. It is cut into rectangles larger than the cells and placed inside the frame, additionally clinging to the hangers. To enhance the effect, you can also fill the profile cavities with it. Mineral wool absorbs sound very well, but when working with it you must use a respirator and gloves.
If you want to watch the installation of a plasterboard ceiling in action, a video lesson will help you learn some of the nuances of the work:
Creating a reliable metal frame for a gypsum board ceiling
The production of the ceiling begins with the installation of the load-bearing base. The guide to creating a metal frame includes 5 main points.
Holes are drilled on the prepared line at the previously designated points. A UD profile is attached to the rough ceiling, which is fixed using dowels and nails.
Installation of hangers is in progress. Their main purpose is to fasten the main longitudinal metal profiles. They are not needed for transverse structural elements. The hangers are fastened with ordinary dowel nails. If voids are detected, it is rational to use a wedge ceiling anchor.
The next step is to install a CD type profile. Before hanging them, it is necessary to determine a flat horizontal plane running across the entire area of work. To do this, just pull the nylon thread.
The longitudinal CD profile is initially fixed between opposite UD parts (specifically, it is inserted into grooves specially designed for this purpose). Then it is sequentially mounted into prepared hangers. The free ends of the hangers are bent vertically downwards, completely encircling the profile and secured with small universal screws.
The final stage of creating the frame involves the installation of transverse profiles, which are recommended to be placed at a distance of half a meter from each other.
The finished frame must be carefully pulled down on each side. This technology allows all suspensions to be aligned to the same length and helps identify possible irregularities in the horizontal plane of the frame.
Ceiling markings
- Using a tape measure, we take measurements of each corner in the room - we need to determine which of them is the lowest;
- from it we make a mark on the wall at a distance of 5 cm if you do not plan to install spotlights, and 8 cm if you still plan to install additional lighting;
- use a prepared laser level or an alternative in the form of a hydraulic level and make similar marks in all 4 corners;
- connect them into one perfectly straight horizontal line using a paint cord: to do this, you need to pull it between each mark and sharply release it - all that remains is to draw a straight line along the remaining paint mark;
- draw all four horizontal lines in the room in this simple way;
- The marking is ready - and you can proceed to the next stage of installation.
Basic principles of working with drywall
Before you begin installing a plasterboard suspended ceiling, you need to think through and organize the space above the ceiling. All electrical wires and cables are placed in flexible corrugated tubes and secured with metal clamps to the rough finish. The gypsum boards indicate the location areas of the lamps, and the corresponding holes are cut along the contour of the outlined figure.
Step-by-step instructions on how to attach drywall are as follows:
- Cut the sheets for ease of fastening.
- Seal the metal profile with tape to provide additional shock absorption and sound insulation.
- Attach the sheets along the edges to the frame. The distance from the edge to the fastening point should be about 2 cm. The pitch between the screws should be 10-15 cm.
- According to the installation rules, the panels that are closely adjacent to the corner sections of the walls are first attached. Next, you need to fix the remaining sheets around the entire perimeter of the room. The central elements of the ceiling structure are attached last.
After completing the installation work, the finished suspended ceiling must “settle” for 48 hours. Then you can begin finishing. To treat the joints, a primer is used, after which the installation seams need to be puttied (the Knauf brand gypsum mixture is perfect for these purposes).
To add additional rigidity and strength to the finish, it is recommended to use reinforcing mesh.
To do this, you need to apply 60% of the putty, drown the mesh with the mixture that has not yet hardened, smooth out the unevenness with a spatula, and fill the remaining volume of the joining recess with a second layer of putty. The frame on the plasterboard ceiling is ready.
Suspended ceiling manufacturing technique
A novice craftsman without experience who does the work with his own hands is recommended to carefully familiarize himself with each stage of decorating the ceiling space with sheets of plasterboard.
Marking
After preparing the room, markings are carried out:
- Using any type of level, draw a straight horizontal line on the wall below the ceiling. If everything is done correctly, then the lines will exactly meet at one point.
- Mark the grid on the ceiling. Work begins from the center of the building base, moving towards the walls. Draw squares measuring 0.5x0.5 or 0.6x0.6 m. Such a grid will allow you to correctly fix the profiles and avoid sagging of the drywall sheets.
- On the base, the places where utility lines will be laid are marked. Hatches are installed in these areas so that in the event of a breakdown the entire structure does not have to be dismantled.
- Focusing on the level line, mark the ceiling height. For a standard design, 50 mm is measured from the ceiling line. Markings are made along the entire perimeter of the room. Next, focusing on the level, draw a horizontal line so that the two markings run parallel to each other. You can ignore the marks on the wall. Installation of built-in lamps requires increasing the size of the suspended ceiling to 60-70 mm. If there are large communications, the ceiling is lowered to a level of 150-250 mm.
Frame installation
Before installing the frame, it is recommended to apply putty to the joints and seams. The gaps between the wall and the ceiling are sealed with sealant. After this, an antiseptic is applied to the building base. Such manipulations will prevent the emergence of an aggressive biological environment, and will also help get rid of existing mold and mildew. Next, install the frame:
- on the ceiling, according to the markings, make holes for dowels for suspensions and fix them with a hammer;
- hangers are mounted using self-tapping screws;
- Profiles are attached to the material and connected to each other with special crabs.
If the work is done correctly, the structure will be securely fixed to the ceiling. If some parts or the entire structure is wobbly, it is recommended to redo the frame.
Fixing drywall
It is very difficult to install drywall on the ceiling alone. To cope with this work, it is recommended to use the services of an assistant. If it is not possible to involve third parties in the installation of the material, you can use the following options:
- Buy a lift. This device lifts the sheets to the desired height, after which the material is manually fixed to the profiles. The advantage of this method is the ease of installation of drywall. The disadvantage is the high cost of the mechanism. It is not advisable to purchase the device for one-time use. The device is usually used by professional craftsmen. For one-time use, it is recommended to rent a lift.
- Build a T-shaped structure from wooden blocks, up to the height of the profiles. This design will securely hold the drywall sheets, which will facilitate installation. The disadvantage is that it is difficult to independently raise the material to the desired level.
Direct installation of drywall is done as follows:
- The sheet is placed with the short side along the short wall at a distance of 2 mm from the base. The long side is located in the middle of the central axial profile. After this, the material is fixed to the frame using self-tapping screws. The distance between the fastenings should be 15-20 cm. The sheet is fixed with self-tapping screws to both longitudinal and transverse jumpers. All screws should “sink” into the drywall by 1 mm.
- The next sheet with the short side is applied to the short side of the fixed material. After this, the drywall is also secured using self-tapping screws. The manipulation is carried out to the end of the ceiling so that the material is fixed on one network line. A piece of the required length is cut from the last sheet. The material is attached with the factory side to the installed drywall and the cut side to the wall.
- Fastening the next row begins from the opposite short wall of the room. This must be done so that the joining seams do not match. In other words, the design is performed in a checkerboard pattern.
Rough finish
Immediately after installing drywall, the surface is not decorated. Even such smooth material needs preparation for the finishing coating. Masking of joining seams and screw heads is required. Rough finishing is done like this:
- the fastener heads are sealed with putty - one stroke with a spatula is enough to hide imperfections;
- Serpyanka is fixed to the joining seams - for ease of work it is recommended to use tape with an adhesive surface;
- a thin layer of putty is applied to the reinforcing mesh;
- take a break to let the solution dry - the drying time of the composition is indicated on the packaging;
- the putty is treated with sandpaper to get rid of traces of the spatula;
- the surface is cleared of dust and treated with a primer - the primer is applied in two layers, taking a break between them to allow the composition to dry.
Installation of lamps
The design of the ceiling space will be incomplete without installing a lighting fixture. Traditionally, chandeliers are used in houses and apartments. They can be attached to a suspended ceiling using two methods. If the device weighs up to 20 kg, then proceed as follows:
- at the surface preparation stage, in the place where the chandelier will be located, fix a piece of round or square plywood, the thickness of which is at least 2 cm, and the dimensions are 250x250 mm;
- a hook with a thick screw thread is fixed on the prepared area;
- on the sheet of drywall on which the chandelier will be located, make a hole for the hook;
- the lighting device is fixed to the mount;
- if the chandelier is not hung on a hook, then it is screwed to the plywood using a self-tapping screw directly through a sheet of drywall; the main thing is to choose a fastener of the appropriate size.
Lighting fixtures weighing 20 kg or more are fixed directly to the concrete building base. If the height of the stretch ceiling exceeds 150 mm, then the area for fixing the chandelier is prepared in advance before installing the drywall. If the size is less than 150 mm, then the place for hanging the lighting fixture can be prepared after installation of the material.
A chandelier weighing more than 20 kg is suspended from the ceiling as follows:
- in the sheet of plasterboard where the chandelier will be placed, make a round hole with a diameter of 50 mm;
- using a hammer drill, drill a hole in the ceiling 80 mm deep;
- An expansion anchor is fixed to a hook with a diameter of 8 mm;
- the device is inserted into the hole, wrapped and driven in with a hammer to ensure secure fixation.
After the completed manipulations and decorative finishing, the chandelier is hung.
How to hang a chandelier on a concrete ceiling, mounting methods.
If a light chandelier is used to illuminate the room, then such complex actions need not be performed. The only device that is required in this case is an expanding anchor. A round hole is made in the place where the chandelier is attached to the drywall. Its diameter should not exceed 8 mm. Next, the anchor is healed and placed inside the structure through the hole made. After this, the device should open and the edges of the anchor rest on the sheet of drywall. Next, the nut is tightened and the lighting fixture is fixed, but only after decorating the surface.
Decorative works
After completing the rough finishing, they move on to decorating the drywall. Professionals recommend painting or wallpapering. You can also fix decorative PVC tiles, but this will further reduce the ceiling space. Professionals do not recommend using decorative plaster for application to drywall. The solution is prepared using water, which has a detrimental effect on the material. For this reason, it is recommended to refrain from using decorative plaster.
How to find a profile under drywall?
In order not to miss and get the fastening equipment exactly into the metal frame, we recommend using powerful neodymium magnets.
Using it, you can easily find a rack, guide profile or auxiliary metal jumpers under the plasterboard surface. Finding a profile ceiling frame is necessary in order to hang lighting fixtures or other decorative interior elements.
If there is an error in the calculations, the entire structure will sooner or later collapse on the floor, so it is very important to determine the correct point for fastening. To do this you need:
- Select an approximate location for future mounting.
- Place a thin sheet of paper or fabric on the ceiling to prevent the magnet from scratching the surface.
- Place a neodymium magnet on the fabric and begin to slowly move it along the intended search area.
- When a magnetic reaction occurs, mark the location with a pencil.
Please note that for the most effective search for a metal profile, it is better to use a large magnet. It is capable of covering a larger radius at a time, which means detecting metal will not take much time.
Fastening and puttying gypsum boards
Self-tapping screws with a length of 25 to 45 mm are used as fasteners, depending on the thickness and number of sheets. They are screwed in in increments of 25–30 mm, the heads are recessed a little so that later they can be easily puttied.
Before installing drywall, all communications should be carried out and holes for lighting fixtures should be drilled in the sheets.
The sheets are arranged in a checkerboard pattern. It is clear that all joints must be on the surface of the profiles. To cut sheets, you can use an ordinary hacksaw.
Do not attach the sheets close to the wall. By leaving a gap of 1–2 mm, you can prevent deformation of the structure due to thermal expansion. A decorative corner glued around the perimeter will easily hide this gap.
It is better to wait a couple of days before plastering the ceiling. Then the sequence of actions will be as follows:
- All joints are cleaned. Usually there are special chamfers along the edges of a sheet of drywall. If they are missing, then they are made with a plane before installation or with a knife after installation of the sheets.
- The seams are covered with putty, reinforcing tape is laid on top and slightly pressed into the wet solution.
- After drying, the seams are smoothed with putty, and the places where the screws are attached are covered.
- The surface is leveled with fine sandpaper, after which a layer of finishing putty is applied to the ceiling.
In the future, such a ceiling can be painted, wallpapered, or other finishing materials can be used.
Preparing for painting
The instructions for preparing the ceiling for finishing consist of three points:
- Remove putty imperfections by sanding. To do this, you can use a grinder (disc or vibration), as well as a hand grater with fiberglass sanding mesh. The author uses #80 mesh for the first pass and #120 for finishing sanding;
Grids No. 120
Tip: When sanding, it is important to provide bright lighting to the ceiling. It is advisable that the light falls on the plane that you are currently sanding at an oblique angle: then the shadows cast by the irregularities will not allow you to miss them.
- Vacuum the ceiling or sweep it thoroughly with a broom to remove plaster dust. It will interfere with the application of paint;
- Apply a coat of penetrating acrylic primer using a roller or brush. The primer will reduce the consumption of noticeably more expensive paint and will glue dust particles that inevitably remain on the surface of the plasterboard.
Applying primer with a roller
Attention: you can paint gypsum boards with light water-dispersion paints no less than a couple of weeks after completing the puttying of the joints. If the gypsum hydration process has not completed in the seams by the time of painting, they will turn out a darker shade, regardless of how many layers of paint you apply.
Install the main frame profiles
YouTube channel “KNAUF Russia”
Cut out the necessary pieces from the PP 60×27 profile and insert into the guides. Position them so that the centers of the beams coincide with the previously marked marks.
YouTube channel “KNAUF Russia”
If the length of one profile is not enough, add an additional section and join them together using a special connector.
Advantages and disadvantages
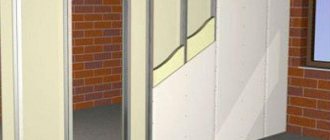
In a wooden house, you can also cover the ceiling with plasterboard. Regardless of where the sheet material will be installed, this finishing option has its advantages and disadvantages. Among the first, we should highlight the durability of the material and the speed of work.
The sheets have a relatively small mass, so they will not put additional load on the floors. The material is environmentally friendly, so it can be installed even in children's rooms. According to experts, plasterboard walls are also good because they are able to regulate the microclimate in the room. An additional bonus is that the fabrics are hypoallergenic. They do not emit foreign odors during installation or during operation.
Wooden walls are considered quite warm, and if they are also covered with plasterboard with a layer of thermal insulation, the house will become more comfortable and economical to live in. After all, its owners will be able to save on heating. Drywall is characterized by flexibility, which allows it to be used when decorating arches. And if such work is planned to be carried out, you should select material with the appropriate marking.
The walls in a wooden house cannot be called fireproof, but if they are covered with plasterboard, the core of the sheet material can become a kind of barrier to the spread of flame. On such walls, only the cardboard layer will burn out. Moreover, gypsum plasterboard is also sold in a fire-resistant version, which can be used in rooms with appropriate requirements for finishing materials.
Another advantage of plasterboard walls is that they can hide communications, which, however, must be laid in heat-insulating corrugation. Finishers like plasterboard so much for another reason that it is easy to process. The sheets are easy to cut, and you only need to use a sharp knife. The walls of private houses usually have requirements for vapor permeability. Drywall has the ability to breathe.
Although it is usually used in conjunction with soundproofing materials, the sheets themselves also have similar properties. And this finishing is quite inexpensive. After its installation, the walls turn out to be even and smooth, which practically does not require additional preparation before decorating.
Before you start finishing with plasterboard, you should also familiarize yourself with the disadvantages of this material. Among others, fragility and inability to endure high loads should be highlighted. The last factor does not allow attaching heavy objects to such walls. Moreover, if the surface is damaged, the gypsum core will be exposed, which will crumble easily. Repairing such a defect involves the use of putty, which does not always allow achieving an ideal result.
Before attaching drywall, you should ask under what conditions it will be used. If we are talking about a kitchen or bathroom, you should choose moisture-resistant sheets, which are more expensive. This also applies to canvases with fire-resistant characteristics. If you cover the walls of a wooden house with the usual type of plasterboard, which then comes into contact with water, you may encounter the problem of swelling and deformation of the material.
Drywall on wooden walls is installed using a certain technology, which necessarily involves the installation of a frame. If you cover the walls using timber, its natural moisture can negatively affect the drywall, which will swell and change its original linear dimensions.
Secure the hangers
YouTube channel “KNAUF Russia”
Next, at the previously marked points, install hangers for the main frame profiles. In reinforced concrete floors - using metal wedge anchors and a hammer drill, in wooden floors - with self-tapping screws and a screwdriver. After installation, bend the hangers down.
For sound insulation, you can also stick sealing tape on them or coat them with silicone. An even greater effect is achieved when using special anti-vibration suspensions with elastic inserts.
What is needed to install a plasterboard ceiling?
You will have to work with long and relatively heavy materials. You will definitely need an assistant.
The tools you will need are:
- water or laser level;
- pencil;
- marker;
- metal scissors (a grinder will do);
- perforator;
- hammer;
- knife;
- a screwdriver and several PH2 Phillips bits.
The list should be supplemented with tools and devices that will make your work much easier:
Chalk shnu
Special bit for drywall with limiter
An ordinary building level would also be useful. If you don't have a hydraulic level or a laser level and have nowhere to get them, you can get by with a regular one.
Trick: how to do without a laser level
- Secure a regular level with electrical tape to a long, perfectly straight bar;
- place the bar on a known horizontal surface;
- If the bubble is not exactly in the middle, slide a thin wedge under the appropriate end of the level. Try to perfectly align the bubble;
- rotate the bar 180°. Make sure that in this position the bubble is exactly in the middle.
So instead of a short and inaccurate level, you got a long and accurate one.
You will also need finishing tools. The list will depend on the type of finish, but in any case the following are necessary:
- spatulas - narrow and wide;
- bucket (or other convenient container).
It is advisable to have an attachment for a drill (mixer) for mixing construction mixtures.
A simple bench will help a lot. Forget about stepladders - working on them is inconvenient. Make a simple bench out of boards or roll up a simple bench out of chipboard. Calculate its height so that there is 10-15 cm above your head to the future ceiling surface.
List of materials:
- guide profile;
- ceiling profile;
- single-level connectors (“crabs”);
- longitudinal connectors (if longitudinal profiles longer than 3 meters are required);
- straight hangers (for heights up to 20 cm);
- anchor suspensions + rods (for heights over 20 cm);
- dowel-nails with a diameter of 6 mm
- or wood screws for wooden walls and ceilings (black, with a rare thread pitch);
- self-tapping screws with a press washer 4.2 x 13 mm (silver, without drill head);
- self-tapping screws for drywall (black, with frequent thread pitch)
- and the drywall itself;
- as well as putty;
- primer;
- and serpyanka.
How many materials will you need? In order to have enough, but not have any surplus, you need an accurate calculation. How to do it, read in the section “Scheme and calculations”.
Is lathing always necessary?
A suspension system made of metal profiles or wooden beams is used quite often, but there are cases that do not involve the use of such structures:
- The ceiling surface does not have significant deviations or deformations. The most common problem is incorrect joining of floor slabs, which requires a lot of effort to align. In houses and apartments built in compliance with all technologies, there are no such differences, which makes it possible to quickly correct minor irregularities by filing gypsum boards.
- The height of the ceilings does not allow for the creation of lathing, since the structure eats up part of the space. In such a situation, drywall is mounted with glue and reinforced with dowels or anchors.
- It is necessary to carry out repair work as soon as possible. This installation method is suitable for office or residential premises in which a full renovation is planned over time.
The absence of a frame has significant disadvantages:
- The need for careful preparation of the base. The surface must be extremely reliable, so a set of measures is carried out to help identify hidden problems. With the frameless method, fixation is carried out with glue and not with screws, which presupposes good adhesion.
- Difficulty in laying communications. You will need many grooves for electrical wires, which is especially difficult if you want to create a large number of lighting points.
- It is very difficult to do all the work yourself: in order to fix the element, you need to align it and hold it for some time.
The technology for gluing plasterboard to the ceiling is simple, but it is practiced extremely rarely, since there is no absolute guarantee of the reliability of such cladding, especially if the work was carried out by a home craftsman without relevant experience
Install wiring and sound insulation
Electroas.ru
Before covering the frame with plasterboard, you need to lay electrical cables. As a rule, they are attached to the ceiling or suspensions. Under no circumstances should wires be laid inside the frame, as there is a risk of damaging them with screws when installing the sheets.
YouTube channel “KNAUF Russia”
To increase the sound insulation of the ceiling, mineral wool slabs are laid between the frame profiles or on top of it. If the free ends of the suspensions are sufficiently long, they are bent, thereby holding the sound insulation layer.