Building a floating ceiling from plasterboard without knowing the technological tricks and tricks may seem like an impossible task for a beginner. But it is not all that bad. Fortunately, there are not many secrets in how an unusual design is built, and how the structure of a floating ceiling made of plasterboard is assembled, so you can spend a few days understanding the technology and boldly get down to business. The remaining points are practically no different from the standards used for plasterboard ceilings.
Features of a floating plasterboard suspended ceiling
Why did this name arise? The term “floating” suspended ceiling appeared due to the special design of the cladding:
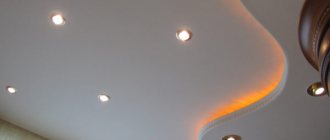
- The design uses one or two backlight circuits, usually based on an LED cord or strip. As a result, a very bright edging is formed along the edge;
- Thanks to the powerful lighting, the ceiling fastening details are practically invisible; it seems that the lower tier of plasterboard cladding is not fixed and is floating overhead.
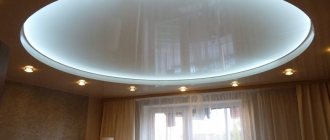
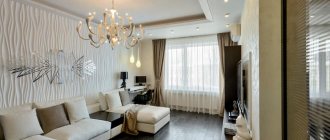
A floating plasterboard ceiling with lighting, photo, looks much more impressive than standard ceiling decor.
It should be remembered that the appearance and perception of a floating ceiling finish largely depends on the correct location of the lighting. Future owners need to be prepared for the fact that when the LED lighting is turned off, the decorative finish is perceived as an ordinary ordinary plasterboard ceiling. Not that this is a big drawback, but sometimes having the ceiling light on all day can be annoying. Especially if the weather outside is sunny and there is plenty of light in the room.
The second important feature is that the backlight very well reveals all the shortcomings made during installation work. A hired craftsman who undertakes the manufacture and installation of a floating plasterboard ceiling must have, as they say, “straight” hands and a conscience. The design of suspended floating ceilings is a rather complex and complex thing, so a good specialist can tell you how this or that element, or even the entire surface of the ceiling, will look before the work is completed.
Installation and connection of lighting
Scheme for attaching LED lighting to a suspended ceiling When your frame is ready, you can finally attach the lighting.
Follow these basic rules for installing LEDs:
- Cut the tape only in specially marked areas.
- To connect several strips into one, you can connect them using special LED connectors for connecting and connecting power. However, it would be safer to solder the tape yourself with a regular soldering iron.
- The power supply must have a reserve of 20-30% power, otherwise sooner or later it will burn out.
- Fastening to metal areas should only take place on insulating material.
- Under no circumstances should you confuse the location of the 220 volt voltage input from the outlet and the 12 volt outlet. Do not work under voltage.
The connection diagram is as follows:
LED strip connection diagram
- One end from the power supply goes to the 220 volt wire, and the other to the LED strip.
- If you are using an RGB strip, then connect it through the controller while maintaining the polarity. The red wire is positive, blue or black is negative. You cannot swap them.
- Connect and check the functionality of the LEDs. If everything is in order, you can stick it to the required place using self-adhesive film.
Connection diagram for a long strip with one power supply
Scheme for parallel connection of several power supplies, if a tape length above 5 meters is required
A video that clearly explains how to connect an LED strip to the network:
Connecting an LED strip is a fairly simple thing. The main thing is to buy the appropriate power supply and observe the polarities. LED ceiling lighting allows you to create a spectacular look, and you can do it yourself.
Advantages and disadvantages of a floating plasterboard ceiling
This design option for the ceiling surface is not suitable for everyone. Some people like simple, ascetic ceiling decor, while for others, a single-level plasterboard ceiling is not enough; they need something exclusively bright and unusual.
Of course, a floating ceiling has its advantages and disadvantages. Let's look at the positive aspects of the finish:
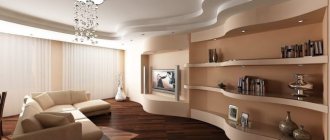
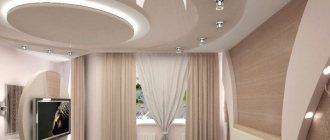
- The composition turns out to be very beautiful, but without the frills characteristic of multi-level stretch ceilings;
- The overall design looks quite sophisticated and stylish at the same time. The construction of the ceiling compares favorably with all other schemes, including those with pictures and decorative figures, in its refined style. The soaring ceiling has everything you need to be beautiful, and at the same time there is nothing unnecessary so as not to look tacky;
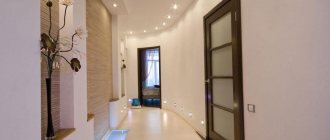
- A floating ceiling with side lighting can be considered an ideal option for organizing room lighting. Especially if, due to the location at high latitudes, the sun does not spoil the owners much with its light, and does not rise high above the horizon in winter and autumn.
Some designers argue that an LED cord laid above a window opening in a room with a soaring ceiling can to some extent replace daylight. And thereby increase the degree of comfort in the room.
If we talk about the negative aspects of a decorative ceiling, there are not so many of them.
There are only two serious disadvantages:
- Large expenses, both for drywall and profiles, and for paying the master for conscientious work and high qualifications;
- The production of a floating ceiling usually takes a long time. At the same time, the customer has to constantly, as they say, keep his finger on the pulse so that workers, on their own initiative, do not simplify or miss any important aspects of finishing.
Of course, the time required for the manufacture and installation of a floating ceiling is 2-3 times longer than for a regular or two-level option. Despite the fact that the frame installation scheme itself and the methods for arranging the adjacent zones do not contain anything new technologically.
For your information! Choosing a circuit design causes certain difficulties; more often you have to resort to the services of a professional designer.
It is difficult to determine how well a plasterboard ceiling will look based only on sketches. Planning is good, but the participation of experienced craftsmen allows you to finalize the soaring ceiling according to inspiration and a sense of style.
Drafting
Before starting work, you should visually see how many transitions there will be and what the structure will be. And it’s also worth deciding on the lighting.
Scheme for installing lighting for a floating ceiling The first thing you need to do is a drawing. It is necessary to put all measurements on it, indicate the places where the profiles and transition points will be, and also indicate the points of passage of lighting. When running new wiring under drywall, it should be done directly into the wall above or into the ceiling joist. You should not make a drawing “by eye”. This is fraught with incorrect lines and transitions. If asymmetry was intended, this is also laid out for the project.
Necessary calculations and drawings
The markup is standard. To find the lowest point of the ceiling, you need to use a level. From this point you need to step back 10 cm. This distance will allow you to lay soundproofing material (if required) or run wires for lighting at the first level. This point is placed on all 4 walls, after which a line is drawn indicating the lower point along which the profile will be attached.
Drawing with dimensions for mounting profiles on the wall and ceiling. Then, going down another 8 cm, draw the same lines through all the walls. This will be the border of level II. On the ceiling itself, lines are drawn 60 cm apart from each other. These are the future profiles. On these lines, another point is placed every 60 cm. These are future pendants. A drawing of a niche for lighting is made at the first level of the ceiling.
Types of plasterboard floating ceiling
Most often you can find a classification of the division of ceiling decoration according to two criteria:
- According to the number of decorative plasterboard levels in the ceiling structure. The system can be combined in single-level and multi-level versions. It is clear that the more levels, the higher the weight and load on the ceiling mount, therefore, when assembling a floating ceiling, they try to make the decorative parts compact, or to place them as close as possible to the walls of the room;
- The second determining criterion is the way the lighting is organized. Usually two types are used - along the outer and inner edges of the decorative box.
The single-level option is a simple flat ceiling, with LED strip lighting hidden around the perimeter. The scheme is quite simple and often does not require any major investment.
Important! The profile on the ceiling will need to be laid with a double 60x40 grid, and not a single row, as is usually done when laying a traditional simple plasterboard ceiling.
Multi-level soaring ceilings have several additional layers of plasterboard finishing. The first layer is technological, the second and third are decorative.
Required materials to create a ceiling with light lines
- Plasterboard ceiling 9.5 mm.
- Profiles: PNP, PP, aluminum for LED strip.
- Hangers for fixing ceiling profiles.
- Dowel-nails and anchor-wedges 6*40.6*60.
- Screws for fastening profiles, hangers 11 mm, for plasterboard 3.5*25 mm.
- Electrical wires for wiring.
- For a light strip in the ceiling: LED strip, plexiglass, plastic corners (the smallest ones).
- PVA glue.
- Primer mixtures.
- Putty materials for reinforcing seams, sickle tape.
- Finishing putty.
Materials for creating a floating ceiling
Required materials for the floating line
Materials are purchased at a rate of 10% more.
Diagram of a floating plasterboard ceiling with lighting
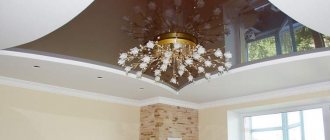
The level of perception of the ceiling finish depends primarily on the correct choice of lighting scheme. Since exclusively LED strips are used to organize the floating effect, firstly, they will need to be at least hidden behind the cladding so that only the reflected light flux is visible. Secondly, it is necessary to choose the right angle of incidence of light. The emission power of the LED strip is selected so as to successfully illuminate and mask structural elements, but at the same time not blind residents or create discomfort due to the excessive brightness of the lamp.
Internal lighting of plasterboard sides
The design of a floating ceiling must have a vertical part, a side or a facing panel. It is with its help that it is possible to block part of the light flux directed at the viewer, leaving only the reflected part of the light.
The LED strip can be located on the inside of a decorative niche - a box. One of the options for arranging a soaring ceiling is shown in the photo below.
To obtain a masking effect, the tape should be located at a short distance from the side, as indicated in the diagram below.
This design has three advantages:
- A very simple device for illuminating a floating ceiling;
- Minimum consumption of profiles and drywall;
- Convenient maintenance of LED strip.
The quality of the backlight depends on the amount of dust on the LED cord, therefore, in order to maintain the brightness of the glow, you need to periodically clean and remove dirt from the lamp. If you leave the LEDs as they are, after a year or a year and a half the backlight will dim greatly, and the drywall will not look so impressive.
External circuit
In this case, the backlight strip is located along the outer perimeter of the mounting box. The scheme is quite complex, but at the same time it is extremely popular, since it covers the most problematic part of the floating ceiling - the area where the ceiling trim adjoins the wall.
External lighting provides the most expressive decorative effect, which is why it is used in almost 90% of cases of plasterboard ceiling construction.
How to make a floating ceiling from plasterboard with your own hands
Regardless of the type of material from which the rough ceiling is assembled, two layers of plasterboard are used in the construction of a floating ceiling.
Initially, a layer of plasterboard is laid on the rough ceiling, as is done with conventional cladding. Drywall sheets can be laid on a single-row cage made from a mounting profile, or you can use a double-row frame with additional locks at the intersections of the slats. If the house is old, built of brick and concrete, then you can get by with one row of load-bearing profile.
Niches are cut out in the sheets of the first layer of drywall into which all communications, wires and channels are laid.
The next step is to sew guide profiles onto the ceiling plasterboard for installing vertical sides, as well as hangers for the mounting profile of the finishing layer of plasterboard finishing. Before moving on to further installation work, it is necessary to plaster, sand and paint the area adjacent to the wall. Otherwise, upon completion of the work, getting to this place for finishing will be quite difficult.
Box assembly
The next step is to lay the second layer of drywall. The technology for laying the material completely coincides with the installation of a single-level scheme.
To build a floating ceiling, you need to form a decorative box around the perimeter of the room. In this case, there should be a niche between the outer vertical panel of the box and the walls of the room, into which the plasterboard lighting system will be installed.
Advice! The easiest way to install the LED strip light is already at the stage of installing the vertical walls of the box, thus, it becomes possible to see all the shortcomings made during the installation work.
After the ceiling has been covered with a finishing layer of plasterboard, two parallel mounting profiles 60 mm wide are sewn around the perimeter.
To give the structure additional rigidity, jumpers are placed between the profiles. The result is a metal frame of the floating ceiling box.
Before covering the structure with plasterboard, you need to check with a square that there is a right angle between the vertical and horizontal surface.
The plane of the box is sewn up with sheets of plasterboard cut to size, after which the edges are carefully adjusted using a hand saw. The thinner vertical pieces of the vertical surface cladding are cut using a circular hand saw by cutting a stack of drywall sheets. It turns out a dozen thin narrow rulers of the same thickness and width, which are used to sew up the inner ends of the box.
All that remains is to putty the structure, and you can move on to finishing work.
Preparation and installation of the frame base
The first layer of sheet material is fixed to the ceiling surface and the upper zone of the walls. Using a level (preferably a laser), mark the location of the future frame base.
After which the desired ceiling height is selected - the distance between the two ceiling levels. On average, this figure is 20 cm. After all, in two-tier structures you need a sufficient amount of internal space to install lighting. Otherwise, if there is a need to replace lamps or repair the lighting system, the lack of space will cause serious inconvenience.
The supporting structure for the ceiling with two tiers will be a special frame base, which is made of galvanized steel.
Elements for making the frame:
- guide type profile (27.5 or 30 cm);
- set of anchors with screws (6/50);
- ceiling profile (27.5 or 30 cm);
- straight hangers;
- self-tapping screws (3.5x11 mm or 4.2x16 mm).
Scissors are used to cut profiles, which are subsequently installed in the appropriate places according to the markings. The profiles are fixed with dowels, which are driven with a hammer into holes prepared in advance with a hammer drill. At the end, each dowel is tightened using a screwdriver.
The ceiling profile is cut into pieces, the length of which is 5 cm shorter than the expected ceiling height. The ends are folded so that they do not interfere with the installation process. Pieces of the ceiling profile are attached to both ends of the guide profile.
Next, a piece of the same length as the upper element is cut from the lower guide profile. After that, this part is turned around with its back side, special grooves are cut on it, and the lower profile is screwed to the bottom of the ceiling at the ends.
After this, the remaining sections of the ceiling parts are installed. This sequence of actions allows you to quickly assemble the frame.
Options for finishing a floating plasterboard ceiling with lighting
In order to give the structure a perfect look, you will need to select materials for painting or applying additional texture to the surface of the drywall.
Most often, a floating ceiling is puttied, coated with a primer and painted with acrylic paints. In this case, the color and shades are selected in accordance with the color scheme and the general style of the interior.
Plasterboard laid inside the space outlined by the box can be additionally decorated with ceiling lights. For example, it can be a square or round insert in the form of a stacked lamp; sometimes chandeliers or a composition of built-in and pendant light sources are used.
If the walls of the room are finished with decorative plaster, then on the floating ceiling you can also use small inserts made of Venetian, liquid wallpaper, imitation marble, wood, and internal contours with stretch glossy and satin films can be used.
Frame assembly - which profiles are suitable
You can assemble a floating ceiling with your own hands if you prepare the required number of profiles in advance. The type of profile is determined by the number of tiers and the level of complexity of the structure. Traditionally, special profiles are used for floating ceilings:
- KP 4003 - allows you to provide soft diffused light, combines well with translucent canvases.
- KP 2301 - suitable for bright lighting and the most accurate color rendering.
- KP 4075 - needed to combine two canvases into a single whole without an unaesthetic cut on the canvas.
- PL 75, KP-2, NP-5 - will be needed for the construction of complex multi-tiered structures.
Having these profiles, as well as drywall for finishing and fastening elements, you can proceed to the direct assembly of the frame.
Expert advice
Before laying the first layer of drywall, a waterproofing film on double-sided tape is laid on the supporting profile. This will ensure the absence of condensation, especially on concrete and non-insulated ceilings.
The most vulnerable part of lighting a floating decor is the LED strip light. During installation work, a lot of dust is raised, and when painting there is a serious risk of damaging the LED cord. Therefore, it is necessary to immediately cover the strip light with a layer of transparent film after installation, or provide polycarbonate protective cases for installation.