A floating ceiling is a type of stretch ceiling, often used in interiors. To create a modern interior, designers use fashionable innovative variations, one of which is a soaring ceiling. Functional, beautiful and practical, the new product quickly became popular. The unique appearance of such ceiling structures will make any room original and interesting. In the article we will talk about the features of their design, the rules for choosing materials, installation and use in the interior.
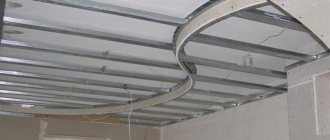
Box formation
The box for hidden LED lighting is the most important component: a strip is mounted in it, which will reflect light rays from the ceiling surface and distribute them throughout the room.
Box assembly steps:
- draw the boundaries of the future box on the base ceiling;
- attach a supporting profile along the border of the drawn line;
- stepping back 10-15 cm from the wall, secure another load-bearing profile, forming the inner perimeter of the box;
- every 40 cm, attach cuttings of the starting strip to the profile, the length should extend beyond the base drawn line by 10 cm;
- connect the supporting and starting profiles with suspensions;
- sheathe the gypsum board frame;
- Install corner profiles at the joints of plasterboard sheets, seal the seams with putty, sand them, and prime them.
Box frame
Preparation and installation of the frame base
The first layer of sheet material is fixed to the ceiling surface and the upper zone of the walls. Using a level (preferably a laser), mark the location of the future frame base.
After which the desired ceiling height is selected - the distance between the two ceiling levels. On average, this figure is 20 cm. After all, in two-tier structures you need a sufficient amount of internal space to install lighting. Otherwise, if there is a need to replace lamps or repair the lighting system, the lack of space will cause serious inconvenience.
The supporting structure for the ceiling with two tiers will be a special frame base, which is made of galvanized steel.
Elements for making the frame:
- guide type profile (27.5 or 30 cm);
- set of anchors with screws (6/50);
- ceiling profile (27.5 or 30 cm);
- straight hangers;
- self-tapping screws (3.5x11 mm or 4.2x16 mm).
Scissors are used to cut profiles, which are subsequently installed in the appropriate places according to the markings. The profiles are fixed with dowels, which are driven with a hammer into holes prepared in advance with a hammer drill. At the end, each dowel is tightened using a screwdriver.
The ceiling profile is cut into pieces, the length of which is 5 cm shorter than the expected ceiling height. The ends are folded so that they do not interfere with the installation process. Pieces of the ceiling profile are attached to both ends of the guide profile.
Next, a piece of the same length as the upper element is cut from the lower guide profile. After that, this part is turned around with its back side, special grooves are cut on it, and the lower profile is screwed to the bottom of the ceiling at the ends.
After this, the remaining sections of the ceiling parts are installed. This sequence of actions allows you to quickly assemble the frame.
Preparatory stage
First of all, a sketch plan of the future structure is drawn up, on the basis of which the ceiling area is calculated. Based on the data obtained, a fabric is ordered onto which harpoons will be welded at the factory.
On the drawing it is necessary to mark the locations of future lamps, transformers, baguettes, columns, possible engineering communications and everything else.
After this, you can start preparing the floor, from which it is necessary to remove poorly adhering pieces of plaster, putty, and old finishing. The cleaned surface must be treated with an antiseptic primer to prevent the formation of fungi and strengthen the base. Based on the diagram, all passing communications should be securely attached to the ceiling, and connections should be made to the installation site of the lighting fixtures.
After this, you can begin marking the installation locations of the fastening profiles on the walls, using a laser level or a water level.
Original design of multi-level ceilings
The construction of a multi-level ceiling is achieved by installing plasterboard at several levels. The first level occupies the entire ceiling area and serves as the basis for each next one. This is an optional condition. If the original ceiling does not require repair, then eliminating the first level will save money and maintain the height of the room.
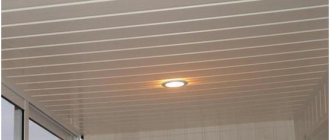
The color design can be made to your liking Ceiling with one color
When installing a suspended ceiling, there is free space between the load-bearing slab and the plasterboard sheet. It is often used for laying communications - air ducts, water pipes, power wires. Recessed luminaires automatically become part of the structure due to the device.
Selecting lighting equipment designed for installation in a suspended ceiling
, varied. Previously, incandescent lamps and their varieties such as halogen lamps were used for lighting, which imposed certain restrictions on the design of the ceiling and on the placement of lamps. They were briefly replaced by CFLs - compact fluorescent lamps or “housekeepers”. But they also have disadvantages related to the size of the lamps.
LED strips
A revolutionary change in the lighting industry was the breakthrough in LED manufacturing technology. Being compact in size, they emit such bright light that there is no alternative way of lighting. A variety of new lighting devices are LED strips. They are a chain of LEDs connected in series, placed on a flexible substrate with an adhesive base. They can be easily given any shape, so such tapes have become the basis for creating hidden lighting in plasterboard ceilings.
The best light sources
LED strips are the best lighting equipment for installing suspended stretch ceilings. And this is understandable, since LED lamps consume minimal electricity. In addition, they practically do not heat up, which guarantees a longer service life of the vinyl sheet. They provide enough light, despite their small size, and their color spectrum is different. In addition, LED strips have additional advantages:
- easy installation, thanks to the sticky substance on the back side;
- long service life, significantly exceeding the service life of other lighting devices;
- wide possibilities for design solutions, thanks to the small size of the tape and good flexibility;
- choice of glow color;
- the presence of special elements that allow you to control the brightness of the LEDs.
Of course, there are also disadvantages, but they are much smaller than the advantages. First of all, the price is higher than the cost of traditional lighting fixtures. It is also impossible to mount an LED strip on old fixtures; everything will need to be changed.
The LED strip itself is made in the form of a flexible board on which LEDs are mounted at regular intervals. Its width can reach up to 2 cm, and its thickness up to 3 mm. In addition to them, there are resistors on the board that limit the amount of current. The emitted light can be of any shade. Often LEDs of red, blue and green light are installed on one strip. This is very convenient, since just one product will replace three similar ones, but with different glow colors.
Device Features
When connecting lighting, you should follow safety rules, first of all, turning off the power to the system.
Light fixtures from high-quality manufacturers have spacer-clamps, with the help of which the fixtures are easily secured in the desired position, without any effort. You should not undertake installation of wiring and lighting without prior preparation and consultation of a professional electrician. Preparation must be serious to avoid trouble.
The last and final stage is a system check. To do this, it is recommended to turn on all lighting fixtures at the same time and check the operation of each of them separately.
Pay attention to the uniformity of the glow and its intensity
It happens that when you turn it on for the first time, a synthetic smell may appear; this is normal if it goes away within the first few hours. If the smell does not go away, you need to start looking for the source of the unnatural smell.
A plasterboard ceiling has many advantages. For example, if desired, you can add another lamp or communication system at any time, and all the wires will be easy to hide.
You can direct and adjust the lighting at your own discretion and discretion, depending on your mood, time of year or a certain moment in life. A multi-level ceiling made of plasterboard completely changes the usual idea of ceilings, realizing all the most unexpected dreams and fantasies.
An effective decorative technique for creating an original interior of a room is the additional lighting of a plasterboard ceiling. Such lighting will easily fit into both classic and minimalist interior styles; the main thing is to create a competent project for the future ceiling structure.
The simplicity of technological procedures allows even the most original design ideas to be realized. This applies not only to the type of lighting, but also to the number and geometry of drywall tiers. In our article we will talk about the types of additional lighting sources, describe their advantages and disadvantages, and also outline the sequence of actions when installing a plasterboard ceiling with additional lighting. In addition, you will receive some practical tips on how to do it yourself correctly.
Number of levels
There is another classification - according to the number of levels. There are three types here:
- Single-level. A simple model in one plane. Suitable for minimalist interiors, it does not clutter or weigh down the space, but does an excellent job of emphasizing the boundaries of the room.
- Two-level. More voluminous design. The first level is the basis for creating the second tier of the intended shape. Using this technique, you can visually increase the space and change the geometry of the room.
- Multi-level. Complex and intricate designs. In small rooms they are inappropriate and look too bulky. Therefore, such ceilings can only be done in spacious and high rooms.
It is clear that installing a single-level structure will cost much less. Complex ceilings require not only financial investments, but also a sufficient amount of time for all work.
Installation and connection of lighting
Scheme for attaching LED lighting to a suspended ceiling When your frame is ready, you can finally attach the lighting.
Follow these basic rules for installing LEDs:
- Cut the tape only in specially marked areas.
- To connect several strips into one, you can connect them using special LED connectors for connecting and connecting power. However, it would be safer to solder the tape yourself with a regular soldering iron.
- The power supply must have a reserve of 20-30% power, otherwise sooner or later it will burn out.
- Fastening to metal areas should only take place on insulating material.
- Under no circumstances should you confuse the location of the 220 volt voltage input from the outlet and the 12 volt outlet. Do not work under voltage.
The connection diagram is as follows:
LED strip connection diagram
- One end from the power supply goes to the 220 volt wire, and the other to the LED strip.
- If you are using an RGB strip, then connect it through the controller while maintaining the polarity. The red wire is positive, blue or black is negative. You cannot swap them.
- Connect and check the functionality of the LEDs. If everything is in order, you can stick it to the required place using self-adhesive film.
Connection diagram for a long strip with one power supply
Scheme for parallel connection of several power supplies, if a tape length above 5 meters is required
A video that clearly explains how to connect an LED strip to the network:
Connecting an LED strip is a fairly simple thing. The main thing is to buy the appropriate power supply and observe the polarities. LED ceiling lighting allows you to create a spectacular look, and you can do it yourself.
Main types of plasterboard ceilings
What types of ceilings are there? There are 3 types of plasterboard structures: single-level, two-level and three-level. There are also models with complex configurations.
Single-level ceilings consist of:
- Frame. It is made of metal and attached to a load-bearing wall.
- Plasterboard sheathing.
- Svetilnikov.
Two-level and three-level systems can have different configurations. They are used for finishing large rooms. Such systems can have an oval, square or rectangular configuration.
There are 3 types of two-level and three-level systems:
- Diagonal. This ceiling is installed on a single-level system or a regular concrete floor. This type of layout is used if you need to achieve visual highlighting of any part of the room. For example, diagonal ceilings can be used to separate the rest and work areas.
- Frame. Such a system is a box of an angular or curly shape. A frame ceiling is often used to decorate small rooms, because with its help you can achieve a visual expansion of the space.
- Zonal. This design can be used to frame the ceiling in the living room or kitchen. It is advisable to use a zone system if you need to conditionally divide a room into a relaxation area and a work area.
Complex configuration models are rarely used. It is advisable to use them if you want to make a multi-level structure.
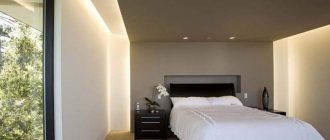
What is a “floating” ceiling
A new type of suspended ceiling plasterboard structure was called “floating”, because this innovation looks exactly like that. Bizarre figures seem to hang in the air. But the main effect is achieved when the backlight flashes above them. Invisible light sources create a feeling of weightlessness and lightness of structures, creating a unique and unique interior.
Those who see such a structure “live” for the first time do not believe that making it yourself is not as difficult as it might seem at first glance. Anyone can create a delightful work of art on the ceiling, like an artist. All you need is a little effort, patience and, of course, imagination.
Let's look at the principle and rules for assembling a plasterboard structure called a “floating ceiling” in more detail.
Floating ceilings can be single-level or two-level, the disadvantage of the latter is that they can reduce the height of the room.
Varieties of forms
The shapes of floating ceilings are limited only by your imagination. Specialists will create any shape you want: square, round, rectangular, irregular polygon shape and even an abstract composition.
For classic interiors, we recommend choosing square and rectangular options, and for extravagant interiors, such as pop art, abstract compositions.
Photo: objetsdedecoration.fr
Photo: paydaydcr.com
What are floating ceilings
Floating structures received an interesting name due to their ability to create the illusion of a surface suspended in the air. This effect can be achieved by installing several levels in a layout with simple geometric shapes framed by lighting. Lighting devices are mounted in the provided gap between the planes, or RGB lighting is installed.
The effect of emptiness and lack of connection between planes can also be achieved through a well-planned play of light and shadow. Ready-made structures of this type are simply mesmerizing even in the simplest design, not to mention the complex design ideas embodied on the surface of the ceiling.
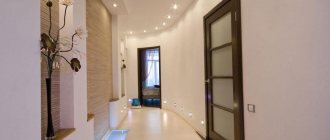
Modern interior designers actively use floating plasterboard ceilings not only in private houses and apartments, but also in offices, shops, showrooms, cafes and restaurants.
Starry sky ceiling decoration
The installation process depends on the chosen method. You won’t have any difficulties with phosphor stickers, but painting is generally a creative process that not everyone can do.
Stretch ceiling
The installation process will be the same in principle as the previous version, but there are some features.
- The tension web should be at a distance of more than 5 centimeters from the concrete base.
- Fiber optic threads are fixed to a base, which is a sheet of plywood or plastic. They are threaded according to the drawing and attached to the concrete ceiling in such a way as not to damage or break the threads.
- After connecting the fiber optic bundle to the projector, you need to attach the tension fabric in the usual way to the corner profiles (see the article about installing two-level stretch ceilings).
- Then you can go several ways - make holes and pull the threads out to make the light brighter, or leave everything as is.
- To make a hole in a suspended ceiling, use a soldering iron with a hot thin wire at the end. A hole is burned and a luminous thread is pulled out. The excess length is cut off and the tip is treated with glue.
Construction of a suspended ceiling with a hatch
Video installation instructions:
That's all the main ways to make a starry sky on the ceiling. Everyone will choose the option that will correspond to their wishes and financial capabilities. Of course, if you do not have experience in repairs, then it is better to choose options with easy installation: stickers, ready-made panels. If you are a real artist, then you can easily draw stars on the ceiling yourself.
Examples of beautiful design in a small bathroom. Photo ideas for repairs, tips.
Technology for installing a single-level plasterboard ceiling. How to properly mark, secure the sheets to the ceiling and putty the seams. Instructions from A to Z with photos and videos.
How to make a plasterboard ceiling with lighting with your own hands. Installation of a box in a plasterboard ceiling, connection of LED lighting. Installation of LED strip, serial and parallel connection.
Description of technology
When choosing a ceiling design method, the following parameters are important:
- Ideal surface evenness, appearance corresponding to the interior. Such a large part of the interior is visible from anywhere in the room. It is the most important component of a certain style. Its visual characteristics affect the psychological state of a person.
- Project cost. When assessing this parameter, it is necessary to take into account the costs of materials, tools, their delivery, installation and auxiliary operations.
- Costs during future operation. Their addition is necessary for accurate comparison of several options.
This technology is considered taking into account the above factors and features of alternative solutions.
Complex forms of multi-level ceilingRelated article:
Basic principles
The design got its specific name from its special contour lighting. When turned on, it masks the angle between the ceiling and the walls, which creates the illusion of no supports. There is a visual effect of a surface “floating” in free space.
Photos of floating suspended ceilings and other evidence of the benefits of modern technologies
To implement this idea, different solutions are used. The simplest option is to install light sources around the perimeter of the room without changing the existing coverage. It is the most economical, but does not allow using all the potential capabilities of the technology.
Illumination of the junction of the wall and ceiling along the contour
It should be noted that side lighting reveals the slightest defects. A similar technique is used by specialists to control surfaces. It will not be possible to provide power to devices without laying the appropriate wire lines. It is for these reasons that radical modifications of ceilings are used in practice:
- Traditional plastering and painting are rarely used, as there will still be problems with discreet installation of lamps.
- Drywall boards are suitable for solving such problems. It will not be difficult to insert the necessary lighting into the mounting structure.
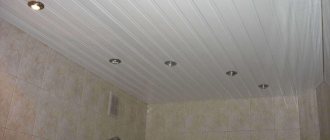
- Stretch ceilings are installed quickly and accurately. They ensure the ideal condition of large-area surfaces with complex configurations.
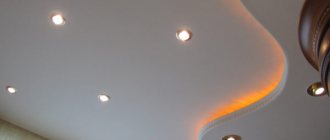
If necessary, a system of floating plasterboard ceilings with lighting can be supplemented with various combinations of the options listed above. The most complex designs are created from two or more levels. The easiest way to hide light sources is in them.
This ceiling was created using several technologies
Design Features
To ensure uniform illumination, gas-discharge lamps were previously used. They occupy a large volume and are characterized by low reliability. Starting devices often fail and make noise
There are toxic chemical compounds inside the flasks, so care must be taken during operation and special disposal methods must be used. Since the production of gas-discharge devices has not yet been discontinued, their individual disadvantages are listed above.
But these days it is much more convenient to use strips with LEDs built into them. Below are their advantages:
- Uniform light field in a comfortable spectral range.
- Low power consumption.
- Durability.
- Resistance to vibrations, changes in network voltage, temperature and humidity.
- Miniature sizes.
- Possibility of installing the tape along a trajectory of complex shape without breaks.
- High security.
A special translucent insert scatters light and masks LED inserts when such an element is placed in a visible place
When choosing the appropriate type of tape and equipping the system with a control unit, the lighting intensity and color are quickly changed. The same actions can be performed according to a user-specified algorithm. It is recorded in the memory of the electronic program device and is activated by one press of a button on the remote control.
Profile fastening diagram for a floating ceiling
How to make a floating stretch ceiling with your own hands?
Suspended ceiling structures using PVC film or textiles are no longer new to anyone. But their modification - floating stretch ceilings, which are sometimes called floating, are still a novelty and are just beginning to gain general interest. Unique in their design and lighting, such ceiling structures can turn any room into a fairy tale. In order to make a bend in the frame, the baguette is sawed to half its height. And the cut areas are cleaned with a file and sandpaper so that the burrs do not damage the blade.
- polyvinyl chloride film - glossy, matte, textured;
- polyester fabric treated with polyurethane;
- aluminum baguette up to 20 cm wide with a groove for mounting lighting;
- backlight equipment, including an electrical current converter or transformer.
- translucent plug covering the profile groove.
There are many options for installing such ceilings. Based on the material of the finishing coating, they can be divided into those that use PVC film and textiles. The lighting system is installed before installing the tension panel. To connect it to the mains, you need a special power supply that reduces the current to 12W or 24W, depending on the selected type of tape.
After checking the operation of the lighting system, proceed directly to the installation of the tension fabric.
Canvas material
There are two types of materials:
- Fabric. Quite an expensive option. They are environmentally friendly, resistant to temperature changes and have good vapor permeability. However, they have some disadvantages: fabric stretch ceilings are not resistant to moisture, quickly absorb odors and become dirty.
- PVC film. The advantages include: durability and practicality. The only drawback is the susceptibility to mechanical damage.
Plasterboard finishing - how to do it right
Plasterboard sheets are attached to the installed frame of the floating ceiling
It is important to ensure that the joints are on the profiles, and that special holes are prepared for the lamps. The finished plasterboard surface is puttied, primed, puttyed again, rubbed and painted.
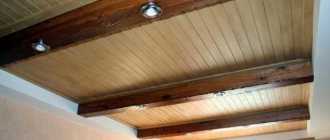
If it is a two-level ceiling, then both frames lying in two planes are sheathed, while the lighting is mounted around the perimeter of the lower level or in the profile of the upper tier.
To create the effect of hanging in the air, an LED strip is suitable as the main lighting for the ceiling. Flexible, quite bright and economical in energy consumption, the tape will make the ceiling design complete and harmonious.
LED strip as a backlight is not only a bright and stylish option. This lighting is more than functional. You can adjust the brightness and colors using the remote control depending on the need to create a particular environment. This function will be especially useful for organizing gala evenings and celebrations in cafes and restaurants.
Light lines in a square
When assembled from standard Flexi profiles into bright squares and rectangles, the square is pre-mounted to the floor.
Based on the obtained dimensions, four segments are cut at an angle of 45 degrees.
So, join them. You can use pins bent at an angle of 90 degrees as guides.
Then secure the structure tightly at the corners with self-tapping screws.
Control of diagonals.
In addition, this clear square rises to the top and is fixed at the corners.
The general principle of assembling the support frame is something like this. However, let's take a closer look at the simplest option in the form of a straight line from one wall to another.
The use of lighting in plasterboard structures
A suspended plasterboard ceiling with lighting will help paint the room in the required colors. Using it, you can fill the room with warm light, creating the illusion of floating.
What color temperature lamps do you prefer?
Poll Options are limited because JavaScript is disabled in your browser.
Neutral or natural white – 3500–5000 K 42%, 1004 votes
Warm white – 2700–3500 K 39%, 916 votes
Cool white – 5000–6400 K 19%, 443 votes
11.03.2018
Smooth lines of transitions from one level to another will not only add coziness and comfort to the room, but will also mask the architectural defects of the room and hide electrical wiring and communications.
Color spectrum
There are a lot of color options. Below are the most profitable ones:
- White.
- Black.
- Blue.
- Lilac.
Frame assembly - which profiles are suitable
You can assemble a floating ceiling with your own hands if you prepare the required number of profiles in advance. The type of profile is determined by the number of tiers and the level of complexity of the structure. Traditionally, special profiles are used for floating ceilings:
- KP 4003 - allows you to provide soft diffused light, combines well with translucent canvases.
- KP 2301 - suitable for bright lighting and the most accurate color rendering.
- KP 4075 - needed to combine two canvases into a single whole without an unaesthetic cut on the canvas.
- PL 75, KP-2, NP-5 - will be needed for the construction of complex multi-tiered structures.
Having these profiles, as well as drywall for finishing and fastening elements, you can proceed to the direct assembly of the frame.
Lighting
It is advisable to use LED strips, since they are small in size and heat up slightly. They are available in different designs and are sold only in reels. The maximum length of the lamp is 5 m.
For floating ceilings, low-power lamps are used. In the bathroom and kitchen you need tapes with moisture protection. In the case of colored lighting, it is better to use a white canvas. To regulate the operation of the lamp, control units are used. Simple options only turn the lighting on and off, while more complex devices allow you to customize the color scheme and use the control panel.