Andrey
8875 0 4
Andrey December 5, 2016Specialization: facade finishing, interior finishing, construction of dachas, garages. Experience of an amateur gardener and gardener. We also have experience in repairing cars and motorcycles. Hobbies: playing the guitar and many other things that I don’t have time for :)
The article is addressed to beginners who have decided to prepare an uneven ceiling for painting using drywall. I will tell you in detail how to finish the ceiling with plasterboard with your own hands before painting, and also give some tips on the finishing coating. I am sure that after reading the article, you will easily cope with the job.
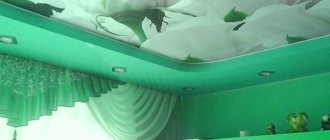
Painted plasterboard ceiling
How to quickly and easily putty a plasterboard ceiling
In construction, gypsum board, or gypsum board, is often used. Interior partitions, arches and suspended ceilings are made from this material. In the latter case, it allows you to hide all the irregularities and build almost any shaped structure. After the main work, the ceiling can be wallpapered, painted or even tiled. But before that it needs to be covered with putty. How to putty a plasterboard ceiling for painting? What features does this process have?
Creation of a timber structure
It is logical to do the finishing of wooden walls with plasterboard using a wooden frame. The following parts are used for its arrangement:
- timber of a certain section;
- wooden slats;
- beams.
For finishing, in addition to wooden slats or timber, plasterboard sheets, you will need dowels and screws, as well as a drill and screwdrivers.
Finishing work begins with marking the location of vertical and horizontal frame elements. Next, using tools, timber or slats are attached to the designated places. They are attached to the ceiling, floor surface and walls. First, the vertical structural elements are installed, and then the horizontal ones are secured, which serve as spacers. When measuring and choosing a location for vertical structural elements, you should take into account the dimensions of the drywall sheets. The joints should be in the middle of the vertical frame part.
Materials and tools
The building materials market offers a fairly wide range of putty mixtures. That is why the issue of their choice must be taken especially seriously.
Plastering the ceiling can be done with two types of material:
- dry,
- liquid or viscous.
It is better to putty plasterboard ceilings for painting with a dry mixture. It has a long shelf life and is not exposed to high temperatures. A viscous material, depending on how it is stored, may lose its properties. The dry mixture can be diluted as much as needed for work.
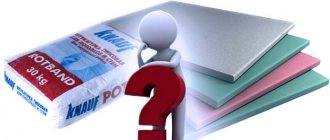
According to its composition, putty material is divided into three types:
- Gypsum is most often used in dry rooms.
- Cement is suitable for puttying a plasterboard ceiling for painting in a bathroom or any other room with high humidity.
- Polymer is considered the ideal option for all cases. It costs more, but is characterized by low consumption and high quality.
When the material is selected, you can begin to prepare the tools. For more experienced craftsmen, you will only need two spatulas of different sizes.
For less experienced people, more tools and equipment are needed:
- a larger spatula;
- small spatula;
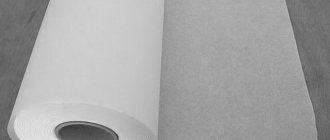
- self-adhesive mesh;
- priming device (roller or brush);
- primer;
- construction mixer.
You need to calculate in advance how much putty you will need. To do this, it is necessary to determine the ceiling area and mixture consumption (usually 1 kg per 1 m2).
Prices for materials for surface puttying
If you putty the ceiling yourself, then you can see that it is much cheaper than ordering work from craftsmen.
You will only need to buy tools for work - a spatula, and this is much cheaper than ordering the services of craftsmen.
Prices for puttying plasterboard ceilings are varied, they vary depending on the manufacturer and purpose. On average, a bag of dry mixture weighing 20 kg will cost about 350 rubles. Finishing putty will cost a little more - from 500 rubles.
If you use ready-made mixtures, then you need to be prepared for a higher cost. Twenty kilograms of this mixture will cost you more than 800 rubles. In addition to putty, we will also need a primer. Ten liters of primer will cost from 300 rubles.
A plasterboard ceiling can be decorated in two ways - painting and wallpapering.
Many people choose the first option for finishing the ceiling, because with this method the ceiling gives a feeling of cleanness and freshness. But this method has a significant drawback - all the unevenness and errors that were made during puttying are very clearly visible on the painted surface. Therefore, if you are not sure that your ceiling is ideal, it is better to refuse painting drywall.
Wallpaper can be glued to the ceiling in any room, because the modern market can offer a wide variety of wallpaper for any room. Irregularities on such ceilings will not be very noticeable.
[custom_ads_shortcode3]
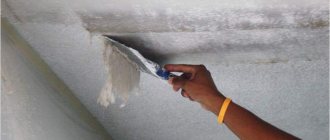
Preparatory work
Before you putty the plasterboard ceiling, it must be prepared. The quality of work directly depends on this. After installing the ceiling, it should be left for about 10 days so that the drywall can “settle.”
The next stage is checking the screws. They should not protrude even 1 mm. Otherwise, it will simply not be possible to smoothly putty the plasterboard ceiling.
Finally, you need to check the joints. Under no circumstances should the cardboard peel off from the plaster. If such a problem does occur, it is necessary to cut off the cardboard and sand the damaged area with sandpaper. If you ignore this problem, the putty will fall off along with the paper.
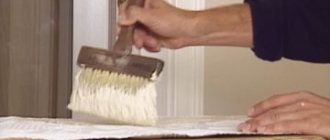
Priming process
Plasterboard ceiling putty is performed on top of the primer. It is advisable to treat the sheets on both sides - this will make them more durable and resistant to moisture.
If for some reason it is not possible to completely process the ceiling, it is necessary to prime at least the joints and corners.
Any primer can be used. The main thing is that it is suitable for working with putty mixtures. After work, the drywall should dry thoroughly (about three hours).
Which is better: heated floors or radiators?
Warm floorBatteries
How to find a profile under drywall?
In order not to miss and get the fastening equipment exactly into the metal frame, we recommend using powerful neodymium magnets.
Using it, you can easily find a rack, guide profile or auxiliary metal jumpers under the plasterboard surface. Finding a profile ceiling frame is necessary in order to hang lighting fixtures or other decorative interior elements.
If there is an error in the calculations, the entire structure will sooner or later collapse on the floor, so it is very important to determine the correct point for fastening. To do this you need:
- Select an approximate location for future mounting.
- Place a thin sheet of paper or fabric on the ceiling to prevent the magnet from scratching the surface.
- Place a neodymium magnet on the fabric and begin to slowly move it along the intended search area.
- When a magnetic reaction occurs, mark the location with a pencil.
Please note that for the most effective search for a metal profile, it is better to use a large magnet. It is capable of covering a larger radius at a time, which means detecting metal will not take much time.
Puttying
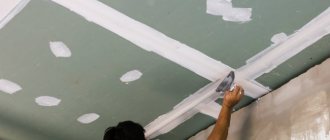
So, how to putty a ceiling? First of all, it is necessary to hide the joints and screws. This can be done using a self-adhesive mesh or paper tape.
Mesh attachment
The mesh is attached to the ceiling using a working solution. The process looks something like this:
- Dilute the putty as written on the package. The consistency should resemble thick sour cream.
- Using a putty knife, apply the solution to the seam. Seal it so that it remains visible.
- Cut a piece of mesh to the desired size. Place it on the putty and press lightly.
- Apply another layer of solution on top of the mesh. It is important that there is an acute angle between the spatula and the ceiling.
- While working, you need to make sure that there are no threads left anywhere.
Paper tape is most often used in rooms with high humidity levels. The process of gluing it looks the same as when working with a mesh. It is better to use a finishing mixture to secure the paper.
Applying material to the entire surface
When everything is sealed, the actual puttying of the plasterboard ceiling begins. First you need to pay attention to the seams, screws and corners:
- At the joints, the solution is applied in two stages. The second layer is applied only after the first one has completely dried. Finally, you need to clean all the seams with sandpaper.
- Before you putty the screws, their locations must be thoroughly primed. Then, using a small spatula and finishing mixture, use a crosswise motion to hide the holes. This should be done when the joints are dry.
- We putty the corners first on one side, then on the other. Moreover, work on the second begins after the first has dried.
Once the seams, screws and corners are ready, the main part of the work can begin. How to properly putty a plasterboard ceiling?
- Using a small spatula, apply the prepared mixture onto the large one.
- Apply the solution to the ceiling plasterboard and carefully distribute. The layer should be thin, maximum 2 mm. You need to putty quickly, otherwise cracks may appear.
- During the process of plastering the ceiling for painting, excess solution must be removed immediately. To do this, use a spatula pre-moistened with ordinary clean water. These residues can be added to the bulk of the composition.
- The ceiling needs to be given time to dry (about a day).
- If any errors remain, you can get rid of them using a smaller spatula.
- The last stage is sanding. Here you will need sandpaper. It will help remove scratches and roughness.
Conclusion
As you can see, by finishing the ceiling with plasterboard, you can quite simply and quickly prepare the surface for painting. I also recommend watching the video in this article about installing a gypsum board ceiling. If any points raised questions for you or you encountered any difficulties during the work process, write in the comments, and I will definitely answer you.
Did you like the article? Subscribe to our Yandex.Zen channel
December 5, 2016
Plasterboard systems, Ceiling operations, Ceiling finishing, Finishing materials, Ceilings, Plasterboard ceilings, Ceiling structures
If you want to express gratitude, add a clarification or objection, or ask the author something, add a comment or say thank you!
The final stage
Achieving a perfectly even layer of putty is not so easy. To correct the shortcomings, it is necessary, as mentioned above, to sand the plasterboard ceiling with your own hands. The process should begin only after the layer of solution has completely dried.
In most cases, this takes up to seven days. During this period, the room can and should be ventilated. As soon as the dark spots disappear from the ceiling and it itself becomes dull, you can begin work.
At this stage, “zero sandpaper” is used. If possible, you can use a special grater.
To make your ceiling perfect, you need to use lighting correctly. Experts recommend using spotlights. But you can get by with a table lamp. The light beam must be directed at the drywall at different angles. This will help you see and subsequently correct even the smallest defects.
How to putty a plasterboard ceiling yourself? First you need to prepare the solution and working tools, and then you can start working, preferably in this order: seams, screws, corners and the rest of the surface.
How to do installation: first stage of finishing
When arranging the frame, you should take into account the design of communication and light sources.
At the initial stage, it is necessary to make a level mark. At this stage, you should take into account the communication device and, of course, all light sources.
If spotlights will be used as lighting devices, then the ceiling height should be more than 15 cm; free space is essential to allow air to circulate, as well as to avoid overheating of light sources. If you plan to hang a beautiful chandelier, then a height of 6-8 cm will be enough.
In order to find the starting point, you need to use a level. It should be noted the zero level along the entire perimeter of the room, and it is to this level that the profile guides will be attached in the future.
All guides must be secured with dowels. The step is 50 cm.
Next you need to start installing the ceiling profile. To do this, you need to put small notches on the guides. The step is 60 cm. The ceiling profiles along the entire room should be attached to the resulting marks. When attaching the profile, it is necessary to make a small indentation from the wall. This will help subsequently avoid such an unpleasant phenomenon as deformation of the frame due to temperature changes.
To attach the second level frame, it must be mounted in the first level frame.
Wallpaper and drywall: are they compatible?
One of the modern widely used materials for interior decoration is plasterboard. Thanks to its versatility, drywall is loved by builders and finishers, both amateurs and professionals. With its help, you can level any surface, build a decorative structure of almost any shape, make a convenient cabinet in a niche, etc.
However, drywall itself does not look very presentable, so it needs finishing. Fortunately, you can use any material for this: from traditional wallpaper to decorative plaster. Wallpaper for plasterboard ceilings remains the most popular option today. Indeed, a surface covered with sheets of plasterboard can be covered with wallpaper, but you need to know some nuances, which we will talk about here.
Why gypsum board?
Continuous coating involves the formation of the most even and smooth surfaces.
Gypsum board contributes to the best design of durable suspended structures with a different number of levels. The durable material is tightly attached, but at the same time allows you to cut out complex transitions, sometimes slightly bend the sheet with a spade onto the walls, forming a smooth transition from the plasterboard ceiling.
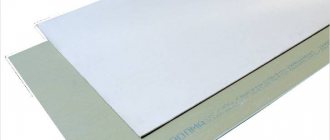
There are several types of gypsum boards for finishing the ceiling:
- GKL is a standard sheet, which is a sandwich of cardboard with a gypsum layer;
- GVLV is a moisture-resistant gypsum fiber material with a green surface;
- GKLO fire-resistant raw materials, which are often used for industrial premises;
- GVL - gypsum fiber products do not contain cardboard at all, the reinforcement is cellulose waste paper;
- GKLVO is a moisture-resistant product with increased fire resistance.
Types of gypsum boards
To putty or not?
There are two ways to wallpaper drywall. One - the wallpaper is glued directly to the surface of the drywall, the other - to the drywall with a pre-applied layer of putty.
The first option is the fastest and least expensive. The only thing you need to do before gluing the wallpaper is to putty the joints between the sheets. However, in this case, in the future you may encounter the fact that if you want to change the interior of the room, you will have to change not only the wallpaper, but also the plasterboard sheathing itself. The fact is that the wallpaper sheets are tightly glued to the drywall. They are very difficult to remove from the surface, or are removed along with the gypsum layer, which accordingly spoils the surface itself. If you decide to do such an experiment, then you should try to glue the canvases evenly and without flaws the first time, because they are very difficult to fix. Wallpaper sheets not only firmly, but also very quickly stick to the plasterboard surface.
The second option is to pre-coat the surface of the plasterboard ceiling with putty. It will take a little more time and effort, but it's worth it. The quality of the repair will be much higher, and it will last much longer. Professionals advise to be sure to putty the entire plasterboard surface, and not just the seams, if the wallpaper is light, because... the seams between the sheets will show through, and the darker shade of the drywall itself will distort the color of the wallpaper.
Tile
On the walls, standard ceramic tiles will most likely be used. Aprons in kitchens, walls in bathrooms and bathrooms, all of this is often finished with tiles. In answer to the question that arises - is it possible to glue tiles to drywall, you can answer - yes, you can.
The procedure for laying this material will not differ too much from laying it on any other surface. One nuance is required - before finishing with tiles, the entire surface of the gypsum board must be treated with a primer. Without this, the tile will hold on less well and may fall off.
When finishing work on ceilings, ceramic tiles are rarely used. Much more often, polyurethane or polystyrene tiles are used here. They are even easier to glue than on conventional concrete bases, due to the fact that the surface is flat and does not have any differences.
Preparing drywall
Before gluing wallpaper, the plasterboard surface is prepared as follows.
- Primer. The primer layer improves the adhesion of materials and protects against the appearance of mold, fungi and other microorganisms.
- Putty. The joints between sheets of drywall are coated with putty to the level of the plaster surface. It is recommended to strengthen the surface at the seams with sickle tape or regular gauze. To do this, reinforcing material is applied to the putty seam and another layer of putty is applied.
- Perfectly flat surface. To seal small depressions and bumps, putty the entire surface of the drywall. Before applying putty material, the base must be thoroughly cleaned, small cracks repaired and sanded.
- Re-priming. After the surface is leveled, it is necessary to apply a second coat of primer. In this case, it serves as an additional strengthening of the putty layer and will give the surface the roughness necessary for better adhesion to wallpaper glue.
Important! It is necessary to apply putty to the surface in even thin layers, avoiding the appearance of tubercles and depressions. It is necessary to process the finishing layer with sandpaper very carefully so as not to erase the putty material to the base. Otherwise, re-application will be required.
Pre-treatment with putty: how to stick wallpaper on drywall
Putty not only allows you to hide joints and minor errors on a sheet of drywall. It makes the structure less susceptible to moisture, allowing you to later easily dismantle old wallpaper, while holding it securely and preventing it from swelling or tearing off.
The first, coarser fraction is applied “roughly to level the surface, after which it is sanded and coated with a finer finish. In addition to the putty itself, the following will be useful: a bucket, a drill with a mixing attachment (construction mixer), a small flat spatula, a large flat spatula, sandpaper with coarse and fine “grain”, a “grater”. After covering the seams with sickle tape, apply a layer of primer to the wall and let it dry.
After this you can start puttingty:
- We dilute a little starting mixture with water in a bucket using a mixer to the consistency of very thick sour cream;
- We take putty with a small spatula and apply it to a large spatula;
- Using a circular motion, apply putty to the wall with a thickness of 1-2 mm;
- Remove the remaining putty from the spatula and repeat the application procedure;
- When the entire wall is evenly covered with a layer of putty, let it dry, after which we go over the uneven areas with a grater and coarse sandpaper;
- After applying “Start”, we do a similar procedure with the finishing putty, only we rub it with “fine” sandpaper;
- When all the layers have dried, you need to apply primer again in two layers.
Grouting putty is a dusty business, and it is better to do it with a respirator or mask. After re-priming, you can move on to covering the walls with the wallpaper you like.
Drywall and liquid wallpaper
Wallpaper for plasterboard ceilings can be different: paper, non-woven backing or vinyl and even liquid wallpaper. The use of liquid wallpaper is especially convenient when finishing figured ceiling structures made of plasterboard, which are quite difficult to paste over with paper or non-woven wallpaper. However, when using liquid wallpaper, you must remember the following features of the interaction of these two types of materials.
Liquid wallpaper is applied only to a completely putty surface. When puttying only the joints between sheets of drywall, it results in them shining through the layer of decorative coating, distorting its color and generally spoiling the overall impression. The fact is that putty materials are not moisture resistant. They absorb moisture perfectly, even if they are treated with a water-repellent composition. When saturated with moisture, the seams darken and show through, especially through light-colored material.
For the same reason described above - the low moisture resistance of the putty, after the putty layer has dried, it should be coated with water-repellent white paint. Don't think that this is a waste of time and money. Despite the fact that the putty layer is already white, if saturated with moisture from the liquid wallpaper, it will darken and spoil the overall background. To strengthen gypsum-based putty, it is recommended to use PVA glue, which is added to water-repellent paint in a 3:1 ratio.
Another problem that can be encountered when covering a plasterboard ceiling with liquid wallpaper is the appearance of rust stains from self-tapping screws. In this case, it is better to use self-tapping screws made of galvanized steel, which will not rust when in contact with liquid wallpaper. If it’s too late to change the screws, then solve the problem as follows. The screw caps are sunk quite deeply into the material and covered with putty, or, as an option, you can paint the caps with oil-based paint.
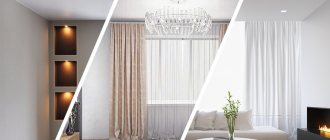
Which wallpaper should you prefer?
To finish a plasterboard ceiling, you can use many types of wallpaper. Most often preference is given to:
- Flizelinov;
- Vinilov;
- Glass wallpaper;
- Liquid;
- Paper.
All of these types are characterized by a fairly dense structure, which makes it possible to hide possible defects on the surface of the base. In addition, they can have a unique texture, which makes it possible to give the surface being decorated uniqueness and originality.
Wallpaper may vary
Attention! A universal option is to paint both of them, which allow you to change the color of the ceiling if necessary.
Manufacturers offer such finishing material on a paper and non-woven basis. The last type is more practical. Paper-based material, due to its insufficient density and thickness, cannot always hide defects on the surface. Sometimes the junction of two sheets can be seen through such wallpaper.
Advice! When deciding to purchase a paper-based finishing material, you should carefully prepare the base to eliminate possible defects.
Non-woven rolls have a denser texture. They can be repainted many times without fear of deterioration in appearance or surface condition. The high density of the finishing material allows you to mask minor irregularities, and therefore creates the illusion of a perfectly smooth ceiling surface. In addition, if after a certain period of operation the house begins to shrink, non-woven wallpaper, as a rule, will be able to withstand the applied load, acting as a reinforcing base. In this case, paper-based material most often breaks.
Some useful tips
High-quality wallpapering on a plasterboard ceiling requires knowledge of some nuances. Professionals know how to hang wallpaper on a plasterboard ceiling, so you should listen to their advice.
The joints between wallpaper sheets and between sheets of drywall should not coincide. Otherwise, the drywall seams will protrude through the wallpaper and noticeably spoil the appearance.
It is recommended to first coat the plasterboard surface with a primer made from a weakly concentrated adhesive solution. To do this, add 1/3 of the total volume of water to the glue prepared according to the instructions. This treatment will significantly extend the life of the wallpaper.
The wallpaper sheet must be placed on the ceiling from the wall with the window to the opposite wall, then the joints between the sheets will be least noticeable. If there are two windows in the room, then the window through which more sunlight penetrates is taken as the basis.
It is not recommended to use a cloth rag to smooth the glued wallpaper; the fabric can ruin the pattern and texture. It is better to use a roller or brush with stiff bristles.
Let's consider this option. If there is a ceiling or wall covered with wallpaper. When making repairs, many amateurs often ask whether it is possible to cover the surface with plasterboard without removing the old wallpaper. Professionals do not recommend doing this in this case, because... the presence of old wallpaper, like any other coating, can deteriorate the quality of drywall installation and shorten its service life.
Marking the ceiling and fastening the guides
- First you need to find the lowest corner in the room. To do this, use a tape measure to measure each corner, and preferably the center of the room. In the lowest corner you need to make a mark at a distance of 5 cm from the ceiling if you do not plan to build in lamps, or 8 cm if there will be lamps.
- Now, using a hydraulic level, make marks at the same level as the first point on each corner.
Cord breaker for wall marking (painting cord)
- Now you need to make a break to evenly connect all the points with a horizontal line. Stretch the paint cord between the marks and release it quickly so that it hits the wall - the paint on the cord will leave an even impression. Make lines around the entire perimeter of the room.
Tape with masking tape
Before covering the ceiling with plasterboard, we recommend making notes on the position of the profiles on the walls. This will make it easier to look for them when attaching sheets to the frame.
- Now attach the guide profiles to the walls. To do this, attach one guide to the line (the bottom edge of the profile is along the line) and make marks on the wall through the finished holes on the profile. There should also be holes along the edges of the profile, so if there are none, step back 10 cm and make them yourself. Drill holes according to the marks.
- Then you need to glue the sealing tape to the profile and secure it to the wall with dowels. We fix it with at least 3 dowels.
- Next, make markings for the main ceiling profiles. Since the width of the plasterboard sheet is 120 cm, the profiles are usually placed at a distance of 40 cm from each other to secure the sheet along the edges and in the middle. So, make lines on the ceiling in 40 cm increments.
- With such a small pitch of the ceiling profiles, jumpers between them are needed only at the transverse joints of the sheets, that is, every 2.5 m (standard length of plasterboard sheets). This means that the pitch of the suspensions for ceiling profiles should be smaller by an integer number of times, for us the optimal would be 50 cm. It should be noted that the first row of suspensions will be twice as close to the wall, so 50:2 = 25 cm. The second row will be 25 +50 = 75 cm and so on in 50 cm increments.
- To mark, place the suspension at the desired points on the ceiling and make 2 marks for each anchor. There will be a lot of dust while drilling holes, so be sure to wear goggles and a dust mask.
Knauf
To produce drywall, Knauf uses the most modern technologies, which confirms its high quality and maximum service life. The standard sheet is 2.5x1.2 m, there are other sizes. One sheet can weigh from 12 to 30 kg. The manufacturer produces material not only of European quality; there are also budget options that meet German quality standards.
Drywall KnaufPros
- low coefficient of thermal expansion;
- flexibility within certain limits without damage;
- the presence of rounded edges;
- reinforcement of the material with fiberglass;
- easy to handle.
Minuses
- high price.
Gyproc
One of the leading companies in the production of drywall. The products are environmentally friendly, since only 100% environmentally friendly raw materials are used for their production. This manufacturer produces especially lightweight sheets that are 20% lighter in weight than standard ones.
Drywall GyprocPros
- completely smooth sheets with minimal roughness;
- resistant to cracking;
- environmentally friendly material.
Minuses
- low flexibility of plasterboard sheets;
- edges need to be cut;
- small range of standard sheets.
Gyproc drywall
Lafarge
French company producing plasterboard. Due to the presence of a huge number of production facilities all over the world, the cost of drywall is one of the lowest. The manufacturer produces only high-quality material. A distinctive advantage is the processing of the edges of the sheets, which makes the drywall perfectly smooth.
Drywall LafargePros
- perfect evenness of sheets;
- low cost good quality.
Minuses
- the presence of only two sheet sizes: 1.2X2.5 m; 1.2X3 m.
Drywall Lafarge
Volma
A Russian manufacturer that produces plasterboard sheets whose quality is not inferior to their European counterparts. The latest technical conditions are used for production.
Drywall VolmaPluses
- high quality at low price.
Minuses
- there are no markings on the sheets;
- waviness of the drywall surface.
Drywall Volma
Wallpaper and drywall: are they compatible?
One of the modern widely used materials for interior decoration is plasterboard. Thanks to its versatility, drywall is loved by builders and finishers, both amateurs and professionals. With its help, you can level any surface, build a decorative structure of almost any shape, make a convenient cabinet in a niche, etc. However, drywall itself does not look very presentable, so it needs finishing. Fortunately, you can use any material for this: from traditional wallpaper to decorative plaster. Wallpaper for plasterboard ceilings remains the most popular option today.
Indeed, a surface covered with sheets of plasterboard can be covered with wallpaper, but you need to know some nuances, which we will talk about here. High-quality wallpapering on a plasterboard ceiling requires knowledge of some nuances. Professionals know how to hang wallpaper on a plasterboard ceiling, so you should listen to their advice.
For the same reason described above - the low moisture resistance of the putty, after the putty layer has dried, it should be coated with water-repellent white paint. Don't think that this is a waste of time and money. Despite the fact that the putty layer is already white, if saturated with moisture from the liquid wallpaper, it will darken and spoil the overall background. To strengthen gypsum-based putty, it is recommended to use PVA glue, which is added to water-repellent paint in a ratio of 3: 1. It is recommended to first coat the plasterboard surface with a primer made from a weakly concentrated glue solution. To do this, add 1/3 of the total volume of water to the glue prepared according to the instructions.
This treatment will significantly extend the life of the wallpaper. Repeated priming is no less important than the primary one - each layer of finishing must have good adhesion to the adjacent one. This removes gypsum dust after sanding, and the putty areas and the cardboard layer of the ceiling are further strengthened.
In addition, a well-primed surface will not absorb glue so quickly, which will provide time for leveling and smoothing the wallpaper, and in the future will facilitate the process of removing it during repeated repairs. Puttying of joints between gypsum boards begins with reinforcement. Serpyanka or perforated paper is used for this purpose.
The choice of material depends on the shape of the gypsum board edge. Serpyanka is used only where it is guaranteed to be covered with putty. To seal joints, special gypsum mixtures are used, for example “Knauf Fugenfüller”, “Volma, etc.
Painting
Before covering the plasterboard on the ceiling with paint, you need to familiarize yourself with the nuances of this work:
- Although the paint is sold ready-to-use, it must be prepared accordingly. After opening the bucket, the mixture is mixed well, ensuring its homogeneity. Some types of paints require the addition of a small amount of water (10-20% of the total volume).
- The base color of water-based paint is white. In cases where a renovation project involves decorating the ceiling in some other color, a certain amount of color is added to the material.
- The well-mixed solution is poured into a special container for painting: such devices are equipped with convenient rolling platforms. After dipping into the paint, the roller must be wrung out on this area.
- The first layer is usually applied perpendicular to the window. In order not to climb onto a sawhorse or stepladder every time, you can get a special telescopic extension for the handle of the roller. As you work, it is important to ensure uniform paint placement. If possible, the layer should be thin and continuous, without boundaries or transitions between individual sectors of the ceiling.
- To finish friezes and corner areas use a soft paint brush.
- Having painted the entire area of the ceiling, they pause to dry. As a rule, 4-5 hours are enough for this. After this, another painting is carried out, this time in a parallel direction relative to the window.
The selection of paint depends on the microclimate and the specifics of the room being finished. For example, in the kitchen and bathroom it is better to use a washable mixture. It is somewhat more expensive than conventional compounds, however, subsequently such a finish can be cleaned of soot and grease. This will significantly extend the life of the finish.
Finishing a plasterboard ceiling with your own hands
An example of calculating the number of plasterboard sheets for a hall with a width of 4 m and a length of 7 m. Since material with dimensions of 2500x1200 mm will be used for cladding, the calculation procedure is as follows: Thin sheets of plasterboard should be used, since the ceiling is not subject to mechanical loads. In specialized stores it is called ceiling. The choice of type of finishing material depends on the room.
If finishing work will be carried out in the bathroom, then a moisture-resistant type of plasterboard should be used. The ordinary one is suitable for finishing in dry rooms. You should also prepare the tool in advance, as this will save a significant amount of time.
It should be possible to connect an electric tool to the network so that it can be reached anywhere in the room where repairs will be carried out. For repairs you will need the following equipment: Preparation for repairs consists of purchasing the necessary building materials, which should be calculated before purchasing, and preparing tools. For finishing, the following building material is required: After preparing the ceiling surface, it should be finished using putty. After drying, it must be sanded to eliminate unevenness. Next, you need to start choosing wallpaper, which is divided into the following types: A method that has long been known to everyone, which can also be used for finishing plasterboard ceilings.
Wallpaper can be paper or non-woven for painting. Before carrying out the main work, you need to plaster the sheets.
- Decorative plaster can only be used on moisture-resistant gypsum boards;
- It is necessary to use a deep penetration primer before using the material;
- Apply textured plaster in several thin layers.
If the room has a ceiling with a complex structure to be painted, then it is necessary to check its outer corners; there should be no plasterboard protrusions on them. To do this, use a spatula - it is passed along each plane of the angle. The tool should not catch on the edges of the sheets. If necessary, the plasterboard is trimmed with a knife.
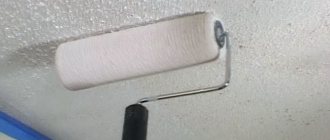
The final step of puttying before painting with your own hands allows you to create an absolutely flat surface, without roughness or unevenness. Mandatory precautions - protective equipment (goggles, respirator). Tip : to cover the surface with paint, choose a roller with a wool coating; when painted, it leaves a bubble mark, which, when dried, forms a uniform coating and shade. The plaster mixture is applied to the ceiling using a spatula and stretched over the surface. The roller is immediately rolled over the composition for leveling.
Leave to dry for 24 hours. In order to carry out the procedure efficiently with your own hands, you must follow certain rules and stages of work. Finishing a plasterboard ceiling requires the following tools, which must be purchased and prepared in advance: First, you need to apply the first layer in one step to avoid streaks. In this case, you can use only one tool, then you need to let the layer dry and apply subsequent ones until the color becomes sufficiently saturated.
By following all the steps and tips, you can achieve a high-quality coating that will not be too expensive and can last for many years.
Installation of the first level of decorative ceiling
Frame installation
UD guide profiles (28*27) are attached along a horizontal line to the walls using dowel-nails every 30-40 cm. To do this, sealing tape is glued to the back side of the guide, the plank is applied to the wall, and fixed with dowel-nails. At the corners, the profiles are inserted into each other and fastened with self-tapping screws.
The next step is to attach the hangers. If you don’t have ready-made elements, make them yourself from the PP 60*27 ceiling profile. To do this, measure the distance from the base ceiling to the bottom edge of the UD profile, cut pieces from the ceiling profile 1 cm less than the measured distance. From the end of the profile, cut off the side flanges by 2.5 cm, and make a tongue from the back. Screw the hangers to the ceiling profile using self-tapping screws, and only then fix the PP 60*27 to them. Or immediately install the hangers to the rough ceiling surface. Then attach the CD profile to the hangers, the edges of which fit into the guides. Extension of the ceiling profile is done using connectors.
After this, a nylon thread is pulled under the structure, which is used to regulate the evenness of the frame for the first level. Leveling is carried out using adjustable hangers. The distance from the ceiling to the bottom edge of the profile must be the same in all areas of the structure. The ceiling and guide profiles are fastened together with self-tapping screws.
Sheathing with plasterboard
The photo shows the frame and the first row of gypsum boards installed
First, the frame is sheathed with whole sheets of material. The remaining space is measured and the drywall is cut to the required size. The ceiling profile strip should be located at the junction of adjacent gypsum board sheets. The pitch between the screws is 25-30 cm. The screws are screwed into the drywall so that the head of the screw enters the sheet 3-5 mm. Subsequently, these recesses will be filled with putty.
In those places where the sheet was cut, a chamfer is made, cutting off part of the material from the gypsum board sheet. This is necessary in order to ensure better adhesion of the putty mixture.
Do-it-yourself finishing of plasterboard ceilings in different ways
First, treat the gypsum board with a deep penetration primer, then cover the structure with sheets. Please note that the distance between the previous and next sheets should not exceed 2.5 mm. The distance between the screws is 25 cm.
The caps of the fastening elements must be completely sunk into the material.
- dismantle the old chandelier and other lighting elements;
- we clean the ceiling and walls of old wallpaper, falling off plaster and old finishing;
- We seal the cracks with putty or a mortar of sand and cement;
- We treat surfaces with antiseptic compounds to protect against mold and mildew.
Uneven ceiling surfaces can spoil the impression of any renovation. In the article we will look in detail at the options for plasterboard ceilings, how to finish a plasterboard ceiling with your own hands for painting, as well as other methods of decorating the material. To check the quality of coloring, you can use a portable lamp.
It is turned on and brought to the surface at different angles. All visible flaws must be re-sanded with sandpaper, then painted again.
How to treat the surface → Room decoration → How to choose the right paint → Surface treatment technologies → Leveling and finishing the walls → Selecting and applying a primer → Removal from the surface → Stretch ceilings and technologies → Reviews and testimonials
- The paint is thoroughly mixed and, if necessary, diluted with water.
- The first step is to paint the areas where the plasterboard sheets meet the wall surfaces in order to eliminate unsightly stripes after the ceiling has dried.
- The main part is painted with a paint roller. The first layer is applied parallel to the position of the window opening.
- After the previous one has dried, it is necessary to apply a second layer of paint, but this time perpendicular to the window and the first layer.
Decorative finishing
The final stage is decorative finishing. There are several options:
- Coloring.
- Wallpapering.
The second option is far from the easiest; if you have covered the ceiling at least once, you are unlikely to want to repeat it. Although this finishing option has its advantages, you don’t have to plaster the sheets with starting and finishing putty. It will be easy to remove this finish and replace it with another one.
Installation and finishing results
Painting is actually much easier, but you also need to follow certain rules, namely:
- Once you start painting, you need to finish it. Applying the composition to one part of the ceiling, and then to the second, will not work. To be more precise, it will be possible to do this, but the result will not be the best.
- For application, use the same tool at all stages. That is, if you started with a roller, then you need to continue working with it. The same goes for a brush or spray gun.
- The working tool must not be turned over during work.
- The same area does not need to be painted again, as the surface will be uneven in color and structure.
- The corners of the room should be painted with a brush, the middle can be painted with a roller on a long handle.
- It is best to apply 2 layers: the first along a long wall, the second across the first layer.